Classic Shaker Side Table - Popular Woodworking Magazine
Classic Shaker Side Table - Popular Woodworking Magazine
Classic Shaker Side Table - Popular Woodworking Magazine

Create successful ePaper yourself
Turn your PDF publications into a flip-book with our unique Google optimized e-Paper software.
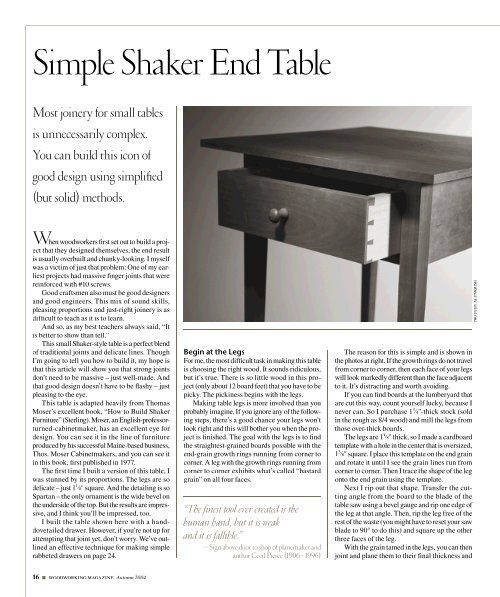
Simple <strong>Shaker</strong> End <strong>Table</strong>Most joinery for small tablesis unnecessarily complex.You can build this icon ofgood design using simplified(but solid) methods.WWhen woodworkers first set out to build a projectthat they designed themselves, the end resultis usually overbuilt and chunky-looking. I myselfwas a victim of just that problem: One of my earliestprojects had massive finger joints that werereinforced with #10 screws.Good craftsmen also must be good designersand good engineers. This mix of sound skills,pleasing proportions and just-right joinery is asdifficult to teach as it is to learn.And so, as my best teachers always said, “Itis better to show than tell.”This small <strong>Shaker</strong>-style table is a perfect blendof traditional joints and delicate lines. ThoughI’m going to tell you how to build it, my hope isthat this article will show you that strong jointsdon’t need to be massive – just well-made. Andthat good design doesn’t have to be flashy – justpleasing to the eye.This table is adapted heavily from ThomasMoser’s excellent book, “How to Build <strong>Shaker</strong>Furniture” (Sterling). Moser, an English-professorturned-cabinetmaker,has an excellent eye fordesign. You can see it in the line of furnitureproduced by his successful Maine-based business,Thos. Moser Cabinetmakers, and you can see itin this book, first published in 1977.The first time I built a version of this table, Iwas stunned by its proportions. The legs are sodelicate – just 1 1 ⁄ 8 " square. And the detailing is soSpartan – the only ornament is the wide bevel onthe underside of the top. But the results are impressive,and I think you’ll be impressed, too.I built the table shown here with a handdovetaileddrawer. However, if you’re not up forattempting that joint yet, don’t worry. We’ve outlinedan effective technique for making simplerabbeted drawers on page 24.Begin at the LegsFor me, the most difficult task in making this tableis choosing the right wood. It sounds ridiculous,but it’s true. There is so little wood in this project(only about 12 board feet) that you have to bepicky. The pickiness begins with the legs.Making table legs is more involved than youprobably imagine. If you ignore any of the followingsteps, there’s a good chance your legs won’tlook right and this will bother you when the projectis finished. The goal with the legs is to findthe straightest-grained boards possible with theend-grain growth rings running from corner tocorner. A leg with the growth rings running fromcorner to corner exhibits what’s called “bastardgrain” on all four faces.“The finest tool ever created is thehuman hand, but it is weakand it is fallible.”— Sign above door to shop of planemaker andauthor Cecil Pierce (1906 - 1996)The reason for this is simple and is shown inthe photos at right. If the growth rings do not travelfrom corner to corner, then each face of your legswill look markedly different than the face adjacentto it. It’s distracting and worth avoiding.If you can find boards at the lumberyard thatare cut this way, count yourself lucky, because Inever can. So I purchase 1 3 ⁄ 4 "-thick stock (soldin the rough as 8/4 wood) and mill the legs fromthose over-thick boards.The legs are 1 1 ⁄ 8 " thick, so I made a cardboardtemplate with a hole in the center that is oversized,1 3 ⁄ 8 " square. I place this template on the end grainand rotate it until I see the grain lines run fromcorner to corner. Then I trace the shape of the legonto the end grain using the template.Next I rip out that shape. Transfer the cuttingangle from the board to the blade of thetable saw using a bevel gauge and rip one edge ofthe leg at that angle. Then, rip the leg free of therest of the waste (you might have to reset your sawblade to 90° to do this) and square up the otherthree faces of the leg.With the grain tamed in the legs, you can thenjoint and plane them to their final thickness andPHOTO BY AL PARRISH16 ■ woodworking magazine Autumn 2004