SRMP Dynamic Earth Curriculum - American Museum of Natural ...
SRMP Dynamic Earth Curriculum - American Museum of Natural ...
SRMP Dynamic Earth Curriculum - American Museum of Natural ...

Create successful ePaper yourself
Turn your PDF publications into a flip-book with our unique Google optimized e-Paper software.
Science Research Mentoring Program<strong>Dynamic</strong> <strong>Earth</strong>Session One: Mineralslearning objectivesStudents make observations and learn terminology.key topics• Mineral• Mineral propertiesClass outlinetime40 minutes10 minutes25 minutes40 minutes5 minutesTOPICPaperworkIntroductionsIntroduction toMineralsACTIVITY: MineralIdentificationWrap UpdescriptionStudents complete pre-assessment and attitude survey (notincluded).Introduce instructors. Use icebreaker to introduce students.Discuss course rules and expectations.Introduce <strong>Earth</strong> as a rocky planet. Explain that rocks are madeup <strong>of</strong> minerals. Define minerals and discuss some <strong>of</strong> the physicaland special properties <strong>of</strong> minerals can be used to identifythem. Hand out copies <strong>of</strong> periodic table for reference. Hand outexamples <strong>of</strong> crystal shapes for reference.Students work in groups to identify a set <strong>of</strong> minerals by testingtheir physical properties.Journal entry: Why are we starting with minerals? Students writefor a few minutes, then share with the class. Minerals are thebuilding blocks <strong>of</strong> rocks!MATERIALSNotebooks, laptop with presentation, Mineral ID worksheets, hardness kit (nails, pennies, glassplates), streak plates, acid, eyedroppers, magnet wands (or stronger magnets), black lights, mineralsamples (olivine, muscovite, talc, quartz, gypsum, pyrite, fluorite, calcite, magnetite, hematite,apatite, sulfur, copper, graphite), 10 paper plates (or 1 per group)PREP WORKCopies <strong>of</strong> assessment, surveys, Periodic Table (find online), list and images <strong>of</strong> crystal shapes(find online), Mineral ID worksheet, Table <strong>of</strong> Mineral Properties, number minerals and arrange 3minerals per plate per groupHalls usedNoneA/V NeedeDNoneHOMEWORKNone© 2013 <strong>American</strong> <strong>Museum</strong> <strong>of</strong> <strong>Natural</strong> History. All Rights Reserved. 2
Science Research Mentoring Program<strong>Dynamic</strong> <strong>Earth</strong>Session One: MineralsACTIVITY: Mineral IdentificationBefore class: Set out one paper plate for each group. Draw lines on the plates to divide them into3-4 sections – one section for each mineral sample. See the list <strong>of</strong> suggested minerals below. Assigna number to each type <strong>of</strong> mineral. Write the number <strong>of</strong> the minerals on the plates as you distributeminerals to the plates. For example, one plate might have Mica (1), sulfur (8), and calcite (4), whileanother plate has Mica (1), calcite (5), and sulfur (8). Avoid putting more than one mineral from agiven class on any plate. I like to use the same number for each class, so that mica, quartz, talc, etc.are all (1). Then when revealing solutions, it’s easy to compare minerals in the same class. You justneed to specify which (1) samples are mica, and which are quartz.List <strong>of</strong> suggested minerals, by class (also see the Table <strong>of</strong> Properties):Silicates – olivine, muscovite, talc, quartzSulfates – gypsumSulfides – pyriteHalides – fluoriteCarbonates – calciteOxides – magnetite, hematitePhosphates – apatiteElements – sulfur, copper, graphiteStudents work in groups <strong>of</strong> 2-4, depending on availability <strong>of</strong> materials. Hand out pre-sortedminerals, worksheets, and materials (as needed).Read through introduction as a class. Discuss the properties tested in part (1) – color and luster.Show some examples (other than the minerals they’ll be identifying), either physical samples, orimages <strong>of</strong> minerals with various lusters. Give groups time to determine and record the properties fortheir samples.Define cleavage and crystal shape. Explain that students should rate cleavage as Perfect, Distinct,Good, Poor, Indistinct, or None. Show examples or describe ratings (perfect if it’s practically fallingapart as you pick it up, none if it looks like it would be very hard to break, and shows no lines <strong>of</strong>weakness). Show examples <strong>of</strong> crystal shapes, and encourage students to use their reference sheet.Give groups time to record these properties for each <strong>of</strong> their samples.Explain that the color <strong>of</strong> a mineral’s streak (powder form) can be different from the color <strong>of</strong> themineral. Show examples. Remind students to be careful with the more delicate samples. Give groupstime to record the streak <strong>of</strong> their samples.Discuss the Moh’s scales, and explain that students won’t be able to determine an exact hardness buta range <strong>of</strong> possible harnesses (for example, 2.5-3.5). Show a Moh’s scale that gives the hardness <strong>of</strong>each <strong>of</strong> the items they use in their hardness kit: fingernail, penny, glass, and steel nail. Give groupstime to determine and record the hardness <strong>of</strong> their samples.© 2013 <strong>American</strong> <strong>Museum</strong> <strong>of</strong> <strong>Natural</strong> History. All Rights Reserved. 3
Science Research Mentoring Program<strong>Dynamic</strong> <strong>Earth</strong>Session One: MineralsWORKSHEET: Mineral IdentificationMinerals can be identified by their physical properties. We will be observing and recording sixcommon properties, as well as three special properties, in order to identify some mineral samples.Materials• Copper penny• Steel nail• Glass plate• Streak plate (porcelain)• Magnifying lens• Magnet• Eyedropper, acid• Black light1. Luster is the character <strong>of</strong> light reflected by a mineral. For each <strong>of</strong> the samples, observe andrecord the color and luster.2. Determine and record the crystal shape and cleavage <strong>of</strong> each sample.3. Scratch the porcelain streak plate with each mineral to determine its streak (color). Recordbelow.4. For each mineral use (in order) your fingernail, the copper penny, the glass plate and the steelnail to scratch the mineral. Once you’ve made a scratch on a mineral, stop with that mineral,and do not try to scratch it with the other materials. Compare your observations to the Moh’sScale, and record the hardness below.5. One <strong>of</strong> the special properties <strong>of</strong> minerals is fluorescence. View each mineral under the UV light.Does the mineral fluoresce? If so, note the color below.6. Another special property <strong>of</strong> minerals magnetism. Bring the magnet near the mineral. Is themineral magnetic? Record your observations.7. The last special property is a reaction to acid. Using the eyedropper, place a drop <strong>of</strong> acid oneach mineral. Is there a reaction? Record your observations.8. Once you have noted all six physical properties and tested for fluorescence, magnetismand reaction to acid, compare your observations to the properties <strong>of</strong> some known minerals.Using the list, identify each <strong>of</strong> the minerals you were given and write their names on thecorresponding lines, next to the observed properties.© 2013 <strong>American</strong> <strong>Museum</strong> <strong>of</strong> <strong>Natural</strong> History. All Rights Reserved. 5
Science Research Mentoring Program<strong>Dynamic</strong> <strong>Earth</strong>Session One: MineralsWORKSHEET: Mineral Identification - Page 3© 2013 <strong>American</strong> <strong>Museum</strong> <strong>of</strong> <strong>Natural</strong> History. All Rights Reserved. 7
Science Research Mentoring Program<strong>Dynamic</strong> <strong>Earth</strong>Session Two: Silicateslearning objectivesStudents will understand that minerals are classified by chemical make-up. They will know thatsilicates are the most abundant class, and understand how silicates are categorized.key topics• Mineral classes• Silicates• Arrangement <strong>of</strong> SO4 tetrahedronClass outlinetime10 minutes20 minutes15 minutes30 minutes25 minutes15 minutes5 minutesTOPICReviewMineral classesACTIVITY:GuggenheimHall <strong>of</strong> MineralsLayoutsACTIVITY:Silicates GaloreSilicate subclassesACTIVITY: Review<strong>of</strong> MineralsWrap UpdescriptionReview mineral definition and properties.Discuss mineral classes, relating to minerals that wereidentified last time (show examples). Explain that silicates aremost abundant, and we will see different subclasses in theGuggenheim Hall <strong>of</strong> Minerals.Visit the Guggenheim Hall <strong>of</strong> Minerals. Students observe thelayout, and note what content topics are presented in the hall.Students work in pairs, observing a particular silicate specimen.Ask students how silicates are classified into subclasses. (Theyshould recall from observation in the Hall that silicates areclassified by arrangement <strong>of</strong> SO 4tetrahedron.) Discuss eachsubclass, showing examples (images or samples), and noting thetetrahedron arrangement. If available, show samples.Students think about what they’ve learned about minerals, anddesign an exhibition that conveys key informationReview what students have learned about minerals. Hand outarticle and homework 1.© 2013 <strong>American</strong> <strong>Museum</strong> <strong>of</strong> <strong>Natural</strong> History. All Rights Reserved. 8
Science Research Mentoring Program<strong>Dynamic</strong> <strong>Earth</strong>Session Two: Silicates (Continued)MATERIALSSilicates from collections, samples <strong>of</strong> types <strong>of</strong> minerals from Session 1 activityPREP WORKCopies <strong>of</strong> Silicates Galore Activity Sheet, Silicate Classification chart, copies <strong>of</strong> article andhomework (set up computers for students to work online if Guggenheim Hall <strong>of</strong> Minerals is notavailable)Halls usedGuggenheim Hall <strong>of</strong> MineralsA/V NeedeDRecommend computer, projector, and screenHOMEWORKRead Article (recommend article about minerals on other planetary bodies).Complete in journalWrite out 10 questions about rock types and minerals that can be answered by studying theMineral Content <strong>of</strong> Igneous Rocks chart. For example, “If a rock is rich in silica, does it have arelatively high or low melting point?”© 2013 <strong>American</strong> <strong>Museum</strong> <strong>of</strong> <strong>Natural</strong> History. All Rights Reserved. 9
Science Research Mentoring Program<strong>Dynamic</strong> <strong>Earth</strong>Session Two: SilicatesACTIVITY: Guggenheim Hall <strong>of</strong> Minerals LayoutHand out maps. Instruct students to explore, noting how information is organized.Give students about 10 minutes to explore the Hall, noting the various sections and labeling themon their maps.Meet back together and briefly discuss findings. The organization <strong>of</strong> minerals by class along onewall leads into the next activity.If the Guggenheim Hall <strong>of</strong> Minerals is not available, spend more time on the Review <strong>of</strong> Mineralsactivity instead.© 2013 <strong>American</strong> <strong>Museum</strong> <strong>of</strong> <strong>Natural</strong> History. All Rights Reserved. 10
Science Research Mentoring Program<strong>Dynamic</strong> <strong>Earth</strong>Session Two: SilicatesACTIVITY: Silicates GaloreBefore class: Print the names and subclasses <strong>of</strong> various silicate minerals. Cut the list into strips, andfold them so that students can draw them out <strong>of</strong> a hat. If available, use a geologists’ hardhat.In the Hall, walk along the wall <strong>of</strong> mineral classes. When you reach the silicates, ask students howthey’re arranged (according to sub-class). Hand out the worksheets. Explain that silicate subclassesare based on the arrangement <strong>of</strong> SO 4tetrahedrons.Have students break into groups <strong>of</strong> 2-3. Each group draws a mineral name from the hat. Review thedirections for the worksheet and give students about 20 minutes to complete them. Students sharetheir observations back in the classroom as each silicate sub-class is discussed.If the Guggenheim Hall <strong>of</strong> Minerals is not available, students can work on computers (minerals.netor similar site) to view images <strong>of</strong> and learn about their assigned mineral.© 2013 <strong>American</strong> <strong>Museum</strong> <strong>of</strong> <strong>Natural</strong> History. All Rights Reserved. 11
Science Research Mentoring Program<strong>Dynamic</strong> <strong>Earth</strong>Session Two: SilicatesACTIVITY: Silicates Galore (Continued)Suggested list <strong>of</strong> silicates, and where to find them in the Hall:Subclass Family Group Species Locationin HallNeosilicate Olivine Olivine 1st Neo panel, DSorosilicate Epidote Epidote Soro panel, ICyclosilicate Turmaline Elbaite Cyclo panel,E Tourmalinegroup, oppositeCyclosilicate Beryl Aquamarine Beryl group, opposite,but notlisted as BerlyInosilicateSingle chainPyroxene Diopside Ino panel, BInosilicateAmphibole Horblende Ino panel, IDouble chainPhyllosilicate Mica Muscovite 1st Phyllo panel, GPhyllosilicate Mica Biotite 1st Phyllo panel GTectosilicate Quartz Quartz 1st Tecto panel, ATectosilicateFeldspar(alkali-feldsparAlbite1st Tecto panel, D____, oppositeTectosilicateFeldspar(plagioclase)Orthoclase1st Tecto panel, EACTIVITY: Review <strong>of</strong> MineralsAsk students to think about what they’ve learned, and if they were to design an exhibition aboutminerals, what concepts and information would they want to convey, and how might they do it?Instruct students to write or draw their design ideas on the back <strong>of</strong> the Hall Map.If the Guggenheim Hall <strong>of</strong> Minerals was not available for the first two activities, then show a labeledmap <strong>of</strong> a mineral hall form any natural history museum. Ask students to compare it to their design.Discuss as a class.© 2013 <strong>American</strong> <strong>Museum</strong> <strong>of</strong> <strong>Natural</strong> History. All Rights Reserved. 12
Science Research Mentoring Program<strong>Dynamic</strong> <strong>Earth</strong>Session Two: SilicatesACTIVITY: Review <strong>of</strong> Minerals (Continued)Hall <strong>of</strong> Gems and Minerals© 2013 <strong>American</strong> <strong>Museum</strong> <strong>of</strong> <strong>Natural</strong> History. All Rights Reserved. 13
Science Research Mentoring Program<strong>Dynamic</strong> <strong>Earth</strong>Session Two: SilicatesACTIVITY: Review <strong>of</strong> MineralsAsk students to think about what they’ve learned, and if they were to design an exhibition aboutminerals, what concepts and information would they want to convey, and how might they do it?Instruct students to write or draw their design ideas on the back <strong>of</strong> the Hall Map.If the Guggenheim Hall <strong>of</strong> Minerals was not available for the first two activities, then show a labeledmap <strong>of</strong> a mineral hall form any natural history museum. Ask students to compare it to their design.Discuss as a class.© 2013 <strong>American</strong> <strong>Museum</strong> <strong>of</strong> <strong>Natural</strong> History. All Rights Reserved. 16
Science Research Mentoring Program<strong>Dynamic</strong> <strong>Earth</strong>Session Three: Rockslearning objectivesStudents understand the three different types <strong>of</strong> rocks, how they are formed, and what theygenerally look like.key topics• Igneous, sedimentary, and metamorphic rocks• Rocky CycleClass outlinetime15 minutes45 minutes40 minutes15 minutes5 minutesTOPICReviewRock TypesACTIVITY:Identifying RocksACTIVITY:Viewing Rock FacesWrap UpdescriptionCollect homework 1. Discuss article. Review minerals andsilicates.Discuss igneous, sedimentary, and metamorphic rocks. As part <strong>of</strong>each discussion view examples <strong>of</strong> rocks and rock faces. (Hand outmultiple labeled images <strong>of</strong> each rock type for comparison, foundonline.) Note key defining features, and practice identifying eachrock type. Briefly discuss rock cycle.Students use a dichotomous key and pictures <strong>of</strong> rocks (onlineimages, hand out copies) to identify the samples in a rock kit.As a class, view a series <strong>of</strong> rock faces on the screen, and identifyrock type. Discuss each briefly – what are its defining features?Review material from the day.MATERIALSRock sets (1 per table), acid & dropper, magnifying lensesPREP WORKCopies <strong>of</strong> rock examples (pictures showing textures and foliation <strong>of</strong> some common rocks), copies<strong>of</strong> Dichotomous Rock KeyHalls usedNoneA/V NeedeDNoneHOMEWORKNone© 2013 <strong>American</strong> <strong>Museum</strong> <strong>of</strong> <strong>Natural</strong> History. All Rights Reserved. 17
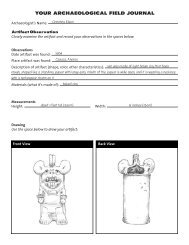
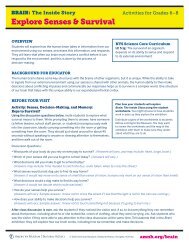
Science Research Mentoring Program<strong>Dynamic</strong> <strong>Earth</strong>Session Three: RocksACTIVITY: Identifying RocksThis activity uses a set <strong>of</strong> 12 rocks (4 <strong>of</strong> each rock type).Pass out rock sets to students, in groups <strong>of</strong> 2-3. Hand out magnifying lenses – one per student – anddichotomous keys. Explain the concept <strong>of</strong> a dichotomous key; walk through one <strong>of</strong> the samples asa group if necessary. Encourage students to use the magnifying lenses to closely observe the rocksamples, and to compare them to the images handed out earlier.While groups work on identifying their rocks, drop diluted hydrochloric acid on each <strong>of</strong> the samplesin question.Once groups have identified all samples, share solutions. Note key features, such as grain sizes <strong>of</strong>sedimentary rocks, foliation <strong>of</strong> metamorphic rocks, and crystal size <strong>of</strong> igneous rocks.ACTIVITY: Viewing Rock FacesFiles with rock faces and answer key are included in the resources. Other images <strong>of</strong> rocks faces canbe used as well. Include some indication <strong>of</strong> location and scale in each image.As a class, view rock faces. Students should briefly discuss each rock with a partner. Then poll theclass, using a show <strong>of</strong> hands or ABCD cards, asking which <strong>of</strong> the three rock types the image shows.If there’s no strong consensus, ask some students to share their reasoning or point out key features.Allow time to discuss before polling the class again.© 2013 <strong>American</strong> <strong>Museum</strong> <strong>of</strong> <strong>Natural</strong> History. All Rights Reserved. 18
Science Research Mentoring Program<strong>Dynamic</strong> <strong>Earth</strong>Session Three: RocksACTIVITY: Viewing Rock Faces (Continued)Can you see grains or crystals? Yes No Does the rock have crystals (flat shiny surfaces) or grains (pieces <strong>of</strong> other rocks broken down and maybe worn down)? Does the rock fizz when you put acid on it? Crystals Grains Yes No Does the rock fizz when you put acid on it? Does the rock fizz when you put acid on it? Yes No Yes No Limestone or Shale Mudstone Marble Are the crystals arranged in layers? Limestone Are the grains like sand or pebbles? Yes No Sand Pebbles Can you see light and dark bands? Are the crystals light or dark? Sandstone Are the pebbles rounded or angular? Yes No Dark Light Rounded Angular Gneiss Yes Are the crystals shinny or flaky? No Are the crystals mostly coarse or fine? Coarse Are the crystals mostly coarse or fine? Fine Coarse Fine Conglomerate Breccia Schist Does the rock break along flat surfaces? Gabbro Basalt Are the crystals all the same color? Rhyolite Yes Slate Quartzite Yes No Granite © 2013 <strong>American</strong> <strong>Museum</strong> <strong>of</strong> <strong>Natural</strong> History. All Rights Reserved. 19
Science Research Mentoring Program<strong>Dynamic</strong> <strong>Earth</strong>Session Four: Rock Cyclelearning objectivesStudents will understand how processes change rocks from one rock type to another. Studentswill understand how to read the history <strong>of</strong> a rock face.key topics• Rock Cycle• Rock types <strong>of</strong> Central ParkClass outlinetime15 minutes35 minutes40 minutesTOPICReview HomeworkRock CycleACTIVITY:Thin SectionsACTIVITY: RockOutcrops inCentral ParkdescriptionReturn homework 1 (graded) and discuss as necessary. Reviewrock types and features from last class.Introduce instructors. Use icebreaker to introduce students.Discuss course rules and expectations.Review how each type <strong>of</strong> rock is made, and its place in the RockCycle. View thin sections in microscopes.Students work in groups to identify a set <strong>of</strong> minerals by testingtheir physical properties.Look two or more outcrops in Central Park, and observe theminerals and features present. Based on their observations,students reconstruct the history <strong>of</strong> the rocks.5 minutesWrap UpReflection: We’ve said that rocks tell us the history <strong>of</strong> <strong>Earth</strong>. Howold do you think this rock is, based on all <strong>of</strong> the changes it’s gonethrough? What was happening on the <strong>Earth</strong> at various stages <strong>of</strong>the rock’s history? What evidence <strong>of</strong> past events might it hold?Hand out article and homework 2.MATERIALSMagnifying lenses, thin sections, microscopesPREP WORKCopies <strong>of</strong> Central Park Outcrop Sheet, article, and homework; set up microscopes with thinsections on them (one per table if possible).Halls usedGottesman Hall <strong>of</strong> Planet <strong>Earth</strong> if weather is badA/V NeedeDNoneHOMEWORKNone© 2013 <strong>American</strong> <strong>Museum</strong> <strong>of</strong> <strong>Natural</strong> History. All Rights Reserved. 20
Science Research Mentoring Program<strong>Dynamic</strong> <strong>Earth</strong>Session Four: Rock CycleACTIVITY: Thin SectionsBefore class: Set up 5-10 microscopes. At each microscope put one thin section <strong>of</strong> particular rocktype (more if available). If thin sections are not available, view images <strong>of</strong> thin sections that can befound online.During class: Briefly explain how thin sections are made. Tell students that the slide(s) at eachmicroscope shows a different rock. Instruct student to move to each microscope in turn, viewthin section(s), and record the key features in their notebooks. Based on these features, studentsdetermine what type <strong>of</strong> rock is at each microscope.Once students have viewed all <strong>of</strong> the thin sections and determined rock types, discuss their answersas a class.ACTIVITY: Rock Outcrops in Central ParkBefore class: Investigate rock outcrops in Central Park. Pick two or more that show a variety <strong>of</strong> rocktypes or features. If Central Park is not available, look for other rock outcrops near the classroom, ortake pictures <strong>of</strong> local rock outcrops and project them on a screen.During class: Explain that geologists have to identify rocks in the field. In this activity, students willhave a chance to identify rocks in situ and note their features. These will allow them to reconstructthe history <strong>of</strong> the rock.Take students to an outcrop and hand out magnifying lenses and worksheets. Ask students toobserve the rock and record their observations for Outcrop 1 on the worksheet. Students thenshare what they see with the class. Point out and further discuss any features that they missed ormisinterpreted.Move to a second outcrop. Ask students to observe the rock and record their observations again,this time searching for items on the scavenger hunt. Students follow directions on the worksheet,looking for the features listed, then reconstructing the history <strong>of</strong> the rock. After students havecompleted the reconstruction, discuses as a class.If time allows, observe additional outcrops.© 2013 <strong>American</strong> <strong>Museum</strong> <strong>of</strong> <strong>Natural</strong> History. All Rights Reserved. 21
Science Research Mentoring Program<strong>Dynamic</strong> <strong>Earth</strong>Session Four: Rock CycleWORKSHEET: Rock Outcrops in Central ParkOutcrop 1: More than a GlanceWhat type <strong>of</strong> rock is this? How can you tell?Observe, sketch and describe the rock. Be sure to note color, texture, grain size and shape,identifiable minerals, and any other features you observe.Outcrop 2: Rock Feature Scavenger Hunt!Find the following features on or near the outcrop and describe them.a. a tectosilicateb. a phyllosilicatec. an intrusiond. evidence <strong>of</strong> bedding (layering)e. evidence <strong>of</strong> regional metamorphismFor bonus points: Find evidence <strong>of</strong> another type <strong>of</strong> metamorphism.© 2013 <strong>American</strong> <strong>Museum</strong> <strong>of</strong> <strong>Natural</strong> History. All Rights Reserved. 22
Science Research Mentoring Program<strong>Dynamic</strong> <strong>Earth</strong>Session Four: Rock CycleWORKSHEET: Rock Outcrops in Central ParkOutcrop 2: ReconstructionRecall that “no rock is accidental.” How did this rock outcrop come to have these features? What is itsstory? How does the evidence that you’ve observed support your proposed order <strong>of</strong> events?Hint: Think about the rock cycle. How was the rock originally formed, and in what order did itsfeatures, mentioned above, develop?Initial formation:1st deformation event?2nd deformation event?3rd deformation event?4th deformation event?Additional events?© 2013 <strong>American</strong> <strong>Museum</strong> <strong>of</strong> <strong>Natural</strong> History. All Rights Reserved. 23
Science Research Mentoring Program<strong>Dynamic</strong> <strong>Earth</strong>Session Five: Geologic Timelearning objectivesStudents gain understanding <strong>of</strong> age <strong>of</strong> <strong>Earth</strong> and the timescales over which geologicalprocesses occur. Students differentiate between relative and absolute dating, and knowmethods for each.key topics• Geologic time• Laws <strong>of</strong> Geology• Relative and absolute datingClass outlinetime10 minutes30 minutes10 minutes20 minutes10 minutes30 minutes5 minutesTOPICReviewPrinciples <strong>of</strong>GeologyACTIVITY: Ages<strong>of</strong> Rocks Part 1 –Relative AgesGeologic Time andAbsolute DatingZircon VideoACTIVITY: Ages<strong>of</strong> Rocks Part 2 –Absolute AgesWrap updescriptionCollect homework 2. Discuss article. Review rock topics fromprevious classes.Students should understand that not all rocks are the same age.Explain that we can use both relative and absolute dating tounderstand rocks. Define relative dating. Introduce and discussthe principles <strong>of</strong> geology, showing examples <strong>of</strong> each.Students work in pairs, using previous knowledge to put rocks inrelative order.Optional: discuss how craters on other planetary bodies can beused for relative dating.Introduce geologic time. Hand out International StratigraphicCharts (www.stratigraphy.org/index.php/ics-chart-timescale).Briefly review the Eras <strong>of</strong> geological time, and what happened onthe <strong>Earth</strong> during each. Define the units <strong>of</strong> time on the ISC (eons,era, epochs, etc.)Clearly define absolute dating. Explain that radioactive dating isused to find ages <strong>of</strong> non-fossil-bearing rocks. Review concepts<strong>of</strong> elements and isotopes if necessary. Discuss primary motherdaughterisotopes and their half-lives.Watch video about zircons and geologic time: http://www.amnh.org/explore/science-bulletins/(watch)/earth/documentaries/zircons-time-capsules-from-the-early-earth/(p)/1Students work in small groups to estimate age <strong>of</strong> their assignedrocks. View estimates as a class, and compare to actual ages.Review key concepts from the day. Reflect on expanse <strong>of</strong>geological time and <strong>of</strong> human history.© 2013 <strong>American</strong> <strong>Museum</strong> <strong>of</strong> <strong>Natural</strong> History. All Rights Reserved. 24
Science Research Mentoring Program<strong>Dynamic</strong> <strong>Earth</strong>Session Five: Geologic Time (Continued)MATERIALSLong rope; list <strong>of</strong> old rocks, names <strong>of</strong> rocks written on separate strips <strong>of</strong> paper; masking tapePREP WORKMeasure and label a long rope (ages <strong>of</strong> rocks part 2); tape long rope up around the classroom;copies International Stratigraphic Charts, homework, and articleHalls usedHeilbrunn Cosmic PathwayA/V NeedeDRecommend computer, projector, and screenHOMEWORKRead the article (recommend recent article about Mercury’s molten core, or similar). Given animage <strong>of</strong> cross-cut layers, ask students to put the layers in order <strong>of</strong> age, based on the principles <strong>of</strong>geology. They should include a sentence for each layer, explaining their reasoning.© 2013 <strong>American</strong> <strong>Museum</strong> <strong>of</strong> <strong>Natural</strong> History. All Rights Reserved. 25
Science Research Mentoring Program<strong>Dynamic</strong> <strong>Earth</strong>Session Five: Geologic TimeACTIVITY: Ages <strong>of</strong> Rocks Part 1 - Relative AgesStudents can work in pairs or small groups. Give the class a list <strong>of</strong> rocks (put them in random order):• Oldest Meteorite found on <strong>Earth</strong>• Oldest Terrestrial Rock• First Stromatolites• Banded Iron Formation• Oldest Rock containing Multi-Cellular Algae• Oldest Trilobite Fossil• Oldest Dinosaur Fossils• Oldest Fossils <strong>of</strong> Mammals• K-T Boundary• Oldest Fossils <strong>of</strong> Modern HumansThe list can be on a handout, or written/projected on the board/screen.Ask students to order the rocks from oldest to youngest, and record the order in their notebooks.Tell students it’s okay if they’re not sure what some <strong>of</strong> the rocks are. Let them know that the K-Tboundary was formed by an impact event that apparently contributed to the dinosaur’s extinctionAfter groups have put rocks in order, review as a class. Clarify any items with which students areunfamiliar, and make sure all understand the correct order. Note that this order represents relativedating; numerical ages have yet to be assigned to the rocks.© 2013 <strong>American</strong> <strong>Museum</strong> <strong>of</strong> <strong>Natural</strong> History. All Rights Reserved. 26
Science Research Mentoring Program<strong>Dynamic</strong> <strong>Earth</strong>Session Five: Geologic TimeACTIVITY: Ages <strong>of</strong> Rocks Part 2 – Absolute AgesBefore class: Use the Heilbrunn Cosmic Pathway to measure the distance from the formation <strong>of</strong>the <strong>Earth</strong> to the present with a long rope (or use another length appropriate to the history <strong>of</strong> <strong>Earth</strong>).Label one end “the present” and the other “formation <strong>of</strong> <strong>Earth</strong>.”In class: Break the class into no more than 10 groups. Assign each one a rock from the list above;hand out appropriate slips <strong>of</strong> paper. Explain to students that the long rope represents the wholehistory <strong>of</strong> the <strong>Earth</strong>, and remind them that <strong>Earth</strong> is 4.567 billion years old. Students should tape theirrock to the rope at the “time” it was formed.It will help for students to work in order, from youngest rock to oldest, or vice versa. Once all groupshave taped their rock names to the rope, quickly review the placements. Ask if anyone disagreeswith any <strong>of</strong> the placements.Carefully remove the rope from the wall <strong>of</strong> the class, and take it to the Heilbrunn Cosmic Pathway.Place the rope along the pathway. Starting with the formation <strong>of</strong> <strong>Earth</strong> (look backwards to see theoldest meteorite), compare the estimated ages <strong>of</strong> rocks to the ages posted on the pathway. Makeadjustments as necessary, and discuss along the way. At the end <strong>of</strong> the rope (the present), challengestudents to consider the depth <strong>of</strong> geologic time.Gather up the rope and return to the classroom.If the Heilbrunn Cosmic Pathway is not available, any long hallway will work. Find the ages <strong>of</strong> therocks, measure out the appropriate length <strong>of</strong> the hall (ratio <strong>of</strong> age <strong>of</strong> <strong>Earth</strong> to length <strong>of</strong> hall equalsage <strong>of</strong> rock to distance in hall) and place markers at the appropriate intervals for each rock. This canserve as the “answer key” in place <strong>of</strong> the Heilbrunn Cosmic Pathway.© 2013 <strong>American</strong> <strong>Museum</strong> <strong>of</strong> <strong>Natural</strong> History. All Rights Reserved. 27
Science Research Mentoring Program<strong>Dynamic</strong> <strong>Earth</strong>Session Six: Inner <strong>Earth</strong>learning objectivesStudents will understand that the inner parts <strong>of</strong> <strong>Earth</strong> cannot be directly observed, and that wecan learn about it by studying seismic events, the magnetic field, and meteorites.key topics• Layers <strong>of</strong> the <strong>Earth</strong> – chemical and mechanical• Core• Mantle• Convection in the mantleClass outlinetime10 minutes40 minutes25 minutes40 minutes5 minutesTOPICReviewThe CoreTOUR: ArthurRoss Hall <strong>of</strong>MeteoritesACTIVITY: OxygenIsotope AnalysisWrap UpdescriptionReturn homework 2 (graded) and discuss as necessary. Reviewtopics form previous sessions.Discuss the mechanical and chemical layers <strong>of</strong> <strong>Earth</strong>. Discuss thecore and its effect on the <strong>Earth</strong>’s magnetic field. View parts or all<strong>of</strong> movie Model <strong>of</strong> <strong>Earth</strong>’s Magnetic Field, or similar.Tour the Ross Hall <strong>of</strong> Meteorites to see how differentiatedmeteorites correspond to the layers <strong>of</strong> <strong>Earth</strong>.Students work in groups to plot meteorite ratios <strong>of</strong> oxygenisotopes in meteorite chondrules. They compare their plots tothose <strong>of</strong> known parent bodies to determine the origin <strong>of</strong> theirmeteorites.Review key concepts from the day. Hand out article andhomework 3.MATERIALSComputers (with excel)PREP WORKCopies <strong>of</strong> activity worksheet, and article; load excel file onto computersHalls usedRoss Hall <strong>of</strong> MeteoritesA/V NeedeDComputer with excel, projector and screenHOMEWORKRead article (recommend article about ancient plate tectonics, on <strong>Earth</strong> or other solar systembodies). Students should respond to the following: Explain convention in your own words. Willconvention in <strong>Earth</strong>’s mantle continue indefinitely? Explain.© 2013 <strong>American</strong> <strong>Museum</strong> <strong>of</strong> <strong>Natural</strong> History. All Rights Reserved. 28
Science Research Mentoring Program<strong>Dynamic</strong> <strong>Earth</strong>Session Six: Inner <strong>Earth</strong>TOUR: Arthur Ross Hall <strong>of</strong> MeteoritesTake students to the Ross Hall <strong>of</strong> Meteorites.Start at the Origins section. View and discuss chondritic meteorites. (Note that Renazzo has beenremoved for study.) Explain that they tell us a lot about the early solar system. View the time line <strong>of</strong>the solar system, pointing out formation <strong>of</strong> chondrites and formation <strong>of</strong> planets. View and brieflydiscuss the comparison <strong>of</strong> solar and chondrite chemical compositions.Move to the Planets section. View and discuss each type <strong>of</strong> meteorite:• Stony looks a lot like <strong>Earth</strong> rocks. Compare basalt to meteorites from moon and Vesta. Whichlayer <strong>of</strong> <strong>Earth</strong> does this resemble?• Stony-iron has lots <strong>of</strong> pyroxene and olivine (point out back-lit sample). Which layer <strong>of</strong> <strong>Earth</strong> doesthis resemble?• Iron meteorites have crystalline patterns (Widmanstatten Pattern) not found on <strong>Earth</strong>. Notethat some have different crystal sizes – what does this indicate? Which layer <strong>of</strong> <strong>Earth</strong> does thisresemble?If time allows, look briefly at impacts.If the Ross Hall <strong>of</strong> Meteorites is not available, view samples <strong>of</strong> meteorites (chondrites, stony, stonyiron,and iron) or images <strong>of</strong> meteorites. Students should have a chance to observe meteorites sothat they can compare them (visually) to terrestrial rocks, and to have a better understanding <strong>of</strong> themake-up <strong>of</strong> <strong>Earth</strong>’s inner layers.ACTIVITY: Oxygen Isotope AnalysisThis activity was designed using a set <strong>of</strong> unpublished data. Published data can be found online(example: Table 2 in Origin <strong>of</strong> low-Ca pyroxene in amoeboid olivine aggregates: Evidencefrom oxygen isotopic compositions, by Krot et al. www.sciencedirect.com/science/article/pii/S0016703704007793).Before class: Set up computers. Modify Isotope Analysis Excel file to match data that students willplot, and load the file onto computers. The file can also be modified, depending on how familiarstudents are with Excel. Worksheet will also require modification to correspond with available datasets.During class: Hand out the (modified) worksheet and a data set to students. Remind them that welearn a lot about the inner layers <strong>of</strong> the <strong>Earth</strong> by studying meteorites – especially iron and stonyironones. Explain that the activity will focus on a chondritic meteorite.Read though the introduction as a class. Briefly explain per mil notation. Students should follow theworksheet to plot the data and compare to known parent bodies. Discuss the results as a class.© 2013 <strong>American</strong> <strong>Museum</strong> <strong>of</strong> <strong>Natural</strong> History. All Rights Reserved. 29
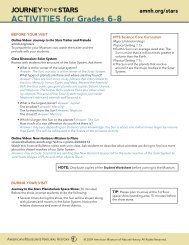
Science Research Mentoring Program<strong>Dynamic</strong> <strong>Earth</strong>Session Six: Inner <strong>Earth</strong>WORKSHEET: Oxygen Isotope AnalysisOxygen has three stable isotopes: 16O (99.757%), 18O (0.205%) and 17O (0.038%). Note that 16Ois by far the most abundant <strong>of</strong> the three. The ratios 17O /16O and 18O /16O describe the relativeabundances <strong>of</strong> the other two isotopes in rock samples. Rocks that are formed together (at thesame time and place) will have similar ratios <strong>of</strong> 17O /16O and 18O /16O. The common standardfor measuring these ratios is ocean water; all other ratios <strong>of</strong> these isotopes are compared to thatstandard mean (SMOW). We will be determining the origin <strong>of</strong> an “unknown” rock specimen bygraphing its ratios <strong>of</strong> oxygen isotopes and comparing the graph to those <strong>of</strong> known rocks.Below is a graph <strong>of</strong> oxygen isotopes for certain meteorite types and some planets. The delta (δ)values for the isotopes are calculated from their ratios compared to - 16 O using the followingequations:$ 17 O 16 O '18 16O O" 17 O = %17 O 16 ) *1000 0 00 δ 18 O18 161 1000 0 00O SMOW (= ⎡⎡O O −⎤⎤⎢⎢⎥⎥⎣⎣⎢⎢SMOW ⎦⎦⎥⎥ ×!© 2013 <strong>American</strong> <strong>Museum</strong> <strong>of</strong> <strong>Natural</strong> History. All Rights Reserved. 30
Science Research Mentoring Program<strong>Dynamic</strong> <strong>Earth</strong>Session Six: Inner <strong>Earth</strong>WORKSHEET: Oxygen Isotope Analysis - Page 2We have a sampling <strong>of</strong> raw (and as <strong>of</strong> now, unpublished!)data from a specimen that was analyzed using theSecondary Isotope Mass Spectrometer (SIMS) in Madison,Wisconsin. We will be looking at data from just four <strong>of</strong> thechondrules.1. In Excel, enter the d18O and d17O values for chondrule2. Do not enter the Opx values.3. As the data is entered, it will be plotted on the graph(with d18O on the horizontal axis and d17O on thevertical axis). Each set <strong>of</strong> data entered has a SeriesName. What name has been given to this series?Series Name:We will be comparing this graph to the graph on page 1, so we want them to have similar scales.Note that the maximum and minimum values on your X and Y-axes correspond roughly to themaximum and minimum values on page 1.4. Give your graph a title and label the axes.Title: Display the Toolbox (icon menu at the top <strong>of</strong> the window). Click within the chart area.Under “Chart Options” in the Toolbox is the “Titles” menu. In the top box, “Chart Title” should beselected. Type “Oxygen Isotopes in Meteorite Chondrules” in the space provided (“click here toadd title”Axis: Now instead <strong>of</strong> “Chart Title,” select “Horizontal (Category) Axis.” Type “delta-18O, relative toSMOW” in the space provided. Select the vertical axis and title it “delta-17O, relative to SMOW.”This graph represents just one tiny portion <strong>of</strong> the meteorite. To get a clearer picture <strong>of</strong> the wholemeteorite, we’ll look at data from some more chondrules.5. Enter the d18O and d17O values for chondrules 6, 9, and 30 under their respective headings. Donot enter the Opx values.6. Once you have graphed the new data, you can compare it to known bodies. Recall that rockswhich form together have similar ratios <strong>of</strong> 17O /16O and 18O /16O. To which (if any) <strong>of</strong> the bodiesrepresented in the graph on page 1 is this new sample most likely related?© 2013 <strong>American</strong> <strong>Museum</strong> <strong>of</strong> <strong>Natural</strong> History. All Rights Reserved. 31
Science Research Mentoring Program<strong>Dynamic</strong> <strong>Earth</strong>Session Seven: Outer <strong>Earth</strong>learning objectivesStudents will understand the concept <strong>of</strong> convection. Students will understand that processesoccurring deep below the <strong>Earth</strong>’s surface influence events and processes on the surface.key topics• Convection in <strong>Earth</strong>’s mantle• Asthenosphere• LithosphereClass outlinetime10 minutes20 minutes30 minutes30 minutes25 minutes5 minutesTOPICReviewMantleUpper LayersACTIVITY: RegionProjectsPlate TectonicsWrap UpdescriptionCollect homework 3. Discuss the article. Review layers <strong>of</strong> the<strong>Earth</strong>.Discuss layers <strong>of</strong> the mantle and convection currents. Watch themovie Model <strong>of</strong> <strong>Earth</strong>’s Mantle Convection, or similar.Clearly define the chemical composition and physical properties<strong>of</strong> asthenosphere and the lithosphere. Discuss how they interactwith each other and their relationship to other layers and spheres<strong>of</strong> <strong>Earth</strong> (including atmosphere, hydrosphere, biosphere, etc.)Introduce and assign groups. Students study the geology <strong>of</strong> aregion.Define tectonic plates. Note the major plates on a map. Discussmantle convection and its effect on tectonic plates. Note thedirections that particular plates are moving. Explain thatthe relative motion <strong>of</strong> the adjacent plates defines the type<strong>of</strong> boundary. Define convergent, divergent and transformboundaries. Given a map that indicates motion <strong>of</strong> plates, studentsshould identify a boundary <strong>of</strong> each type. Note the geographicalfeatures that occur at each boundary type.Talked about the outermost layers <strong>of</strong> the earth, the part that wesee.MATERIALS12 computers (or 2 per group), flash drive to save presentations (if necessary)PREP WORKCopies <strong>of</strong> region images, set out computersHalls usedNoneA/V NeedeDSpeakers for video; computer, projector, and screenHOMEWORKNone© 2013 <strong>American</strong> <strong>Museum</strong> <strong>of</strong> <strong>Natural</strong> History. All Rights Reserved. 32
Science Research Mentoring Program<strong>Dynamic</strong> <strong>Earth</strong>Session Seven: Outer <strong>Earth</strong>ACTIVITY: Region ProjectsExplain to students that they will be working in groups to study the geology and geologic processes<strong>of</strong> a particular region <strong>of</strong> <strong>Earth</strong>.Show each region, in turn, on the screen. Ask students to identify the region, and ask what featuresthey observe. Note the “wide view” in the corner and the elevation scale. Point out volcanoes on thefirst few slides.Break students into no more than 6 groups. Assign a region to each group, or let them choose.Supply each group with images <strong>of</strong> its region (one copy to each group member) and instructions forresearching and taking notes to address parts 1-3 <strong>of</strong> the Region Project (see Instructor’s Outline <strong>of</strong>Region Project in Resources folder).Groups should take notes and discuss their ideas. If they locate their region quickly, they might startbuilding a PowerPoint presentation. Save any presentations to bring to session 9.© 2013 <strong>American</strong> <strong>Museum</strong> <strong>of</strong> <strong>Natural</strong> History. All Rights Reserved. 33
Science Research Mentoring Program<strong>Dynamic</strong> <strong>Earth</strong>Session Eight: Theory <strong>of</strong> Plate Tectonicslearning objectivesStudents will understand that convection currents in the mantle move tectonic plates. Studentswill be able to identify boundary types and give examples.key topics• Tectonic plates• Oceanic and continental crust• Convergent, divergent, and transform boundariesClass outlinetime10 minutes40 minutes55 minutes10 minutes5 minutesTOPICReviewPlate BoundariesACTIVITY:GeoworldWilson CycleWrap UpdescriptionHand back homework 3 and discuss as necessary. Review topicsfrom previous classes.Students should understand that the theory <strong>of</strong> plate tectonicsis an encompassing theory <strong>of</strong> geology. Review convergent,divergent, and transform boundaries. Define and discussoceanic and continental crust. Discuss what boundary mightoccur between two oceanic, two continental, or continental andoceanic crusts.Analyze hypothetical planet with plate tectonics.Discuss what might happen in the future on Geoworld. Defineand briefly discuss the Wilson cycle.Review key topics. Hand out homework 4 and article.MATERIALSHighlighters, transparent rulers, calculatorsPREP WORKCopies <strong>of</strong> Geoworld Part 1, Geoworld Parts 2 and 3, and articleHalls usedNoneA/V NeedeDNoneHOMEWORKRead the article (recommend a recent article about tectonic activity on another planetary body).Complete the Geoworld Parts 2 and 3.© 2013 <strong>American</strong> <strong>Museum</strong> <strong>of</strong> <strong>Natural</strong> History. All Rights Reserved. 34
Science Research Mentoring Program<strong>Dynamic</strong> <strong>Earth</strong>Session Eight: Theory <strong>of</strong> Plate TectonicsACTIVITY: GeoworldAnalysis <strong>of</strong> hypothetical planet with plate tectonics. http://serc.carleton.edu/sp/library/guided_discovery/examples/geoworld.html This is a free resource; users should email the author indicatingwhere and how the lab is being used. This course divides the lab into two parts. As part <strong>of</strong> Lesson 8,students complete a modified version <strong>of</strong> Part 1, sections A,B,C,F,and G. Parts 2 and 3 are assigned ashomework.Hand out worksheet and materials (highlighters, rulers, calculators). Read through the instructionsand make sure students understand the key showing the reversals <strong>of</strong> Geoworld’s magnetic field overtime. Note that thickness in the key does not match thickness on the map; students need to considerthe relative thickness <strong>of</strong> each layer.Students work individually or in pairs. Start by working slowly though the first calculations insection A as a class. Make sure students understand how to calculate the rates, since they’ll need todo so as part <strong>of</strong> their homework. Discuss answers as a class. Students who finish early can work onsections F and G.Possible bodies to view:Body Features <strong>Dynamic</strong> ProcessesCallistoCraters, crater line, craterconcentric wrinklesNo volcanoes, or tectonicfeatures! Crust, salty ocean layer,not completely differentiated(shutdown <strong>of</strong> convection)Mercury Craters, streaks Has been geologically inactive forbillions <strong>of</strong> yearsMoon Craters, smooth areas Some shield volcanoes, volcanicdomes, presence <strong>of</strong> waterGanymedeStarburst patterns, some small craters,large slabs <strong>of</strong> darker materialEvidence <strong>of</strong> faulting / riftsEuropaMarsStreaks and scratches, some smallridgesCratered regions, large canyons,volcanoes, polar capsSmooth, young surface;tectonically active (water-icesurface) – possibly driven by warmplumes <strong>of</strong> water rising form deepinside the moonWas once tectonically active(straight line along Tharsis region);likely extinct nowIo Volcanoes See VenusVenus (Radar, then Elevation) Dendritic patterns, volcanoes Uniformly buoyant lithosphere(instead <strong>of</strong> negatively buoyant);melt-down 750 Ma (periodic),covering much <strong>of</strong> surface withvolcanism <strong>of</strong> some form© 2013 <strong>American</strong> <strong>Museum</strong> <strong>of</strong> <strong>Natural</strong> History. All Rights Reserved. 35
Science Research Mentoring Program<strong>Dynamic</strong> <strong>Earth</strong>Session Nine: Other Bodies & Tectonicslearning objectivesStudents will recognize that other planetary bodies have or have had tectonic activity, and willbe able to give examples. Students identify and interpret features on extraterrestrial surfaces.key topics• Features <strong>of</strong> tectonic activity• Surface features <strong>of</strong> planetary bodiesClass outlinetime10 minutes25 minutes35 minutes45 minutes5 minutesTOPICReviewTectonics on OtherPlanetary BodiesACTIVITY: MagicPlanetACTIVITY: RegionProjectsWrap UpdescriptionCollect homework 4. Discuss article. Review plate tectonicstopics.Review the processes that make <strong>Earth</strong> a dynamic planet. Surveythe terrestrial planets and the Moon. View and discuss their mainsurface features, and internal structure (if known). Ask studentswhich features indicate tectonic activity (current or in the past).Are or were other bodies dynamic?Use Magic Planet to view and discuss plate tectonics <strong>of</strong> earth. Seeand discuss examples <strong>of</strong> other bodies in the solar system.Students work in groups on the Region Project (parts 4-7)Save group PowerPoints to flash drive. Review dynamics <strong>of</strong> otherplanetary bodies.MATERIALS12 computers (or two per group), flash drive for Region ProjectsPREP WORKSet up for Magic Planet, set out computersHalls usedNoneA/V NeedeDMagic Planet, or computer with Celestia (or similar), projector and screenHOMEWORKNone© 2013 <strong>American</strong> <strong>Museum</strong> <strong>of</strong> <strong>Natural</strong> History. All Rights Reserved. 36
Science Research Mentoring Program<strong>Dynamic</strong> <strong>Earth</strong>Session Nine: Other Bodies & TectonicsACTIVITY: Magic PlanetUse Magic Planet to view <strong>Earth</strong> and other solar system bodies. If Magic Planet is not available, useCelestia to view other bodies, or download skins from www.mapaplanet.org/explorer/help/data_set.htmlStudents gather around Magic Planet so that all can see. Present as follows.<strong>Earth</strong>’s Plate Tectonics – Oceans Draining• Watch as the oceans drain, fill again.• Look for the deepest parts <strong>of</strong> the oceans. What did we call these regions?• When oceans drain the 2nd or 3rd time, pause with the oceans empty.• Look for plate boundaries. What do they look like?• Have each student identify a boundary and what type it is. Have groups identify their region (forRegion Project), and note the boundaries.<strong>Earth</strong>’s Plate Tectonics – Plate boundaries• Were you right? Do other regions look like plate boundaries? Why? What do you think they are?<strong>Earth</strong>’s Plate Tectonics – Oceans draining• Pause program, go to drained oceans again• Identify the type <strong>of</strong> plate boundary. Can you tell which direction the plates are moving?<strong>Earth</strong>’s Plate Tectonics – Plate Movement• Were you right? Groups, note what’s happening in your regions.Optional: Go back to Drained Oceans to see how each type <strong>of</strong> boundary looked.Now let’s look for features on other bodies…View each body in turn. Don’t identify until after students have discussed its features.• What features do you see?• Is there evidence <strong>of</strong> plate tectonics? Of other dynamic processes?• What type <strong>of</strong> rocks would you expect to find here?© 2013 <strong>American</strong> <strong>Museum</strong> <strong>of</strong> <strong>Natural</strong> History. All Rights Reserved. 37
Science Research Mentoring Program<strong>Dynamic</strong> <strong>Earth</strong>Session Nine: Other Bodies & TectonicsACTIVITY: Magic Planet (Continued)Possible bodies to view:Body Features <strong>Dynamic</strong> ProcessesCallistoCraters, crater line, craterconcentric wrinklesNo volcanoes, or tectonicfeatures! Crust, salty ocean layer,not completely differentiated(shutdown <strong>of</strong> convection)Mercury Craters, streaks Has been geologically inactive forbillions <strong>of</strong> yearsMoon Craters, smooth areas Some shield volcanoes, volcanicdomes, presence <strong>of</strong> waterGanymedeStarburst patterns, some small craters,large slabs <strong>of</strong> darker materialEvidence <strong>of</strong> faulting / riftsEuropaMarsStreaks and scratches, some smallridgesCratered regions, large canyons,volcanoes, polar capsSmooth, young surface;tectonically active (water-icesurface) – possibly driven by warmplumes <strong>of</strong> water rising form deepinside the moonWas once tectonically active(straight line along Tharsis region);likely extinct nowIo Volcanoes See VenusVenus (Radar, then Elevation) Dendritic patterns, volcanoes Uniformly buoyant lithosphere(instead <strong>of</strong> negatively buoyant);melt-down 750 Ma (periodic),covering much <strong>of</strong> surface withvolcanism <strong>of</strong> some formACTIVITY: Region ProjectsStudents work in groups on computers. One computer can be used for research while the other oneis used for building a PowerPoint presentation. Groups continue work on parts 1-3 if necessary, andbegin working on parts 4-7. See Instructor’s Outline for Region Projects in the Resource folder.© 2013 <strong>American</strong> <strong>Museum</strong> <strong>of</strong> <strong>Natural</strong> History. All Rights Reserved. 38
Science Research Mentoring Program<strong>Dynamic</strong> <strong>Earth</strong>Session Ten: Volcanismlearning objectivesStudents will understand various types <strong>of</strong> volcanism and identify volcanic features on <strong>Earth</strong>.key topics• Effusive volcanism• Explosive volcanismClass outlinetime10 minutes40 minutes30 minutes35 minutes5 minutesTOPICReviewVolcanismACTIVITY:Volcanic Rocks inthe Gottesman Hall<strong>of</strong> Planet <strong>Earth</strong>ACTIVITY: VolcanicRock IdentificationWrap UpdescriptionHand back homework 4 (graded) and discuss as necessary.Review from previous classes.Discuss volcanism – occurrences at plate boundaries, andintraplate. Define and discuss volcanic features. Reviewvolcanism on other planetary bodies.A guided exploration <strong>of</strong> volcanism in the Gottesman Hall <strong>of</strong>Planet <strong>Earth</strong>.Students graph data for chemical compositions to determinerock types.Review volcanism key concepts. Hand out homework 5 andarticle.MATERIALSClear rulers, colored pencils or markersPREP WORKCopies <strong>of</strong> Volcanic Rocks in HoPE worksheet, Volcanic Rock ID worksheet, articleHalls usedGottesman Hall <strong>of</strong> Planet <strong>Earth</strong>A/V NeedeDRecommend computer, projector, and screenHOMEWORKRead the article (recent article about <strong>Earth</strong>’s unique tectonics, or about moon quakesrecommended). Complete the Volcanic Rock Identification started during class.© 2013 <strong>American</strong> <strong>Museum</strong> <strong>of</strong> <strong>Natural</strong> History. All Rights Reserved. 39
Science Research Mentoring Program<strong>Dynamic</strong> <strong>Earth</strong>Session Ten: VolcanismACTIVITY: Volcanic rocks in HoPEHand out worksheets and point out the parts <strong>of</strong> the Gottesman Hall <strong>of</strong> Planet <strong>Earth</strong> that presentexplosive volcanism, effusive volcanism, and hydrothermal vents. Explain that questions can beanswered in any order, and suggest that students start in different places. Students work in smallgroups.Regroup and discuss highlights from each <strong>of</strong> the 3 sections. Point out interesting details thatstudents may have missed.If Gottesman Hall <strong>of</strong> Planet <strong>Earth</strong> is not available, view images <strong>of</strong> rocks, and where they were found.You can shorten this to spend more time on the following activity.ACTIVITY: Volcanic Rock IdentificationHand out worksheets, rulers, calculators, and colored pencils or markers. Read though introductionas a class. Work through Part A in pairs, and compare answers as a class. Note that all <strong>of</strong> the rocks arebasalts. (That’s probably why they were all on the same shelf.)Read through the introduction for part B as a class. Explain the concept <strong>of</strong> normalization.Demonstrate how to plot data on the discrimination diagrams. Optional: use the PowerPointpresentation to show normalization and discrimination diagrams (see Volcanic Rock ID Supplementin Resource folder).Note that plotting all five data sets on the same diagram can get messy and difficult to read.Encourage students to use both diagrams; plotting should yield the same result. They shoulduse one colored pencil or marker for each rock. Also note that only two lines are required for anintersection, but plotting the third line will confirm the point <strong>of</strong> intersection.As students are working, make sure they’re plotting the normalized data. All students should plotat least one rock during class to show that they understand the process. If necessary, students cancomplete the activity as homework.© 2013 <strong>American</strong> <strong>Museum</strong> <strong>of</strong> <strong>Natural</strong> History. All Rights Reserved. 40
Science Research Mentoring Program<strong>Dynamic</strong> <strong>Earth</strong>Session Ten: VolcanismWORKSHEET: Volcanic Rocks in the Gottesman Hall<strong>of</strong> Planet <strong>Earth</strong>Today we will explore the types <strong>of</strong> volcanism that occur all over the planet. Answer the followingquestions based on your exploration <strong>of</strong> the Gottesman Hall <strong>of</strong> Planet <strong>Earth</strong>:Explosive Volcanism1. Where are explosive volcanoes usually found (in what kind <strong>of</strong> tectonic environment)?2. What makes one magma more likely to explode than another? What are the key ingredients inexplosive magma?3. What is a volcanic “bomb”? What does it look like.4. Name at least three types <strong>of</strong> volcanic rock that are on display. What are some <strong>of</strong> the differencesbetween them?5. Examine the large cast <strong>of</strong> the section <strong>of</strong> rock from Pompeii (behind the glass). Describe what itlooks like. What does it tell you about the composition <strong>of</strong> volcanic output over time?© 2013 <strong>American</strong> <strong>Museum</strong> <strong>of</strong> <strong>Natural</strong> History. All Rights Reserved. 41
Science Research Mentoring Program<strong>Dynamic</strong> <strong>Earth</strong>Session Ten: VolcanismWORKSHEET: Volcanic Rocks in the Gottesman Hall<strong>of</strong> Planet <strong>Earth</strong> - Page 2Effusive Volcanism6. What type <strong>of</strong> magma results in effusive volcanism? (What keeps it from being explosive)? Whereare effusive volcanoes normally found?7. Look at the cast <strong>of</strong> the black rock behind the glass. What does it show? Can you tell anything aboutthe sequence <strong>of</strong> eruption?8. What are some <strong>of</strong> the different types <strong>of</strong> lava on display? How are they different from each other?9. Why are there no large, individual volcanoes on the ocean floor?10. What is a flood basalt?© 2013 <strong>American</strong> <strong>Museum</strong> <strong>of</strong> <strong>Natural</strong> History. All Rights Reserved. 42
Science Research Mentoring Program<strong>Dynamic</strong> <strong>Earth</strong>Session Ten: VolcanismWORKSHEET: Volcanic Rocks in the Gottesman Hall<strong>of</strong> Planet <strong>Earth</strong> - Page 3Hydrothermal Vents11. Observer the Finn, Roane, and Gwenen vents. Record your observations <strong>of</strong> their exteriors, andthe interior <strong>of</strong> Gwenen.12. Sketch a hydrothermal vent. Explain how hydrothermal vents grow.13. Compare and contrast the hydrothermal vents with explosive or effusive volcanism. (How arethey the same? How are they different?)© 2013 <strong>American</strong> <strong>Museum</strong> <strong>of</strong> <strong>Natural</strong> History. All Rights Reserved. 43
Science Research Mentoring Program<strong>Dynamic</strong> <strong>Earth</strong>Session Ten: VolcanismWORKSHEET: Volcanic Rock IdentificationYou will determine a rock type by comparing the chemical abundances in an unknown rock tovalues <strong>of</strong> known rocks. You’ll look at the percent weights and parts per million (ppm) <strong>of</strong> severalelements.Suppose you have a collection <strong>of</strong> 5 rocks that were labeled and stored together on a shelf, alongwith tables <strong>of</strong> their chemical compositions. The labels have been eaten by mice, but the tables <strong>of</strong>chemical composition, which were recorded on less tasty paper, remain. You’re asked to identify therock type for each specimen, and, if possible, where it came from.Table 1: Composition by Percent-WeightFe 2 O 3SiO 2 TiO 2 Al 2 O 3 (T) MnO MgO CaO Na 2 O K 2 O P 2 O 5 Cr 2 O 3 NiO Totalwtwt-%wt-% wt-% wt-% wt-% wt-% wt-% wt-% % wt-% wt-% wt-% wt-%1 48.96 0.43 15.60 9.69 0.16 10.83 13.24 1.30 0.09 0.02 100.322 46.74 2.77 15.35 12.85 0.17 6.80 12.81 2.77 0.80 0.39 0.00 0.00 101.453 48.16 1.06 16.79 10.97 0.19 8.60 11.66 2.28 0.17 0.114 51.23 1.55 17.45 9.59 0.15 6.17 9.38 3.62 0.65 0.20 99.995 49.81 1.91 14.59 11.53 7.48 11.63 2.62 0.13 0.19 99.89Table 2: Composition by ppmTi Rb Sr Y Zr Nb La Ce Nd Sm Eu Tb Yb LuPpm ppm ppm ppm ppm ppm ppm ppm ppm ppm ppm ppm ppm1 2577.14 4.00 103.00 9.00 27.00 0.21 0.78 2.13 2.39 0.86 0.36 0.21 1.01 0.162 16628.78 14.00 498.00 23.00 173.00 44.00 28.20 57.80 31.10 6.65 2.19 1.03 1.90 0.293 6352.94 4.00 189.00 57.00 70.00 51.00 7.00 13.50 2.60 0.90 1.704 9289.68 15.00 363.00 27.00 139.00 11.00 10.20 25.00 4.02 1.32 0.77 2.41 0.385 11447.28 0.79 124.50 49.34 162.20 4.41 5.42 17.41 15.23 5.33 1.80 1.23 4.76 0.68© 2013 <strong>American</strong> <strong>Museum</strong> <strong>of</strong> <strong>Natural</strong> History. All Rights Reserved. 44
Science Research Mentoring Program<strong>Dynamic</strong> <strong>Earth</strong>Session Ten: VolcanismWORKSHEET: Volcanic Rock Identification - Page 2Identification Part AUse Table 1 and the TAS diagram on page 2 to identify the type <strong>of</strong> rock for each <strong>of</strong> our fivespecimens. First find the percent-weight <strong>of</strong> Na 2O, K 2O and SiO 2on the table. Note that the axes <strong>of</strong> thegraph are SiO 2and Na 2]O + K 2O.1. Find the combined percent weight <strong>of</strong> Na2O and K2O for each rock sample.Na 2O + K 2O for rock 1 = Na 2O + K 2O for rock 4 =Na 2O + K 2O for rock 2 = Na 2O + K 2O for rock 5 =Na 2O + K 2]O for rock 3 =2. Use the Na2O + K2O (calculated above) and SiO2 percent-weights from Table 1 to determine therock types for each specimen.Rock 1: Rock 4:Rock 2: Rock 5:Rock 3:3. Which <strong>of</strong> the rocks are volcanic?© 2013 <strong>American</strong> <strong>Museum</strong> <strong>of</strong> <strong>Natural</strong> History. All Rights Reserved. 45
Science Research Mentoring Program<strong>Dynamic</strong> <strong>Earth</strong>Session Ten: VolcanismWORKSHEET: Volcanic Rock Identification - Page 3Identification Part BNow let’s get even more specific. You can use the Ti-Zr-Y and Zr-Nb-Y discrimination charts onpage 4 to further classify volcanic rocks. Refer to the appropriate data on Table 2. Note that thediscrimination charts may require you to multiply or divide the ppm value by a whole number.For example, on the Ti-Zr-Y chart, you multiply the ppm <strong>of</strong> Yttrium by 3, and divide the ppm <strong>of</strong>Titanium by 100. This has been done for you in Tables 3 and 4.However, when all three elements are added up for a given rock sample, the total may not be 100.Uh-oh! That means that the data needs to be normalized; the total must be 100%, so you need toknow what percent <strong>of</strong> the total is represented by each <strong>of</strong> the three elements. These normalizedvalues appear in the tables below.Table 3: Normalizations for Ti-Zr-YRaw Data (ppm) Totals to be Normalized Normalized ValuesY Ti Zr Y*3 Ti/100 Zr Total 3*Y Ti/100 Zr Total1 9.00 2577.14 27.00 27.00 25.77 27.00 79.77 33.85 32.31 33.85 100.002 23.00 16628.78 173.00 69.00 166.29 173.00 408.29 16.90 40.73 42.37 100.003 57.00 6352.94 70.00 171.00 63.53 70.00 304.53 56.15 20.86 22.99 100.004 27.00 9289.68 139.00 81.00 92.90 139.00 312.90 25.89 29.69 44.42 100.005 49.34 11447.28 162.20 148.02 114.47 162.20 424.69 34.85 26.95 38.19 100.00Table 4: Normalization for Zr-Nb-YRaw Data (ppm) Totals to be Normalized Normalized ValuesY Nb Zr Y 2Nb Zr/4 Totals Y 2Nb Zr/4 Totals1 9.00 0.21 27.00 9.00 0.42 6.75 16.17 55.66 2.60 41.74 100.002 23.00 44.00 173.00 23.00 88.00 43.25 154.25 14.91 57.05 28.04 100.003 57.00 51.00 70.00 57.00 102.00 17.50 176.50 32.29 57.79 9.92 100.004 27.00 11.00 139.00 27.00 22.00 34.75 83.75 32.24 26.27 41.49 100.005 49.34 4.41 162.20 49.34 8.82 40.55 98.71 49.98 8.94 41.08 100.00Use the Ti-Zr-Y and Zr-Nb-Y discrimination charts on page 4, and the corresponding normalizedvalues from Tables 3 and 4 above to determine what (if any) type <strong>of</strong> volcanic rocks the samples are.4. Place the number for each rock at the appropriate place on either discrimination chart. Record theletter from the discrimination chart and the corresponding rock types below.Rock 1: Rock 4:Rock 2: Rock 5:Rock 3:© 2013 <strong>American</strong> <strong>Museum</strong> <strong>of</strong> <strong>Natural</strong> History. All Rights Reserved. 46
Science Research Mentoring Program<strong>Dynamic</strong> <strong>Earth</strong>Session Ten: VolcanismWORKSHEET: Volcanic Rock Identification - Page 4Identification Part CNow that you know what types <strong>of</strong> rocks you have, you should be able to figure out where they werefound. Suppose you’re given the following list <strong>of</strong> locations: Saint Helena Island in the South AtlanticOcean, Mount St Helens in Washington, South Sandwich Island Arc.5. Identify the location from which specimens 1, 2 and 4 were collected, based on what you knowabout the specimens, and the types <strong>of</strong> rocks that would form at the listed locations.Rock 1: Rock 3:Rock 2: Rock 4:© 2013 <strong>American</strong> <strong>Museum</strong> <strong>of</strong> <strong>Natural</strong> History. All Rights Reserved. 47
Science Research Mentoring Program<strong>Dynamic</strong> <strong>Earth</strong>Session Ten: VolcanismWORKSHEET: Volcanic Rock Identification - Page 5© 2013 <strong>American</strong> <strong>Museum</strong> <strong>of</strong> <strong>Natural</strong> History. All Rights Reserved. 48
Science Research Mentoring Program<strong>Dynamic</strong> <strong>Earth</strong>Session Eleven: Seismicitylearning objectivesStudents will learn that seismic activity generates waves that we can study.key topics• Seismic waves• FaultsClass outlinetime15 minutes30 minutes30 minutes35 minutes5 minutesTOPICReviewSeismicityTOUR: Seismicityand Review in theGottesman Hall <strong>of</strong>Planet <strong>Earth</strong>ACTIVITY: RegionProjectsWrap UpdescriptionCollect homework 5. Discuss the article. Briefly review fromprevious classes.Introduce earthquakes. Explain that quakes produce differenttypes <strong>of</strong> waves. Define and discuss P, S, Love, and Rayleighwaves, and magnitude scales. Define faults, and give examples <strong>of</strong>different types. Discuss earthquakes in terms <strong>of</strong> plate tectonics.Tour parts <strong>of</strong> the Gottesman Hall <strong>of</strong> Planet <strong>Earth</strong>, looking atseismic waves sections. Review main concepts from the course.Groups work on Region Projects (part 8).Save group ppt’s to flash drive. Review seismicity key concepts.MATERIALS12 computers, flash drive with Region ProjectsPREP WORKSet out computersHalls usedGottesman Hall <strong>of</strong> Planet <strong>Earth</strong>A/V NeedeDNoneHOMEWORKNone© 2013 <strong>American</strong> <strong>Museum</strong> <strong>of</strong> <strong>Natural</strong> History. All Rights Reserved. 49
Science Research Mentoring Program<strong>Dynamic</strong> <strong>Earth</strong>Session Eleven: SeismicityTOUR: Seismicity and Review in HoPETake students to the Gottesman Hall <strong>of</strong> Planet <strong>Earth</strong>. View sections with content that has beencovered in the course• Rock types and thin section viewing,• Convection <strong>of</strong> the mantle• Volcanic rocks (explosive and effusive)• Rock formation – sedimentary and metamorphic• Recent seismic activity display• Seismograph in the floor – students can step on it to see the effect <strong>of</strong> their motion on theseismograph.• Brass globe - groups should locate their regions on the globe, and feel the surface <strong>of</strong> the globe attheir plate boundaries.If the Gottesman Hall <strong>of</strong> Planet <strong>Earth</strong> is not available, recent seismic activity can be viewed online:www.iris.edu/seismon/ To review content, groups can be assigned key topics. In 5-10 minutes,groups review that material, and develop a way to present key concepts to the rest <strong>of</strong> the class –brief lecture, acting out a process, game, etc. Then each group has 2-3 minutes to present.ACTIVITY: Region ProjectsStudents work in groups, on computers. One computer can be used for research while the otherone is used to build a PowerPoint presentation. Groups continue work on parts 1-7 if necessaryand begin working on part 8 (see Instructor’s Outline for Region Projects in the Resource folder).If groups finish building their presentations, they should assign parts to each group member andpractice presenting.© 2013 <strong>American</strong> <strong>Museum</strong> <strong>of</strong> <strong>Natural</strong> History. All Rights Reserved. 50
Science Research Mentoring Program<strong>Dynamic</strong> <strong>Earth</strong>Session Twelve: Present!learning objectivesStudents will present their projects to the class.key topics• Scientific talksClass outlinetime10 minutes20 minutes60 minutes30 minutesTOPICReviewACTIVITY: RegionProjectsPresentations!PaperworkdescriptionHand back homework 5 (graded) and discuss as necessary.Review topics from the course.Groups finish and practice presentations. Load all files onto onecomputer for presentation.Groups present in standard format: presentation, applause, Q&A,applause.Post-assessments, program evaluations, and attitude surveys.MATERIALS6 computers, flash drive with Region ProjectsPREP WORKSet out computers, copies <strong>of</strong> assessments, evaluations, and surveysHalls usedNoneA/V NeedeDScreen and projectors to show group presentationsHOMEWORKNone© 2013 <strong>American</strong> <strong>Museum</strong> <strong>of</strong> <strong>Natural</strong> History. All Rights Reserved. 51
Science Research Mentoring Program<strong>Dynamic</strong> <strong>Earth</strong>Session Eleven: SeismicityACTIVITY: Region ProjectsStudents work in groups, one computer per group, finishing parts 1-8 if necessary (see Instructor’sOutline for Region Projects in the Resource folder). Instruct groups to assign parts <strong>of</strong> thepresentation to each member, and to practice presenting.© 2013 <strong>American</strong> <strong>Museum</strong> <strong>of</strong> <strong>Natural</strong> History. All Rights Reserved. 52