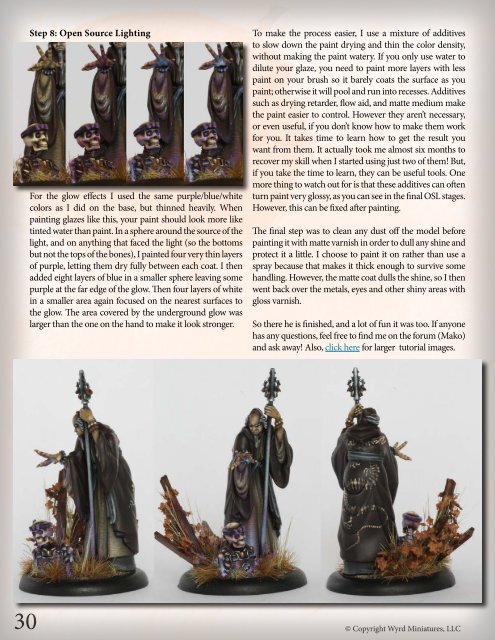
Step 8: Open Source LightingFor the glow effects I used the same purple/blue/whitecolors as I did on the base, but thinned heavily. Whenpainting glazes like this, your paint should look more liketinted water than paint. In a sphere around the source of thelight, and on anything that faced the light (so the bottomsbut not the tops of the bones), I painted four very thin layersof purple, letting them dry fully between each coat. I thenadded eight layers of blue in a smaller sphere leaving somepurple at the far edge of the glow. Then four layers of whitein a smaller area again focused on the nearest surfaces tothe glow. The area covered by the underground glow waslarger than the one on the hand to make it look stronger.To make the process easier, I use a mixture of additivesto slow down the paint drying and thin the color density,without making the paint watery. If you only use water todilute your glaze, you need to paint more layers with lesspaint on your brush so it barely coats the surface as youpaint; otherwise it will pool and run into recesses. Additivessuch as drying retarder, flow aid, and matte medium makethe paint easier to control. However they aren’t necessary,or even useful, if you don’t know how to make them workfor you. It takes time to learn how to get the result youwant from them. It actually took me almost six months torecover my skill when I started using just two of them! But,if you take the time to learn, they can be useful tools. Onemore thing to watch out for is that these additives can oftenturn paint very glossy, as you can see in the final OSL stages.However, this can be fixed after painting.The final step was to clean any dust off the model beforepainting it with matte varnish in order to dull any shine andprotect it a little. I choose to paint it on rather than use aspray because that makes it thick enough to survive somehandling. However, the matte coat dulls the shine, so I thenwent back over the metals, eyes and other shiny areas withgloss varnish.So there he is finished, and a lot of fun it was too. If anyonehas any questions, feel free to find me on the forum (Mako)and ask away! Also, click here for larger tutorial images.30 © Copyright Wyrd Miniatures, LLC
By: Dan WeberThe Never Was FilesBoris the Dancing BearFor every <strong>Malifaux</strong> model that appears in a bookthere are several that never make it past our inhouseplaytesting for one reason or another. Somehave concepts that never solidify the way we wouldlike them to once the design is tested on the table.Others work, but we find we lack room in thepage count and are forced to set them aside for afuture release. Or we find that the model fills a rolealready occupied by another model, and so on.But there are also character designs which younever see. Character concepts we might havestarted down one path with, but transformed into acompletely different idea by the end of design andtesting. One such model is the Slate Ridge Mauler.Ever wonder why the Mauler lacks a bite attack?Well, the Mauler was once called Boris…Boris, theDancing Bear.Boris was originally conceived as an additionalBeast for Marcus in Twisting Fates. His characterconcept began straightforward enough as anotheranimal transformed by its trip through the Breach.Boris was not intended as a main character, butas an ‘extra’ that fit into the background and didits job on the table. The model concept remainedfairly consistent throughout design and testing:large melee-centric bear that both slowed downand ripped through an opponent. The bear’s lackof a bite attack was a facet of the character concept:as a circus bear, Boris wore a muzzle.But somewhere along the way, bland Boris, theDancing Bear changed. A mutated dancing bearwearing a fez, vest, and muzzle seemed a littlebland. I thought about the bear’s situation andhow silly he must feel. Then a cruel inspirationstruck me. What if the Breach ignited a human’sself-awareness in the bear? How would it react toits years of captivity while wearing a ridiculouscostume night after night dancing for strangers asclownish entertainment? The result is the originalBoris bio written for Twisting Fates, which was verydifferent from the final bio we went with. Once itwas decided a clinically-depressed circus bear witha death wish was a little too over the top for even<strong>Malifaux</strong> we transformed Boris into a species ofbear native to <strong>Malifaux</strong>: the Slate Ridge Mauler.And the rest is history.(I just think it’s because Nathan hated the fez…)Boris, the Dancing BearBlithely unaware of his situation, Boris the DancingBear was one of the star performers of YuriAndrekov’s Traveling Circus Earthside. For years,Boris traveled the countryside entertaining smallvillages and towns, used to the feel of the matchingembroidered fez, vest, and muzzle he wore duringperformances. A bit long in the tooth, he had livedas a performing bear for so long that even the scentof freedom no longer tickled his nostrils.When the circus fell on hard times the animalswere sold off one by one to other traveling showsand zoos. It fell upon Andrekov’s kind-heartedniece, Natalya, to rescue Boris from the butcher’sblock. Words like “Breach” and “the Star” meantnothing to him as Natalya helped her beloved bearsettle into the cage mounted inside a boxcar andsent him through the Breach to his new owners.Boris’ trip through the Breach had a horribly adverseeffect on the normally docile bear. It expanded hisawareness to his predicament. Crushing depressionstruck Boris. He now understood what it meantto spend so many years in captivity, serving asentertainment for crowds of laughing humans. Thebear wanted nothing more than to end the mockeryhe now called his life in an explosion of rage, anddrown the laughter in lakes of blood...31 © Copyright Wyrd Miniatures, LLC