IBM XIV Storage System Copy Services and Migration
IBM XIV Storage System: Copy Services and Migration - Common ...
IBM XIV Storage System: Copy Services and Migration - Common ...
- No tags were found...

You also want an ePaper? Increase the reach of your titles
YUMPU automatically turns print PDFs into web optimized ePapers that Google loves.
Front cover<strong>IBM</strong> <strong>XIV</strong> <strong>Storage</strong> <strong>System</strong>:<strong>Copy</strong> <strong>Services</strong> <strong>and</strong> <strong>Migration</strong>Learn copy <strong>and</strong> migration functions<strong>and</strong> explore practical scenariosIntegrate Snapshots with TivoliFlash<strong>Copy</strong> ManagerUnderts<strong>and</strong> SVC-basedmigrationsBertr<strong>and</strong> DufrasneAubrey ApplewhaiteDavid DennyJawed IqbalChristina LaraLisa MartinezRosemary McCutchenHank SautterStephen SolewinAnthony V<strong>and</strong>ewerdtRon VerbeekPete WendlerRol<strong>and</strong> Wolfibm.com/redbooks
International Technical Support Organization<strong>IBM</strong> <strong>XIV</strong> <strong>Storage</strong> <strong>System</strong>: <strong>Copy</strong> <strong>Services</strong> <strong>and</strong> <strong>Migration</strong>April 2010SG24-7759-00
Note: Before using this information <strong>and</strong> the product it supports, read the information in “Notices” onpage ix.First Edition (April 2010)This edition applies to Version 10, Release 2.1, of the <strong>XIV</strong> <strong>Storage</strong> <strong>System</strong> software.© <strong>Copy</strong>right International Business Machines Corporation 2010. All rights reserved.Note to U.S. Government Users Restricted Rights -- Use, duplication or disclosure restricted by GSA ADP ScheduleContract with <strong>IBM</strong> Corp.
5.4.1 Last consistent snapshot . . . . . . . . . . . . . . . . . . . . . . . . . . . . . . . . . . . . . . . . . . 1365.4.2 Last consistent snapshot timestamp. . . . . . . . . . . . . . . . . . . . . . . . . . . . . . . . . . 1375.5 Synchronous mirror step-by-step scenario . . . . . . . . . . . . . . . . . . . . . . . . . . . . . . . . . 1375.5.1 Phase 1: setup <strong>and</strong> configuration . . . . . . . . . . . . . . . . . . . . . . . . . . . . . . . . . . . . 1385.5.2 Phase 2: disaster at local site . . . . . . . . . . . . . . . . . . . . . . . . . . . . . . . . . . . . . . . 1395.5.3 Phase 3: recovery of the primary site . . . . . . . . . . . . . . . . . . . . . . . . . . . . . . . . . 1425.5.4 Phase 4: switching production back to the primary site . . . . . . . . . . . . . . . . . . . 146Chapter 6. Asynchronous Remote Mirroring . . . . . . . . . . . . . . . . . . . . . . . . . . . . . . . . 1496.1 Asynchronous mirroring configuration. . . . . . . . . . . . . . . . . . . . . . . . . . . . . . . . . . . . . 1506.1.1 Volume mirroring setup <strong>and</strong> activation . . . . . . . . . . . . . . . . . . . . . . . . . . . . . . . . 1506.1.2 Consistency group configuration. . . . . . . . . . . . . . . . . . . . . . . . . . . . . . . . . . . . . 1556.1.3 Coupling activation, deactivation, <strong>and</strong> deletion. . . . . . . . . . . . . . . . . . . . . . . . . . 1616.2 Role reversal . . . . . . . . . . . . . . . . . . . . . . . . . . . . . . . . . . . . . . . . . . . . . . . . . . . . . . . . 1666.3 Resynchronization after link failure . . . . . . . . . . . . . . . . . . . . . . . . . . . . . . . . . . . . . . . 1696.4 Disaster recovery . . . . . . . . . . . . . . . . . . . . . . . . . . . . . . . . . . . . . . . . . . . . . . . . . . . . 1696.5 Mirroring process . . . . . . . . . . . . . . . . . . . . . . . . . . . . . . . . . . . . . . . . . . . . . . . . . . . . 1706.5.1 Initialization process . . . . . . . . . . . . . . . . . . . . . . . . . . . . . . . . . . . . . . . . . . . . . . 1706.5.2 Mirroring ongoing operation . . . . . . . . . . . . . . . . . . . . . . . . . . . . . . . . . . . . . . . . 1726.5.3 Mirroring consistency groups . . . . . . . . . . . . . . . . . . . . . . . . . . . . . . . . . . . . . . . 1726.5.4 Mirroring special snapshots . . . . . . . . . . . . . . . . . . . . . . . . . . . . . . . . . . . . . . . . 1726.6 Detailed asynchronous mirroring process. . . . . . . . . . . . . . . . . . . . . . . . . . . . . . . . . . 1736.7 Asynchronous mirror step-by-step illustration . . . . . . . . . . . . . . . . . . . . . . . . . . . . . . . 1766.7.1 Mirror initialization . . . . . . . . . . . . . . . . . . . . . . . . . . . . . . . . . . . . . . . . . . . . . . . . 1766.7.2 Remote backup scenario . . . . . . . . . . . . . . . . . . . . . . . . . . . . . . . . . . . . . . . . . . 1776.7.3 DR testing scenario. . . . . . . . . . . . . . . . . . . . . . . . . . . . . . . . . . . . . . . . . . . . . . . 1796.8 Pool space depletion. . . . . . . . . . . . . . . . . . . . . . . . . . . . . . . . . . . . . . . . . . . . . . . . . . 182Chapter 7. Data migration . . . . . . . . . . . . . . . . . . . . . . . . . . . . . . . . . . . . . . . . . . . . . . . 1857.1 Overview . . . . . . . . . . . . . . . . . . . . . . . . . . . . . . . . . . . . . . . . . . . . . . . . . . . . . . . . . . . 1867.2 H<strong>and</strong>ling I/O requests . . . . . . . . . . . . . . . . . . . . . . . . . . . . . . . . . . . . . . . . . . . . . . . . . 1877.3 Data migration steps . . . . . . . . . . . . . . . . . . . . . . . . . . . . . . . . . . . . . . . . . . . . . . . . . . 1907.3.1 Initial connection setup . . . . . . . . . . . . . . . . . . . . . . . . . . . . . . . . . . . . . . . . . . . . 1907.3.2 Define the host being migrated to the <strong>XIV</strong> . . . . . . . . . . . . . . . . . . . . . . . . . . . . . 1957.3.3 Creating <strong>and</strong> activating a data migration volume . . . . . . . . . . . . . . . . . . . . . . . . 1967.3.4 Create <strong>and</strong> activate a data migration volume on <strong>XIV</strong> . . . . . . . . . . . . . . . . . . . . . 2007.3.5 Complete the data migration on <strong>XIV</strong> . . . . . . . . . . . . . . . . . . . . . . . . . . . . . . . . . . 2017.4 Comm<strong>and</strong>-line interface . . . . . . . . . . . . . . . . . . . . . . . . . . . . . . . . . . . . . . . . . . . . . . . 2027.4.1 Using XCLI scripts or batch files . . . . . . . . . . . . . . . . . . . . . . . . . . . . . . . . . . . . . 2057.4.2 Sample scripts . . . . . . . . . . . . . . . . . . . . . . . . . . . . . . . . . . . . . . . . . . . . . . . . . . 2067.5 Manually creating the migration volume . . . . . . . . . . . . . . . . . . . . . . . . . . . . . . . . . . . 2077.6 Changing <strong>and</strong> monitoring the progress of a migration . . . . . . . . . . . . . . . . . . . . . . . . 2087.6.1 Changing the synchronization rate . . . . . . . . . . . . . . . . . . . . . . . . . . . . . . . . . . . 2097.6.2 Monitoring migration speed. . . . . . . . . . . . . . . . . . . . . . . . . . . . . . . . . . . . . . . . . 2107.6.3 Monitoring migration via the <strong>XIV</strong> event log . . . . . . . . . . . . . . . . . . . . . . . . . . . . . 2117.6.4 Monitoring migration speed via the fabric . . . . . . . . . . . . . . . . . . . . . . . . . . . . . . 2117.6.5 Monitoring migration speed via the non-<strong>XIV</strong> storage . . . . . . . . . . . . . . . . . . . . . 2117.7 Thick-to-thin migration. . . . . . . . . . . . . . . . . . . . . . . . . . . . . . . . . . . . . . . . . . . . . . . . . 2127.8 Resizing the <strong>XIV</strong> volume after migration . . . . . . . . . . . . . . . . . . . . . . . . . . . . . . . . . . . 2137.9 Troubleshooting . . . . . . . . . . . . . . . . . . . . . . . . . . . . . . . . . . . . . . . . . . . . . . . . . . . . . 2167.9.1 Target connectivity fails . . . . . . . . . . . . . . . . . . . . . . . . . . . . . . . . . . . . . . . . . . . 2167.9.2 Remote volume LUN is unavailable . . . . . . . . . . . . . . . . . . . . . . . . . . . . . . . . . . 2177.9.3 Local volume is not formatted . . . . . . . . . . . . . . . . . . . . . . . . . . . . . . . . . . . . . . . 218Contentsv
7.9.4 Host server cannot access the <strong>XIV</strong> migration volume. . . . . . . . . . . . . . . . . . . . . 2187.9.5 Remote volume cannot be read . . . . . . . . . . . . . . . . . . . . . . . . . . . . . . . . . . . . . 2187.9.6 LUN is out of range . . . . . . . . . . . . . . . . . . . . . . . . . . . . . . . . . . . . . . . . . . . . . . . 2197.10 Backing out of a data migration. . . . . . . . . . . . . . . . . . . . . . . . . . . . . . . . . . . . . . . . . 2197.10.1 Back-out prior to migration being defined on the <strong>XIV</strong> . . . . . . . . . . . . . . . . . . . . 2197.10.2 Back-out after a data migration has been defined but not activated. . . . . . . . . 2197.10.3 Back-out after a data migration has been activated but is not complete. . . . . . 2197.10.4 Back-out after a data migration has reached the synchronised state . . . . . . . . 2207.11 <strong>Migration</strong> checklist. . . . . . . . . . . . . . . . . . . . . . . . . . . . . . . . . . . . . . . . . . . . . . . . . . . 2207.12 Device-specific considerations . . . . . . . . . . . . . . . . . . . . . . . . . . . . . . . . . . . . . . . . . 2237.12.1 EMC CLARiiON. . . . . . . . . . . . . . . . . . . . . . . . . . . . . . . . . . . . . . . . . . . . . . . . . 2247.12.2 EMC Symmetrix <strong>and</strong> DMX . . . . . . . . . . . . . . . . . . . . . . . . . . . . . . . . . . . . . . . . 2247.12.3 HDS TagmaStore USP . . . . . . . . . . . . . . . . . . . . . . . . . . . . . . . . . . . . . . . . . . . 2267.12.4 HP EVA. . . . . . . . . . . . . . . . . . . . . . . . . . . . . . . . . . . . . . . . . . . . . . . . . . . . . . . 2267.12.5 <strong>IBM</strong> DS3000/DS4000/DS5000 . . . . . . . . . . . . . . . . . . . . . . . . . . . . . . . . . . . . . 2277.12.6 <strong>IBM</strong> ESS E20/F20/800 . . . . . . . . . . . . . . . . . . . . . . . . . . . . . . . . . . . . . . . . . . . 2297.12.7 <strong>IBM</strong> DS6000 <strong>and</strong> DS8000. . . . . . . . . . . . . . . . . . . . . . . . . . . . . . . . . . . . . . . . . 2307.13 Sample migration . . . . . . . . . . . . . . . . . . . . . . . . . . . . . . . . . . . . . . . . . . . . . . . . . . . 231Chapter 8. SVC migration with <strong>XIV</strong> . . . . . . . . . . . . . . . . . . . . . . . . . . . . . . . . . . . . . . . . 2438.1 Steps to take when using SVC migration with <strong>XIV</strong> . . . . . . . . . . . . . . . . . . . . . . . . . . . 2448.2 <strong>XIV</strong> <strong>and</strong> SVC interoperability. . . . . . . . . . . . . . . . . . . . . . . . . . . . . . . . . . . . . . . . . . . . 2448.2.1 Firmware versions. . . . . . . . . . . . . . . . . . . . . . . . . . . . . . . . . . . . . . . . . . . . . . . . 2448.2.2 <strong>Copy</strong> functions . . . . . . . . . . . . . . . . . . . . . . . . . . . . . . . . . . . . . . . . . . . . . . . . . . 2458.2.3 TPC with <strong>XIV</strong> <strong>and</strong> SVC . . . . . . . . . . . . . . . . . . . . . . . . . . . . . . . . . . . . . . . . . . . . 2458.3 Zoning setup . . . . . . . . . . . . . . . . . . . . . . . . . . . . . . . . . . . . . . . . . . . . . . . . . . . . . . . . 2458.3.1 Capacity on dem<strong>and</strong> . . . . . . . . . . . . . . . . . . . . . . . . . . . . . . . . . . . . . . . . . . . . . . 2468.3.2 Determining <strong>XIV</strong> WWPNs . . . . . . . . . . . . . . . . . . . . . . . . . . . . . . . . . . . . . . . . . . 2478.3.3 Hardware dependencies . . . . . . . . . . . . . . . . . . . . . . . . . . . . . . . . . . . . . . . . . . . 2488.3.4 Sharing an <strong>XIV</strong> with another SVC cluster or non-SVC hosts . . . . . . . . . . . . . . . 2488.3.5 Zoning rules . . . . . . . . . . . . . . . . . . . . . . . . . . . . . . . . . . . . . . . . . . . . . . . . . . . . 2488.4 Volume size considerations for <strong>XIV</strong> with SVC. . . . . . . . . . . . . . . . . . . . . . . . . . . . . . . 2488.4.1 SCSI queue depth considerations . . . . . . . . . . . . . . . . . . . . . . . . . . . . . . . . . . . 2498.4.2 <strong>XIV</strong> volume sizes . . . . . . . . . . . . . . . . . . . . . . . . . . . . . . . . . . . . . . . . . . . . . . . . 2508.4.3 Creating <strong>XIV</strong> volumes that are exactly the same size as SVC VDisks . . . . . . . . 2528.4.4 SVC 2TB volume limit . . . . . . . . . . . . . . . . . . . . . . . . . . . . . . . . . . . . . . . . . . . . . 2528.4.5 MDisk group creation . . . . . . . . . . . . . . . . . . . . . . . . . . . . . . . . . . . . . . . . . . . . . 2528.4.6 SVC MDisk group extent sizes . . . . . . . . . . . . . . . . . . . . . . . . . . . . . . . . . . . . . . 2528.5 Using an <strong>XIV</strong> for SVC quorum disks . . . . . . . . . . . . . . . . . . . . . . . . . . . . . . . . . . . . . . 2538.6 Configuring an <strong>XIV</strong> for attachment to SVC . . . . . . . . . . . . . . . . . . . . . . . . . . . . . . . . . 2558.6.1 <strong>XIV</strong> setup steps. . . . . . . . . . . . . . . . . . . . . . . . . . . . . . . . . . . . . . . . . . . . . . . . . . 2558.6.2 SVC setup steps . . . . . . . . . . . . . . . . . . . . . . . . . . . . . . . . . . . . . . . . . . . . . . . . . 2578.7 Data movement strategy overview . . . . . . . . . . . . . . . . . . . . . . . . . . . . . . . . . . . . . . . 2598.7.1 Using SVC migration to move data. . . . . . . . . . . . . . . . . . . . . . . . . . . . . . . . . . . 2598.7.2 Using VDisk mirroring to move the data . . . . . . . . . . . . . . . . . . . . . . . . . . . . . . . 2608.7.3 Using SVC migration with image mode. . . . . . . . . . . . . . . . . . . . . . . . . . . . . . . . 2608.8 Using SVC migration to move data to <strong>XIV</strong> . . . . . . . . . . . . . . . . . . . . . . . . . . . . . . . . . 2618.8.1 Determine the required extent size <strong>and</strong> VDisk c<strong>and</strong>idates . . . . . . . . . . . . . . . . . 2618.8.2 Create the MDisk group . . . . . . . . . . . . . . . . . . . . . . . . . . . . . . . . . . . . . . . . . . . 2628.8.3 <strong>Migration</strong> . . . . . . . . . . . . . . . . . . . . . . . . . . . . . . . . . . . . . . . . . . . . . . . . . . . . . . . 2628.9 Using VDisk mirroring to move the data . . . . . . . . . . . . . . . . . . . . . . . . . . . . . . . . . . . 2638.9.1 Determine the required extent size <strong>and</strong> VDisk c<strong>and</strong>idates . . . . . . . . . . . . . . . . . 2638.9.2 Create the MDisk group . . . . . . . . . . . . . . . . . . . . . . . . . . . . . . . . . . . . . . . . . . . 264vi<strong>IBM</strong> <strong>XIV</strong> <strong>Storage</strong> <strong>System</strong>: <strong>Copy</strong> <strong>Services</strong> <strong>and</strong> <strong>Migration</strong>
8.9.3 Set up the IO group for mirroring . . . . . . . . . . . . . . . . . . . . . . . . . . . . . . . . . . . . 2648.9.4 Create the mirror. . . . . . . . . . . . . . . . . . . . . . . . . . . . . . . . . . . . . . . . . . . . . . . . . 2658.9.5 Validating a VDisk copy . . . . . . . . . . . . . . . . . . . . . . . . . . . . . . . . . . . . . . . . . . . 2668.9.6 Removing the VDisk copy. . . . . . . . . . . . . . . . . . . . . . . . . . . . . . . . . . . . . . . . . . 2678.10 Using SVC migration with image mode. . . . . . . . . . . . . . . . . . . . . . . . . . . . . . . . . . . 2678.10.1 Create image mode destination volumes on the <strong>XIV</strong> . . . . . . . . . . . . . . . . . . . . 2678.10.2 Migrate the VDisk to image mode. . . . . . . . . . . . . . . . . . . . . . . . . . . . . . . . . . . 2698.10.3 Outage step . . . . . . . . . . . . . . . . . . . . . . . . . . . . . . . . . . . . . . . . . . . . . . . . . . . 2708.10.4 Bring the VDisk online. . . . . . . . . . . . . . . . . . . . . . . . . . . . . . . . . . . . . . . . . . . . 2708.10.5 <strong>Migration</strong> from image mode to managed mode . . . . . . . . . . . . . . . . . . . . . . . . 2718.10.6 Remove image mode MDisks . . . . . . . . . . . . . . . . . . . . . . . . . . . . . . . . . . . . . . 2728.10.7 Use transitional space as managed space . . . . . . . . . . . . . . . . . . . . . . . . . . . . 2728.10.8 Remove non-<strong>XIV</strong> MDisks . . . . . . . . . . . . . . . . . . . . . . . . . . . . . . . . . . . . . . . . . 2728.11 Future configuration tasks. . . . . . . . . . . . . . . . . . . . . . . . . . . . . . . . . . . . . . . . . . . . . 2738.11.1 Adding additional capacity to the <strong>XIV</strong> . . . . . . . . . . . . . . . . . . . . . . . . . . . . . . . . 2738.11.2 Using additional <strong>XIV</strong> host ports. . . . . . . . . . . . . . . . . . . . . . . . . . . . . . . . . . . . . 2738.12 Underst<strong>and</strong>ing the SVC controller path values . . . . . . . . . . . . . . . . . . . . . . . . . . . . . 2748.13 SVC with <strong>XIV</strong> implementation checklist . . . . . . . . . . . . . . . . . . . . . . . . . . . . . . . . . . 275Related publications . . . . . . . . . . . . . . . . . . . . . . . . . . . . . . . . . . . . . . . . . . . . . . . . . . . . 277<strong>IBM</strong> Redbooks publications . . . . . . . . . . . . . . . . . . . . . . . . . . . . . . . . . . . . . . . . . . . . . . . . 277Other publications . . . . . . . . . . . . . . . . . . . . . . . . . . . . . . . . . . . . . . . . . . . . . . . . . . . . . . . 277Online resources . . . . . . . . . . . . . . . . . . . . . . . . . . . . . . . . . . . . . . . . . . . . . . . . . . . . . . . . 278How to get <strong>IBM</strong> Redbooks publications . . . . . . . . . . . . . . . . . . . . . . . . . . . . . . . . . . . . . . . 278Help from <strong>IBM</strong> . . . . . . . . . . . . . . . . . . . . . . . . . . . . . . . . . . . . . . . . . . . . . . . . . . . . . . . . . . 278Index . . . . . . . . . . . . . . . . . . . . . . . . . . . . . . . . . . . . . . . . . . . . . . . . . . . . . . . . . . . . . . . . . 279Contentsvii
viii<strong>IBM</strong> <strong>XIV</strong> <strong>Storage</strong> <strong>System</strong>: <strong>Copy</strong> <strong>Services</strong> <strong>and</strong> <strong>Migration</strong>
NoticesThis information was developed for products <strong>and</strong> services offered in the U.S.A.<strong>IBM</strong> may not offer the products, services, or features discussed in this document in other countries. Consultyour local <strong>IBM</strong> representative for information on the products <strong>and</strong> services currently available in your area. Anyreference to an <strong>IBM</strong> product, program, or service is not intended to state or imply that only that <strong>IBM</strong> product,program, or service may be used. Any functionally equivalent product, program, or service that does notinfringe any <strong>IBM</strong> intellectual property right may be used instead. However, it is the user's responsibility toevaluate <strong>and</strong> verify the operation of any non-<strong>IBM</strong> product, program, or service.<strong>IBM</strong> may have patents or pending patent applications covering subject matter described in this document. Thefurnishing of this document does not give you any license to these patents. You can send license inquiries, inwriting, to:<strong>IBM</strong> Director of Licensing, <strong>IBM</strong> Corporation, North Castle Drive, Armonk, NY 10504-1785 U.S.A.The following paragraph does not apply to the United Kingdom or any other country where suchprovisions are inconsistent with local law: INTERNATIONAL BUSINESS MACHINES CORPORATIONPROVIDES THIS PUBLICATION "AS IS" WITHOUT WARRANTY OF ANY KIND, EITHER EXPRESS ORIMPLIED, INCLUDING, BUT NOT LIMITED TO, THE IMPLIED WARRANTIES OF NON-INFRINGEMENT,MERCHANTABILITY OR FITNESS FOR A PARTICULAR PURPOSE. Some states do not allow disclaimer ofexpress or implied warranties in certain transactions, therefore, this statement may not apply to you.This information could include technical inaccuracies or typographical errors. Changes are periodically madeto the information herein; these changes will be incorporated in new editions of the publication. <strong>IBM</strong> may makeimprovements <strong>and</strong>/or changes in the product(s) <strong>and</strong>/or the program(s) described in this publication at any timewithout notice.Any references in this information to non-<strong>IBM</strong> Web sites are provided for convenience only <strong>and</strong> do not in anymanner serve as an endorsement of those Web sites. The materials at those Web sites are not part of thematerials for this <strong>IBM</strong> product <strong>and</strong> use of those Web sites is at your own risk.<strong>IBM</strong> may use or distribute any of the information you supply in any way it believes appropriate without incurringany obligation to you.Information concerning non-<strong>IBM</strong> products was obtained from the suppliers of those products, their publishedannouncements or other publicly available sources. <strong>IBM</strong> has not tested those products <strong>and</strong> cannot confirm theaccuracy of performance, compatibility or any other claims related to non-<strong>IBM</strong> products. Questions on thecapabilities of non-<strong>IBM</strong> products should be addressed to the suppliers of those products.This information contains examples of data <strong>and</strong> reports used in daily business operations. To illustrate themas completely as possible, the examples include the names of individuals, companies, br<strong>and</strong>s, <strong>and</strong> products.All of these names are fictitious <strong>and</strong> any similarity to the names <strong>and</strong> addresses used by an actual businessenterprise is entirely coincidental.COPYRIGHT LICENSE:This information contains sample application programs in source language, which illustrate programmingtechniques on various operating platforms. You may copy, modify, <strong>and</strong> distribute these sample programs inany form without payment to <strong>IBM</strong>, for the purposes of developing, using, marketing or distributing applicationprograms conforming to the application programming interface for the operating platform for which the sampleprograms are written. These examples have not been thoroughly tested under all conditions. <strong>IBM</strong>, therefore,cannot guarantee or imply reliability, serviceability, or function of these programs.© <strong>Copy</strong>right <strong>IBM</strong> Corp. 2010. All rights reserved. ix
Trademarks<strong>IBM</strong>, the <strong>IBM</strong> logo, <strong>and</strong> ibm.com are trademarks or registered trademarks of International Business MachinesCorporation in the United States, other countries, or both. These <strong>and</strong> other <strong>IBM</strong> trademarked terms aremarked on their first occurrence in this information with the appropriate symbol (® or ), indicating USregistered or common law trademarks owned by <strong>IBM</strong> at the time this information was published. Suchtrademarks may also be registered or common law trademarks in other countries. A current list of <strong>IBM</strong>trademarks is available on the Web at http://www.ibm.com/legal/copytrade.shtmlThe following terms are trademarks of the International Business Machines Corporation in the United States,other countries, or both:AIX®BladeCenter®DB2®Domino®DS4000®DS6000DS8000®Flash<strong>Copy</strong>®<strong>IBM</strong>®Lotus®Redbooks®RedpaperRedbooks (logo) ®S/390®<strong>System</strong> <strong>Storage</strong><strong>System</strong> x®<strong>System</strong> z®Tivoli®WebSphere®<strong>XIV</strong>®The following terms are trademarks of other companies:ITIL is a registered trademark, <strong>and</strong> a registered community trademark of the Office of GovernmentCommerce, <strong>and</strong> is registered in the U.S. Patent <strong>and</strong> Trademark Office.Snapshot, <strong>and</strong> the NetApp logo are trademarks or registered trademarks of NetApp, Inc. in the U.S. <strong>and</strong> othercountries.VMware, the VMware "boxes" logo <strong>and</strong> design are registered trademarks or trademarks of VMware, Inc. in theUnited States <strong>and</strong>/or other jurisdictions.Microsoft, Windows, <strong>and</strong> the Windows logo are trademarks of Microsoft Corporation in the United States,other countries, or both.UNIX is a registered trademark of The Open Group in the United States <strong>and</strong> other countries.Linux is a trademark of Linus Torvalds in the United States, other countries, or both.Other company, product, or service names may be trademarks or service marks of others.x<strong>IBM</strong> <strong>XIV</strong> <strong>Storage</strong> <strong>System</strong>: <strong>Copy</strong> <strong>Services</strong> <strong>and</strong> <strong>Migration</strong>
PrefaceThis <strong>IBM</strong>® Redbooks® publication provides a practical underst<strong>and</strong>ing of the <strong>XIV</strong>® <strong>Storage</strong><strong>System</strong> copy <strong>and</strong> migration functions. The <strong>XIV</strong> <strong>Storage</strong> <strong>System</strong> has a rich set of copyfunctions suited for various data protection scenarios, which enables clients to enhance theirbusiness continuance, data migration, <strong>and</strong> online backup solutions. These functions allowpoint-in-time copies, known as snapshots <strong>and</strong> full volume copies, <strong>and</strong> also include remotecopy capabilities in either synchronous or asynchronous mode. These functions are includedin the <strong>XIV</strong> software <strong>and</strong> all their features are available at no additional charge.The various copy functions are reviewed under separate chapters that include detailedinformation about usage, as well as practical illustrations.This book also discusses how to integrate the snapshot function with the <strong>IBM</strong> Tivoli®Flash<strong>Copy</strong>® manager, explains the <strong>XIV</strong> built-in migration capability, <strong>and</strong> presents migrationalternatives based on the San Volume Controller (SVC).Note: GUI <strong>and</strong> XCLI illustrations included in this book were created with an early version ofthe 10.2.1 code, as available at the time of writing. There could be minor differences withthe <strong>XIV</strong> 10.2.1 code that is publicly released.This book is intended for anyone who needs a detailed <strong>and</strong> practical underst<strong>and</strong>ing of the <strong>XIV</strong>copy functions.The team who wrote this bookThis book was produced by a team of specialists from around the world working at theInternational Technical Support Organization, San Jose Center.Bertr<strong>and</strong> Dufrasne is an <strong>IBM</strong> Certified Consulting IT Specialist <strong>and</strong> Project Leader for<strong>System</strong> <strong>Storage</strong> disk products at the International Technical Support Organization, SanJose Center. He has worked at <strong>IBM</strong> in various IT areas. He has authored many <strong>IBM</strong>Redbooks publications <strong>and</strong> has also developed <strong>and</strong> taught technical workshops. Beforejoining the ITSO, he worked for <strong>IBM</strong> Global <strong>Services</strong> as an Application Architect. He holds aMaster’s degree in Electrical Engineering from the Polytechnic Faculty of Mons.Aubrey Applewhaite is an <strong>IBM</strong> Certified Consulting IT Specialist working for the <strong>Storage</strong><strong>Services</strong> team in the UK. He has worked for <strong>IBM</strong> since 1996 <strong>and</strong> has over 20 years ofexperience in the IT industry. He has worked in a number of areas, including <strong>System</strong> x®servers, operating system administration, <strong>and</strong> technical support. He currently works in acustomer-facing role providing advice <strong>and</strong> practical expertise to help <strong>IBM</strong> customersimplement new storage technology. He specializes in <strong>XIV</strong>, SVC, DS8000®, <strong>and</strong> DS5000hardware. He holds a Bachelor of Science degree in Sociology <strong>and</strong> Politics from AstonUniversity <strong>and</strong> is also a VMware Certified Professional.David Denny is a Solutions Architect with <strong>XIV</strong> in the <strong>IBM</strong> <strong>System</strong>s <strong>and</strong> Technology Group.David has over 20 years of experience in the IT field, ranging from systems administration toenterprise storage architect. David is the lead corporate resource for data migrations with <strong>XIV</strong>.Prior to joining <strong>IBM</strong>, David was a Lead Architect of the Enterprise SAN for the DoD Disaster© <strong>Copy</strong>right <strong>IBM</strong> Corp. 2010. All rights reserved. xi
Recovery Program at the Pentagon following the events of 9/11. He holds a Bachelor of Artsdegree as well a Bachelor of Science degree in Computer Science from Lynchburg College.Jawed Iqbal is an Advisory Software Engineer <strong>and</strong> a Team Lead for Tivoli <strong>Storage</strong> ManagerClient, Data Protection, <strong>and</strong> Flash<strong>Copy</strong> Manager products at the <strong>IBM</strong> Almaden ResearchCenter in San Jose, CA. Jawed joined <strong>IBM</strong> in 2000 <strong>and</strong> worked as Test Lead on several DataProtection products, including Oracle RDBMS Server, WebSphere®, MS SQL, MS Exchange,<strong>and</strong> Lotus® Domino® Server. He holds a master’s degree in Computer Science, a BBA inComputer Information <strong>System</strong>s, <strong>and</strong> a bachelor’s degree in Math, Stats, <strong>and</strong> Economics.Jawed also holds an ITIL® certification.Christina Lara is a Senior Test Engineer currently working on the <strong>XIV</strong> storage test team inTucson, AZ. She just completed a 1-year assignment as a Assistant Technical Staff Member(ATSM) to the <strong>System</strong>s Group Chief Test Engineer. Christina has just begun her ninth yearwith <strong>IBM</strong>, having held different test <strong>and</strong> leadership positions within the <strong>Storage</strong> Division overthat last several years. Her responsibilities included system level testing <strong>and</strong> field support teston both DS8000 <strong>and</strong> ESS800 storage products <strong>and</strong> test project management. Christinagraduated from the University of Arizona in 1991 with a BSBA in MIS <strong>and</strong> OperationsManagement. In 2002, she received her MBA in Technology Management from the Universityof Phoenix.Lisa Martinez is a Senior Software Engineer working in the DS8000 <strong>and</strong> <strong>XIV</strong> <strong>System</strong> TestArchitecture in Tucson, Arizona. She has extensive experience in Enterprise Disk Test. Sheholds a Bachelor of Science degree in Electrical Engineering from the University of NewMexico <strong>and</strong> a Computer Science degree from New Mexico Highl<strong>and</strong>s University. Her areas ofexpertise include the <strong>XIV</strong> <strong>Storage</strong> <strong>System</strong> <strong>and</strong> <strong>IBM</strong> <strong>System</strong> <strong>Storage</strong> DS8000, including <strong>Copy</strong><strong>Services</strong>, with Open <strong>System</strong>s <strong>and</strong> <strong>System</strong> z®.Rosemary McCutchen has over 20 years of IT experience <strong>and</strong> is currently a CertifiedConsulting IT Specialist working in <strong>Storage</strong> ATS in <strong>IBM</strong> Gaithersburg. There she isresponsible for <strong>XIV</strong> customer demonstrations, proof of concepts, <strong>and</strong> workshops, as well as<strong>XIV</strong> beta testing. Rosemary has extensive h<strong>and</strong>s-on experience with <strong>XIV</strong> <strong>and</strong> has authoredmultiple <strong>XIV</strong> white papers <strong>and</strong> <strong>XIV</strong> training documents.Hank Sautter is a Consulting IT Specialist with Advanced Technical Support in the U.S. Hehas 17 years of experience with S/390® <strong>and</strong> <strong>IBM</strong> disk storage hardware <strong>and</strong> Advanced <strong>Copy</strong><strong>Services</strong> functions working in Tucson, Arizona. His previous 13 years of experience include<strong>IBM</strong> Processor microcode development <strong>and</strong> S/390 system testing while working inPoughkeepsie, NY. He has worked at <strong>IBM</strong> for 30 years. Hank's areas of expertise includeenterprise storage performance <strong>and</strong> disaster recovery implementation for large systems <strong>and</strong>open systems. He writes <strong>and</strong> presents on these topics. He holds a BS degree in Physics.Stephen Solewin is an <strong>XIV</strong> Corporate Solutions Architect based in Tucson, Arizona. He has13 years of experience working on <strong>IBM</strong> storage, including Enterprise <strong>and</strong> Midrange Disk, LTOdrives <strong>and</strong> libraries, SAN, <strong>Storage</strong> Virtualization, <strong>and</strong> software. Steve has been working onthe <strong>XIV</strong> product line since March of 2008, working with both clients <strong>and</strong> various <strong>IBM</strong> teamsworldwide. Steve holds a Bachelor of Science degree in Electrical Engineering from theUniversity of Arizona, where he graduated with honors.Anthony V<strong>and</strong>ewerdt is a Senior IT Specialist who currently works for <strong>IBM</strong> STG <strong>Storage</strong><strong>System</strong>s Sales in Australia. He has 21 years of experience providing pre-sales <strong>and</strong> post-salestechnical support at <strong>IBM</strong>. Anthony has extensive h<strong>and</strong>s-on experience with nearly all <strong>IBM</strong>storage products, especially DS8000, SVC, <strong>XIV</strong>, ESS800, <strong>and</strong> Brocade <strong>and</strong> Cisco SANswitches. He has worked in a wide variety of post-sales technical support roles includingcountry <strong>and</strong> Asia Pacific storage support. Anthony has also worked as an instructor for STGEducation.xii<strong>IBM</strong> <strong>XIV</strong> <strong>Storage</strong> <strong>System</strong>: <strong>Copy</strong> <strong>Services</strong> <strong>and</strong> <strong>Migration</strong>
Ron Verbeek is a Senior Consulting IT Specialist with <strong>Storage</strong> <strong>and</strong> Data <strong>System</strong> <strong>Services</strong>,<strong>IBM</strong> Global Technology <strong>Services</strong> Canada. He has over 22 years of experience in thecomputing industry, with the last 10 years spent working on storage <strong>and</strong> data solutions. Heholds multiple product <strong>and</strong> industry certifications, including SNIA <strong>Storage</strong> Architect. Ronspends most of his client time in technical pre-sales solutioning, defining, <strong>and</strong> architectingstorage optimization solutions. He has extensive experience in data transformation services<strong>and</strong> information life-cycle consulting. He holds a Bachelor of Science degree in Mathematicsfrom McMaster University in Canada.Pete Wendler is a Software Engineer for <strong>IBM</strong> <strong>System</strong>s <strong>and</strong> Technology Group, <strong>Storage</strong>Platform, located in Tucson, Arizona. In his 10 years working for <strong>IBM</strong>, Peter has worked inclient support for enterprise storage products, solutions testing, <strong>and</strong> development of the <strong>IBM</strong>DR550 archive appliance. He currently holds a position in technical marketing at <strong>IBM</strong>. Peterreceived a Bachelor of Science degree from Arizona State University in 1999.Rol<strong>and</strong> Wolf is a Certified IT Specialist in Germany. He has worked for <strong>IBM</strong> for 23 years <strong>and</strong>has 15 years of experience with high-end disk storage hardware in S/390 <strong>and</strong> Open <strong>System</strong>senvironments. He is working in Field Technical Sales Support for storage systems. His areasof expertise include performance analysis <strong>and</strong> disaster recovery solutions in enterprisesutilizing the unique capabilities <strong>and</strong> features of the <strong>IBM</strong> disk storage servers, DS8000 <strong>and</strong><strong>XIV</strong>. He has contributed to various <strong>IBM</strong> Redbooks publications including ESS, DS80000Architecture, <strong>and</strong> DS8000 <strong>Copy</strong> <strong>Services</strong>. He holds a Ph.D. in Theoretical Physics.Special thanks to Rami Elron for his help with <strong>and</strong> advice on many of the topics covered inthis book.Thanks to the following people for their contributions to this project:John Bynum, Aviad Offer, Jim Segdwick, Brian Sherman, Juan YanesNow you can become a published author, too!Here's an opportunity to spotlight your skills, grow your career, <strong>and</strong> become a publishedauthor - all at the same time! Join an ITSO residency project <strong>and</strong> help write a book in yourarea of expertise, while honing your experience using leading-edge technologies. Your effortswill help to increase product acceptance <strong>and</strong> customer satisfaction, as you exp<strong>and</strong> yournetwork of technical contacts <strong>and</strong> relationships. Residencies run from two to six weeks inlength, <strong>and</strong> you can participate either in person or as a remote resident working from yourhome base.Find out more about the residency program, browse the residency index, <strong>and</strong> apply online at:ibm.com/redbooks/residencies.htmlPrefacexiii
Comments welcomeYour comments are important to us!We want our books to be as helpful as possible. Send us your comments about this book orother <strong>IBM</strong> Redbooks publications in one of the following ways:► Use the online Contact us review Redbooks form found at:ibm.com/redbooks► Send your comments in an e-mail to:redbooks@us.ibm.com► Mail your comments to:<strong>IBM</strong> Corporation, International Technical Support OrganizationDept. HYTD Mail Station P0992455 South RoadPoughkeepsie, NY 12601-5400Stay connected to <strong>IBM</strong> Redbooks►►►►►Find us on Facebook:http://www.facebook.com/pages/<strong>IBM</strong>-Redbooks/178023492563?ref=tsFollow us on twitter:http://twitter.com/ibmredbooksLook for us on LinkedIn:http://www.linkedin.com/groups?home=&gid=2130806Explore new Redbooks publications, residencies, <strong>and</strong> workshops with the <strong>IBM</strong> Redbooksweekly newsletter:https://www.redbooks.ibm.com/Redbooks.nsf/subscribe?OpenFormStay current on recent Redbooks publications with RSS Feeds:http://www.redbooks.ibm.com/rss.htmlxiv<strong>IBM</strong> <strong>XIV</strong> <strong>Storage</strong> <strong>System</strong>: <strong>Copy</strong> <strong>Services</strong> <strong>and</strong> <strong>Migration</strong>
1Chapter 1.SnapshotsThe <strong>XIV</strong> <strong>Storage</strong> <strong>System</strong> has a rich set of copy functions suited for various data protectionscenarios, which enables clients to enhance their business continuance, data migration, <strong>and</strong>online backup solutions. This chapter provides an overview of the snapshot function for the<strong>XIV</strong> product.A snapshot is a point-in-time copy of a volume’s data. The <strong>XIV</strong> snapshot is based on severalinnovative technologies to ensure minimal degradation of or impact on system performance.A volume copy is an exact copy of a system volume <strong>and</strong> differs in approach to a snapshot inthat a full data copy is performed in the background. Snapshots make use of pointers <strong>and</strong> donot necessarily copy all the data to the second instance of a volume.With these definitions in mind, we explore the architecture <strong>and</strong> functions of snapshots withinthe <strong>XIV</strong> <strong>Storage</strong> <strong>System</strong>.© <strong>Copy</strong>right <strong>IBM</strong> Corp. 2010. All rights reserved. 1
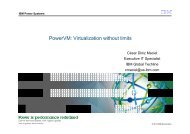
1.1 Snapshots architectureBefore we begin discussing snapshots we provide a short review of <strong>XIV</strong>’s architecture. Formore information refer to <strong>IBM</strong> <strong>XIV</strong> <strong>Storage</strong> <strong>System</strong>: Architecture, Implementation, <strong>and</strong> Usage,SG24-7659.The <strong>XIV</strong> system consists of several servers with 12 disk drives each <strong>and</strong> memory that acts ascache. All the servers are connected to each other <strong>and</strong> certain servers act as interfaceservers to the SAN <strong>and</strong> the host servers (Figure 1-1).ServerNetwork (FC/Ethernet)Module 4 Module 5 Module 6 Module 7 Module 8 Module 9EthernetSwitch 1 Switch 2Module 1 Module 15Module 2Module 3Module 10Module 11Module 12Module 13Module 14Figure 1-1 <strong>XIV</strong> architecture: modules <strong>and</strong> disk drives2 <strong>IBM</strong> <strong>XIV</strong> <strong>Storage</strong> <strong>System</strong>: <strong>Copy</strong> <strong>Services</strong> <strong>and</strong> <strong>Migration</strong>
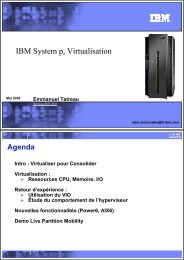
When a logical volume or LUN is created on an <strong>XIV</strong> system, the volume’s data is divided intopieces 1 MB in size, called partitions. Each partition is duplicated for data protection <strong>and</strong>stored on disks of different modules. All partitions of a volume are pseudo-r<strong>and</strong>omlydistributed across the modules <strong>and</strong> disk drives, as shown in Figure 1-2.<strong>XIV</strong> Architecture• Split volume data in 1MBpartitions• Maintain a copy of eachpartition• Store both copies indifferent modules• Spread data of a volumeacross all disk drivespseudo r<strong>and</strong>omlyVolumeData M odule 1Data Module 2Data M odule 3Figure 1-2 <strong>XIV</strong> architecture: distribution of dataChapter 1. Snapshots 3
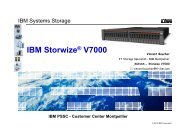
A logical volume is represented by pointers to partitions that make up the volume. If asnapshot is taken of a volume, the pointers are just copied to form the snapshot volume, asshown in Figure 1-3. No space is consumed for the snapshot volume up to now.Vol• Logical volume <strong>and</strong> itspartitions: Partitionsare spread across alldisk drives <strong>and</strong>actually each partitionexists two times (notshown here)• A snapshot of avolume is taken.Pointers point to thesame partitions as theoriginal volumeVolsnap• There is an update ofa data partition of theoriginal volume. Theupdated partition iswritten to a newlocation.VolsnapFigure 1-3 <strong>XIV</strong> architecture: snapshotsWhen an update is performed on the original data, the update is stored in a new position <strong>and</strong>a pointer of the original volume now points to the new partition, whereas the snapshot volumestill points to the old partition. Now we use up more space for the original volume <strong>and</strong> itssnapshot <strong>and</strong> it has the size of a partition (1 MB). This method is called redirect-on-write.4 <strong>IBM</strong> <strong>XIV</strong> <strong>Storage</strong> <strong>System</strong>: <strong>Copy</strong> <strong>Services</strong> <strong>and</strong> <strong>Migration</strong>
It is important to note that data on a volume comprises two fundamental building blocks.Metadata is information about how the data is stored on the physical volume <strong>and</strong> the dataitself in the blocks. Metadata management is the key to rapid snapshot performance. Asnapshot points to the partitions of its master volume for all unchanged partitions. When thedata is modified, a new partition is allocated for the modified data. In other words, the <strong>XIV</strong><strong>Storage</strong> <strong>System</strong> manages a set of pointers based on the volume <strong>and</strong> the snapshot. Thosepointers are modified when changes are made to the user data. Managing pointers to dataenables <strong>XIV</strong> to instantly create snapshots, as opposed to physically copying the data into anew partition. Refer to Figure 1-4.Snapshot Pointerto PartitionData layout before modificationEmptyEmptyVolume AHost modifies data in Volume AVolume Pointerto PartitionSnapshot Pointerto PartitionEmptyVolume ASnapshot of AVolume Pointerto PartitionFigure 1-4 Example of a redirect-on-write operationThe actual metadata overhead for a snapshot is small. When the snapshot is created, thesystem does not require new pointers because the volume <strong>and</strong> snapshot are exactly thesame, which means that the time to create the snapshot is independent of the size or numberof snapshots present in the system. As data is modified, new metadata is created to track thechanges to the data.Note: The <strong>XIV</strong> system minimizes the impact to the host for write operations by performinga redirect-on-write operation. As the host writes data to a volume with a snapshotrelationship, the incoming information is placed into a newly allocated partition. Then thepointer to the data for the master volume is modified to point at the new partition. Thesnapshot volume continues to point at the original data partition.Because the <strong>XIV</strong> <strong>Storage</strong> <strong>System</strong> tracks the snapshot changes on a partition basis, data isonly copied when a transfer is less than the size of a partition. For example, a host writes4 KB of data to a volume with a snapshot relationship. The 4 KB is written to a new partition,but in order for the partition to be complete, the remaining data must be copied from theoriginal partition to the newly allocated partition.The alternative to redirect-on-write is the copy on write function. Most other systems do notmove the location of the volume data. Instead, when the disk subsystem receives a change, itcopies the volume’s data to a new location for the point-in-time copy. When the copy iscomplete, the disk system commits the newly modified data. Therefore, each individualmodification takes longer to complete, as the entire block must be copied before the changecan be made.As the storage assigned to the snapshot is completely utilized, the <strong>XIV</strong> <strong>Storage</strong> <strong>System</strong>implements a deletion mechanism to protect itself from overutilizing the set pool space.Deletion of snapshots is further explained in 1.2.8, “Deleting a snapshot” on page 19.Chapter 1. Snapshots 5
If you know in advance that an automatic deletion is possible, a pool can be exp<strong>and</strong>ed toaccommodate additional snapshots. This function requires that there is available space onthe system for the storage pool. See Figure 1-5.Snapshot space on a single diskSnapshot free partitionSnapshot 2Snapshot 1Utilization before anew allocationSnapshot 3Snapshot 3Snapshot 2Snapshot 1Snapshot 3Snapshot 2Snapshot free partitionSnapshot 3 allocatesa partition <strong>and</strong>Snapshot 1 isdeleted, becausethere must alwaysbe at least one freepartition for anysubsequent snapshot.Figure 1-5 Diagram of automatic snapshot deletionEach snapshot has a deletion priority property that is set by the user. There are four priorities,with 1 being the highest priority <strong>and</strong> 4 being the lowest priority. The system uses this priorityto determine which snapshot to delete first. The lowest priority becomes the first c<strong>and</strong>idate fordeletion. If there are multiple snapshots with the same deletion priority, the <strong>XIV</strong> systemdeletes the snapshot that was created first. Refer to 1.2.3, “Deletion priority” on page 12 foran example of working with deletion priorities.A snapshot also has a unique ability to be unlocked. By default, a snapshot is locked oncreation <strong>and</strong> is only readable. Unlocking a snapshot allows the user to modify the data in thesnapshot for post-processing.When unlocked, the snapshot takes on the properties of a volume <strong>and</strong> can be resized ormodified. As soon as the snapshot has been unlocked, the modified property is set. Themodified property cannot be reset after a snapshot is unlocked, even if the snapshot isrelocked without modification.In certain cases, it might be important to duplicate a snapshot. When duplicating a snapshot,the duplicate snapshot points to the original data <strong>and</strong> has the same creation date as theoriginal snapshot, if the first snapshot has not been unlocked. This feature can be beneficialwhen the user wants to have one copy for a backup <strong>and</strong> another copy for testing purposes.If the first snapshot is unlocked <strong>and</strong> the duplicate snapshot already exists, the creation timefor the duplicate snapshot does not change. The duplicate snapshot points to the originalsnapshot. If a duplicate snapshot is created from the unlocked snapshot, the creation date isthe time of duplication <strong>and</strong> the duplicate snapshot points at the original snapshot.6 <strong>IBM</strong> <strong>XIV</strong> <strong>Storage</strong> <strong>System</strong>: <strong>Copy</strong> <strong>Services</strong> <strong>and</strong> <strong>Migration</strong>
For the further discussion we must introduce two other terms, pools <strong>and</strong> consistency groups(Figure 1-6).Terminology• <strong>Storage</strong> Pool– Administrative constructfor controlling usage ofdata capacity• Volume– Data capacity spreadsacross all disks in <strong>IBM</strong><strong>XIV</strong> system• Snapshot– Point in time image– Same storage pool assource• Consistency group– Multiple volumes thatrequire consistentsnapshot creation– All in same storage pool• Snapshot group– Group of consistentsnapshots<strong>Storage</strong> PoolConsistency GroupVolumeVolumeSnapshot SnapshotSnapshot GroupFigure 1-6 <strong>XIV</strong> terminologyA storage pool is just a logical entity that represents storage capacity. Volumes are created ina storage pool <strong>and</strong> snapshots of a volume are within the same storage pool. Becausesnapshots require capacity as the source <strong>and</strong> the snapshot volume differ over time, space forsnapshots must be set aside when defining a storage pool (Figure 1-7). A storage pool canbe resized as needed as long as there is enough free capacity in the <strong>XIV</strong> <strong>Storage</strong> <strong>System</strong>.Figure 1-7 Creating a storage pool with capacity for snapshotsChapter 1. Snapshots 7
An application can utilize many volumes on the <strong>XIV</strong> <strong>Storage</strong> <strong>System</strong>. For example, adatabase application can span several volumes for journaling <strong>and</strong> user data. In this case, thesnapshot for the volumes must occur at the same moment in time so that the journal <strong>and</strong> dataare synchronized. The consistency group allows the user to perform the snapshot on all thevolumes assigned to the group at the same moment in time, therefore enforcing dataconsistency.The <strong>XIV</strong> <strong>Storage</strong> <strong>System</strong> creates a special snapshot related to the Remote Mirroringfunctionality. During the recovery process of lost links, the system creates a snapshot of allthe volumes in the system. This snapshot is used if the synchronization process fails. Thedata can be restored to a point of known consistency. A special value of the deletion priority isused to prevent the snapshot from being automatically deleted. Refer to 1.4, “Snapshot withRemote Mirror” on page 33, for an example of this snapshot.1.2 SnapshotsThe creation <strong>and</strong> management of snapshots with the <strong>XIV</strong> <strong>Storage</strong> <strong>System</strong> are simple <strong>and</strong>easy to perform. This section guides you through the life cycle of a snapshot, providingexamples of how to interact with the snapshots using the GUI. This section also discussesduplicate snapshots <strong>and</strong> the automatic deletion of snapshots.1.2.1 Creating a snapshotSnapshot creation is a simple <strong>and</strong> easy task to accomplish. Using the Volumes <strong>and</strong>snapshots view, right-click the volume <strong>and</strong> select Create Snapshot. Figure 1-8 depicts howto make a snapshot of the ITSO_Volume volume.Figure 1-8 Creating a snapshot8 <strong>IBM</strong> <strong>XIV</strong> <strong>Storage</strong> <strong>System</strong>: <strong>Copy</strong> <strong>Services</strong> <strong>and</strong> <strong>Migration</strong>
The new snapshot is displayed in Figure 1-9. The <strong>XIV</strong> <strong>Storage</strong> <strong>System</strong> uses a specific namingconvention. The first part is the name of the volume followed by the word snapshot <strong>and</strong> then anumber or count of snapshots for the volume. The snapshot is the same size as the mastervolume. However, it does not display how much space has been used by the snapshot.Figure 1-9 View of the new snapshotFrom this view shown in Figure 1-9, there are three other details:► First is the locked property of the snapshot. By default, a snapshot is locked, which meansthe it is write inhibited at the time of creation.► Secondly, the modified property is displayed to the right of the locked property. In thisexample, the snapshot has not been modified.► Third, the creation date is displayed. For this example, the snapshot was created on12 June 2009 at 21:39.You might want to create a duplicate snapshot, for example, if you want to keep this snapshotas it is <strong>and</strong> you want another one that you want to modify,The duplicate has the same creation date as the first snapshot, <strong>and</strong> it also has a similarcreation process. From the Volumes <strong>and</strong> snapshots view, right-click the snapshot to duplicate.Select Duplicate from the menu to create a new duplicate snapshot. Figure 1-10 provides anexample of duplicating the snapshot, ITSO_Volume.snapshot_00001.Figure 1-10 Creating a duplicate snapshotAfter selecting Duplicate from the menu, the duplicate snapshot is displayed directly underthe original snapshot.Chapter 1. Snapshots 9
Note: The creation date of the duplicate snapshot in Figure 1-11 is the same creation dateas the original snapshot. Even though it is not shown, the duplicate snapshot points to themaster volume, not the original snapshot.Figure 1-11 View of the new duplicate snapshotExample 1-1 provides an example of creating a snapshot <strong>and</strong> a duplicate snapshot with theExtended Comm<strong>and</strong> Line Interface (XCLI).In the following examples we use the <strong>XIV</strong> Session XCLI. You could also use the XCLIcomm<strong>and</strong>. In this case, however, specify the configuration file or the IP address of the <strong>XIV</strong>that you are talking to as well as the user ID <strong>and</strong> password. Use the XCLI comm<strong>and</strong> toautomate tasks with batch jobs. For simplicity, we used the <strong>XIV</strong> Session XCLI in ourexamples.Example 1-1 Creating a snapshot <strong>and</strong> a duplicate with the XCLI Sessionsnapshot_create vol=ITSO_Volumesnapshot_duplicate snapshot=ITSO_Volume.snapshot_00001After the snapshot is created, it must be mapped to a host in order to access the data. Thisaction is performed in the same way as mapping a normal volume.Important: A snapshot is an exact replica of the original volume. Certain hosts do notproperly h<strong>and</strong>le having two volumes with the same exact metadata describing them. Inthese cases, you must map the snapshot to a different host to prevent failures.Creation of a snapshot is only done in the volume’s storage pool. A snapshot cannot becreated in a storage pool other than the one that owns the volume. If a volume is moved toanother storage pool, the snapshots are moved with the volume to the new storage pool(provided that there is enough space).10 <strong>IBM</strong> <strong>XIV</strong> <strong>Storage</strong> <strong>System</strong>: <strong>Copy</strong> <strong>Services</strong> <strong>and</strong> <strong>Migration</strong>
1.2.2 Viewing snapshot detailsAfter creating the snapshots, you might want to view the details of the snapshot for creationdate, deletion priority, <strong>and</strong> whether the volume has been modified. Using the GUI, selectSnapshot Tree from the Volumes menu, as shown in Figure 1-12.Figure 1-12 Selecting the Snapshot Tree viewThe GUI displays all the volumes in a list.Scroll down to the snapshot of interest <strong>and</strong> select the snapshot by clicking its name. Details ofthe snapshot are displayed in the upper right panel. Looking at the volume ITSO_Volume, itcontains a snapshot 00001 <strong>and</strong> a duplicate snapshot 00002. The snapshot <strong>and</strong> the duplicatesnapshot have the same creation date of 2009-06-12 21:39:08, as shown in Figure 1-13. Inaddition, the snapshot is locked, has not been modified, <strong>and</strong> has a deletion priority of 1 (whichis the highest priority, so it will be deleted last).Figure 1-13 Viewing the snapshot detailsChapter 1. Snapshots 11
Along with these properties, the tree view shows a hierarchal structure of the snapshots. Thisstructure provides details about restoration <strong>and</strong> overwriting snapshots. Any snapshot can beoverwritten by any parent snapshot, <strong>and</strong> any child snapshot can restore a parent snapshot ora volume in the tree structure.In Figure 1-13 on page 11, the duplicate snapshot is a child of the original snapshot, or inother words, the original snapshot is the parent of the duplicate snapshot. This structure hasnothing to do with how the <strong>XIV</strong> <strong>Storage</strong> <strong>System</strong> manages the pointers with the snapshots, butis intended to provide an organizational flow for snapshots.Example 1-2 is an example of viewing the snapshot data in the XCLI Session. Due to spacelimitations, only a small portion of the data is displayed from the output.Example 1-2 Viewing the snapshots on the XCLI sessionsnapshot_list vol=ITSO_VolumeName Size (GB) Master NameITSO_Volume.snapshot_00001 17 ITSO_VolumeITS0_Volume.snapshot_00002 17 ITSO_Volume1.2.3 Deletion priorityDeletion priority enables the user to rank the importance of the snapshots within a pool. Forthe current example, the duplicate snapshot ITSO_Volume.snapshot_00002 is not asimportant as the original snapshot ITSO_Volume.snapshot_00001. Therefore, the deletionpriority is reduced.If the snapshot space is full, the duplicate snapshot is deleted first even though the originalsnapshot is older.To modify the deletion priority, right-click the snapshot in the Volumes <strong>and</strong> snapshots view<strong>and</strong> select Change Deletion Priority, as shown in Figure 1-14.Figure 1-14 Changing the deletion priority12 <strong>IBM</strong> <strong>XIV</strong> <strong>Storage</strong> <strong>System</strong>: <strong>Copy</strong> <strong>Services</strong> <strong>and</strong> <strong>Migration</strong>
After clicking Change Deletion Priority, select the desired deletion priority from the dialogwindow <strong>and</strong> accept the change by clicking OK. Figure 1-15 shows the four options that areavailable for setting the deletion priority. The lowest priority setting is 4, which causes thesnapshot to be deleted first. The highest priority setting is 1, <strong>and</strong> these snapshots are deletedlast. All snapshots have a default deletion priority of 1, if not specified on creation.Figure 1-15 Lowering the priority for a snapshotFigure 1-16 confirms that the duplicate snapshot has had its deletion priority lowered to 4. Asshown in the upper right panel, the delete priority is reporting a 4 for snapshotITSO_Volume.snapshot_00002.Figure 1-16 Confirming the modification to the deletion priorityTo change the deletion priority for the XCLI Session, specify the snapshot <strong>and</strong> new deletionpriority, as illustrated in Example 1-3.Example 1-3 Changing the deletion priority for a snapshotsnapshot_change_priority snapshot=ITSO_Volume.snapshot_00002 delete_priority=4Chapter 1. Snapshots 13
The GUI also lets you specify the deletion priority when you create the snapshot. Instead ofselecting Create Snapshot, you select Create Snapshot (Advanced), as shown inFigure 1-17).Figure 1-17 Create Snapshot AdvancedA panel is presented that allows you to specify the deletion priority, but it also allows you touse your own volume name for the snapshot.Figure 1-18 Advanced snapshot options1.2.4 Restore a snapshotThe <strong>XIV</strong> <strong>Storage</strong> <strong>System</strong> provides the ability to restore the data from a snapshot back to themaster volume, which can be helpful for operations where data was modified incorrectly <strong>and</strong>you want to restore the data. From the Volumes <strong>and</strong> snapshots view, right-click the volume<strong>and</strong> click Restore. This action opens a dialog box where you can select which snapshot is tobe used to restore the volume. Click OK to perform the restoration.14 <strong>IBM</strong> <strong>XIV</strong> <strong>Storage</strong> <strong>System</strong>: <strong>Copy</strong> <strong>Services</strong> <strong>and</strong> <strong>Migration</strong>
Figure 1-19 illustrates selecting the Restore action on the ITSO_Volume volume.Figure 1-19 Snapshot volume restoreAfter you perform the restore action, you return to the Volumes <strong>and</strong> snapshots panel. Theprocess is instantaneous, <strong>and</strong> none of the properties (creation date, deletion priority, modifiedproperties, or locked properties) of the snapshot or the volume have changed.Specifically, the process modifies the pointers to the master volume so that they areequivalent to the snapshot pointer. This change only occurs for partitions that have beenmodified. On modification, the <strong>XIV</strong> <strong>Storage</strong> <strong>System</strong> stores the data in a new partition <strong>and</strong>modifies the master volume’s pointer to the new partition. The snapshot pointer does notchange <strong>and</strong> remains pointing at the original data. The restoration process restores the pointerback to the original data <strong>and</strong> frees the modified partition space.If a snapshot is taken <strong>and</strong> later on the original volume increases in size, you can still do arestore operation. The snapshot still has the original volume size <strong>and</strong> when you restore it tothe original volume this volume also will have the original size again.The XCLI Session (or XCLI comm<strong>and</strong>) provides more options for restoration than the GUI.With the XCLI, you can restore a snapshot to a parent snapshot (Example 1-4).Example 1-4 Restoring a snapshot to another snapshotsnapshot_restore snapshot=ITSO_Volume.snapshot_00002target_snapshot=ITSO_Volume.snapshot_000011.2.5 Overwriting snapshotsFor your regular backup jobs you can decide whether you always want to create newsnapshots (<strong>and</strong> let the system delete the old ones) or whether you prefer to overwrite theexisting snapshots with the latest changes to the data. For instance, a backup applicationrequires the latest copy of the data to perform its backup operation. This overwrite operationmodifies the pointers to the snapshot data to be reset to the master volume. Therefore, allChapter 1. Snapshots 15
pointers to the original data are lost, <strong>and</strong> the snapshot appears as new. <strong>Storage</strong> that wasallocated for the data changes between the volume <strong>and</strong> its snapshot is released.From either the Volumes <strong>and</strong> Snapshots view or the Snapshots Tree view, right-click thesnapshot to overwrite. Select Overwrite from the menu <strong>and</strong> a dialog box opens. Click OK tovalidate the overwriting of the snapshot. Figure 1-20 illustrates overwriting the snapshotnamed ITSO_Volume.snapshot_00001.Figure 1-20 Overwriting a snapshotIt is important to note that the overwrite process modifies the snapshot properties <strong>and</strong>pointers when involving duplicates. Figure 1-21 shows two changes to the properties. Thesnapshot named ITSO_Volume.snapshot_00001 has a new creation date. The duplicatesnapshot still has the original creation date. However, it no longer points to the originalsnapshot. Instead, it points to the master volume according to the snapshot tree, whichprevents a restoration of the duplicate to the original snapshot. If the overwrite occurs on theduplicate snapshot, the duplicate creation date is changed, <strong>and</strong> the duplicate is now pointingto the master volume.Figure 1-21 Snapshot tree after the overwrite process has occurredThe XCLI performs the overwrite operation through the snapshot_create comm<strong>and</strong>. There isan optional parameter in the comm<strong>and</strong> to specify which snapshot to overwrite. If the optionalparameter is not used, a new snapshot volume is created.Example 1-5 Overwriting a snapshotsnapshot_create vol=ITSO_Volume overwrite=ITSO_Volume.snapshot_000011.2.6 Unlocking a snapshotAt certain times, it might be beneficial to modify the data in a snapshot. This feature is usefulfor performing tests on a set of data or performing other types of data-mining activities.16 <strong>IBM</strong> <strong>XIV</strong> <strong>Storage</strong> <strong>System</strong>: <strong>Copy</strong> <strong>Services</strong> <strong>and</strong> <strong>Migration</strong>
There are two scenarios that you must investigate when unlocking snapshots. The firstscenario is to unlock a duplicate. By unlocking the duplicate, none of the snapshot propertiesare modified, <strong>and</strong> the structure remains the same. This method is straightforward <strong>and</strong>provides a backup of the master volume along with a working copy for modification. To unlockthe snapshot, simply right-click the snapshot <strong>and</strong> select Unlock, as shown in Figure 1-22.Figure 1-22 Unlocking a snapshotThe results in the Snapshots Tree window show that the locked property is off <strong>and</strong> themodified property is on for ITSO_Volume.snapshot_00002. Even if the volume is relocked oroverwritten with the original master volume, the modified property remains on. Also note thatin Figure 1-23 the structure is unchanged. If an error occurs in the modified duplicatesnapshot, the duplicate snapshot can be deleted, <strong>and</strong> the original snapshot duplicated asecond time to restore the information.Figure 1-23 Unlocked duplicate snapshotChapter 1. Snapshots 17
For the second scenario, the original snapshot is unlocked <strong>and</strong> not the duplicate. Figure 1-24shows the new property settings for ITSO_Volume.snapshot.00001. At this point, the duplicatesnapshot mirrors the unlocked snapshot, because both snapshots still point to the originaldata. While the unlocked snapshot is modified, the duplicate snapshot references the originaldata. If the unlocked snapshot is deleted, the duplicate snapshot remains, <strong>and</strong> its parentbecomes the master volume.Figure 1-24 Unlocked original snapshotBecause the hierarchal snapshot structure was unmodified, the duplicate snapshot can beoverwritten by the original snapshot. The duplicate snapshot can be restored to the mastervolume. Based on the results, this process is no different from the first scenario. There is stilla backup <strong>and</strong> a working copy of the data.Unlocking a snapshot is the same as unlocking a volume (Example 1-6).Example 1-6 Unlocking a snapshot with the XCLI Session comm<strong>and</strong>svol_unlock vol=ITSO_Volume.snapshot_000011.2.7 Locking a snapshotIf the changes made to a snapshot must be preserved, you can lock an unlocked snapshot.Figure 1-25 shows locking the snapshot named ITSO_Redbooks.snapshot.00001. From theVolumes <strong>and</strong> snapshots panel, right-click the snapshot to lock <strong>and</strong> select Lock. The snapshotis locked immediately.Figure 1-25 Locking a snapshot18 <strong>IBM</strong> <strong>XIV</strong> <strong>Storage</strong> <strong>System</strong>: <strong>Copy</strong> <strong>Services</strong> <strong>and</strong> <strong>Migration</strong>
The locking process completes immediately, preventing further modification to the snapshot.In Figure 1-26, the ITSO_Volume.00001 snapshot shows that both the lock property is on <strong>and</strong>the modified property is on.Even though there has not been a change to the snapshot, the system does not remove themodified property.Figure 1-26 Validating that the snapshot is lockedThe XCLI lock comm<strong>and</strong> (vol_lock), which is shown in Example 1-7, is almost a mirroroperation of the unlock comm<strong>and</strong>. Only the actual comm<strong>and</strong> changes, but the sameoperating parameters are used when issuing the comm<strong>and</strong>.Example 1-7 Locking a snapshotvol_lock vol=ITSO_Redbooks.snapshot_000011.2.8 Deleting a snapshotWhen a snapshot is no longer needed, delete it. Figure 1-27 illustrates how to delete asnapshot. In this case, the modified snapshot redbook_markus_01.snapshot.00001 is nolonger needed. To delete the snapshot, right-click it <strong>and</strong> select Delete from the menu. Adialog box appears requesting that you validate the operation.Figure 1-27 Deleting a snapshotChapter 1. Snapshots 19
Figure 1-28 no longer displays the snapshot ITSO_volume.snapshot.00001. Note that thevolume <strong>and</strong> the duplicate snapshot are unaffected by the removal of this snapshot. In fact, theduplicate becomes the child of the master volume. The <strong>XIV</strong> <strong>Storage</strong> <strong>System</strong> provides theability to restore the duplicate snapshot to the master volume or to overwrite the duplicatesnapshot from the master volume even after deleting the original snapshot.Figure 1-28 Validating the snapshot is removedThe delete snapshot comm<strong>and</strong> (snapshot_delete) operates the same as the creationsnapshot. Refer to Example 1-8.Example 1-8 Deleting a snapshotsnapshot_delete snapshot=ITSO_Volume.snapshot_00001Important: If you delete a volume all snapshots associated with the volume are alsodeleted.20 <strong>IBM</strong> <strong>XIV</strong> <strong>Storage</strong> <strong>System</strong>: <strong>Copy</strong> <strong>Services</strong> <strong>and</strong> <strong>Migration</strong>
1.2.9 Automatic deletion of a snapshotThe <strong>XIV</strong> <strong>Storage</strong> <strong>System</strong> has a feature in place to protect a storage pool from becoming full. Ifthe space allocated for snapshots becomes full, the <strong>XIV</strong> <strong>Storage</strong> <strong>System</strong> automaticallydeletes a snapshot. Figure 1-29 shows a storage pool with a single 17 GB volume labeled<strong>XIV</strong>_ORIG_VOL. The host connected to this volume is sequentially writing to a file that is storedon this volume. While the data is written, a snapshot called <strong>XIV</strong>_ORIG_VOL.snapshot.00006 iscreated, <strong>and</strong> one minute later, a second snapshot is taken (not a duplicate), which is called<strong>XIV</strong>_ORIG_VOL.snapshot.00007.Figure 1-29 Snapshot before the automatic deletionWith this scenario, a duplicate does not cause the automatic deletion to occur. Because aduplicate is a mirror copy of the original snapshot, the duplicate does not create the additionalallocations in the storage pool.Approximately one minute later, the oldest snapshot (<strong>XIV</strong>_ORIG_VOL.snapshot_00006) isremoved from the display. The storage pool is 51 GB in size, with a snapshot size of 34 GB,which is enough for one snapshot. If the master volume is unmodified, many snapshots canexist within the pool, <strong>and</strong> the automatic deletion does not occur. If there were two snapshots<strong>and</strong> two volumes, it might take longer to cause the deletion, because the volumes utilizedifferent portions of the disks, <strong>and</strong> the snapshots might not have immediately overlapped.Chapter 1. Snapshots 21
To examine the details of the scenario at the point where the second snapshot is taken, apartition is in the process of being modified. The first snapshot caused a redirect on write, <strong>and</strong>a partition was allocated from the snapshot area in the storage pool. Because the secondsnapshot occurs at a different time, this action generates a second partition allocation in thestorage pool space. This second allocation does not have available space, <strong>and</strong> the oldestsnapshot is deleted. Figure 1-30 shows that the master volume <strong>XIV</strong>_ORIG_VOL <strong>and</strong> the newestsnapshot <strong>XIV</strong>_ORIG_VOL.snapshot.00007 are present. The oldest snapshot<strong>XIV</strong>_ORIG_VOL.snapshot.00006 was removed.Figure 1-30 Snapshot after automatic deletion22 <strong>IBM</strong> <strong>XIV</strong> <strong>Storage</strong> <strong>System</strong>: <strong>Copy</strong> <strong>Services</strong> <strong>and</strong> <strong>Migration</strong>
To determine the cause of removal, you must go to the Events panel under the <strong>System</strong> menu.As shown on Figure 1-31, the event “SNAPSHOT_DELETED_DUE_TO_POOL_EXHAUSTION” is logged.The snapshot name <strong>XIV</strong>_ORIG_VOL.snapshot.00006 <strong>and</strong> time 2008-07-31 15:17:31 are alsologged for future reference.Figure 1-31 Record of automatic deletion1.3 Snapshots consistency groupThe purpose of a consistency group is to pool multiple volumes together so that a snapshotcan be taken of all the volumes at the same moment in time. This action creates asynchronized snapshot of all the volumes <strong>and</strong> is ideal for applications that span multiplevolumes, for example, a database application that has the logs on one volume <strong>and</strong> thedatabase on another volume. When creating a backup of the database, it is important tosynchronize the data so that it is consistent. If the data is inconsistent, a database restore isnot possible, because the log <strong>and</strong> the data are different <strong>and</strong> therefore part of the data can belost.1.3.1 Creating a consistency groupThere are two methods of creating a consistency group. The first method is to create theconsistency group <strong>and</strong> add the volumes in one step. The second method creates theconsistency group <strong>and</strong> then adds the volumes in a subsequent step. If you also useconsistency groups to manage Remote Mirroring, you must first create an empty consistencygroup, mirror it, <strong>and</strong> later add mirrored volumes to the consistency group.Chapter 1. Snapshots 23
Restriction: Volumes in a consistency group must be in the same storage pool. Aconsistency group cannot have volumes from different pools.Starting at the Volumes menu, select the volume that is to be added to the consistency group.To select multiple volumes, hold down the Ctrl key <strong>and</strong> click each volume. After the volumesare selected, right-click a selected volume to bring up the Operations menu. From there, clickCreate consistency group with these Volumes. Refer to Figure 1-32 for an example of thisoperation.Figure 1-32 Creating a consistency group with these VolumesAfter selecting the Create option from the menu, a dialog window appears. Enter the name ofthe consistency group. Because the volumes are added during creation, it is not possible tochange the pool name. Figure 1-33 shows the process of creating a consistency group. Afterthe name is entered, click Create.Figure 1-33 Naming the consistency groupViewing the volumes displays the owning consistency group. As in Figure 1-34, the twovolumes contained in the xiv_volume_copy pool are now owned by the xiv_db_cg consistencygroup. The volumes are displayed in alphabetical order <strong>and</strong> do not reflect a preference orinternal ordering.Figure 1-34 Viewing the volumes after creating a consistency group24 <strong>IBM</strong> <strong>XIV</strong> <strong>Storage</strong> <strong>System</strong>: <strong>Copy</strong> <strong>Services</strong> <strong>and</strong> <strong>Migration</strong>
In order to obtain details about the consistency group, the GUI provides a panel to view theinformation. Under the Volumes menu, select Consistency Groups. Figure 1-35 illustrateshow to access this panel.Figure 1-35 Accessing the consistency group viewThis selection sorts the information by consistency group. The panel allows you to exp<strong>and</strong> theconsistency group <strong>and</strong> see all the volumes owned by that consistency group. In Figure 1-36,there are two volumes owned or contained by the xiv_db_cg consistency group. In thisexample, a snapshot of the volumes has not been created.Figure 1-36 Consistency Group viewFrom the consistency group view, you can create a consistency group without addingvolumes. On the menu bar at the top of the window, there is an icon to add a new consistencygroup. By clicking the Add consistency group icon shown in Figure 1-37, a creation dialog boxappears, as shown in Figure 1-33 on page 24. Then provide a name <strong>and</strong> the storage pool forthe consistency group.Figure 1-37 Adding a new consistency groupChapter 1. Snapshots 25
When created, the consistency group appears in the Consistency Groups view of the GUI(Figure 1-38). The new group does not have any volumes associated with it. A newconsistency group named xiv_db_cg is created. The consistency group cannot be exp<strong>and</strong>edyet, because there are no volumes contained in the consistency group xiv_db_cg.Figure 1-38 Validating new consistency groupUsing the Volumes view in the GUI, select the volumes to add to the consistency group. Youcan select multiple volumes by holding Ctrl down <strong>and</strong> clicking the desired volumes. Afterselecting the desired volumes, right-click the volumes <strong>and</strong> select Add to ConsistencyGroup. Figure 1-39 shows two volumes being added to a consistency group:► xiv_vmware_1► xiv_vmware_2Figure 1-39 Adding volumes to a consistency group26 <strong>IBM</strong> <strong>XIV</strong> <strong>Storage</strong> <strong>System</strong>: <strong>Copy</strong> <strong>Services</strong> <strong>and</strong> <strong>Migration</strong>
After selecting the volumes to add, a dialog box opens asking for the consistency group towhich to add the volumes. Figure 1-40 adds the volumes to the xiv_db_cg group. Clicking OKcompletes the operation.Figure 1-40 Selecting a consistency group for adding volumesUsing the XCLI Session (or XCLI comm<strong>and</strong>), the process must be done in two steps. First,create the consistency group, then the volumes are added. Example 1-9 provides an exampleof setting up a consistency group <strong>and</strong> adding volumes using the XCLI.Example 1-9 Creating consistency groups <strong>and</strong> adding volumes with the XCLIcg_create cg=xiv_new_cg pool=ITSO_Volume_CGcg_add_vol cg=xiv_new_cg vol=ITSO_Volume_01cg_add_vol cg=xiv_new_cg vol=ITSO_Volume_021.3.2 Creating a snapshot using consistency groupsWhen the consistency group is created <strong>and</strong> the volumes added, the snapshot can be created.From the consistency group view on the GUI, select the consistency group to copy. As inFigure 1-41, right-click the group <strong>and</strong> select Create Snapshots Group from the menu. Thesystem immediately creates the snapshot.Figure 1-41 Creating a snapshot using consistency groupsChapter 1. Snapshots 27
The new snapshots are created <strong>and</strong> displayed beneath the volumes in the consistency groupview (Figure 1-42). These snapshots have the same creation date <strong>and</strong> time. Each snapshot islocked on creation <strong>and</strong> has the same defaults as a regular snapshot. The snapshots arecontained in a group structure (called a snapshot group) that allows all the snapshots to bemanaged by a single operation.Figure 1-42 Validating the new snapshots in the consistency groupAdding volumes to a consistency group does not prevent you from creating a single volumesnapshot. If a single volume snapshot is created, it is not displayed in the consistency groupview. The single volume snapshot is also not consistent across multiple volumes. However,the single volume snapshot does work according to all the rules defined previously in 1.2,“Snapshots” on page 8.With the XCLI, when the consistency group is set up, it is simple to create the snapshot. Onecomm<strong>and</strong> creates all the snapshots within the group at the same moment in time.Example 1-10 Creating a snapshot groupcg_Snapshots_create cg=xiv_new_cg1.3.3 Managing a consistency groupAfter the snapshots are created within a consistency group, you have several optionsavailable. The same management options for a snapshot are available to a consistencygroup. Specifically, the deletion priority is modifiable, <strong>and</strong> the snapshot or group can beunlocked <strong>and</strong> locked, <strong>and</strong> the group can be restored or overwritten. Refer to 1.2, “Snapshots”on page 8, for specific details about performing these operations.28 <strong>IBM</strong> <strong>XIV</strong> <strong>Storage</strong> <strong>System</strong>: <strong>Copy</strong> <strong>Services</strong> <strong>and</strong> <strong>Migration</strong>
In addition to the snapshot functions, you can remove a volume from the consistency group.By right-clicking the volume, a menu opens. Click Remove from Consistency Group <strong>and</strong>validate the removal on the dialog window that opens. Figure 1-43 provides an example ofremoving the xiv_windows_1 volume from the consistency group.Figure 1-43 Removing a volume from a consistency groupRemoving a volume from a consistency group after a snapshot is performed preventsrestoration of any snapshots in the group. If the volume is added back into the group, thegroup can be restored.Chapter 1. Snapshots 29
To obtain details about a consistency group, you can select Snapshots Group Tree from theVolumes menu. Figure 1-44 shows where to find the group view.Figure 1-44 Selecting the Snapshot Group Tree30 <strong>IBM</strong> <strong>XIV</strong> <strong>Storage</strong> <strong>System</strong>: <strong>Copy</strong> <strong>Services</strong> <strong>and</strong> <strong>Migration</strong>
From the Snapshots Group Tree view, you can see many details. Select the group to view onthe left panel by clicking the group snapshot. The right panes provide more in-depthinformation about the creation time, the associated pool, <strong>and</strong> the size of the snapshots. Inaddition, the consistency group view points out the individual snapshots present in the group.Refer to Figure 1-45 for an example of the data that is contained in a consistency group.Figure 1-45 Snapshots Group Tree viewTo display all the consistency groups in the system, issue the XCLI cg_list comm<strong>and</strong>.Example 1-11 Listing the consistency groupscg_listNamePool NameGroup1GCHI_THIN_01EXCH_CLU_CONSGROUP GCHI_THIN_01snapshot_test snapshot_testTiexiv_poolmirror_cgredbooks_mirrorxiv_db_cgxiv_volume_copyMySQL Group redbooks_markusxiv_new_cgredbooks_markusMore details are available by viewing all the consistency groups within the system that havesnapshots. The groups can be unlocked or locked, restored, or overwritten. All the operationsdiscussed in the snapshot section are available with the snap_group operations.Chapter 1. Snapshots 31
Example 1-12 illustrates the snap_group_list comm<strong>and</strong>.Example 1-12 Listing all the consistency groups with snapshotssnap_group_listName CG Snapshot Time Deletion Priorityxiv_db_cg.snap_group_00001 xiv_db_cg 2008-08-07 18:59:06 1MySQL Group.snap_group_00001 MySQL Group 2008-08-08 18:16:53 1xiv_new_cg.snap_group_00001 xiv_new_cg 2008-08-08 20:39:57 11.3.4 Deleting a consistency groupBefore a consistency group can be deleted, the associated volumes must be removed fromthe consistency group. On deletion of a consistency group, the snapshots becomeindependent snapshots <strong>and</strong> remain tied to their volume. To delete the consistency group,right-click the group <strong>and</strong> select Delete. Validate the operation by clicking OK. Figure 1-46provides an example of deleting the consistency group called xiv_db_cg.Figure 1-46 Deleting a consistency groupIn order to delete a consistency group with the XCLI, you must first remove all the volumesone at a time. As in Example 1-13, each volume in the consistency group is removed first.Then the consistency group is available for deletion. Deletion of the consistency group doesnot delete the individual snapshots. They are tied to the volumes <strong>and</strong> were removed from theconsistency group when you removed the volumes.Example 1-13 Deleting a consistency groupcg_remove_vol vol=ITSO_Redbooks_03cg_remove_vol vol=ITSO_Redbooks_04cg_delete cg=xiv_new_cg32 <strong>IBM</strong> <strong>XIV</strong> <strong>Storage</strong> <strong>System</strong>: <strong>Copy</strong> <strong>Services</strong> <strong>and</strong> <strong>Migration</strong>
1.4 Snapshot with Remote Mirror<strong>XIV</strong> has a special snapshot (shown in Figure 1-47) that is automatically created by thesystem. During the recovery phase of a Remote Mirror, the system creates a snapshot on thetarget to ensure a consistent copy.Important: This snapshot has a special deletion priority <strong>and</strong> is not deleted automatically ifthe snapshot space becomes fully utilized.When the synchronization is complete, the snapshot is removed by the system because it isno longer needed. The following list describes the sequence of events to trigger the creationof the special snapshot. Note that if a write does not occur while the links are broken, thesystem does not create the special snapshot. The events are:1. Remote Mirror is synchronized.2. Loss of connectivity to remote system occurs.3. Writes continue to the primary <strong>XIV</strong> <strong>Storage</strong> <strong>System</strong>.4. Mirror paths are reestablished (here the snapshot is created) <strong>and</strong> synchronization starts.Figure 1-47 Special snapshot during Remote Mirror synchronization operationFor more details about Remote Mirror refer to Chapter 5, “Synchronous Remote Mirroring” onpage 125.Important: The special snapshot is created regardless of the amount of pool space on thetarget pool. If the snapshot causes the pool to be overutilized, the mirror remains inactive.The pool must be exp<strong>and</strong>ed to accommodate the snapshot, then the mirror can bereestablished.Chapter 1. Snapshots 33
1.5 MySQL database backup exampleMySQL is an open source database application that is used by many Web programs. Formore information go to:http://www.mysql.comThe database has several important files:► The database data► The log data► The backup dataThe MySQL database stores the data in a set directory <strong>and</strong> cannot be separated. The backupdata, when captured, can be moved to a separate system. The following scenario shows anincremental backup of a database <strong>and</strong> then uses snapshots to restore the database to verifythat the database is valid.The first step is to back up the database. For simplicity, a script is created to perform thebackup <strong>and</strong> take the snapshot. Two volumes are assigned to a Linux® host (Figure 1-48). Thefirst volume contains the database <strong>and</strong> the second volume holds the incremental backups incase of a failure.Figure 1-48 <strong>XIV</strong> view of the volumesOn the Linux host, the two volumes are mapped onto separate file systems. The first filesystem xiv_pfe_1 maps to volume redbook_markus_09, <strong>and</strong> the second file system xiv_pfe_2maps to volume redbook_markus_10. These volumes belong to the consistency group MySQLGroup so that when the snapshot is taken, snapshots of both volumes are taken at the samemoment.To perform the backup you must configure the following items:► The <strong>XIV</strong> XCLI must be installed on the server. This way, the backup script can invoke thesnapshot instead of relying on human intervention.► Secondly, the database must have the incremental backups enabled. To enable theincremental backup feature, MySQL must be started with the --log-bin feature(Example 1-14). This feature enables the binary logging <strong>and</strong> allows database restorations.Example 1-14 Starting MySQL./bin/mysqld_safe --no-defaults --log-bin=backupThe database is installed on /xiv_pfe_1. However, a pointer in /usr/local is made, whichallows all the default settings to coexist, <strong>and</strong> yet the database is stored on the <strong>XIV</strong> volume. Tocreate the pointer, use the comm<strong>and</strong> in Example 1-15. Note that the source directory must bechanged for your particular installation. You can also install the MySQL application on a localdisk <strong>and</strong> change the default data directory to be on the <strong>XIV</strong> volume.Example 1-15 MySQL setupcd /usr/localln -s /xiv_pfe_1/mysql-5.0.51a-linux-i686-glibc23 mysql34 <strong>IBM</strong> <strong>XIV</strong> <strong>Storage</strong> <strong>System</strong>: <strong>Copy</strong> <strong>Services</strong> <strong>and</strong> <strong>Migration</strong>
The backup script is simple, <strong>and</strong> depending on the implementation of your database, thefollowing script might be too simple. However, the following script (Example 1-16) does forcean incremental backup <strong>and</strong> copies the data to the second <strong>XIV</strong> volume. Then the script locksthe tables so that no more data can be modified. When the tables are locked, the scriptinitiates a snapshot, which saves everything for later use. Finally, the tables are unlocked.Example 1-16 Script to perform backup# Report the time of backing update# First flush the tables this can be done while running <strong>and</strong># creates an incremental backup of the DB at a set point in time./usr/local/mysql/bin/mysql -h localhost -u root -p password < ~/SQL_BACKUP# Since the mysql daemon was run specifying the binary log name# of backup the files can be copied to the backup directory on another diskcp /usr/local/mysql/data/backup* /xiv_pfe_2# Secondly lock the tables so a Snapshot can be performed./usr/local/mysql/bin/mysql -h localhost -u root -p password < ~/SQL_LOCK# XCLI comm<strong>and</strong> to perform the backup# ****** NOTE User ID <strong>and</strong> Password are set in the user profile *****/root/<strong>XIV</strong>GUI/xcli -c xiv_pfe cg_Snapshots_create cg="MySQL Group"# Unlock the tables so that the database can continue in operation./usr/local/mysql/bin/mysql -h localhost -u root -p password < ~/SQL_UNLOCKWhen issuing comm<strong>and</strong>s to the MySQL database, the password for the root user is stored inan environment variable (not in the script, as was done in Example 1-16 for simplicity).Storing the password in an environment variable allows the script to perform the actionwithout requiring user intervention. For the script to invoke the MySQL database, the SQLstatements are stored in separate files <strong>and</strong> piped into the MySQL application. Example 1-17provides the three SQL statements that are issued to perform the backup operation.Example 1-17 SQL comm<strong>and</strong>s to perform backup operationSQL_BACKUPFLUSH TABLESSQL_LOCKFLUSH TABLES WITH READ LOCKSQL_UNLOCKUNLOCK TABLESChapter 1. Snapshots 35
Before running the backup script, a test database, which is called redbook, is created. Thedatabase has one table, which is called chapter, which contains the chapter name, author,<strong>and</strong> pages. The table has two rows of data that define information about the chapters in theredbook. Figure 1-49 shows the information in the table before the backup is performed.Figure 1-49 Data in database before backupNow that the database is ready, the backup script is run. Example 1-18 is the output from thescript. Then the snapshots are displayed to show that the system now contains a backup ofthe data.Example 1-18 Output from the backup process[root@x345-tic-30 ~]# ./mysql_backupMon Aug 11 09:12:21 CEST 2008Comm<strong>and</strong> executed successfully.[root@x345-tic-30 ~]# /root/<strong>XIV</strong>GUI/xcli -c xiv_pfe snap_group_list cg="MySQLGroup"Name CG Snapshot Time Deletion PriorityMySQL Group.snap_group_00006 MySQL Group 2008-08-11 15:14:24 1[root@x345-tic-30 ~]# /root/<strong>XIV</strong>GUI/xcli -c xiv_pfe time_listTime Date Time Zone Daylight Saving Time15:17:04 2008-08-11 Europe/Berlin yes[root@x345-tic-30 ~]#36 <strong>IBM</strong> <strong>XIV</strong> <strong>Storage</strong> <strong>System</strong>: <strong>Copy</strong> <strong>Services</strong> <strong>and</strong> <strong>Migration</strong>
To show that the restore operation is working, the database is dropped (Figure 1-50) <strong>and</strong> allthe data is lost. After the drop operation is complete, the database is permanently removedfrom MySQL. It is possible to perform a restore action from the incremental backup. For thisexample, the snapshot function is used to restore the entire database.Figure 1-50 Dropping the databaseThe restore script, shown in Example 1-19, stops the MySQL daemon <strong>and</strong> unmounts theLinux file systems. Then the script restores the snapshot <strong>and</strong> finally remounts <strong>and</strong> startsMySQL.Example 1-19 Restore script[root@x345-tic-30 ~]# cat mysql_restore# This resotration just overwrites all in the database <strong>and</strong> puts the# data back to when the snapshot was taken. It is also possible to do# a restore based on the incremental data; this script does not h<strong>and</strong>le# that condition.# Report the time of backing update# First shutdown mysqlmysqladmin -u root -p password shutdown# Unmount the filesystemsumount /xiv_pfe_1umount /xiv_pfe_2#List all the snap groups/root/<strong>XIV</strong>GUI/xcli -c xiv_pfe snap_group_list cg="MySQL Group"#Prompt for the group to restoreecho "Enter Snapshot group to restore: "read -e snap_groupChapter 1. Snapshots 37
# XCLI comm<strong>and</strong> to perform the backup# ****** NOTE User ID <strong>and</strong> Password are set in the user profile *****/root/<strong>XIV</strong>GUI/xcli -c xiv_pfe snap_group_restore snap_group="$snap_group"# Mount the FSmount /dev/dm-2 /xiv_pfe_1mount /dev/dm-3 /xiv_pfe_2# Start the MySQL servercd /usr/local/mysql./configureExample 1-20 shows the output from the restore action.Example 1-20 Output from the restore script[root@x345-tic-30 ~]# ./mysql_restoreMon Aug 11 09:27:31 CEST 2008STOPPING server from pid file/usr/local/mysql/data/x345-tic-30.mainz.de.ibm.com.pid080811 09:27:33 mysqld endedName CG Snapshot Time Deletion PriorityMySQL Group.snap_group_00006 MySQL Group 2008-08-11 15:14:24 1Enter Snapshot group to restore:MySQL Group.snap_group_00006Comm<strong>and</strong> executed successfully.NOTE: This is a MySQL binary distribution. It's ready to run, you don'tneed to configure it!To help you a bit, I am now going to create the needed MySQL databases<strong>and</strong> start the MySQL server for you. If you run into any trouble, pleaseconsult the MySQL manual, that you can find in the Docs directory.Installing MySQL system tables...OKFilling help tables...OKTo start mysqld at boot time you have to copysupport-files/mysql.server to the right place for your systemPLEASE REMEMBER TO SET A PASSWORD FOR THE MySQL root USER !To do so, start the server, then issue the following comm<strong>and</strong>s:./bin/mysqladmin -u root password 'new-password'./bin/mysqladmin -u root -h x345-tic-30.mainz.de.ibm.com password 'new-password'Alternatively you can run:./bin/mysql_secure_installationwhich also gives the option of removing the testdatabases <strong>and</strong> anonymous user created by default. This isstrongly recommended for production servers.See the manual for more instructions.38 <strong>IBM</strong> <strong>XIV</strong> <strong>Storage</strong> <strong>System</strong>: <strong>Copy</strong> <strong>Services</strong> <strong>and</strong> <strong>Migration</strong>
You can start the MySQL daemon with:cd . ; ./bin/mysqld_safe &You can test the MySQL daemon with mysql-test-run.plcd mysql-test ; perl mysql-test-run.plPlease report any problems with the ./bin/mysqlbug script!The latest information about MySQL is available on the Web athttp://www.mysql.comSupport MySQL by buying support/licenses at http://shop.mysql.comStarting the mysqld server. You can test that it is up <strong>and</strong> runningwith the comm<strong>and</strong>:./bin/mysqladmin version[root@x345-tic-30 ~]# Starting mysqld daemon with databases from/usr/local/mysql/dataWhen complete, the data is restored <strong>and</strong> the redbook database is available, as shown inFigure 1-51.Figure 1-51 Database after restore operationChapter 1. Snapshots 39
40 <strong>IBM</strong> <strong>XIV</strong> <strong>Storage</strong> <strong>System</strong>: <strong>Copy</strong> <strong>Services</strong> <strong>and</strong> <strong>Migration</strong>
2Chapter 2.Tivoli <strong>Storage</strong> Flash<strong>Copy</strong>Manager <strong>and</strong> Volume Shadow<strong>Copy</strong> <strong>Services</strong>This chapter explains how the <strong>XIV</strong> Snapshot function can be combined with the Microsoft®Volume Shadow <strong>Copy</strong> <strong>Services</strong> (VVS) <strong>and</strong> <strong>IBM</strong> Tivoli <strong>Storage</strong> Flash<strong>Copy</strong> Manager to provideefficient <strong>and</strong> reliable application or database backup <strong>and</strong> recovery solutions.After a brief overview of the Microsoft VSS architecture <strong>and</strong> an introduction to <strong>IBM</strong> Tivoli<strong>Storage</strong> Flash<strong>Copy</strong> Manager, we cover the requirements, configuration, <strong>and</strong> implementationof the <strong>XIV</strong> VSS Provider with the Tivoli <strong>Storage</strong> Flash<strong>Copy</strong> Manager for backing up MicrosoftExchange Server data.© <strong>Copy</strong>right <strong>IBM</strong> Corp. 2010. All rights reserved. 41
2.1 OverviewThis section includes an introduction to the <strong>IBM</strong> Tivoli <strong>Storage</strong> Flash<strong>Copy</strong> Manager, whichprovides application-integrated snapshot backup <strong>and</strong> restore support. The product providesthe tools <strong>and</strong> information needed to create <strong>and</strong> manage volume-level snapshots of MicrosoftSQL Server <strong>and</strong> Microsoft Exchange server data.Tivoli <strong>Storage</strong> Flash<strong>Copy</strong> Manager uses Microsoft Volume Shadow <strong>Copy</strong> <strong>Services</strong> in aWindows® environment. VSS relies on a VSS hardware provider.We explain in subsequent sections the installation of the <strong>XIV</strong> VSS Provider <strong>and</strong> providedetailed installation <strong>and</strong> configuration information for the <strong>IBM</strong> Tivoli <strong>Storage</strong> Flash<strong>Copy</strong>Manager. We have also included usage scenarios.2.2 Tivoli <strong>Storage</strong> Flash<strong>Copy</strong> ManagerTivoli <strong>Storage</strong> Flash<strong>Copy</strong> Manager V2.1 is a package that is easy to install, configure, <strong>and</strong>deploy, <strong>and</strong> integrates in a seamless manner with the <strong>IBM</strong> <strong>System</strong> <strong>Storage</strong> DS3000,DS4000®, DS5000, DS8000, <strong>IBM</strong> SAN Volume Controller, <strong>and</strong> <strong>IBM</strong> <strong>XIV</strong> <strong>Storage</strong> <strong>System</strong>products.<strong>IBM</strong> Tivoli <strong>Storage</strong> Flash<strong>Copy</strong> Manager V2.1 is a st<strong>and</strong>alone product designed to performnear-instant application-aware snapshot backups, with minimal performance impact, for <strong>IBM</strong>DB2®, Oracle, SAP, Microsoft SQL Server, <strong>and</strong> Microsoft Exchange. It improves applicationavailability <strong>and</strong> service levels through high-performance, near-instant restore capabilities thathelp reduce downtime.In addition, it can satisfy advanced data protection <strong>and</strong> data reduction needs through optionalintegration with <strong>IBM</strong> Tivoli <strong>Storage</strong> Manager V6.42 <strong>IBM</strong> <strong>XIV</strong> <strong>Storage</strong> <strong>System</strong>: <strong>Copy</strong> <strong>Services</strong> <strong>and</strong> <strong>Migration</strong>
Tivoli <strong>Storage</strong> Flash<strong>Copy</strong> Manager (Figure 2-1) is the successor to the former Tivoli <strong>Storage</strong>Manager (TSM) for Advanced <strong>Copy</strong> <strong>Services</strong> <strong>and</strong> TSM for <strong>Copy</strong> <strong>Services</strong> products.Application<strong>System</strong>Flash<strong>Copy</strong> ManagerApplicationDataSnapshotBackupLocalSnapshotVersions Online, near instantsnapshot backupswith with minimalperformance impact•Oracle•DB2•SAP•SQL Server•MicrosoftExchangeServer1SnapshotRestoreFor <strong>IBM</strong> <strong>Storage</strong>SVC<strong>XIV</strong>DS8000DS 3/4/5*<strong>Storage</strong> Manager 6WithOptionalTSMBackupIntegrationFigure 2-1 Tivoli <strong>Storage</strong> Flash<strong>Copy</strong> Manager overview High High performance,near near instant restorecapability Integrated with with <strong>IBM</strong> <strong>IBM</strong><strong>Storage</strong> Hardware Simplified deployment*VSS IntegrationTivoli <strong>Storage</strong> Flash<strong>Copy</strong> Manager V2.1 has the following key features:► Step-by-step product provision using Microsoft Management Console (MMC) for MicrosoftExchange Server <strong>and</strong> Microsoft SQL server► Performs application snapshots without using the TSM Server► Easy to integrate with TSM environment► Diagnostic snapshot tool► Provider complete reporting tool► Manages <strong>and</strong> schedules application snapshots► Maintains application snapshot history► Configuration verification tool► Incremental <strong>and</strong> differential support for Exchange VSS Backups► Oracle ASM support► SAP Control File BackupFor more detailed information refer to the <strong>IBM</strong> Tivoli <strong>Storage</strong> Web site:http://www.ibm.com/software/tivoliChapter 2. Tivoli <strong>Storage</strong> Flash<strong>Copy</strong> Manager <strong>and</strong> Volume Shadow <strong>Copy</strong> <strong>Services</strong> 43
Figure 2-2 shows the Tivoli <strong>Storage</strong> Flash<strong>Copy</strong> Manager Management Console.Figure 2-2 Tivoli <strong>Storage</strong> Flash<strong>Copy</strong> Manager: Management Console2.3 Windows Server 2008 Volume Shadow <strong>Copy</strong> ServiceMicrosoft first introduced Volume Shadow <strong>Copy</strong> <strong>Services</strong> in Windows 2003 Server <strong>and</strong> all ofits server line <strong>and</strong> subsequent releases after that. VSS provides a framework <strong>and</strong> themechanisms to create consistent point-in-time copies (known as shadow copies) ofdatabases <strong>and</strong> applications data. It consists of a set of Microsoft COM APIs that enablevolume-level snapshots to be performed while the applications that contain data on thosevolumes remain online <strong>and</strong> continue to write.Without VSS, if you do not have an online backup solution implemented, you either must stopor quiesce applications during the backup process, or live with the side effects of an onlinebackup with inconsistent data <strong>and</strong> open files that could not be backed up.With VSS, you can produce consistent shadow copies by coordinating tasks with businessapplications, file system services, backup applications, fast recovery solutions, <strong>and</strong> storagehardware such as the <strong>XIV</strong> <strong>Storage</strong> <strong>System</strong>.44 <strong>IBM</strong> <strong>XIV</strong> <strong>Storage</strong> <strong>System</strong>: <strong>Copy</strong> <strong>Services</strong> <strong>and</strong> <strong>Migration</strong>
2.3.1 VSS architecture <strong>and</strong> componentsFigure 2-3 shows the VSS architecture <strong>and</strong> how the VSS service interacts with the othercomponents to create a shadow copy of a volume, or, when it pertains to <strong>XIV</strong>, a volumesnapshot.Figure 2-3 VSS componentsThe components of the VSS architecture are:► VSS ServiceThe VSS Service is at the core of the VSS architecture. It is the Microsoft Windowsservice that directs all of the other VSS components that are required to create thevolumes shadow copies (snapshots). This Windows service is the overall coordinator forall VSS operations.► RequestorThis is the software application that comm<strong>and</strong>s that a shadow copy be created forspecified volumes. The VSS requestor is provided by Tivoli <strong>Storage</strong> Flash<strong>Copy</strong> Manager<strong>and</strong> is installed with the Tivoli <strong>Storage</strong> Flash<strong>Copy</strong> Manager software.► WriterThis is a component of a software application that places the persistent information for theshadow copy on the specified volumes. A database application (such as SQL Server orExchange Server) or a system service (such as Active Directory) can be a writer.Writers serve two main purposes by:– Responding to signals provided by VSS to interface with applications to prepare forshadow copy– Providing information about the application name, icons, files, <strong>and</strong> a strategy to restorethe files.Writers prevent data inconsistencies.Chapter 2. Tivoli <strong>Storage</strong> Flash<strong>Copy</strong> Manager <strong>and</strong> Volume Shadow <strong>Copy</strong> <strong>Services</strong> 45
►For exchange data, the Microsoft Exchange Server contains the writer components <strong>and</strong>requires no configuration.For SQL data, Microsoft SQL Server contains the writer components (SqlServerWriter). Itis installed with the SQL Server software <strong>and</strong> requires the following minor configurationtasks:– Set the SqlServerWriter service to automatic. This enables the service to startautomatically when the machine is rebooted.– Start the SqlServerWriter service.ProviderThis is the application that produces the shadow copy <strong>and</strong> also manages its availability. Itcan be a system provider (such as the one included with the Microsoft Windows operatingsystem), a software provider, or a hardware provider (such as the one available with the<strong>XIV</strong> storage system).For <strong>XIV</strong>, you must install <strong>and</strong> configure the <strong>IBM</strong> <strong>XIV</strong> VSS Provider.VSS uses the following terminology to characterize the nature of volumes participating in ashadow copy operation:► PersistentThis is a shadow copy that remains after the backup application completes its operations.This type of shadow copy also survives system reboots.► Non-persistentThis is a temporary shadow copy that remains only as long as the backup applicationneeds it in order to copy the data to its backup repository.► TransportableThis is a shadow copy volume that is accessible from a secondary host so that the backupcan be off-loaded. Transportable is a feature of hardware snapshot providers. On an <strong>XIV</strong>you can mount a snapshot volume to another host.► Source volumeThis is the volume that contains the data to be shadow copied. These volumes contain theapplication data.► Target or snapshot volumeThis is the volume that retains the shadow-copied storage files. It is an exact copy of thesource volume at the time of backup.VSS supports the following shadow copy methods:► Clone (full copy/split mirror)A clone is a shadow copy volume that is a full copy of the original data as it resides on avolume. The source volume continues to take application changes while the shadow copyvolume remains an exact read-only copy of the original data at the point-in-time that it wascreated.► <strong>Copy</strong>-on-write (differential copy)A copy-on-write shadow copy volume is a differential copy (rather than a full copy) of theoriginal data as it resides on a volume. This method makes a copy of the original databefore it is overwritten with new changes. Using the modified blocks <strong>and</strong> the unchangedblocks in the original volume, a shadow copy can be logically constructed that representsthe shadow copy at the point-in-time at which it was created.46 <strong>IBM</strong> <strong>XIV</strong> <strong>Storage</strong> <strong>System</strong>: <strong>Copy</strong> <strong>Services</strong> <strong>and</strong> <strong>Migration</strong>
►Redirect-on-write (differential copy)A redirect-on-write shadow copy volume is a differential copy (rather than a full copy) ofthe original data as it resides on a volume. This method is similar to copy-on-write, withoutthe double-write penalty, <strong>and</strong> it offers storage space <strong>and</strong> performance efficient snapshots.New writes to the original volume are redirected to another location set aside for snapshot.The advantage of redirecting the write is that only one write takes place, whereas withcopy-on-write, two writes occur (one to copy original data onto the storage space, theother to copy changed data). The <strong>XIV</strong> storage system supports redirect-on-write.2.3.2 Microsoft Volume Shadow <strong>Copy</strong> Service functionMicrosoft VSS accomplishes the fast backup process when a backup application (therequestor, which is Tivoli <strong>Storage</strong> Flash<strong>Copy</strong> Manager in our case) initiates a shadow copybackup. The VSS service coordinates with the VSS-aware writers to briefly hold writes ondatabases, applications, or both. VSS flushes the file system buffers <strong>and</strong> asks a provider(such as the <strong>XIV</strong> provider) to initiate a snapshot of the data. When the snapshot is logicallycompleted, VSS allows writes to resume <strong>and</strong> notifies the requestor that the backup hascompleted successfully. The (backup) volumes are mounted, but hidden <strong>and</strong> read-only, readyto be used when a rapid restore is requested. Alternatively, the volumes can be mounted to adifferent host <strong>and</strong> used for application testing or backup to tape.The Microsoft VSS Flash<strong>Copy</strong> process is:1. The requestor notifies VSS to prepare for a shadow copy creation.2. VSS notifies the application-specific writer to prepare its data for making a shadow copy.3. The writer prepares the data for that application by completing all open transactions,flushing cache <strong>and</strong> buffers, <strong>and</strong> writing in-memory data to disk.4. When the application data is ready for shadow copy, the writer notifies VSS, which in turnrelays the message to the requestor to initiate the commit copy phase.5. VSS temporarily quiesces application I/O write requests for a few seconds <strong>and</strong> the VSShardware provider performs the snapshot on the storage system.6. Once the storage snapshot has completed, VSS releases the quiesce, <strong>and</strong> database orapplication writes resume.7. VSS queries the writers to confirm that write I/Os were successfully held during theVolume Shadow <strong>Copy</strong>.2.4 <strong>XIV</strong> VSS providerA VSS hardware provider, such as the <strong>XIV</strong> VSS Provider, is used by third-party software toact as an interface between the hardware (storage system) <strong>and</strong> the operating system. Thethird-party application (which can be <strong>IBM</strong> Tivoli <strong>Storage</strong> Flash<strong>Copy</strong> Manager) uses <strong>XIV</strong> VSSProvider to instruct the <strong>XIV</strong> storage system to perform a snapshot of a volume attached to thehost system.Chapter 2. Tivoli <strong>Storage</strong> Flash<strong>Copy</strong> Manager <strong>and</strong> Volume Shadow <strong>Copy</strong> <strong>Services</strong> 47
2.4.1 <strong>XIV</strong> VSS Provider installationThis section illustrates the installation of the <strong>XIV</strong> VSS Provider. First, make sure that yourWindows system meets the minimum requirements listed below:► Supported operating systems: Windows 2003 <strong>and</strong> later► Disk space: 3 MB► Host attachment: 1.0.4 or later► .NET Framework: 2.0 with SP1 or laterAt the time of writing, the <strong>XIV</strong> VSS Provider 2.0.9 version was available. We used a Windows2008 64bit host system for our tests.The <strong>XIV</strong> VSS Hardware Provider 2.0.9 version can be downloaded at:http://www.ibm.com/systems/storage/disk/xiv/index.htmlThe installation of the <strong>XIV</strong> VSS Provider is a straightforward normal Windows applicationprogram installation.To start, locate the <strong>XIV</strong> VSS Provider installation file, also known as the xProv installation file.If the <strong>XIV</strong> VSS Provider 2.0.9 is downloaded from the Internet, the file name isxProvSetup-x64-2.0.9.exe. Execute the file to start the installation.A Welcome window opens (Figure 2-4). Click Next.Tip: Uninstall any previous versions of the <strong>XIV</strong> VSS xProv driver if installed. An upgrade isnot allowed with the 2.0.9 release of <strong>XIV</strong> VSS provider.Figure 2-4 <strong>XIV</strong> VSS provider installation: Welcome windowThe License Agreement window is displayed <strong>and</strong> to continue the installation you must acceptthe license agreement.48 <strong>IBM</strong> <strong>XIV</strong> <strong>Storage</strong> <strong>System</strong>: <strong>Copy</strong> <strong>Services</strong> <strong>and</strong> <strong>Migration</strong>
In the next step you can specify the <strong>XIV</strong> VSS Provider configuration file directory <strong>and</strong> theinstallation directory. Keep the default directory folder <strong>and</strong> installation folder or change it tomeet your needs.The next dialog window is for post-installation operations, as shown in Figure 2-5. Perform apost-installation configuration during the installation process. The configuration can, however,be performed at later time. When done, click Next.Figure 2-5 Installation: post-installation operationA Confirm Installation window is displayed. If required you can go back to make changes orconfirm the installation by clicking Next.Once the installation is complete click Close to exit.2.4.2 <strong>XIV</strong> VSS Provider configurationThe <strong>XIV</strong> VSS Provider must now be configured.If the post installation check box was selected during the installation (Figure 2-5), the <strong>XIV</strong>VSS Provider configuration window shown in Figure 2-7 on page 50 is now displayed. If thepost-installation check box had not been selected during the installation, it must be manuallyinvoked by selecting Start All Programs <strong>XIV</strong> <strong>and</strong> starting the MachinePool Editor, asshown in Figure 2-6.Figure 2-6 Configuration: <strong>XIV</strong> VSS Provider setupChapter 2. Tivoli <strong>Storage</strong> Flash<strong>Copy</strong> Manager <strong>and</strong> Volume Shadow <strong>Copy</strong> <strong>Services</strong> 49
Provide specific information regarding the <strong>XIV</strong> <strong>Storage</strong> <strong>System</strong> IP addresses <strong>and</strong> user ID <strong>and</strong>password with admin privileges. Have that information available.1. In the dialog shown in Figure 2-7, click Add Machine.Figure 2-7 <strong>XIV</strong> Configuration: Machine Pool Editor2. The New Machine dialog shown in Figure 2-8 is displayed. Enter the user name <strong>and</strong>password of an <strong>XIV</strong> user with administrator privileges (storageadmin role) <strong>and</strong> the primaryIP address of the <strong>XIV</strong> <strong>Storage</strong> <strong>System</strong>. Then click Validate.Figure 2-8 <strong>XIV</strong> configuration: add machine50 <strong>IBM</strong> <strong>XIV</strong> <strong>Storage</strong> <strong>System</strong>: <strong>Copy</strong> <strong>Services</strong> <strong>and</strong> <strong>Migration</strong>
3. When the validation is successful, the Validation Success dialog shown in Figure 2-9opens. Click OK.Figure 2-9 <strong>XIV</strong> configuration: validation success4. You are now returned to the VSS MachinePool Editor window. The VSS Provider collectedadditional information about the <strong>XIV</strong> storage system, as illustrated in Figure 2-10.Figure 2-10 <strong>XIV</strong> Configuration: Machine Pool Editor5. Click SaveAll.At this point <strong>XIV</strong> VSS Provider configuration is complete <strong>and</strong> you can close the Machine PoolEditor window. If you must add other <strong>XIV</strong> <strong>Storage</strong> <strong>System</strong>s, repeat steps 1 to 5.Once the <strong>XIV</strong> VSS provider has been configured as just explained, ensure that the operatingsystem can recognize it. For that purpose, launch the vssadmin comm<strong>and</strong> from the operatingsystem comm<strong>and</strong> line:C:\>vssadmin list providersMake sure that <strong>IBM</strong> <strong>XIV</strong> VSS HW Provider appears among the list of installed VSS providersreturned by the vssadmin comm<strong>and</strong>.Tip: The <strong>XIV</strong> VSS Provider log file is located in C:\Windows\Temp\xProvDotNet.Chapter 2. Tivoli <strong>Storage</strong> Flash<strong>Copy</strong> Manager <strong>and</strong> Volume Shadow <strong>Copy</strong> <strong>Services</strong> 51
The Windows server is now ready to perform snapshot operations on the <strong>XIV</strong> <strong>Storage</strong><strong>System</strong>. Refer to you application documentation for completing the VSS setup.The next section demonstrates how the Tivoli <strong>Storage</strong> Flash<strong>Copy</strong> Manager application usesthe <strong>XIV</strong> VSS Provider to perform a consistent point-in-time snapshot of the Exchange 2007<strong>and</strong> SQL 2008 data on Windows 2008 64bit.2.5 Installing <strong>and</strong> configuring Tivoli <strong>Storage</strong> Flash<strong>Copy</strong>Manager for Microsoft ExchangeTo install Tivoli <strong>Storage</strong> Flash<strong>Copy</strong> Manager, insert the product media into the DVD drive <strong>and</strong>the installation starts automatically. If this does not occur, or if you are using a copy ordownloaded version of the media, locate <strong>and</strong> execute the SetpFCM.exe file. During theinstallation, accept all default values.The Tivoli <strong>Storage</strong> Flash<strong>Copy</strong> Manager installation <strong>and</strong> configuration wizards will guide youthrough the installation <strong>and</strong> configuration steps. After you run the setup <strong>and</strong> configurationwizards, your computer is ready to take snapshots.Tivoli <strong>Storage</strong> Flash<strong>Copy</strong> Manager provides the following wizards for installation <strong>and</strong>configuration tasks:► Setup wizardUse this wizard to install Tivoli <strong>Storage</strong> Flash<strong>Copy</strong> Manager on your computer.► Local configuration wizardUse this wizard to configure Tivoli <strong>Storage</strong> Flash<strong>Copy</strong> Manager on your computer toprovide locally managed snapshot support. To manually start the configuration wizard,double-click Local Configuration in the results pane.► Tivoli <strong>Storage</strong> Manager configuration wizardUse this wizard to configure Tivoli <strong>Storage</strong> Flash<strong>Copy</strong> Manager to manage snapshotbackups using a Tivoli <strong>Storage</strong> Manager server. This wizard is only available when a Tivoli<strong>Storage</strong> Manager license is installed.Once installed, Tivoli <strong>Storage</strong> Flash<strong>Copy</strong> Manager must be configured for VSS snapshotbackups. Use the local configuration wizard for that purpose. These tasks include selectingthe applications to protect, verifying requirements, provisioning, <strong>and</strong> configuring thecomponents required to support the selected applications.52 <strong>IBM</strong> <strong>XIV</strong> <strong>Storage</strong> <strong>System</strong>: <strong>Copy</strong> <strong>Services</strong> <strong>and</strong> <strong>Migration</strong>
The configuration process for Microsoft Exchange Server is:1. Start the Local Configuration Wizard from the Tivoli <strong>Storage</strong> Flash<strong>Copy</strong> ManagerManagement Console, as shown in Figure 2-11.Figure 2-11 Tivoli Flash<strong>Copy</strong> Manager: local configuration wizard for Exchange Server2. A dialog window is displayed, as shown in Figure 2-12. Select the Exchange Server toconfigure <strong>and</strong> click Next.Figure 2-12 Local configuration wizard: local data protection selectionNote: The Show <strong>System</strong> Information button shows the basic information about yourhost system.Tip: Select the check box at the bottom if you do not want the local configuration wizardto start automatically the next time that the Tivoli <strong>Storage</strong> Flash<strong>Copy</strong> ManagerManagement Console windows starts.Chapter 2. Tivoli <strong>Storage</strong> Flash<strong>Copy</strong> Manager <strong>and</strong> Volume Shadow <strong>Copy</strong> <strong>Services</strong> 53
3. The Requirements Check dialog window opens, as shown in Figure 2-13. At this stage,the systems checks that all prerequisites are met.Figure 2-13 Local Configuration for exchange: requirements checkIf any requirement is not met, the configuration wizard does not proceed to the next step.You may have to upgrade components to fulfill the requirements. The requirements checkcan be run again by clicking Re-run once fulfilled. When the check completessuccessfully, click Next.54 <strong>IBM</strong> <strong>XIV</strong> <strong>Storage</strong> <strong>System</strong>: <strong>Copy</strong> <strong>Services</strong> <strong>and</strong> <strong>Migration</strong>
4. In this configuration step, the Local Configuration wizard performs all necessaryconfiguration steps, as shown in Figure 2-14. The steps include provisioning <strong>and</strong>configuring the VSS Requestor, provisioning <strong>and</strong> configuring data protection for theExchange Server, <strong>and</strong> configuring services. When done, click Next.Figure 2-14 Local configuration for exchange: configurationNote: By default, details are hidden. Details can be seen or hidden by clicking ShowDetails or Hide Details.Chapter 2. Tivoli <strong>Storage</strong> Flash<strong>Copy</strong> Manager <strong>and</strong> Volume Shadow <strong>Copy</strong> <strong>Services</strong> 55
5. The completion window shown in Figure 2-15 is displayed. To run a VSS diagnostic check,ensure that the corresponding check box is selected <strong>and</strong> click Finish.Figure 2-15 Local configuration for exchange: completion6. The VSS Diagnostic dialog window is displayed. The goal of this step is to verify that anyvolume that you select is indeed capable of performing an <strong>XIV</strong> snapshot using VSS. Selectthe <strong>XIV</strong> mapped volumes to test, as shown in Figure 2-16, <strong>and</strong> click Next.Figure 2-16 VSS Diagnostic Wizard: Snapshot Volume Selection56 <strong>IBM</strong> <strong>XIV</strong> <strong>Storage</strong> <strong>System</strong>: <strong>Copy</strong> <strong>Services</strong> <strong>and</strong> <strong>Migration</strong>
Tip: Any previously taken snapshots can be seen by clicking Snapshots. Clicking thebutton refreshes the list <strong>and</strong> shows all of the existing snapshots.7. The VSS Snapshot Tests window is displayed, showing a status for each of the snapshots.This dialog also displays the event messages when clicking Show Details, as shown inFigure 2-17. When done, click Next.Figure 2-17 VSS Diagnostic Wizard: Snapshot tests8. A completion window is displayed with the results, as shown in Figure 3-25. When done,click Finish.Note: Microsoft SQL Server can be configured the same way as Microsoft ExchangeServer to perform <strong>XIV</strong> VSS snapshots for Microsoft SQL Server using Tivoli <strong>Storage</strong>Flash<strong>Copy</strong> Manager.2.6 Backup scenario for Microsoft Exchange ServerMicrosoft Exchange Server is a Microsoft server-line product that provides the capability ofmessaging <strong>and</strong> collaboration software. The main features of Exchange Server are e-mailexchange, contacts, <strong>and</strong> calendar functions.Chapter 2. Tivoli <strong>Storage</strong> Flash<strong>Copy</strong> Manager <strong>and</strong> Volume Shadow <strong>Copy</strong> <strong>Services</strong> 57
To perform a VSS snapshot backup of Exchange data, we used the following setup:► Windows 2008 64bit► Exchange 2007 Server► <strong>XIV</strong> Host Attachment Kit 1.0.4► <strong>XIV</strong> VSS Provider 2.0.9► Tivoli <strong>Storage</strong> Flash<strong>Copy</strong> Manager 2.0Microsoft Exchange Server <strong>XIV</strong> VSS Snapshot backupOn the <strong>XIV</strong> <strong>Storage</strong> <strong>System</strong> a single volume has been created <strong>and</strong> mapped to the hostsystem, as illustrated in Figure 2-18. On the Windows host system, the volume has beeninitialized as a basic disk <strong>and</strong> assigned the drive letter G. The G drive has been formatted asNTFS, <strong>and</strong> we created a single Exchange Server storage group with a couple of mailboxes onthat drive.Figure 2-18 Mapped volume to the host systemTivoli <strong>Storage</strong> Flash<strong>Copy</strong> Manager was already configured <strong>and</strong> tested for <strong>XIV</strong> VSS snapshot,as shown in 2.5, “Installing <strong>and</strong> configuring Tivoli <strong>Storage</strong> Flash<strong>Copy</strong> Manager for MicrosoftExchange” on page 52. To review the Tivoli <strong>Storage</strong> Flash<strong>Copy</strong> Manager configurationsettings, use the comm<strong>and</strong> shown in Example 2-1.Example 2-1 Tivoli <strong>Storage</strong> Flash<strong>Copy</strong> Manager for Mail: query DP configurationC:\Program Files\Tivoli\TSM\TDPExchange>tdpexcc query tdp<strong>IBM</strong> Flash<strong>Copy</strong> Manager for Mail:Flash<strong>Copy</strong> Manager for Microsoft Exchange ServerVersion 6, Release 1, Level 1.0(C) <strong>Copy</strong>right <strong>IBM</strong> Corporation 1998, 2009. All rights reserved.Flash<strong>Copy</strong> Manager for Exchange Preferences----------------------------------------BACKUPDESTination................... LOCALBACKUPMETHod........................ VSSBUFFers ............................ 3BUFFERSIze ......................... 102458 <strong>IBM</strong> <strong>XIV</strong> <strong>Storage</strong> <strong>System</strong>: <strong>Copy</strong> <strong>Services</strong> <strong>and</strong> <strong>Migration</strong>
DATEformat ......................... 1LANGuage ........................... ENULOCALDSMAgentnode................... sundayLOGFile ............................ tdpexc.logLOGPrune ........................... 60MOUNTWait .......................... YesNUMberformat ....................... 1REMOTEDSMAgentnode..................RETRies............................. 4TEMPDBRestorepath...................TEMPLOGRestorepath..................TIMEformat ......................... 1As explained earlier, Tivoli <strong>Storage</strong> Flash<strong>Copy</strong> Manger does not use (or need) a TSM serverto perform a snapshot backup. You can see this when you execute the query tsm comm<strong>and</strong>,as shown in Example 2-2. The output does not show a TSM service butFLASHCOPYMANAGER instead for the NetWork Host Name of Server field. Tivoli <strong>Storage</strong>Flash<strong>Copy</strong> Manager creates a virtual server instead of using a TSM Server to perform a VSSsnapshot backup.Example 2-2 Tivoli Flash<strong>Copy</strong> Manager for Mail: query TSMC:\Program Files\Tivoli\TSM\TDPExchange>tdpexcc query tsm<strong>IBM</strong> Flash<strong>Copy</strong> Manager for Mail:Flash<strong>Copy</strong> Manager for Microsoft Exchange ServerVersion 6, Release 1, Level 1.0(C) <strong>Copy</strong>right <strong>IBM</strong> Corporation 1998, 2009. All rights reserved.Flash<strong>Copy</strong> Manager Server Connection Information----------------------------------------------------Nodename ............................... SUNDAY_EXCHNetWork Host Name of Server ............ FLASHCOPYMANAGERFCM API Version ........................ Version 6, Release 1, Level 1.0Server Name ............................ Virtual ServerServer Type ............................ Virtual PlatformServer Version ......................... Version 6, Release 1, Level 1.0Compression Mode ....................... Client DeterminedDomain Name ............................ STANDARDActive Policy Set ...................... STANDARDDefault Management Class ............... STANDARDExample 2-3 shows what options have been configured <strong>and</strong> used for TSM Client Agent toperform VSS snapshot backups.Example 2-3 TSM Client Agent: option file*======================================================================** ** <strong>IBM</strong> Tivoli <strong>Storage</strong> Manager for Databases ** ** dsm.opt for the Microsoft Windows Backup-Archive Client Agent **======================================================================*NodenamesundayChapter 2. Tivoli <strong>Storage</strong> Flash<strong>Copy</strong> Manager <strong>and</strong> Volume Shadow <strong>Copy</strong> <strong>Services</strong> 59
CLUSTERnodePASSWORDAccessNOGenerate*======================================================================** TCP/IP Communication Options **======================================================================*COMMMethod TCPipTCPSERVERADDRESS Flash<strong>Copy</strong>managerTCPPort 1500TCPWindowsize 63TCPBuffSize 32Before we can perform any backup, we must ensure that VSS is properly configured forMicrosoft Exchange Server <strong>and</strong> that the DSMagent service is running (Example 2-4).Example 2-4 Tivoli <strong>Storage</strong> Flash<strong>Copy</strong> Manger: Query Exchange ServerC:\Program Files\Tivoli\TSM\TDPExchange>tdpexcc query exchange<strong>IBM</strong> Flash<strong>Copy</strong> Manager for Mail:Flash<strong>Copy</strong> Manager for Microsoft Exchange ServerVersion 6, Release 1, Level 1.0(C) <strong>Copy</strong>right <strong>IBM</strong> Corporation 1998, 2009. All rights reserved.Querying Exchange Server to gather storage group information, please wait...Microsoft Exchange Server Information-------------------------------------Server Name:SUNDAYDomain Name:sunday.localExchange Server Version: 8.1.375.1 (Exchange Server 2007)<strong>Storage</strong> Groups with Databases <strong>and</strong> Status----------------------------------------First <strong>Storage</strong> GroupCircular Logging - DisabledReplica - NoneRecovery - FalseMailbox DatabaseUser Define Public FolderSTG3G_<strong>XIV</strong>G2_BASCircular Logging - DisabledReplica - NoneRecovery - False2nd MailBoxMail Box1OnlineOnlineOnlineOnlineVolume Shadow <strong>Copy</strong> Service (VSS) Information--------------------------------------------Writer Name: Microsoft Exchange WriterLocal DSMAgent Node : sundayRemote DSMAgent Node :60 <strong>IBM</strong> <strong>XIV</strong> <strong>Storage</strong> <strong>System</strong>: <strong>Copy</strong> <strong>Services</strong> <strong>and</strong> <strong>Migration</strong>
Writer Status: OnlineSelectable Components : 8Our test Microsoft Exchange <strong>Storage</strong> Group is on drive G:\ <strong>and</strong> it is called STG3G_<strong>XIV</strong>G2_BAS. Itcontains two mailboxes:► Mail Box1► 2nd MailBoxNow we can take a full backup of the storage group by executing the backup comm<strong>and</strong>, asshown in Example 2-5.Example 2-5 Tivoli <strong>Storage</strong> Flash<strong>Copy</strong> Manger: full <strong>XIV</strong> VSS snapshot backupC:\Program Files\Tivoli\TSM\TDPExchange>tdpexcc backup STG3G_<strong>XIV</strong>G2_BAS full<strong>IBM</strong> Flash<strong>Copy</strong> Manager for Mail:Flash<strong>Copy</strong> Manager for Microsoft Exchange ServerVersion 6, Release 1, Level 1.0(C) <strong>Copy</strong>right <strong>IBM</strong> Corporation 1998, 2009. All rights reserved.Updating mailbox history on FCM Server...Mailbox history has been updated successfully.Querying Exchange Server to gather storage group information, please wait...Connecting to FCM Server as node 'SUNDAY_EXCH'...Connecting to Local DSM Agent 'sunday'...Starting storage group backup...Beginning VSS backup of 'STG3G_<strong>XIV</strong>G2_BAS'...Executing system comm<strong>and</strong>: Exchange integrity check for storage group'STG3G_<strong>XIV</strong>G2_BAS'Files Examined/Completed/Failed: [ 4 / 4 / 0 ] Total Bytes: 44276VSS Backup operation completed with rc = 0Files Examined : 4Files Completed : 4Files Failed : 0Total Bytes : 44276Note that we did not specify a disk drive here. Tivoli <strong>Storage</strong> Flash<strong>Copy</strong> Manager finds outwhich disk drives to copy with snapshot when doing a backup of a Microsoft Exchange<strong>Storage</strong> Group. This is the advantage of an application-aware snapshot backup process.Chapter 2. Tivoli <strong>Storage</strong> Flash<strong>Copy</strong> Manager <strong>and</strong> Volume Shadow <strong>Copy</strong> <strong>Services</strong> 61
To see a list of the available VSS snapshot backups issue a query comm<strong>and</strong>, as shown inExample 2-6.Example 2-6 Tivoli <strong>Storage</strong> Flash<strong>Copy</strong> Manger: query full VSS snapshot backupC:\Program Files\Tivoli\TSM\TDPExchange>tdpexcc query TSM STG3G_<strong>XIV</strong>G2_BAS full<strong>IBM</strong> Flash<strong>Copy</strong> Manager for Mail:Flash<strong>Copy</strong> Manager for Microsoft Exchange ServerVersion 6, Release 1, Level 1.0(C) <strong>Copy</strong>right <strong>IBM</strong> Corporation 1998, 2009. All rights reserved.Querying Flash<strong>Copy</strong> Manager server for a list of database backups, please wait...Connecting to FCM Server as node 'SUNDAY_EXCH'...Exchange Server : SUNDAYBackup List-----------<strong>Storage</strong> Group: STG3G_<strong>XIV</strong>G2_BASBackup Date Size S Fmt Type Loc Object Name/Database Name------------------- ----------- - ---- ---- --- -------------------------06/30/2009 22:25:57 101.04MB A VSS full Loc 2009063022255791.01MBLogs6,160.00KBMail Box14,112.00KB2nd MailBoxTo show that a restore operation is working, we deleted the 2nd Mailbox mail box, as shownin Example 2-7.Example 2-7 Deleting the mailbox <strong>and</strong> adding a fileG:\MSExchangeSvr2007\Mailbox\STG3G_<strong>XIV</strong>G2_BAS>dirVolume in drive G is <strong>XIV</strong>G2_SJCVTPOOL_BASVolume Serial Number is 344C-09F106/30/2009 11:05 PM .06/30/2009 11:05 PM ..06/30/2009 11:05 PM 4,210,688 2nd MailBox.edb:G:\MSExchangeSvr2007\Mailbox\STG3G_<strong>XIV</strong>G2_BAS> del “2nd MailBox.edb”To perform a restore, all the mailboxes must be unmounted first. A restore will be done at thevolume level, called instant restore (IR), then the recovery operation will run, applying all thelogs, <strong>and</strong> then mount the mail boxes, as shown in Example 2-8.Example 2-8 Tivoli <strong>Storage</strong> Flash<strong>Copy</strong> Manager: VSS Full Instant Restore <strong>and</strong> recovery.C:\Program Files\Tivoli\TSM\TDPExchange>tdpexcc Restore STG3G_<strong>XIV</strong>G2_BAS Full/RECOVer=APPLYALLlogs /MOUNTDAtabases=Yes<strong>IBM</strong> Flash<strong>Copy</strong> Manager for Mail:62 <strong>IBM</strong> <strong>XIV</strong> <strong>Storage</strong> <strong>System</strong>: <strong>Copy</strong> <strong>Services</strong> <strong>and</strong> <strong>Migration</strong>
Flash<strong>Copy</strong> Manager for Microsoft Exchange ServerVersion 6, Release 1, Level 1.0(C) <strong>Copy</strong>right <strong>IBM</strong> Corporation 1998, 2009. All rights reserved.Starting Microsoft Exchange restore...Beginning VSS restore of 'STG3G_<strong>XIV</strong>G2_BAS'...Starting snapshot restore process. This process may take several minutes.VSS Restore operation completed with rc = 0Files Examined : 0Files Completed : 0Files Failed : 0Total Bytes : 0Recovery being run. Please wait. This may take a while...C:\Program Files\Tivoli\TSM\TDPExchange>Note: Instant restore is at the volume level. It does not show the total number of filesexamined <strong>and</strong> completed like a normal backup process does.To verify that the restore operation worked, open the Exchange Management Console <strong>and</strong>check that the storage group <strong>and</strong> all the mailboxes have been mounted. Furthermore, verifythat the 2nd Mailbox.edb file exists.See the Tivoli <strong>Storage</strong> Flash<strong>Copy</strong> Manager: Installation <strong>and</strong> User’s Guide for Windows,SC27-2504, or Tivoli <strong>Storage</strong> Flash<strong>Copy</strong> Manager for AIX: Installation <strong>and</strong> User’s Guide,SC27-2503, for more <strong>and</strong> detailed information about Tivoli <strong>Storage</strong> Flash<strong>Copy</strong> Manager <strong>and</strong>its functions.The latest information about the Tivoli <strong>Storage</strong> Flash<strong>Copy</strong> Manager is available on the Webat:http://www.ibm.com/software/tivoliChapter 2. Tivoli <strong>Storage</strong> Flash<strong>Copy</strong> Manager <strong>and</strong> Volume Shadow <strong>Copy</strong> <strong>Services</strong> 63
64 <strong>IBM</strong> <strong>XIV</strong> <strong>Storage</strong> <strong>System</strong>: <strong>Copy</strong> <strong>Services</strong> <strong>and</strong> <strong>Migration</strong>
3Chapter 3.Volume copyThe <strong>XIV</strong> <strong>Storage</strong> <strong>System</strong> provides the ability to copy a volume into another volume. Thisvaluable feature, known as volume copy, is best used for duplicating an image of the volumewhen the data residency is extremely long <strong>and</strong> the information diverges after the copy iscomplete.© <strong>Copy</strong>right <strong>IBM</strong> Corp. 2010. All rights reserved. 65
3.1 Volume copy architectureThe volume copy feature provides an instantaneous copy of data from one volume to anothervolume. By utilizing the same functionality of the snapshot, the system modifies the targetvolume to point at the source volume’s data. After the pointers are modified, the host has fullaccess to the data on the volume.After the <strong>XIV</strong> <strong>Storage</strong> <strong>System</strong> completes the setup of the pointers to the source data, abackground copy of the data is performed. The data is copied from the source volume to anew area on the disk, <strong>and</strong> the pointers of the target volume are then updated to use this newspace. The copy operation is done in such a way as to minimize the impact to the system. Ifthe host performs an update before the background copy is complete, a redirect on writeoccurs, which allows the volume to be readable <strong>and</strong> writable before the volume copycompletes.3.2 Performing a volume copyPerforming a volume copy is a simple task. The only requirement is that the target volumemust be created before the copy can occur.If the sizes of the volumes differ, the size of the target volume is modified to match the sourcevolume when the copy is initiated. The resize operation does not require user intervention.66 <strong>IBM</strong> <strong>XIV</strong> <strong>Storage</strong> <strong>System</strong>: <strong>Copy</strong> <strong>Services</strong> <strong>and</strong> <strong>Migration</strong>
Figure 3-1 illustrates making a copy of volume redbook_markus_01. The target volume for thisexample is redbook_chris_01. By right-clicking the source volume, a menu appears <strong>and</strong> youcan then select <strong>Copy</strong> This Volume. This action causes a dialog box to open.Figure 3-1 Initiating a copy volume processFrom the dialog box, select redbook_chris_01 <strong>and</strong> click OK. The system then asks you tovalidate the copy action.The <strong>XIV</strong> <strong>Storage</strong> <strong>System</strong> instantly performs the update process <strong>and</strong> displays a completionmessage. When the copy process is complete, the volume is available for use.Chapter 3. Volume copy 67
Figure 3-2 provides an example of the volume selection.Figure 3-2 Target volume selectionTo create a volume copy with the XCLI, the source <strong>and</strong> target volumes must be specified inthe comm<strong>and</strong>. In addition, the -y parameter must be specified to provide an affirmativeresponse to the validation questions. See Example 3-1.Example 3-1 Performing a volume copyxcli -c MZ_PFE_1 -y vol_copy vol_src=xiv_vmware_1 vol_trg=xiv_vmware_23.3 Creating an OS image with volume copyThis section describes another usage of the volume copy feature. In certain cases, you mightwant to install another operating system (OS) image. By using volume copy, the installationcan be done immediately. Usage of VMware simplified the need for SAN boot. However, thisexample can be applied to any OS installation in which the hardware configuration is similar.VMware allows the resources of a server to be separated into logical virtual systems, eachcontaining its own OS <strong>and</strong> resources. When creating the configuration, it is extremelyimportant to have the hard disk assigned to the virtual machine to be a mapped raw LUN. Ifthe hard disk is a VMware File <strong>System</strong> (VMFS), the volume copy fails because there areduplicate file systems in VMware. In Figure 3-3, the mapped raw LUN is the <strong>XIV</strong> volume thatwas mapped to the VMware server.Figure 3-3 Configuration of the virtual machine in VMware68 <strong>IBM</strong> <strong>XIV</strong> <strong>Storage</strong> <strong>System</strong>: <strong>Copy</strong> <strong>Services</strong> <strong>and</strong> <strong>Migration</strong>
To perform the volume copy:1. Validate the configuration for your host. With VMware, ensure that the hard disk assignedto the virtual machine is a mapped raw LUN. For a disk directly attached to a server, theSAN boot must be enabled <strong>and</strong> the target server must have the <strong>XIV</strong> volume discovered.2. Shut down the source server or OS. If the source remains active, there might be data inmemory that is not synchronized to the disk. If this step is skipped, unexpected results canoccur.3. Perform volume copy from the source volume to the target volume.4. Power on the new system.A demonstration of the process is simple using VMware. Starting with the VMware resourcewindow, power off the virtual machines for both the source <strong>and</strong> the target. The summarydescribed in Figure 3-4 shows that both <strong>XIV</strong> Source VM (1), the source, <strong>and</strong> <strong>XIV</strong> Source VM(2), the target, are powered off.Figure 3-4 VMware virtual machine summaryLooking at the <strong>XIV</strong> <strong>Storage</strong> <strong>System</strong> before the copy (Figure 3-5), xiv_vmware_1 is mapped tothe <strong>XIV</strong> Source VM (1) in VMware <strong>and</strong> has utilized 1 GB of space. This information shows thatthe OS is installed <strong>and</strong> operational. The second volume, xiv_vmware_2, is the target volumefor the copy <strong>and</strong> is mapped to <strong>XIV</strong> Source VM (2) <strong>and</strong> is 0 in size. At this point, the OS has notbeen installed on the virtual machine <strong>and</strong> thus the OS is not usable.Figure 3-5 The <strong>XIV</strong> volumes before the copyBecause the virtual machines are powered off, simply initiate the copy process as justdescribed.Selecting xiv_vmware_1 as the source, copy the volume to the target xiv_vmware_2. Thecopy completes immediately <strong>and</strong> is available for usage.To verify that the copy is complete, the used area of the volumes must match, as shown inFigure 3-6.Figure 3-6 The <strong>XIV</strong> volumes after the copyChapter 3. Volume copy 69
After the copy is complete, power up the new virtual machine to use the new operatingsystem. Both servers usually boot up normally with only minor modifications to the host. Inthis example, the server name we had to changed because there were two servers on thenetwork with the same name. Refer to Figure 3-7.Figure 3-7 VMware summary showing both virtual machines powered onFigure 3-8 shows the second virtual machine console with the Windows operating systempowered on.Figure 3-8 Booted Windows server70 <strong>IBM</strong> <strong>XIV</strong> <strong>Storage</strong> <strong>System</strong>: <strong>Copy</strong> <strong>Services</strong> <strong>and</strong> <strong>Migration</strong>
4Chapter 4.Remote MirroringThe Remote Mirroring function of the <strong>XIV</strong> <strong>Storage</strong> <strong>System</strong> provides a real-time copy betweentwo or more storage systems supported over Fibre Channel (FC) or iSCSI links. This featureprovides a method to protect data from site failures.Remote Mirroring can be a synchronous copy solution where write operations are completedon both copies (local <strong>and</strong> remote sites) before they are considered to be complete (seeChapter 5, “Synchronous Remote Mirroring” on page 125). This type of remote mirroring isnormally used for short distances to minimize the effect of I/O delays inherent to the distanceto the remote site.Remote Mirroring can also be an asynchronous solution were consistent sets of data arecopied to the remote location at specified intervals <strong>and</strong> host I/O operations are complete afterwriting to the primary (see Chapter 6, “Asynchronous Remote Mirroring” on page 149). Thisis typically used for long distances between sites.Note: For asynchronous mirroring over iSCSI links, a reliable, dedicated network must beavailable. It requires consistent network b<strong>and</strong>width <strong>and</strong> a non-shared link.Unless otherwise noted, this chapter describes the basic concepts, functions, <strong>and</strong> terms thatare common to both <strong>XIV</strong> synchronous <strong>and</strong> asynchronous mirroring.© <strong>Copy</strong>right <strong>IBM</strong> Corp. 2010. All rights reserved. 71
4.1 <strong>XIV</strong> Remote Mirroring overviewThe purpose of mirroring is to create a set of consistent data that can be used by productionapplications in the event of problems with production volumes or for other purposes.<strong>XIV</strong> remote mirroring is application <strong>and</strong> operating system independent, <strong>and</strong> does not requireserver processor cycle usage.4.1.1 <strong>XIV</strong> Remote Mirror terminologyIt is worth going through <strong>and</strong> becoming familiar with several terms used throughout the nextchapters involving remote mirroring. A number of terms, meanings, <strong>and</strong> usage with regards to<strong>XIV</strong> <strong>and</strong> synchronous remote mirroring are noted below:► Local site: This site is made up of the primary storage <strong>and</strong> the servers runningapplications with the <strong>XIV</strong> <strong>Storage</strong> <strong>System</strong>.► Remote site: This site holds the mirror copy of the data on another <strong>XIV</strong> <strong>Storage</strong> <strong>System</strong><strong>and</strong> usually st<strong>and</strong>by servers as well. In this case, the remote site is capable of becomingthe active production site with consistent data available in the event of a failure at the localsite.► Primary: This denotes the <strong>XIV</strong> designated under normal conditions to serve hosts <strong>and</strong>have its data replicated to a secondary <strong>XIV</strong> for disaster recovery purposes.► Secondary. This denotes the <strong>XIV</strong> designated under normal conditions to act as the mirror(backup) for the primary, <strong>and</strong> that could be set to replace the primary if the primary fails.► Consistency groups (CG): A consistency group is a set of related volumes on the same<strong>XIV</strong> <strong>Storage</strong> <strong>System</strong> that are treated as a single consistent unit. Consistency groups aresupported within Remote Mirroring.► Coupling: This is the pairing of volumes or consistency groups (CGs) to form a mirrorrelationship between the source of the replication (master) <strong>and</strong> the target (slave).► Peer: This is one side of a coupling. It can either be a volume or a consistency group.However, peers must be of the same type (that is, both volumes or CGs). Whenever acoupling is defined, a role is specified for each peer. One peer is designated as the master<strong>and</strong> the other peer is designated as the slave.► Role: This denotes the actual role that the peer is fulfilling:– Master: A role that indicates that the peer serves host requests <strong>and</strong> acts as the sourcefor replication. Changing a peer’s role to master from slave may be warranted after adisruption of the current master’s service either due to a disaster or to planned servicemaintenance.– Slave: A role that indicates that the peer does not serve host requests <strong>and</strong> acts as thetarget for replication. Changing a peer’s role to slave from master may be warrantedafter the peer is recovered from a site/system/link failure or disruption that led to thepromotion of the other peer from slave to master. Changing roles can also be done inpreparation for supporting a planned service maintenance.► Sync job: This applies to async mirroring only. It denotes a synchronization procedure runby the master at specified user-configured intervals corresponding to the asynchronousmirroring definition or upon manual execution of a dedicated XCLI comm<strong>and</strong> (the relatedcomm<strong>and</strong> is mirror_create_snapshot). The resulting job is dubbed snapshot mirror syncjob or ad-hoc sync job, or manual sync job in contrast with a scheduled sync job. The syncjob entails synchronization of data updates recorded on the master since the creation timeof the most recent snapshot that was successfully synchronized.72 <strong>IBM</strong> <strong>XIV</strong> <strong>Storage</strong> <strong>System</strong>: <strong>Copy</strong> <strong>Services</strong> <strong>and</strong> <strong>Migration</strong>
►►Asynchronous schedule interval: This applies to asynchronous mirroring only. Itrepresents, per given coupling, how often the master automatically runs a new sync job.For example, if the pertinent mirroring configuration parameter specifies a 60-minuteinterval, then during a period of 1 day, 24 sync jobs will be created.Recovery Point Objective (RPO): The RPO is a setting that is only applicable toasynchronous mirroring. It represents an objective set by the user implying the maximalcurrency difference considered acceptable between the mirror peers (the actual differencebetween mirror peers can be shorter or longer than the RPO set).An RPO of zero indicates that no currency difference between the mirror peers isacceptable. An RPO that is greater than zero indicates that the replicated volume is lesscurrent or lags somewhat behind the master volume, <strong>and</strong> that there is a potential forcertain transactions that have been run against the production volume to be rerun whenapplications come up on the replicated volume.For <strong>XIV</strong> asynchronous mirroring, the required RPO is user-specified. The <strong>XIV</strong> system thenreports effective RPO <strong>and</strong> compares it to the required RPO.Connectivity, b<strong>and</strong>width, <strong>and</strong> distance between the <strong>XIV</strong> system that contains theproduction volume <strong>and</strong> the <strong>XIV</strong> system that contains the replicated copy directly impactRPO. More connectivity, greater b<strong>and</strong>width, <strong>and</strong> less distance typically enable a lowerRPO.4.1.2 <strong>XIV</strong> Remote Mirroring modesAs mentioned in our introduction, <strong>XIV</strong> supports both synchronous mirroring <strong>and</strong>asynchronous mirroring:►<strong>XIV</strong> synchronous mirroring<strong>XIV</strong> synchronous mirroring is designed to accommodate a requirement for zero RPO.To ensure that data is also written to the Secondary <strong>XIV</strong> (slave role), an acknowledgementof the write operation to the host is only issued after the data has been written to both <strong>XIV</strong>systems. This ensures the consistency of mirroring peers. A write acknowledgement issent to the host once the write data has been cached into two separate <strong>XIV</strong> modules ateach site. This is depicted in Figure 4-1.Host Server1241. Host Write to Master <strong>XIV</strong>(data placed in cache of 2Modules)2. Master replicates to Slave<strong>XIV</strong> (data placed in cache of2 Modules)3. Slave acknowledges writecomplete to Master4. Master acknowledges writecomplete to applicationLocal <strong>XIV</strong>(Master)3Remote <strong>XIV</strong>(Slave)Figure 4-1 <strong>XIV</strong> synchronous mirroringChapter 4. Remote Mirroring 73
►Host read operations are performed from the Primary <strong>XIV</strong> (master role), whereas writing isperformed at the primary (master role) <strong>and</strong> replicated to the Secondary <strong>XIV</strong> systems.Refer to 5.5, “Synchronous mirror step-by-step scenario” on page 137, for more details.<strong>XIV</strong> asynchronous mirroring<strong>XIV</strong> asynchronous mirroring is designed to provide a consistent replica of data on a targetpeer through timely replication of data changes recorded on a source peer.<strong>XIV</strong> Asynchronous mirroring exploits the <strong>XIV</strong> snapshot function, which creates apoint-in-time (PiT) image. In <strong>XIV</strong> asynchronous mirroring, successive snapshots(point-in-time images) are made <strong>and</strong> used to create consistent data on the slave peers.The system sync job copies the data corresponding to the differences between twodesignated snapshots on the master (most_recent <strong>and</strong> last_replicated).For <strong>XIV</strong> asynchronous mirroring, acknowledgement of write complete is returned to theapplication as soon as the write data has been received at the local <strong>XIV</strong> system, as shownin Figure 4-2. Refer to 6.6, “Detailed asynchronous mirroring process” on page 173, fordetails.Application Server1231. Host Write to Master <strong>XIV</strong>(data placed in cache of 2Modules))2. Master acknowledges writecomplete to application3. Master replicates to Slave4. Slave acknowledges writecompleteLocal <strong>XIV</strong>(Master)4Remote <strong>XIV</strong>(Slave)Figure 4-2 <strong>XIV</strong> asynchronous mirroring74 <strong>IBM</strong> <strong>XIV</strong> <strong>Storage</strong> <strong>System</strong>: <strong>Copy</strong> <strong>Services</strong> <strong>and</strong> <strong>Migration</strong>
4.2 Mirroring schemesMirroring, whether synchronous or asynchronous, requires two or more <strong>XIV</strong> systems. Thesource <strong>and</strong> target of the asynchronous mirroring can reside on the same site <strong>and</strong> form a localmirroring or they can reside on different sites <strong>and</strong> enable a disaster recovery plan. Figure 4-3shows how peers can be spread across multiple storage systems <strong>and</strong> sites.Replication Scheme<strong>XIV</strong> <strong>System</strong> E<strong>XIV</strong> <strong>System</strong> B<strong>XIV</strong> <strong>System</strong> AMirrored CGMasterM irroredMirrored VolMasterMirrored CGMaster<strong>Storage</strong>Pool<strong>XIV</strong> <strong>System</strong> CMirrored CGSlave<strong>XIV</strong> <strong>System</strong> DMirrored VolSlaveMirrored VolSlaveMirrored VolMasterMirrored CGSlaveStor agePool<strong>Storage</strong>PoolFigure 4-3 Mirroring replication schemesUp to 16 targets can be referenced by a single system. A system can host replication sources<strong>and</strong> separate replication targets simultaneously.In a bi-directional configuration, an <strong>XIV</strong> system concurrently functions as the replicationsource (master) for one or more couplings, <strong>and</strong> as the replication target (slave) for othercouplings. If production applications are eventually running at both sides, the applications ateach site are independent from each other to ensure data consistency in case of a site failure.Figure 4-3 illustrates possible schemes for how mirroring can be configured.Chapter 4. Remote Mirroring 75
Figure 4-4 shows remote mirror connections as shown in the <strong>XIV</strong> GUI.Figure 4-4 <strong>XIV</strong> GUI showing the remote mirror connections4.2.1 Peer designations <strong>and</strong> rolesA peer (volume or consistency group) is assigned either a master or a slave role when themirror is defined. By default, in a new mirror definition, the location of the master designatesthe primary system, <strong>and</strong> the slave designates the secondary system. A mirror must haveexactly one primary <strong>and</strong> exactly one secondary. The actual function of the peer is determinedbased on the peer role (see below).Important: A single <strong>XIV</strong> can contain both master volumes <strong>and</strong> CGs (mirroring to another<strong>XIV</strong>) <strong>and</strong> slave volumes <strong>and</strong> CGs (mirroring from another <strong>XIV</strong>). Peers in a master role <strong>and</strong>peers in a slave role on the same <strong>XIV</strong> system must belong to different mirror couplings.76 <strong>IBM</strong> <strong>XIV</strong> <strong>Storage</strong> <strong>System</strong>: <strong>Copy</strong> <strong>Services</strong> <strong>and</strong> <strong>Migration</strong>
The various mirroring role status options are:► Designations:– Primary: the designation of the source peer, which is initially assigned the master role– Secondary: the designation of the target peer, which initially plays the slave role► Role status:– Master: denotes the peer with the source data in a mirror coupling. Such peers servehost requests <strong>and</strong> are the source for synchronization updates to the slave peer. Insynchronous mirroring, slave <strong>and</strong> master roles can be switched (switch_rolecomm<strong>and</strong>) if the status is synchronized). For both synchronous <strong>and</strong> asynchronousmirroring, the master can be changed (change_role comm<strong>and</strong>) to a slave if the status isinactive.– Slave: denotes the active target peer in a mirror. Such peers do not serve hostrequests <strong>and</strong> accept synchronization updates from a corresponding master. A slaveLUN could be accessed in read-only mode by a host. In synchronous mirroring, slave<strong>and</strong> master roles can be switched (switch_role comm<strong>and</strong>) if the status issynchronized. For both synchronous <strong>and</strong> asynchronous mirroring, a slave can bechanged (change_role comm<strong>and</strong>) to a master regardless of the synchronization state.As a master the LUN accepts write I/Os. The change_role <strong>and</strong> switch_role comm<strong>and</strong>sare relevant to disaster recovery situations <strong>and</strong> failover scenarios.Consistency groupWith mirroring (synchronous or asynchronous), the major reason for consistency groups is toh<strong>and</strong>le a large number of mirror pairs as a group (mirrored volumes are consistent). Insteadof dealing with many volume remote mirror pairs individually, consistency groups simplify theh<strong>and</strong>ling of many pairs considerably.Important: If your mirrored volumes are in a mirrored consistency group you cannot domirroring operations like deactivate or change_role on a single volume basis. If you want todo this, you must remove the volume from the consistency group (refer to “Removing avolume from a mirrored consistency group” on page 132 or “Removing a volume from amirrored consistency group” on page 159).Consistency groups also play an important role in the recovery process. If mirroring wassuspended (for example, due to complete link failure), data on different slave volumes at theremote <strong>XIV</strong> are consistent. However, when the links are up again <strong>and</strong> resynchronization isstarted, data spread across several slave volumes is not consistent until the master state issynchronized. To preserve the consistent state of the slave volumes, the <strong>XIV</strong> systemautomatically creates a snapshot of each slave volume <strong>and</strong> keeps it until the remote mirrorvolume pair is synchronized (the snapshot is kept until all pairs are synchronized in order toenable restoration to the same consistent point in time). If the remote mirror pairs are in aconsistency group, then the snapshot is taken for the whole group of slave volumes <strong>and</strong> thesnapshots are preserved until all pairs are synchronized. Then the snapshot is deletedautomatically.Chapter 4. Remote Mirroring 77
4.2.2 Operational proceduresMirroring operations involve configuration, initialization, ongoing operation, h<strong>and</strong>ling ofcommunication failures, <strong>and</strong> role switching activities.The following list defines the mirroring operation activities:► ConfigurationLocal <strong>and</strong> remote replication peers are defined by an administrator who specifies themaster <strong>and</strong> slave peers roles. These peers can be volumes or consistency groups. Thesecondary peer provides a backup of the primary.► InitializationMirroring operations begin with a master volume that contains data <strong>and</strong> a formatted slavevolume. The first step is to copy the data from the master volume (or CG) to the slavevolume (or CG). This process is called initialization. Initialization is performed once in thelifetime of a mirror. After it is performed, both volumes or CGs are considered to besynchronized to a specific point in time. The completion of initialization marks the firstpoint-in-time that a consistent master replica on the slave is available. Details of theprocess differ depending on the mirroring mode (synchronous or asynchronous). Refer to5.5, “Synchronous mirror step-by-step scenario” on page 137, for synchronous mirroring<strong>and</strong> 6.6, “Detailed asynchronous mirroring process” on page 173, for asynchronousmirroring.► Ongoing operationAfter the initialization process is complete, mirroring ensues.In synchronous mirroring, normal ongoing operation means that all data written to theprimary volume or CG is first mirrored to the slave volume or CG. At any point in time, themaster <strong>and</strong> slave volumes or CGs will be identical except for any unacknowledged(pending) writes.In asynchronous mirroring, ongoing operation means that data is written to the mastervolume or CG <strong>and</strong> then replicated on the slave volume or CG at specified intervals.► MonitoringThe <strong>XIV</strong> <strong>System</strong> effectively monitors the mirror activity <strong>and</strong> places events in the event logfor error conditions. Alerts can be set up to notify the administrator of such conditions. Youmust have set up SNMP trap monitoring tools or e-mail notification to be informed aboutabnormal mirroring situations.► H<strong>and</strong>ling of communication failuresFrom time to time the communication between the sites might break down. The mastercontinues to serve host requests, yet mirroring will only resume once the link is restored.Events will be generated for link failures.► Role switching (synchronous mirroring only)If required, mirror peer roles of slave <strong>and</strong> master can be switched. A role switching isalways initiated at the master site. Usually, this is done for certain maintenance operationsor because of a drill that tests the disaster recovery procedures.► Role changeIn case of a disaster at the primary site, the master peer might fail. To allow read/writeaccess to the volumes at the remote site, the volume’s role must be changed from slave tomaster. A role change only changes the role of the <strong>XIV</strong> volumes or CGs to which thecomm<strong>and</strong> was addressed. Remote mirror peer volumes or CGs are not changedautomatically. That is why changing roles on both mirror sides if mirroring is to be restoredis imperative (if possible).78 <strong>IBM</strong> <strong>XIV</strong> <strong>Storage</strong> <strong>System</strong>: <strong>Copy</strong> <strong>Services</strong> <strong>and</strong> <strong>Migration</strong>
4.2.3 Mirroring statusThe status of a mirror is affected by a number of factors such as the links between the <strong>XIV</strong>s orthe initialization state.Link statusThe link status reflects the connection from the master to the slave volume or CG. A link hasa direction (from local site to remote or vice versa). A failed link or a failed secondary systemboth result in a link error status. The link state is one of the factors determining the mirroroperational status. Link states are as follows:►►OK: link is up <strong>and</strong> functioningError: link is downFigure 4-5 <strong>and</strong> Figure 4-6 depict how the link status is reflected in the <strong>XIV</strong> GUI, respectively.Figure 4-5 Link upFigure 4-6 Link downIf there are several links (at least two) in one direction <strong>and</strong> one link fails, this usually does notaffect mirroring as long as the b<strong>and</strong>width of the remaining link is high enough to keep up withthe data traffic.Monitoring the link utilizationThe mirroring b<strong>and</strong>width of the links must be high enough to cope with the data traffic causedby the changes on the master volumes. During the planning phase, before setting upmirroring, monitor the write activity to the local volumes. The b<strong>and</strong>width of the links formirroring must be as large as the peak write workload.Chapter 4. Remote Mirroring 79
After mirroring has been implemented, from time to time monitor the utilization of the links.The <strong>XIV</strong> statistics panels allow you to select targets to show the data traffic to remote <strong>XIV</strong><strong>System</strong>s, as shown in Figure 4-7.Figure 4-7 Monitoring link utilizationMirror operational statusMirror operational status is defined as either operational or non_operational.►►Mirroring is operational if:– The activation state is active.– The link is UP.– Both peers have different roles (master or slave).– The mirror is active.Mirroring is non_operational if:– The mirror is inactive.– The link is in an error state or deactivated (link down).Synchronous mirroring statesNote: This section only applies to synchronous mirroring.The synchronization status reflects the consistency of the data between the master <strong>and</strong> slavevolumes. Because the purpose of the remote mirroring feature is to ensure that the slavevolumes are an identical copy of the master volumes, this status indicates whether thisobjective is currently being achieved.80 <strong>IBM</strong> <strong>XIV</strong> <strong>Storage</strong> <strong>System</strong>: <strong>Copy</strong> <strong>Services</strong> <strong>and</strong> <strong>Migration</strong>
The following states or statuses are possible.► InitializingThe first step in remote mirroring is to create a copy of all the data from the master volumeor CG to the slave volume or CG. During this initial copy phase, the status remainsinitializing.► Synchronized (master volume or CG only)/consistent (slave volume or CG only)This status indicates that all data that has been written to the master volume or CG hasalso been written to the slave volume or CG. Ideally, the master <strong>and</strong> slave volumes or CGsmust always be synchronized. However, this does not always indicate that the twovolumes are absolutely identical in case of a disaster because there are situations whenthere might be a limited amount of data that was written to one volume, but that was notyet written to its peer volume. This means that the write operations have not yet beenacknowledged. These are also known as pending writes or data in flight.► Unsynchronized (master volume only)/inconsistent (slave volume only)After a volume or CG has completed the initializing stage <strong>and</strong> achieved the synchronizedstatus it can become unsynchronized (master) or inconsistent (slave). This occurs when itis not known whether all the data that has been written to the master volume has alsobeen written to the slave volume. This status can occur in the following cases:– The communications link is down <strong>and</strong> as a result certain data might have been writtento the master volume, but was not yet written to the slave volume.– Secondary <strong>XIV</strong> is down. This is similar to communication link errors because in thisstate, the Primary <strong>XIV</strong> is updated, whereas the secondary is not.– Remote mirroring is deactivated. As a result, certain data might have been written tothe master volume <strong>and</strong> not to the secondary volume.The <strong>XIV</strong> keeps track of the partitions that have been modified on the master volumes <strong>and</strong>when the link is operational again or the remote mirroring is reactivated. These changedpartitions can be sent to the remote <strong>XIV</strong> <strong>and</strong> applied to the slave volumes there.Asynchronous mirroring statesNote: This section only applies to asynchronous mirroring.The mirror states can be one of the following:► Inactive: The synchronization process is disabled. It is possible to delete a mirror.► Initializing: The initial copy is not done yet. Synchronization does not start until theinitialization completes.► When initialization is complete, the synchronization process is enabled. It is possible torun sync jobs <strong>and</strong> copy data between master <strong>and</strong> slave. The possible synchronizationstates are:– RPO_OK: Synchronization has completed within the specified sync job interval time(RPO).– RPO_Lagging: Synchronization has completed but took longer that the specifiedinterval time (RPO).Chapter 4. Remote Mirroring 81
4.3 <strong>XIV</strong> Remote Mirroring usageRemote Mirroring solutions can be used to address multiple types of failures <strong>and</strong> plannedoutages, from events affecting a single <strong>XIV</strong> system or its components, to events affecting anentire data center or campus, or events affecting an entire geographical region. When theproduction <strong>XIV</strong> system <strong>and</strong> the disaster recovery (DR) <strong>XIV</strong> system are separated byincreasing distance, disaster recovery protection for more levels of failures is possible, asillustrated in Figure 4-8. A global distance disaster recovery solution protects fromsingle-system failures, local disasters, <strong>and</strong> regional disasters.Remote MirroringSingle <strong>System</strong> Failure• Component failures• Single system failuresLocal Disaster• Terrorist Attacks•Human Error•HVAC failures• Power failures• Building Fire• Architectural failures• Planned MaintenanceRegional Disasters• Electric grid failures• Natural disasters- Floods- Hurricanes- EarthquakesHigh Availability Metro Distance Recovery Global Distance Recovery<strong>IBM</strong> <strong>System</strong> <strong>Storage</strong> TMFigure 4-8 Disaster recovery protection levels©2009 <strong>IBM</strong> Corporation 3Several configurations are possible:► Single-site high-availability <strong>XIV</strong> Remote Mirroring configurationProtection for the event of a failure or planned outage of an <strong>XIV</strong> system (single-systemfailure) can be provided by a zero-distance high-availability (HA) solution including another<strong>XIV</strong> system in the same location (zero distance). Typical usage of this configuration is an<strong>XIV</strong> synchronous mirroring solution that is part of a high-availability clustering solutionincluding both servers <strong>and</strong> <strong>XIV</strong> storage systems. Figure 4-9 shows a single-sitehigh-availability configuration (where both <strong>XIV</strong> systems are in the same data center).Figure 4-9 Single site HA configuration82 <strong>IBM</strong> <strong>XIV</strong> <strong>Storage</strong> <strong>System</strong>: <strong>Copy</strong> <strong>Services</strong> <strong>and</strong> <strong>Migration</strong>
►Metro region <strong>XIV</strong> Remote Mirroring configurationProtection for the event of a failure or planned outage of an entire location (local disaster)can be provided by a metro distance disaster recovery solution, including another <strong>XIV</strong>system in a different location within a metro region. The two <strong>XIV</strong> systems may be indifferent buildings on a corporate campus or in different buildings within the same city(typically up to approximately 100 km apart). Typical usage of this configuration is an <strong>XIV</strong>synchronous mirroring solution. Figure 4-10 shows a metro region disaster recoveryconfiguration.Figure 4-10 Metro region disaster recovery configuration►Out-of-region <strong>XIV</strong> Remote Mirroring configurationProtection for the event of a failure or planned outage of an entire geographic region(regional disaster) can be provided by a global distance disaster recovery solutionincluding another <strong>XIV</strong> system in a different location outside the metro region. (The twolocations may be separated by up to a global distance.) Typical usage of this configurationis an <strong>XIV</strong> asynchronous mirroring solution. Figure 4-11 shows an out-of-region disasterrecovery configuration.Figure 4-11 Out-of-region disaster recovery configurationChapter 4. Remote Mirroring 83
►Metro region plus out-of-region <strong>XIV</strong> mirroring configurationCertain volumes may be protected by a metro distance disaster recovery configuration,<strong>and</strong> other volumes may be protected by a global distance disaster recovery configuration,as shown in the configuration in Figure 4-12. Typical usage of this configuration is an <strong>XIV</strong>synchronous Mirroring solution for a set of volumes with a requirement for zero RPO, <strong>and</strong>an <strong>XIV</strong> asynchronous mirroring solution for a set of volumes with a requirement for a low,but non-zero RPO. Figure 4-12 shows a metro region plus out-of-region configuration.Figure 4-12 Metro region plus out-of-region configurationUsing snapshotsSnapshots can be used with Remote Mirroring to provide copies of production data forbusiness or IT purposes. Moreover, when used with Remote Mirroring, snapshots provideprotection against data corruption.84 <strong>IBM</strong> <strong>XIV</strong> <strong>Storage</strong> <strong>System</strong>: <strong>Copy</strong> <strong>Services</strong> <strong>and</strong> <strong>Migration</strong>
Like any continuous or near-continuous remote mirroring solution, <strong>XIV</strong> Remote Mirroringcannot protect against software data corruption because the corrupted data will be copied aspart of the remote mirroring solution. However, the <strong>XIV</strong> snapshot function provides apoint-in-time image that may be used for rapid restore in the event of software data corruption(that occurred after the snapshot was taken), <strong>and</strong> <strong>XIV</strong> snapshot may be used in combinationwith <strong>XIV</strong> Remote Mirroring, as illustrated in Figure 4-13.Point in Time<strong>Copy</strong>Remote MirroringData CorruptionPoint In TimeDisk Backup,Extra CopiesSingle <strong>System</strong> Failure• Component failures• Single system failuresHigh AvailabilityLocal Disaster• Terrorist Attacks•Human Error•HVAC failures•Power failures• Building Fire• Architectural failures• Planned MaintenanceRegional Disasters• Electric grid failures• Natural disasters- Floods- Hurricanes- EarthquakesMetro Distance Recovery Global Distance Recovery<strong>IBM</strong> S t StTMFigure 4-13 Combining snapshots with Remote Mirroring8Note that recovery using a snapshot warrants deletion <strong>and</strong> recreation of the mirror.► <strong>XIV</strong> snapshot (within a single <strong>XIV</strong> system)Protection for the event of software data corruption can be provided by a point-in-timebackup solution using the <strong>XIV</strong> snapshot function within the <strong>XIV</strong> system that contains theproduction volumes. Figure 4-14 shows a single-system point-in-time online backupconfiguration.Figure 4-14 Point-in-time online backup configuration►<strong>XIV</strong> local snapshot plus Remote Mirroring configurationAn <strong>XIV</strong> snapshot of the production (local) volume may be used in addition to <strong>XIV</strong> RemoteMirroring of the production volume when protection from logical data corruption is requiredin addition to protection against failures <strong>and</strong> disasters. The additional <strong>XIV</strong> snapshot of theproduction volume provides a quick restore to recover from data corruption. An additionalSnapshot of the production (local) volume may also be used for other business or ITpurposes (for example, reporting, data mining, development <strong>and</strong> test, <strong>and</strong> so on).Chapter 4. Remote Mirroring 85
Figure 4-15 shows an <strong>XIV</strong> local snapshot plus Remote Mirroring configuration.Figure 4-15 Local snapshot plus Remote Mirroring configuration►<strong>XIV</strong> remote snapshot plus Remote Mirroring configurationAn <strong>XIV</strong> snapshot of the consistent replicated data at the remote site may be used inaddition to <strong>XIV</strong> Remote Mirroring to provide an additional consistent copy of data that canbe used for business purposes such as data mining, reporting, <strong>and</strong> for IT purposes, suchas remote backup to tape or development, test, <strong>and</strong> quality assurance. Figure 4-16 showsan <strong>XIV</strong> remote snapshot plus Remote Mirroring configuration.Figure 4-16 <strong>XIV</strong> remote snapshot plus Remote Mirroring configuration4.4 <strong>XIV</strong> Remote Mirroring actionsThese <strong>XIV</strong> Remote Mirroring actions are the fundamental building blocks of <strong>XIV</strong> RemoteMirroring solutions <strong>and</strong> usage scenarios.4.4.1 Defining the <strong>XIV</strong> mirroring targetIn order to connect two <strong>XIV</strong> systems for remote mirroring, each system must be defined to bea mirroring target of the other. An <strong>XIV</strong> mirroring target is an <strong>XIV</strong> system with volumes thatreceive data copied through <strong>XIV</strong> remote mirroring. Defining an <strong>XIV</strong> mirroring target for an <strong>XIV</strong>system simply involves giving the target a name <strong>and</strong> specifying whether Fibre Channel oriSCSI protocol will be used to copy the data. For a practical illustration refer to 4.11.2,“Remote mirror target configuration” on page 118.86 <strong>IBM</strong> <strong>XIV</strong> <strong>Storage</strong> <strong>System</strong>: <strong>Copy</strong> <strong>Services</strong> <strong>and</strong> <strong>Migration</strong>
<strong>XIV</strong> Remote Mirroring copies data from a peer on one <strong>XIV</strong> system to a peer on another <strong>XIV</strong>system (the mirroring target system). Whereas the basic underlying mirroring relationship is aone-to-one relationship between two peers, <strong>XIV</strong> systems may be connected in severaldifferent ways:► <strong>XIV</strong> target configuration: one-to-oneThe most typical <strong>XIV</strong> Remote Mirroring configuration is a one-to-one relationship betweena local <strong>XIV</strong> system (production system) <strong>and</strong> a remote <strong>XIV</strong> system (DR system), as shownin Figure 4-17. This configuration is typical where there is a single production site <strong>and</strong> asingle disaster recovery (DR) site.TargetSMFigure 4-17 One-to-one target configurationDuring normal remote mirroring operation, one <strong>XIV</strong> system (at the DR site) will be activeas a mirroring target. The other <strong>XIV</strong> system (at the local production site) will be active as amirroring target only when it becomes available again after an outage <strong>and</strong> switch ofproduction to the DR site. Changes made while production was running at the DR site arecopied back to the original production site, as shown in Figure 4-18.TargetSMFigure 4-18 <strong>Copy</strong>ing changes back to productionIn a configuration with two identically provisioned sites, production may be periodicallyswitched from one site to another as part of normal operation, <strong>and</strong> the <strong>XIV</strong> system that isthe active mirroring target will be switched at the same time. (The mirror_switch_rolescomm<strong>and</strong> allows for switching roles in both synchronous <strong>and</strong> asynchronous mirroring.Note that there are special requirements for doing so with asynchronous mirroring.)Chapter 4. Remote Mirroring 87
►<strong>XIV</strong> target configuration: synchronous <strong>and</strong> asynchronous one-to-one<strong>XIV</strong> supports both synchronous <strong>and</strong> asynchronous mirroring (for different peers) on thesame <strong>XIV</strong> system, so a single local <strong>XIV</strong> system could have certain volumes synchronouslymirrored to a remote <strong>XIV</strong> system, whereas other peers are asynchronously mirrored to thesame remote <strong>XIV</strong> system as shown in Figure 4-19. Highly response-time-sensitivevolumes could be asynchronously mirrored <strong>and</strong> less response-time-sensitive volumescould be synchronously mirrored to a single remote <strong>XIV</strong>.Figure 4-19 Synchronous <strong>and</strong> asynchronous peers►<strong>XIV</strong> target configuration: fan-outA single local (production) <strong>XIV</strong> system may be connected to two remote (DR) <strong>XIV</strong> systemsin a fan-out configuration, as shown in Figure 4-20. Both remote <strong>XIV</strong> systems could be atthe same location, or each of the two target systems could be at a different location.Certain volumes on the local <strong>XIV</strong> system are copied to one remote <strong>XIV</strong> system, <strong>and</strong> othervolumes on the same local <strong>XIV</strong> system are copied to a different remote <strong>XIV</strong> system. Thisconfiguration may be used when each <strong>XIV</strong> system at the DR site has less availablecapacity than the <strong>XIV</strong> system at the local site.TargetTargetFigure 4-20 Fan-out target configuration88 <strong>IBM</strong> <strong>XIV</strong> <strong>Storage</strong> <strong>System</strong>: <strong>Copy</strong> <strong>Services</strong> <strong>and</strong> <strong>Migration</strong>
►<strong>XIV</strong> target configuration: synchronous <strong>and</strong> asynchronous fan-out<strong>XIV</strong> supports both synchronous <strong>and</strong> asynchronous mirroring (for different peers) on thesame <strong>XIV</strong> system, so a single local <strong>XIV</strong> system could have certain peers synchronouslymirrored to a remote <strong>XIV</strong> system at a metro distance, whereas other peers areasynchronously mirrored to a remote <strong>XIV</strong> system at a global distance, as shown inFigure 4-21. This configuration may be used when higher priority data is synchronouslymirrored to another <strong>XIV</strong> system within the metro area, <strong>and</strong> lower priority data isasynchronously mirrored to an <strong>XIV</strong> system within or outside the metro area.TargetTargetFigure 4-21 Synchronous <strong>and</strong> asynchronous fan-out►<strong>XIV</strong> target configuration: fan-inTwo (or more) local <strong>XIV</strong> systems may have peers mirrored to a single remote <strong>XIV</strong> systemin a fan-in configuration, as shown in Figure 4-22. This configuration must be evaluatedcarefully <strong>and</strong> used with caution because it includes the risk of overloading the singleremote <strong>XIV</strong> system. The performance capability of the single remote <strong>XIV</strong> system must becarefully reviewed before implementing a fan-in configuration.This configuration may be used in situations where there is a single disaster recovery datacenter supporting multiple production data centers, or when multiple <strong>XIV</strong> systems aremirrored to a single <strong>XIV</strong> system at a service provider.TargetFigure 4-22 Fan-in configurationChapter 4. Remote Mirroring 89
►<strong>XIV</strong> target configuration: bi-directionalTwo different <strong>XIV</strong> systems may have different volumes mirrored in a bi-directionalconfiguration, as shown in Figure 4-23. This configuration may be used for situationswhere there are two active production sites <strong>and</strong> each site provides a DR solution for theother. Each <strong>XIV</strong> system is active as a production system for certain peers <strong>and</strong> as amirroring target for other peers.STargetTargetMFigure 4-23 Bi-directional configuration4.4.2 Setting the maximum initialization <strong>and</strong> synchronization ratesThe <strong>XIV</strong> system allows a user-specifiable maximum rate (in MBps) for remote mirroringcoupling initialization, <strong>and</strong> a different user-specifiable maximum rate for re-synchronization.The initialization rate <strong>and</strong> resynchronization rate are specified for each mirroring target usingthe XCLI comm<strong>and</strong> target_config_sync_rates. As such, if different rates are required fordifferent volumes for a single remote target <strong>XIV</strong> system, multiple logical targets may bedefined for the single physical remote <strong>XIV</strong> system. The actual effective initialization orsynchronization rate will also be dependent on the number <strong>and</strong> speed of connectionsbetween the <strong>XIV</strong> systems. The maximum initialization rate must be less than or equal to themaximum sync job rate (asynchronous mirroring only), which must be less than or equal tothe maximum resynchronization rate. The defaults are:► Maximum initialization rate: 100 MBps► Maximum sync job: 300 MBps► Maximum resync rate: 300 MBps90 <strong>IBM</strong> <strong>XIV</strong> <strong>Storage</strong> <strong>System</strong>: <strong>Copy</strong> <strong>Services</strong> <strong>and</strong> <strong>Migration</strong>
4.4.3 Connecting <strong>XIV</strong> mirroring portsAfter defining remote mirroring targets, one-to-one connections must be made between portson each <strong>XIV</strong> system. For an illustration of these actions using the GUI or the XCLI, refer to4.11, “Using the GUI or XCLI for Remote Mirroring actions” on page 113.► FC portsFor <strong>XIV</strong> Fibre Channel (FC) ports, connections are unidirectional—from an initiator port(port 4 is configured as a Fibre Channel initiator by default) on the source <strong>XIV</strong> system to atarget port (typically port 2) on the target <strong>XIV</strong> system. Use a minimum of four connections(two connections in each direction, from ports in two different modules, using a total ofeight ports) to provide availability protection. Connections must be made between ports onmodules with the same number on each <strong>XIV</strong> system (for example, from module 9 tomodule 9 <strong>and</strong> from module 6 to module 6, as shown in Figure 4-24).9876Data,5,Data, Mgt 4 ,MgtFC SANFC SAN9876Data,5,Data, Mgt 4 ,MgtFigure 4-24 Connecting <strong>XIV</strong> mirroring ports (FC connections)►In Figure 4-24, the solid lines represent mirroring connections used during normaloperation (the mirroring target system is on the right), <strong>and</strong> the dotted lines representmirroring connections used when production is running at the disaster recovery site <strong>and</strong>changes are being copied back to the original production site (mirroring target is on theleft.)<strong>XIV</strong> Fibre Channel ports may be easily <strong>and</strong> dynamically configured as initiator or targetports.iSCSI portsFor iSCSI ports, connections are bi-directional.Use a minimum of two connections (with each of these ports in a different module) using atotal of four ports to provide availability protection. In Figure 4-25 on page 92, the solidlines represent data flow during normal operation <strong>and</strong> the dotted lines represent data flowwhen production is running at the disaster recovery site <strong>and</strong> changes are being copiedback to the original production site.Chapter 4. Remote Mirroring 91
Connections must be made between ports on modules with the same number on each<strong>XIV</strong> system (for example, from module 9 to module 9 <strong>and</strong> from module 7 to module 7, asshown in Figure 4-25).9879 IP Network987Data, ,MgtData, ,MgtIP NetworkData, ,MgtData, ,MgtFigure 4-25 Connecting <strong>XIV</strong> mirroring ports (iSCSI connections)Note: For asynchronous mirroring over iSCSI links, a reliable, dedicated network mustbe available. It requires consistent network b<strong>and</strong>width <strong>and</strong> a non-shared link.4.4.4 Defining the <strong>XIV</strong> mirror coupling <strong>and</strong> peers: volumeAfter the mirroring targets have been defined, a coupling or mirror may be defined, creating amirroring relationship between two peers.Before discussing actions involved in creating mirroring pairs, we must introduce the basic<strong>XIV</strong> concepts used in the discussion.<strong>Storage</strong> pools, volumes, <strong>and</strong> consistency groupsAn <strong>XIV</strong> storage pool is a purely administrative construct used to manage <strong>XIV</strong> logical <strong>and</strong>physical capacity allocation.An <strong>XIV</strong> volume is a logical volume that is presented to an external server as a logical unitnumber (LUN). An <strong>XIV</strong> volume is allocated from logical <strong>and</strong> physical capacity within a single<strong>XIV</strong> storage pool. The physical capacity on which data for an <strong>XIV</strong> volume is stored is alwaysspread across all available disk drives in the <strong>XIV</strong> systemThe <strong>XIV</strong> system is data aware. It monitors <strong>and</strong> reports the amount of physical data written toa logical volume <strong>and</strong> does not copy any part of the volume that has not been used yet to storeany actual data.92 <strong>IBM</strong> <strong>XIV</strong> <strong>Storage</strong> <strong>System</strong>: <strong>Copy</strong> <strong>Services</strong> <strong>and</strong> <strong>Migration</strong>
In Figure 4-26, seven logical volumes have been allocated from a storage pool with 40 TB ofcapacity. Remember that the capacity assigned to a storage pool <strong>and</strong> its volumes is spreadacross all available physical disk drives in the <strong>XIV</strong> system.40TB<strong>Storage</strong>PoolFigure 4-26 <strong>Storage</strong> pool with seven volumesWith Remote Mirroring, the concept of consistency group represents a logical container for agroup of volumes, allowing them to be managed as a single unit. Instead of dealing with manyvolume remote mirror pairs individually, consistency groups simplify the h<strong>and</strong>ling of manypairs considerably.An <strong>XIV</strong> consistency group exists within the boundary of an <strong>XIV</strong> storage pool in a single <strong>XIV</strong>system (in other words, you can have different CGs in different storage pools within an <strong>XIV</strong>storage system, but a CG cannot span multiple storage pools). All volumes in a particularconsistency group are in the same <strong>XIV</strong> storage pool.In Figure 4-27, an <strong>XIV</strong> storage pool with 40 TB capacity contains seven logical volumes. Oneconsistency group has been defined for the <strong>XIV</strong> storage pool, but no volumes have beenadded to or created in the consistency group.40TB<strong>Storage</strong>PoolCGFigure 4-27 Consistency group definedVolumes may be easily <strong>and</strong> dynamically (that is, without stopping mirroring or applicationI/Os) added to a consistency group.Chapter 4. Remote Mirroring 93
In Figure 4-28, five of the seven existing volumes in the storage pool have been added to theconsistency group in the storage pool. One or more additional volumes may be dynamicallyadded to the consistency group at any time. Also, volumes may be dynamically moved fromanother storage pool to the storage pool containing the consistency group, <strong>and</strong> then added tothe consistency group.40TB<strong>Storage</strong>PoolCGFigure 4-28 Volumes added to the consistency groupVolumes may also be easily <strong>and</strong> dynamically removed from an <strong>XIV</strong> consistency group. InFigure 4-29, one of the five volumes has been removed from the consistency group, leavingfour volumes remaining in the consistency group. It is also possible to remove all volumesfrom a consistency group.40TB<strong>Storage</strong>PoolCGFigure 4-29 Volume removed from the consistency groupDependent write consistency<strong>XIV</strong> Remote Mirroring provides dependent write consistency, preserving the order ofdependent writes in the mirrored data. Dependent write consistency is also referred to ascrash consistency or power-loss consistency, <strong>and</strong> applications <strong>and</strong> databases are developedto be able to perform a fast restart from volumes that are consistent in terms of dependentwrites.94 <strong>IBM</strong> <strong>XIV</strong> <strong>Storage</strong> <strong>System</strong>: <strong>Copy</strong> <strong>Services</strong> <strong>and</strong> <strong>Migration</strong>
Dependent writes: normal operationApplications or databases often manage dependent write consistency using a 3-step processsuch as the sequence of three writes shown in Figure 4-30. Even when the writes aredirected at different logical volumes, the application ensures that the writes are committed inorder during normal operation.2) Update RecordDB1) Intend to update DB3) DB updatedLogFigure 4-30 Dependent writes: normal operationDependent writes: failure scenarioIn the event of a failure, applications or databases manage dependent writes, as shown inFigure 4-31. If the database record is not updated (step 2), the application does not allow DBupdated (step 3) to be written to the log.x2) Update RecordDB1) Intend to update DB3) DB updatedLogFigure 4-31 Dependent writes: failure scenarioJust as the application or database manages dependent write consistency for the productionvolumes, the <strong>XIV</strong> system must manage dependent write consistency for the mirror targetvolumes.Chapter 4. Remote Mirroring 95
If multiple volumes will have dependent write activity, they may be put into a single storagepool in the <strong>XIV</strong> system <strong>and</strong> then added to an <strong>XIV</strong> consistency group to be managed as asingle unit for remote mirroring. Any mirroring actions are taken simultaneously against themirrored consistency group as a whole, preserving dependent write consistency. Mirroringactions cannot be taken against an individual volume pair while it is part of a mirrored CG.However, an individual volume pair may be dynamically removed from the mirroredconsistency group.<strong>XIV</strong> also supports creation of application-consistent data in the remote mirroring targetvolumes, as discussed 4.5.4, “Creating application-consistent data at both local <strong>and</strong> theremote sites” on page 109.Defining mirror coupling <strong>and</strong> peersAfter the remote mirroring targets have been defined, a coupling or mirror may be defined,creating a mirroring relationship between two peers.The two peers in the mirror coupling may be either two volumes (volume peers) or twoconsistency groups (CG peers), as shown in Figure 4-32.SITE 1 SITE 2ProductionDR Test/Recovery ServersVolume PeerDesignatedPrimaryMMMVolumeCoupling/MirrorDefinedVolumeCoupling/MirrorDefinedVolumeCoupling/MirrorDefinedSSSVolume PeerDesignatedSecondaryConsistency Group PeerPrimary Designation (P)Master Role (M)P/MCGCoupling/MirrorDefinedS/SConsistency Group PeerSecondary Designation (S)Slave Role (S)Figure 4-32 Defining mirror couplingEach of the two peers in the mirroring relationship is given a designation <strong>and</strong> a role. Thedesignation indicates the original or normal function of each of the two peers—either primaryor secondary. The peer designation does not change with operational actions or comm<strong>and</strong>s.(If necessary, the peer designation may be changed by explicit user comm<strong>and</strong> or action.)The role of a peer indicates its current (perhaps temporary) operational function (eithermaster or slave). The operational role of a peer may change as the result of user comm<strong>and</strong>sor actions. Peer roles typically change during DR testing or a true disaster recovery <strong>and</strong>production site switch.When a mirror coupling is created, the first peer specified (for example, the volumes or CG atsite 1, as shown in Figure 4-32) is the source for data to be replicated to the target system, soit is given the primary designation <strong>and</strong> the master role.The second peer specified (or automatically created by the <strong>XIV</strong> system) when the mirroringcoupling is created is the target of data replication, so it is given the secondary designation<strong>and</strong> the slave role.96 <strong>IBM</strong> <strong>XIV</strong> <strong>Storage</strong> <strong>System</strong>: <strong>Copy</strong> <strong>Services</strong> <strong>and</strong> <strong>Migration</strong>
When a mirror coupling relationship is first created, no data movement occurs.4.4.5 Activating an <strong>XIV</strong> mirror couplingWhen an <strong>XIV</strong> mirror coupling is first activated, all actual data existing on the master is copiedto the slave. This process is referred to as initialization. <strong>XIV</strong> Remote Mirroring copies volumeidentification information (that is, physical volume ID/PVID) <strong>and</strong> any actual data on thevolumes. Space that has not been used is not copied.Initialization may take a significant amount of time if a large amount of data exists on themaster when a mirror coupling is activated. As discussed earlier, the rate for this initial copy ofdata can be specified by the user. The speed of this initial copy of data will also be affected bythe connectivity <strong>and</strong> b<strong>and</strong>width (number of links <strong>and</strong> link speed) between the <strong>XIV</strong> primary <strong>and</strong>secondary systems.As an option to remove the impact of distance on initialization, <strong>XIV</strong> mirroring may be initializedwith the target system installed locally, <strong>and</strong> the target system may be disconnected afterinitialization, shipped to the remote site <strong>and</strong> reconnected, <strong>and</strong> mirroring reactivated.If a remote mirroring configuration is set up when a volume is first created (that is, before anyapplication data has been written to the volume), initialization will be very quick.When an <strong>XIV</strong> consistency group mirror coupling is created, the CG must be empty so there isno data movement <strong>and</strong> the initialization process is extremely fast.The mirror coupling status at the end of initialization differs for <strong>XIV</strong> synchronous mirroring <strong>and</strong><strong>XIV</strong> asynchronous mirroring (see “Synchronous mirroring states” on page 80 <strong>and</strong> “<strong>Storage</strong>pools, volumes, <strong>and</strong> consistency groups” on page 92), but in either case, when initialization iscomplete, a consistent set of data exists at the remote site. See Figure 4-33.SITE 1 SITE 2ProductionDR Test/Recovery ServersVolume PeerDesignatedPrimaryMMMVolumeCoupling/MirrorActiveVolumeCoupling/MirrorActiveVolumeCoupling/MirrorActiveSSSVolume PeerDesignatedSecondaryConsistency Group PeerPrimary Designation (P)Master Role (M)P/MCGCoupling/MirrorActiveS/SConsistency Group PeerSecondary Designation (S)Slave Role (S)Figure 4-33 Active mirror coupling4.4.6 Adding volume mirror coupling to consistency group mirror couplingOnce a volume mirror coupling has completed initialization, the master volume may be addedto a mirrored consistency group in the same storage pool (note that with each mirroring typeChapter 4. Remote Mirroring 97
there are certain additional constraints, such as same role, target, schedule, <strong>and</strong> so on). Theslave volume is automatically added to the consistency group on the remote <strong>XIV</strong> system.In Figure 4-34, three active volume couplings that have completed initialization have beenmoved into the active mirrored consistency group.SITE 1 SITE 2ProductionDR Test/Recovery ServersConsistency Group PeerPrimary Designation (P)Master Role (M)P/MCGCoupling/MirrorActiveS/SConsistency Group PeerSecondary Designation (S)Slave Role (S)Figure 4-34 Consistency group mirror couplingOne or more additional mirrored volumes may be added to a mirrored consistency group at alater time in the same way.It is also important to realize that in a CG all volumes have the same role. Also, consistencygroups are h<strong>and</strong>led as a single entity <strong>and</strong>, for example, in asynchronous mirroring, a delay inreplicating a single volume affects the status of the entire CG.4.4.7 Normal operation: volume mirror coupling <strong>and</strong> CG mirror coupling<strong>XIV</strong> mirroring normal operation begins after initialization has completed successfully <strong>and</strong> allactual data on the master volume at the time of activation has been copied to the slavevolume. During normal operation, a consistent set of data is available on the slave volumes.Normal operation, statuses, <strong>and</strong> reporting differ for <strong>XIV</strong> synchronous mirroring <strong>and</strong> <strong>XIV</strong>asynchronous mirroring. Refer to Chapter 5, “Synchronous Remote Mirroring” on page 125,<strong>and</strong> Chapter 6, “Asynchronous Remote Mirroring” on page 149, for details.98 <strong>IBM</strong> <strong>XIV</strong> <strong>Storage</strong> <strong>System</strong>: <strong>Copy</strong> <strong>Services</strong> <strong>and</strong> <strong>Migration</strong>
During normal operation, a single <strong>XIV</strong> system may contain one or more mirrors of volumepeers as well as one or more mirrors of CG peers, as shown in Figure 4-35.SITE 1 SITE 2Production ServersDR Test/Recovery ServersRemote TargetVolume PeerDesignated PrimaryMaster RoleMVolumeCoupling/MirrorActiveSVolume PeerDesignated SecondarySlave RoleCG PeerDesignated PrimaryMaster RoleMCGCoupling/MirrorActiveSCG PeerDesignated SecondarySlave RoleFigure 4-35 Normal operations: volume mirror coupling <strong>and</strong> CG mirror coupling4.4.8 Deactivating <strong>XIV</strong> mirror coupling: change recordingAn <strong>XIV</strong> mirror coupling may be deactivated by a user comm<strong>and</strong>. In this case, the mirrortransitions to st<strong>and</strong>by mode, as shown in Figure 4-36.SITE 1 SITE 2Production ServersDR Test/Recovery ServersVolume PeerDesignated PrimaryMaster RoleMVolumeCoupling/MirrorSt<strong>and</strong>bySVolume PeerDesignated SecondaryMaster RoleCG PeerDesignated PrimaryMaster RoleMCGCoupling/MirrorSt<strong>and</strong>bySCG PeerDesignated SecondaryMaster RoleFigure 4-36 Deactivating <strong>XIV</strong> mirror coupling: change recordingDuring st<strong>and</strong>by mode, a consistent set of data is available at the remote site (site 2, in ourexample). The currency of the consistent data ages in comparison to the master volumes,<strong>and</strong> the gap increases while mirroring is in st<strong>and</strong>by mode.Chapter 4. Remote Mirroring 99
In synchronous mirroring, during st<strong>and</strong>by mode, <strong>XIV</strong> metadata is used to note which parts ofa master volume have changed but have not yet been replicated to the slave volume(because mirroring is not currently active). The actual changed data is not retained in cache,so there is no danger of exhausting cache while mirroring is in st<strong>and</strong>by mode.When synchronous mirroring is reactivated by a user comm<strong>and</strong> or communication is restored,the metadata is used to resynchronize changes from the master volumes to the slavevolumes. <strong>XIV</strong> mirroring records changes for master volumes only. If it is desirable to recordchanges to both peer volumes while mirroring is in st<strong>and</strong>by mode, the slave volume must bechanged to a master volume.Note that in asynchronous mirroring, metadata is not used <strong>and</strong> the comparison between themost_recent <strong>and</strong> last_replicated snapshots indicates the data that must be replicated.Planned deactivation of <strong>XIV</strong> remote mirroring may be done to suspend remote mirroringduring a planned network outage or DR test, or to reduce b<strong>and</strong>width during a period of peakload.4.4.9 Changing role of slave volume or CGWhen <strong>XIV</strong> mirroring is active, the slave volume or CG is locked <strong>and</strong> write access is prohibited.To allow write access to a slave peer, in case of failure or unavailability of the master, theslave volume role must be changed to the master role. Refer to Figure 4-37.SITE 1 SITE 2Production ServersDR Test/Recovery ServersVolume PeerDesignated PrimaryMaster RoleMVolumeCoupling/MirrorSt<strong>and</strong>byMVolume PeerDesignated SecondaryMaster RoleCG PeerDesignated PrimaryMaster RoleMCGCoupling/MirrorSt<strong>and</strong>byMCG PeerDesignated SecondaryMaster RoleFigure 4-37 Changing role of slave volume or CGChanging the role of a volume from slave to master allows the volume to be accessed. Insynchronous mirroring, changing the role also starts metadata recording for any changesmade to the volume. This metadata may be used for resynchronization (if the new mastervolume remains the master when remote mirroring is reactivated). In asynchronous mirroring,changing a peer's role automatically reverts the peer to its last_replicated snapshot.When mirroring is in st<strong>and</strong>by mode, both volumes may have the master role, as shown in thefollowing section. When changing roles, both peer roles must be changed if possible (theexception being a site disaster or complete system failure). Changing the role of a slavevolume or CG is typical during a true disaster recovery <strong>and</strong> production site switch.100 <strong>IBM</strong> <strong>XIV</strong> <strong>Storage</strong> <strong>System</strong>: <strong>Copy</strong> <strong>Services</strong> <strong>and</strong> <strong>Migration</strong>
4.4.10 Changing role of master volume or CGDuring a true disaster recovery, to resume production at the remote site a slave must have itsrole changed to the master role.In synchronous mirroring, changing a peer role from master to slave allows the slave toaccept mirrored data from the master <strong>and</strong> cause deletion of metadata that was used to recordany changes while the peer had the master role.In asynchronous mirroring, changing a peer's role automatically reverts the peer to itslast_replicated snapshot. If at any point in time the comm<strong>and</strong> is run on the slave (changingthe slave to a master), the former master must first be changed to the slave role (uponrecovery of the primary site) before changing the secondary role back from master to slave.Both peers may temporarily have the master role when a failure at site 1 has resulted in a truedisaster recovery production site switch from site 1 to site 2. When site 1 becomes availableagain <strong>and</strong> there is a requirement to switch production back to site 1, the production changesmade to the volumes at site 2 must be resynchronized to the volumes at site 1. In order to dothis, the peers at site 1 must change their role from master to slave, as shown in Figure 4-38.SITE 1 SITE 2Production ServersDR Test/Recovery ServersVolume PeerDesignated PrimarySlave RoleSVolumeCoupling/MirrorSt<strong>and</strong>byMVolume PeerDesignated SecondaryMaster RoleCG PeerDesignated PrimarySlave RoleSCGCoupling/MirrorSt<strong>and</strong>byMCG PeerDesignated SecondaryMaster RoleFigure 4-38 Changing role to slave volume <strong>and</strong> CGChapter 4. Remote Mirroring 101
4.4.11 Mirror reactivation <strong>and</strong> resynchronization: normal directionIn synchronous mirroring, when mirroring has been in st<strong>and</strong>by mode, any changes tovolumes with the master role were recorded in metadata. Then when mirroring is reactivated,changes recorded in metadata for the current master volumes are resynchronized to thecurrent slave volumes. Refer to Figure 4-39.SITE 1 SITE 2Production ServersDR Test/Recovery ServersRemote TargetVolume PeerDesignated PrimaryMaster RoleMVolumeCoupling/MirrorActiveSVolume PeerDesignated SecondarySlave RoleCG PeerDesignated PrimaryMaster RoleMCGCoupling/MirrorActiveSCG PeerDesignated SecondarySlave RoleFigure 4-39 Mirror reactivation <strong>and</strong> resynchronization: normal directionThe rate for this resynchronization of changes can be specified by the user in MBps using theXCLI target_config_sync_rates comm<strong>and</strong>.When <strong>XIV</strong> mirroring is reactivated in the normal direction, changes recorded at the primarypeers are copied to the secondary peers.Examples of mirror deactivation <strong>and</strong> reactivation in the same direction are:► Remote mirroring is temporarily inactivated due to communication failure <strong>and</strong> thenautomatically reactivated by the <strong>XIV</strong> system when communication is restored.► Remote mirroring is temporarily inactivated to create an extra copy of consistent data atthe secondary.► Remote mirroring is temporarily inactivated via user action during peak load in anenvironment with constrained network b<strong>and</strong>width.102 <strong>IBM</strong> <strong>XIV</strong> <strong>Storage</strong> <strong>System</strong>: <strong>Copy</strong> <strong>Services</strong> <strong>and</strong> <strong>Migration</strong>
4.4.12 Reactivation, resynchronization, <strong>and</strong> reverse directionWhen <strong>XIV</strong> mirroring is reactivated in the reverse direction, as shown in the previous section,changes recorded at the secondary peers are copied to the primary peers. The primary peersmust change the role from master to slave before mirroring can be reactivated in the reversedirection. See Figure 4-40.SITE 1 SITE 2Production ServersDR Test/Recovery ServersRemote TargetVolume PeerDesignated PrimarySlave RoleSVolumeCoupling/MirrorActiveMVolume PeerDesignated SecondaryMaster RoleCG PeerDesignated PrimarySlave RoleSCGCoupling/MirrorActiveMCG PeerDesignated SecondaryMaster RoleFigure 4-40 Reactivation <strong>and</strong> resynchronizationA typical usage example of this scenario is when returning to the primary site after a truedisaster recovery with production switched to the secondary peers at the remote site.4.4.13 Switching roles of mirrored volumes or CGsWhen mirroring is active <strong>and</strong> synchronized (consistent), the master <strong>and</strong> slave roles ofmirrored volumes or consistency groups may be switched simultaneously. Role switching istypical for returning mirroring to the normal direction after changes have been mirrored in thereverse direction after a production site switch. Role switching is also typical for any plannedproduction site switch. For asynchronous mirroring, host server write activity <strong>and</strong> replicationactivity must be paused very briefly before <strong>and</strong> during the role switch.4.4.14 Adding a mirrored volume to a mirrored consistency groupFirst make sure that the following constraints are respected:► Volume <strong>and</strong> CG must be associated with the same pool► Volume is not already part of a CG► Comm<strong>and</strong> must be issued only on the master CG► Comm<strong>and</strong> must not be run during initialization of volume or CGChapter 4. Remote Mirroring 103
►►The volume mirroring settings must be identical to those of the CG:– Mirroring type– Mirroring role– Mirroring status– Mirroring target– Target poolBoth volume synchronization status <strong>and</strong> mirrored CG synchronization status is RPO OK.To add a volume mirror to a mirrored consistency group (for instance, when an applicationneeds additional capacity):1. Define <strong>XIV</strong> volume mirror coupling from the additional master volume at <strong>XIV</strong> 1 to the slavevolume at <strong>XIV</strong> 2.2. Activate <strong>XIV</strong> remote mirroring from the additional master volume at <strong>XIV</strong> 1 to the slavevolume at <strong>XIV</strong> 2.3. Monitor initialization until it is complete. Volume coupling initialization must be completebefore the coupling can be moved to a mirrored CG.4. Add the additional master volume at <strong>XIV</strong> 1 to the master consistency group at <strong>XIV</strong> 1. (Theadditional slave volume at <strong>XIV</strong> 2 will be automatically added to the slave consistencygroup at <strong>XIV</strong> 2.)In Figure 4-41, one volume has been added to the mirrored <strong>XIV</strong> consistency group. Thevolumes must be in a volume peer relationship <strong>and</strong> must have completed initializationSITE 1 SITE 2ProductionDR Test/Recovery ServersM/PS/SCGCoupling/MirrorActiveConsistency Group PeerPrimary Designation (P)Master Role (M)Consistency Group PeerSecondary Designation (S)Slave Role (S)Figure 4-41 Adding a mirrored volume to a mirrored consistency groupRefer also to 4.4.4, “Defining the <strong>XIV</strong> mirror coupling <strong>and</strong> peers: volume” on page 92, <strong>and</strong>4.4.6, “Adding volume mirror coupling to consistency group mirror coupling” on page 97, foradditional details.4.4.15 Removing a mirrored volume from a mirrored consistency groupIf a volume in a mirrored consistency group is no longer being used by an application or ifactions must be taken against the individual volume, it can be dynamically removed from theconsistency group.104 <strong>IBM</strong> <strong>XIV</strong> <strong>Storage</strong> <strong>System</strong>: <strong>Copy</strong> <strong>Services</strong> <strong>and</strong> <strong>Migration</strong>
To remove a volume mirror from a mirrored consistency group:1. Remove the master volume from the master consistency group at site 1. (The slavevolume at site 2 will be automatically removed from the slave CG.)2. When a mirrored volume is removed from a mirrored CG, it retains its mirroring status <strong>and</strong>settings <strong>and</strong> continues remote mirroring until deactivated.In Figure 4-42, one volume has been removed from the example mirrored <strong>XIV</strong> consistencygroup with three volumes. After being removed from the mirrored CG, a volume will continueto be mirrored as part of a volume peer relationship.Site 1 Site 2ProductionDR Test/Recovery ServersP/MVolumeCoupling/MirrorActiveS/SP/MVolumeCoupling/MirrorActiveS/SConsistency Group PeerPrimary Designation (P)Master Role (M)P/MCGCoupling/MirrorActiveS/SConsistency Group PeerSecondary Designation (S)Slave Role (S)Figure 4-42 Removing a mirrored volume from a mirrored CGChapter 4. Remote Mirroring 105
4.4.16 Deleting mirror coupling definitionsWhen an <strong>XIV</strong> mirror coupling is deleted, all metadata <strong>and</strong> mirroring definitions are deleted,<strong>and</strong> the peers do not have any relationship at all (Figure 4-43). However, any volumes <strong>and</strong>consistency groups mirroring snapshots remain on the local <strong>and</strong> remote <strong>XIV</strong> systems. Inorder to restart <strong>XIV</strong> mirroring, a full copy of data is required.Site 1 Site 2Production ServersDR Test/Recovery ServersFigure 4-43 Deleting mirror coupling definitionsTypical usage of mirror deletion is a one-time data migration using remote mirroring. Thisincludes deleting the <strong>XIV</strong> mirror couplings after the migration is complete.106 <strong>IBM</strong> <strong>XIV</strong> <strong>Storage</strong> <strong>System</strong>: <strong>Copy</strong> <strong>Services</strong> <strong>and</strong> <strong>Migration</strong>
4.5 Best practice usage scenariosThe following best practice usage scenarios begin with the normal operation remotemirroring environment shown in Figure 4-44.Site 1 Site 2Production ServersDR Test/Recovery Servers<strong>XIV</strong> 1Target<strong>XIV</strong> 2Volume PeerDesignated PrimaryMaster RoleMVolumeCoupling/MirrorActiveSVolume PeerDesignated SecondarySlave RoleCG PeerDesignated PrimaryMaster RoleMCGCoupling/MirrorActiveSCG PeerDesignated SecondarySlave RoleFigure 4-44 Remote Mirroring environment for scenarios4.5.1 Failure at primary site: switch production to secondaryThis scenario begins with normal operation of <strong>XIV</strong> remote mirroring from <strong>XIV</strong> 1 to <strong>XIV</strong> 2,followed by a failure at <strong>XIV</strong> 1 with the assumption that the data already existing on the <strong>XIV</strong>system at <strong>XIV</strong> 1 will be available for resynchronization when <strong>XIV</strong> 1 is repaired <strong>and</strong> returned tooperation.1. <strong>XIV</strong> remote mirroring may have been deactivated by the failure.2. Change the role of the peer at <strong>XIV</strong> 2 from slave to master. This allows the peer to beaccessed for writes from a host server, <strong>and</strong> also causes recording of any changes inmetadata for synchronous mirroring. For asynchronous mirroring, changing the role fromslave to master causes the last replicated snapshot to be restored to the volume. Nowboth <strong>XIV</strong> 1 <strong>and</strong> <strong>XIV</strong> 2 peers have the master role.3. Map the master (secondary) peers at <strong>XIV</strong> 2 to the DR servers.4. Bring the <strong>XIV</strong> 2 peers (now with the master role) online to the DR servers to beginproduction workload at <strong>XIV</strong> 2.5. When the failure at <strong>XIV</strong> 1 has been corrected <strong>and</strong> <strong>XIV</strong> 1 is available, deactivate mirrors at<strong>XIV</strong> 1 if they are not already inactive.6. Unmap <strong>XIV</strong> 1 peers from servers if necessary.7. Activate remote mirroring from the master peers at <strong>XIV</strong> 2 to the slave peers at <strong>XIV</strong> 1. Thisstarts resynchronization of production changes from <strong>XIV</strong> 2 to <strong>XIV</strong> 1.8. Monitor the progress to ensure that resynchronization is complete.9. Quiesce production applications at <strong>XIV</strong> 2 to ensure that application-consistent data iscopied to <strong>XIV</strong> 1.Chapter 4. Remote Mirroring 107
10.Unmap master peers at <strong>XIV</strong> 2 from DR servers.11.For asynchronous mirroring, monitor completion of sync job <strong>and</strong> change the replicationinterval to never.12.Monitor to ensure that no more data is flowing from <strong>XIV</strong> 2 to <strong>XIV</strong> 1.13.Switch roles of master <strong>and</strong> slave. <strong>XIV</strong> 1 peers now have the master role <strong>and</strong> <strong>XIV</strong> 2 peersnow have the slave role.14.For asynchronous mirroring, change the replication schedule to the desired interval.15.Map master peers at <strong>XIV</strong> 1 to the production servers.16.Bring master peers online to <strong>XIV</strong> 1 production servers.4.5.2 Complete destruction of <strong>XIV</strong> 1This scenario begins with normal operation of <strong>XIV</strong> remote mirroring from <strong>XIV</strong> 1 to <strong>XIV</strong> 2,followed by complete destruction of <strong>XIV</strong> 1.1. Change the role of the peer at <strong>XIV</strong> 2 from slave to master. This allows the peer to beaccessed for writes from a host server.2. Map the new master peer at <strong>XIV</strong> 2 to the DR servers at <strong>XIV</strong> 2.3. Bring the <strong>XIV</strong> 2 peer (now with a master role) online to <strong>XIV</strong> 2 DR servers to beginproduction workload at <strong>XIV</strong> 2.4. Deactivate <strong>XIV</strong> remote mirroring from the master peer at <strong>XIV</strong> 2 if necessary. (It may havealready been deactivated by the <strong>XIV</strong> 1 failure.)5. Delete <strong>XIV</strong> remote mirroring from the master peer at <strong>XIV</strong> 2.6. Rebuild <strong>XIV</strong> 1, including configuration of the new <strong>XIV</strong> system at <strong>XIV</strong> 1, the definition ofremote targets for both <strong>XIV</strong> 1 <strong>and</strong> <strong>XIV</strong> 2, <strong>and</strong> the definition of connectivity between <strong>XIV</strong> 1<strong>and</strong> <strong>XIV</strong> 2.7. Define <strong>XIV</strong> remote mirroring from the master peer at <strong>XIV</strong> 2 to the slave peer at <strong>XIV</strong> 1.8. Activate <strong>XIV</strong> remote mirroring from the master peer at <strong>XIV</strong> 2 to the slave peer at <strong>XIV</strong> 1.This causes a full copy of all actual data on the master peer at <strong>XIV</strong> 2 to the slave volume at<strong>XIV</strong> 1.9. Monitor initialization until it is complete.10.Quiesce the production applications at <strong>XIV</strong> 2 to ensure that all application-consistent datais copied to <strong>XIV</strong> 1.11.Unmap master peers at <strong>XIV</strong> 2 from DR servers.12.For asynchronous mirroring, monitor completion of the sync job <strong>and</strong> change the replicationinterval to never.13.Monitor to ensure that no more data is flowing from <strong>XIV</strong> 2 to <strong>XIV</strong> 1.14.You can do a switch roles, which simultaneously changes the role of the peers at <strong>XIV</strong> 1from slave to master <strong>and</strong> changes the role of the peers at <strong>XIV</strong> 2 from master to slave.15.For asynchronous mirroring, change the replication schedule to the desired interval.16.Map master peers at <strong>XIV</strong> 1 to the production servers.17.Bring master peers online to <strong>XIV</strong> 1 production servers.18.Change the designation of the master peer at <strong>XIV</strong> 1 to primary.19.Change the designation of the slave peer at <strong>XIV</strong> 2 to secondary.108 <strong>IBM</strong> <strong>XIV</strong> <strong>Storage</strong> <strong>System</strong>: <strong>Copy</strong> <strong>Services</strong> <strong>and</strong> <strong>Migration</strong>
4.5.3 Using an extra copy for DRThis scenario begins with normal operation of <strong>XIV</strong> remote mirroring from <strong>XIV</strong> 1 to <strong>XIV</strong> 2.1. Create a Snapshot or volume copy of the consistent data at <strong>XIV</strong> 2. (The procedure isslightly different for <strong>XIV</strong> synchronous mirroring <strong>and</strong> <strong>XIV</strong> asynchronous mirroring. Forasynchronous mirroring, consistent data is on the last replicated snapshot.)2. Unlock the snapshot or volume copy.3. Map the snapshot/volume copy to DR servers at <strong>XIV</strong> 2.4. Bring the snapshot/volume copy at <strong>XIV</strong> 2 online to DR servers to begin disaster recoverytesting at <strong>XIV</strong> 2.5. When DR testing is complete, unmap the snapshot/volume copy from <strong>XIV</strong> 2 DR servers.6. Delete the snapshot/volume copy if desired.4.5.4 Creating application-consistent data at both local <strong>and</strong> the remote sites4.5.5 <strong>Migration</strong>This scenario begins with normal operation of <strong>XIV</strong> remote mirroring from <strong>XIV</strong> 1 to <strong>XIV</strong> 2. Thisscenario may be used when the fastest possible application restart is required.1. No actions are taken to change <strong>XIV</strong> remote mirroring.2. Briefly quiesce the application at <strong>XIV</strong> 1 or place the database into hot backup mode.3. Ensure that all data has been copied from the master peer at <strong>XIV</strong> 1 to the slave peer at<strong>XIV</strong> 2.4. Issue Create Mirrored Snapshot at the master peer. This creates an additional snapshotat the master <strong>and</strong> slave.5. Resume normal operation of the application or database at <strong>XIV</strong> 1.6. Unlock the snapshot or volume copy.7. Map the snapshot/volume copy to DR servers at <strong>XIV</strong> 2.8. Bring the snapshot or volume copy at <strong>XIV</strong> 2 online to <strong>XIV</strong> 2 servers to begin disasterrecovery testing or other functions at <strong>XIV</strong> 2.9. When DR testing or other use is complete, unmap the snapshot/volume copy from <strong>XIV</strong> 2DR servers.10.Delete the snapshot/volume copy if desired.A migration scenario involves a one-time movement of data from one <strong>XIV</strong> system to another(for example, migration to new <strong>XIV</strong> hardware.) This scenario begins with existing connectivitybetween <strong>XIV</strong> 1 <strong>and</strong> <strong>XIV</strong> 2.1. Define <strong>XIV</strong> remote mirroring from the master volume at <strong>XIV</strong> 1 to the slave volume at <strong>XIV</strong> 2.2. Activate <strong>XIV</strong> remote mirroring from the master volume at <strong>XIV</strong> 1 to the slave volume at <strong>XIV</strong>2.3. Monitor initialization until it is complete.4. Deactivate <strong>XIV</strong> remote mirroring from the master volume at <strong>XIV</strong> 1 to the slave volume at<strong>XIV</strong> 2.5. Delete <strong>XIV</strong> remote mirroring from the master volume at <strong>XIV</strong> 1 to the slave volume at <strong>XIV</strong> 2.Chapter 4. Remote Mirroring 109
6. Remove connectivity between the <strong>XIV</strong> systems at <strong>XIV</strong> 1 <strong>and</strong> <strong>XIV</strong> 2.7. Redeploy the <strong>XIV</strong> system at <strong>XIV</strong> 1 if desired.4.5.6 Adding data corruption protection to disaster recovery protectionThis scenario begins with normal operation of <strong>XIV</strong> remote mirroring from <strong>XIV</strong> 1 to <strong>XIV</strong> 2followed by creation of an additional snapshot of the master volume at <strong>XIV</strong> 1 to be used in theevent of application data corruption. To create a dependent-write consistent snapshot, nochanges are required to <strong>XIV</strong> remote mirroring.1. Periodically issue Create Mirrored Snapshot at the master peer. This creates an additionalsnapshot at the master <strong>and</strong> slave.2. When production data corruption is discovered, quiesce the application <strong>and</strong> take anysteps necessary to prepare the application to be restored.3. Deactivate <strong>and</strong> delete mirroring.4. Restore production volumes from the appropriate snapshots.5. Bring production volumes online <strong>and</strong> begin production access.6. Remove remote volumes from the consistency group.7. Delete or format remote volumes.8. Delete any mirroring snapshots existing at the production site.9. Remove production volumes from the consistency group.10.Define <strong>and</strong> activate mirroring. Initialization results in a full copy of data.If an application-consistent snapshot is desired, the following alternative procedure is used:1. Periodically quiesce the application (or place into hot backup mode).2. Create a snapshot of the production data at <strong>XIV</strong> 1. (The procedure may be slightlydifferent for <strong>XIV</strong> synchronous mirroring <strong>and</strong> <strong>XIV</strong> asynchronous mirroring. Forasynchronous mirroring, a duplicate snapshot or a volume copy of the last replicatedsnapshot may be used.)3. As soon as the snapshot or volume copy relationship has been created, resume normaloperation of the application.4. When production data corruption is discovered, deactivate mirroring.5. Remove master peers from the consistency group at <strong>XIV</strong> 1 if necessary. (Slave peers willbe automatically removed from the consistency group at <strong>XIV</strong> 2.)6. Delete mirroring.7. Restore the production volume from the snapshot or volume copy at <strong>XIV</strong> 1.8. Delete any remaining mirroring-related snapshots or snapshot groups at <strong>XIV</strong> 1.9. Delete secondary volumes at <strong>XIV</strong> 2.10.Remove <strong>XIV</strong> 1 volumes (primary) from the consistency group.11.Define remote mirroring peers from <strong>XIV</strong> 1 to <strong>XIV</strong> 2.12.Activate remote mirroring peers from <strong>XIV</strong> 1 to <strong>XIV</strong> 2 (full copy is required).110 <strong>IBM</strong> <strong>XIV</strong> <strong>Storage</strong> <strong>System</strong>: <strong>Copy</strong> <strong>Services</strong> <strong>and</strong> <strong>Migration</strong>
4.5.7 Communication failureThis scenario begins with normal operation of <strong>XIV</strong> remote mirroring from <strong>XIV</strong> 1 to <strong>XIV</strong> 2followed by a failure in the communication network used for <strong>XIV</strong> remote mirroring from <strong>XIV</strong> 1to <strong>XIV</strong> 2.1. No action is required to change <strong>XIV</strong> remote mirroring.2. When communication between the two <strong>XIV</strong> systems is not available, <strong>XIV</strong> remote mirroringis automatically deactivated <strong>and</strong> changes to the master volume are recorded in metadata.3. When communication between the <strong>XIV</strong> systems at <strong>XIV</strong> 1 <strong>and</strong> <strong>XIV</strong> 2 is restored, <strong>XIV</strong>mirroring is automatically reactivated, resynchronizing changes from the master at <strong>XIV</strong> 1to the slave at <strong>XIV</strong> 2.4.5.8 Temporary deactivation <strong>and</strong> reactivationThis scenario begins with normal operation of <strong>XIV</strong> remote mirroring from <strong>XIV</strong> 1 to <strong>XIV</strong> 2,followed by user deactivation of <strong>XIV</strong> remote mirroring for a period of time. This scenario maybe used to temporarily suspend <strong>XIV</strong> remote mirroring during a period of peak activity if thereis not enough b<strong>and</strong>width to h<strong>and</strong>le the peak load or if the response time impact during peakactivity is unacceptable.1. Deactivate <strong>XIV</strong> remote mirroring from the master volume at <strong>XIV</strong> 1 to the slave volume at<strong>XIV</strong> 2. Changes to the master volume at <strong>XIV</strong> 1 will be recorded in metadata forsynchronous mirroring.2. Wait until it is acceptable to reactivate mirroring.3. Reactivate <strong>XIV</strong> remote mirroring from the master volume at <strong>XIV</strong> 1 to the slave volume at<strong>XIV</strong> 2.4.6 PlanningThe most important planning considerations for <strong>XIV</strong> Remote Mirroring are those related toensuring availability <strong>and</strong> performance of the mirroring connections between <strong>XIV</strong> systems, aswell as the performance of the <strong>XIV</strong> systems. Planning for snapshot capacity usage is alsoextremely important.To optimize availability, <strong>XIV</strong> remote mirroring connections must be spread across multipleports on different adapter cards in different modules, <strong>and</strong> must be connected to differentnetworks.To optimize capacity usage, the number <strong>and</strong> frequency of snapshots (both those required forasynchronous replication <strong>and</strong> any additional user-initiated snapshots) <strong>and</strong> the workloadchange rates must be carefully reviewed. If not enough information is available, a snapshotarea that is 30% of the pool size may be used as a starting point. <strong>Storage</strong> pool snapshotusage thresholds must be set to trigger notification (for example, SNMP, e-mail, SMS) whenthe snapshot area capacity reaches 50%, <strong>and</strong> snapshot usage must be monitored continuallyto underst<strong>and</strong> long-term snapshot capacity requirements.Chapter 4. Remote Mirroring 111
4.7 Advantages of <strong>XIV</strong> mirroring<strong>XIV</strong> remote mirroring provides all the functions typical of remote mirroring solutions in additionto the following advantages:► Both synchronous <strong>and</strong> asynchronous mirroring are supported on a single <strong>XIV</strong> system.►►►►►►<strong>XIV</strong> mirroring is supported for consistency groups <strong>and</strong> individual volumes <strong>and</strong> mirroredvolumes may be dynamically moved into <strong>and</strong> out of mirrored consistency groups.<strong>XIV</strong> mirroring is data aware. Only actual data is replicated.Synchronous mirroring automatically resynchronizes couplings when a connectionrecovers after a network failure.Both FC <strong>and</strong> iSCSI protocols are supported, <strong>and</strong> both may be used to connect betweenthe same <strong>XIV</strong> systems.<strong>XIV</strong> mirroring provides an option to automatically create slave volumes.<strong>XIV</strong> allows user specification of initialization <strong>and</strong> resynchronization speed.4.8 Mirroring eventsThe <strong>XIV</strong> system generates events for user actions, failures, <strong>and</strong> changes in mirroring status.These events can be used to trigger SNMP traps <strong>and</strong> send e-mails or text messages.Thresholds for RPO <strong>and</strong> for link disruption may be specified by the user <strong>and</strong> trigger an eventwhen the threshold is reached.4.9 Mirroring statisticsThe <strong>XIV</strong> system provides Remote Mirroring performance statistics via both the graphical userinterface (GUI) <strong>and</strong> the comm<strong>and</strong>-line interface (XCLI) using the mirror_statistics_getcomm<strong>and</strong>.Performance statistics from the FC or IP network components are also extremely useful.4.10 BoundariesWith Version 10.2, the <strong>XIV</strong> <strong>Storage</strong> <strong>System</strong> has the following boundaries or limits:► Maximum remote systems: The maximum number of remote systems that can beattached to a single primary is 16.► Number of remote mirrors: The combined number of master <strong>and</strong> slave volumes (includingin mirrored CG) cannot exceed 512.► Distance: Distance is only limited by the response time of the medium used. Useasynchronous mirroring when the distance causes unacceptable delays to the host I/O insynchronous mode.► Consistency groups are supported within Remote Mirroring. The maximum number ofconsistency groups is 256.112 <strong>IBM</strong> <strong>XIV</strong> <strong>Storage</strong> <strong>System</strong>: <strong>Copy</strong> <strong>Services</strong> <strong>and</strong> <strong>Migration</strong>
►►►Snapshots: Snapshots are allowed with either the primary or secondary volumes withoutstopping the mirror. There are also special-purpose snapshots used in the mirroringprocess. Space must be available in the storage pool for snapshots.Master <strong>and</strong> slave peers cannot be the target of a copy operation <strong>and</strong> cannot be restoredfrom a snapshot. Peers cannot be deleted or formatted without deleting the coupling first.Master volumes cannot be resized or renamed if the link is operational.4.11 Using the GUI or XCLI for Remote Mirroring actionsThis section illustrates Remote Mirroring definition actions through the GUI or XCLI.4.11.1 Initial setupWhen preparing to set up Remote Mirroring, take the following questions into consideration:► Will the paths be configured via SAN or direct attach, FC or iSCSI?► Is the desired port configured as an initiator or a target?– The port 4 default configuration an initiator.– Port 2 is suggested as the target port for remote mirror links.– Ports can be changed if needed.► How many pairs will be copied?This is related to the b<strong>and</strong>width needed between sites.► How many secondary machines will be used for a single primary?Remote Mirroring can be set up on paths that are either direct or SAN attached via FC oriSCSI protocols. For most disaster recovery solutions, the secondary system will be located ata geographically remote site. The sites will be connected using either SAN connectivity withFibre Channel Protocol (FCP) or Ethernet with iSCSI. In certain cases, using direct connectmight be the option of choice if the machines are located near each other <strong>and</strong> could be usedfor initialization before the target <strong>XIV</strong> <strong>Storage</strong> <strong>System</strong> is moved to the remote site.B<strong>and</strong>width considerations must be taken into account when planning the infrastructure tosupport the Remote Mirroring implementation. Knowing when the peak write rate occurs forsystems attached to the storage will help with the planning for the number of paths needed tosupport the Remote Mirroring function <strong>and</strong> any future growth plans.When the protocol has been selected, it is time to determine which ports on the <strong>XIV</strong> <strong>Storage</strong><strong>System</strong> will be used. The port settings are easily displayed using the XCLI Sessionenvironment <strong>and</strong> the comm<strong>and</strong> fc_port_list for Fibre Channel or ipinterface_list foriSCSI.There must always be a minimum of two paths configured within Remote Mirroring for FCPconnections, <strong>and</strong> these paths must be dedicated to Remote Mirroring. These two paths mustbe considered a set. Use port 4 <strong>and</strong> port 2 in the selected interface module for this purpose.For redundancy, additional sets of paths must be configured in different interface modules.Fibre Channel paths for Remote Mirroring have slightly more requirements for setup, <strong>and</strong> welook at this interface first.Chapter 4. Remote Mirroring 113
As seen in Example 4-1, in the Role column each Fibre Channel port is identified as either atarget or an initiator. Simply put, a target in a Remote Mirror configuration is the port that willbe receiving data from the other system, whereas an initiator is the port that will be doing thesending of data. In this example, there are three initiators configured. Initiators, by default, areconfigured on FC:X:4 (X is the module number). In this highlighted example, port 4 in module6 is configured as the initiator.Example 4-1 The fc_port_list output comm<strong>and</strong>>> fc_port_listComponent ID Status Currently Functioning WWPN Port ID Role1:FC_Port:4:1 OK yes 5001738000130140 00030A00 Target1:FC_Port:4:2 OK yes 5001738000130141 0075002E Target1:FC_Port:4:3 OK yes 5001738000130142 00750029 Target1:FC_Port:4:4 OK yes 5001738000130143 00750027 Initiator1:FC_Port:5:1 OK yes 5001738000130150 00611000 Target1:FC_Port:5:2 OK yes 5001738000130151 0075001F Target1:FC_Port:5:3 OK yes 5001738000130152 00021D00 Target1:FC_Port:5:4 OK yes 5001738000130153 00000000 Initiator1:FC_Port:6:1 OK yes 5001738000130160 00070A00 Target1:FC_Port:6:2 OK yes 5001738000130161 006D0713 Target1:FC_Port:6:3 OK yes 5001738000130162 00000000 Target1:FC_Port:6:4 OK yes 5001738000130163 0075002F Initiator1:FC_Port:9:1 OK yes 5001738000130190 00DDEE02 Target1:FC_Port:9:2 OK yes 5001738000130191 00FFFFFF Target1:FC_Port:9:3 OK yes 5001738000130192 00021700 Target1:FC_Port:9:4 OK yes 5001738000130193 00021600 Initiator1:FC_Port:8:1 OK yes 5001738000130180 00060219 Target1:FC_Port:8:2 OK yes 5001738000130181 00021C00 Target1:FC_Port:8:3 OK yes 5001738000130182 002D0027 Target1:FC_Port:8:4 OK yes 5001738000130183 002D0026 Initiator1:FC_Port:7:1 OK yes 5001738000130170 006B0F00 Target1:FC_Port:7:2 OK yes 5001738000130171 00681813 Target1:FC_Port:7:3 OK yes 5001738000130172 00021F00 Target1:FC_Port:7:4 OK>>yes 5001738000130173 00021E00 InitiatorThe iSCSI connections are shown in Example 4-2 using the comm<strong>and</strong> ipinterface_list.The output has been truncated to show just the iSCSI connections in which we are interestedhere. The comm<strong>and</strong> also displays all Ethernet connections <strong>and</strong> settings. In this example wehave two connections displayed for iSCSI—one connection in module 7 <strong>and</strong> one connectionin module 8.Example 4-2 The ipinterface_list comm<strong>and</strong>>> ipinterface_listName Type IP Address Network Mask Default Gateway MTU Module Portsitso_m8_p1 iSCSI 9.11.237.156 255.255.254.0 9.11.236.1 4500 1:Module:8 1itso_m7_p1 iSCSI 9.11.237.155 255.255.254.0 9.11.236.1 4500 1:Module:7 1114 <strong>IBM</strong> <strong>XIV</strong> <strong>Storage</strong> <strong>System</strong>: <strong>Copy</strong> <strong>Services</strong> <strong>and</strong> <strong>Migration</strong>
Alternatively, a single port can be queried by selecting a system in the GUI, followed byselecting Mirror Connectivity (Figure 4-45).Figure 4-45 Selecting Mirror ConnectivityClick the connecting links between the systems of interest to view the ports.Right-click a specific port <strong>and</strong> select Properties, the output of which is shown in Figure 4-46.This particular port is configured as a target.Figure 4-46 Port properties displayed with GUIAnother way to query the port configuration is to select the desired system, click the curvedarrow (at the bottom right of the window) to display the ports on the back of the system, <strong>and</strong>Chapter 4. Remote Mirroring 115
hover the mouse over a port, as shown in Figure 4-47. This view displays all the informationthat is shown in Figure 4-46 on page 115.Figure 4-47 Port information from the patch panel viewSimilar information can be displayed for the iSCSI connections using the GUI, as shown inFigure 4-48. This view can be seen either by right-clicking the Ethernet port (similar to theFibre Channel port shown in Figure 4-47) or by selecting the system, then selecting Hosts<strong>and</strong> LUNs iSCSI Connectivity. This sequence displays the same two iSCSI definitionsthat are shown with the XCLI comm<strong>and</strong>.Figure 4-48 iSCSI connectivityBy default, Fibre Channel ports 2 <strong>and</strong> 4 (target <strong>and</strong> initiator, respectively) from every moduleare designed to be used for Remote Mirroring. For example, port 4 module 8 (initiator) on thelocal machine is connected to port 2 module 8 (target) on the remote machine. When settingup a new system, it is best to plan for any Remote Mirroring <strong>and</strong> reserve these ports for thatpurpose. However different ports could be used as needed.116 <strong>IBM</strong> <strong>XIV</strong> <strong>Storage</strong> <strong>System</strong>: <strong>Copy</strong> <strong>Services</strong> <strong>and</strong> <strong>Migration</strong>
In the event that a port role does need to be changed, you can change the port role with boththe XCLI <strong>and</strong> the GUI. Use the XCLI fc_port_config comm<strong>and</strong> to change a port, as shown inExample 4-3. Using the output from fc_port_list, we can get the fc_port name to be used inthe comm<strong>and</strong>, changing the port role to be either initiator or target, as needed.Example 4-3 XCLI comm<strong>and</strong> to configure a portfc_port_config fc_port=1:FC_Port:4:3 role=initiatorComm<strong>and</strong> completed successfullyfc_port_listComponent ID Status Currently Functioning WWPNPort ID Role1:FC_Port:4:3 OK yes 5001738000130142 00750029 InitiatorTo perform the same function with the GUI, select the primary system, open the patch panelview, <strong>and</strong> right-click the port, as shown in Figure 4-49.Figure 4-49 Configure portsChapter 4. Remote Mirroring 117
Selecting Configure opens a configuration window, as shown in Figure 4-50, which allowsthe port to be enabled (or disabled), its role defined as target or initiator, <strong>and</strong>, finally, thespeed for the port configured (Auto, 1 Gbps, 2 Gbps, or 10 Gbps).Figure 4-50 Configure port with GUIPlanning for Remote Mirroring is important when determining how many copy pairs will exist.All volumes defined in the system can be mirrored. A single primary system is limited to amaximum of 16 secondary systems. Volumes cannot be part of an <strong>XIV</strong> data migration <strong>and</strong> aremote mirror volume at the same time. Data migration information can be found in Chapter 7,“Data migration” on page 185.4.11.2 Remote mirror target configurationThe connections to the target (secondary) <strong>XIV</strong> system must be defined. We assume that thephysical connections <strong>and</strong> zoning have been set up. Target configuration is done from themirror connectivity menu. The first step is to add the target system. To do this right-click thesystem image <strong>and</strong> select Create Target, as shown in Figure 4-51.Figure 4-51 Create target118 <strong>IBM</strong> <strong>XIV</strong> <strong>Storage</strong> <strong>System</strong>: <strong>Copy</strong> <strong>Services</strong> <strong>and</strong> <strong>Migration</strong>
Then define the type of mirroring to be used (mirroring or migration) <strong>and</strong> the type ofconnection (iSCSI or FC), as shown in Figure 4-52.Figure 4-52 Target type <strong>and</strong> protocolRepeat the same process to define the local (primary) <strong>XIV</strong> system as a target for thesecondary <strong>XIV</strong> system.Next, as shown in Figure 4-53, connections are defined by clicking the line between the two<strong>XIV</strong> systems to display the link status detail screen.Figure 4-53 Define connectionsChapter 4. Remote Mirroring 119
Connections are easily defined by clicking Show Auto Detected Connections. This showsthe possible connections <strong>and</strong> provides an Approve button to define the detected connections.Remember that for FCP ports an initiator must be connected to a target <strong>and</strong> the proper zoningmust be established for the connections to be successful. The possible connections areshown in light grey, as depicted in Figure 4-54.Figure 4-54 Show possible connectionsConnections can also be defined by clicking a port on the primary system <strong>and</strong> dragging thethe corresponding port on the target system. This is shown as a blue line in Figure 4-55.Figure 4-55 Graphically define a connectionReleasing the mouse button initiates the connection <strong>and</strong> then the status can be displayed, asshown in Figure 4-56.Figure 4-56 Define connection <strong>and</strong> view status120 <strong>IBM</strong> <strong>XIV</strong> <strong>Storage</strong> <strong>System</strong>: <strong>Copy</strong> <strong>Services</strong> <strong>and</strong> <strong>Migration</strong>
Right-click a path <strong>and</strong> you have options to Activate, Deactivate, <strong>and</strong> Delete the selected path,as shown in Figure 4-57.Figure 4-57 Paths actions menuDeleting the connections between two <strong>XIV</strong> systems is done from the Mirror Connectivitydisplay. Right-click the connecting links <strong>and</strong> select Delete, as illustrated in Figure 4-58.Figure 4-58 Delete mirror connectionsChapter 4. Remote Mirroring 121
4.11.3 XCLI examplesXCLI comm<strong>and</strong>s can be used to configure connectivity between the primary <strong>XIV</strong> system <strong>and</strong>the target or secondary <strong>XIV</strong> system (Figure 4-59).target_define target="WSC_1300331" protocol=FC xiv_features=yestarget_mirroring_allow target="WSC_1300331"target_define target="WSC_6000639" system_id=639 protocol=FC xiv_features=yestarget_mirroring_allow target="WSC_6000639"target_port_add fcaddress=50017380014B0183 target="WSC_1300331"target_port_add fcaddress=50017380027F0180 target="WSC_6000639"target_port_add fcaddress=50017380014B0193 target="WSC_1300331"target_port_add fcaddress=50017380027F0190 target="WSC_6000639"target_port_add fcaddress=50017380027F0183 target="WSC_6000639"target_port_add fcaddress=50017380014B0181 target="WSC_1300331"target_connectivity_define local_port="1:FC_Port:8:4"fcaddress=50017380014B0181 target="WSC_1300331"target_port_add fcaddress=50017380027F0193 target="WSC_6000639"target_port_add fcaddress=50017380014B0191 target="WSC_1300331"target_connectivity_define local_port="1:FC_Port:9:4"fcaddress=50017380014B0191 target="WSC_1300331"target_connectivity_define target="WSC_6000639" local_port="1:FC_Port:8:4"fcaddress="50017380027F0180"target_connectivity_define target="WSC_6000639" local_port="1:FC_Port:9:4"fcaddress="50017380027F0190"Figure 4-59 Define target XCLI comm<strong>and</strong>sXCLI comm<strong>and</strong>s can also be used to delete the connectivity between the primary <strong>XIV</strong> <strong>System</strong><strong>and</strong> the secondary <strong>XIV</strong> system (Figure 4-60).target_connectivity_delete local_port="1:FC_Port:8:4"fcaddress=50017380014B0181 target="WSC_1300331"target_port_delete fcaddress=50017380014B0181 target="WSC_1300331"target_connectivity_delete local_port="1:FC_Port:8:4"fcaddress=50017380027F0180 target="WSC_6000639"target_port_delete fcaddress=50017380027F0180 target="WSC_6000639"target_connectivity_delete local_port="1:FC_Port:9:4"fcaddress=50017380014B0191 target="WSC_1300331"target_port_delete fcaddress=50017380014B0191 target="WSC_1300331"target_connectivity_delete local_port="1:FC_Port:9:4"fcaddress=50017380027F0190 target="WSC_6000639"target_port_delete fcaddress=50017380027F0190 target="WSC_6000639"target_port_delete target="WSC_6000639" fcaddress="50017380027F0183"target_port_delete target="WSC_6000639" fcaddress="50017380027F0193"target_delete target="WSC_6000639"target_port_delete target="WSC_1300331" fcaddress="50017380014B0183"target_port_delete target="WSC_1300331" fcaddress="50017380014B0193"target_delete target="WSC_1300331"Figure 4-60 Delete target XCLI comm<strong>and</strong>s122 <strong>IBM</strong> <strong>XIV</strong> <strong>Storage</strong> <strong>System</strong>: <strong>Copy</strong> <strong>Services</strong> <strong>and</strong> <strong>Migration</strong>
4.12 Configuring Remote MirroringConfiguration tasks differ depending on the nature of the coupling. Synchronous <strong>and</strong>asynchronous mirroring are the two types of coupling supported. Refer to Chapter 5,“Synchronous Remote Mirroring” on page 125, for specific configuration tasks related tosynchronous mirroring <strong>and</strong> Chapter 6, “Asynchronous Remote Mirroring” on page 149, forspecific configuration tasks related to asynchronous mirroring.Chapter 4. Remote Mirroring 123
124 <strong>IBM</strong> <strong>XIV</strong> <strong>Storage</strong> <strong>System</strong>: <strong>Copy</strong> <strong>Services</strong> <strong>and</strong> <strong>Migration</strong>
5Chapter 5.Synchronous Remote MirroringThis chapter describes the features of synchronous remote mirroring, the options that areavailable, <strong>and</strong> procedures for setting it up <strong>and</strong> recovering from a disaster.Note: GUI <strong>and</strong> XCLI illustrations included in this chapter were created with an earlyversion of the 10.2.1 code, available at the time of writing. There could be minordifferences with the code that was publicly released.© <strong>Copy</strong>right <strong>IBM</strong> Corp. 2010. All rights reserved. 125
5.1 Synchronous mirroring configurationThe mirroring configuration process involves configuring volumes or CGs. When a pair ofvolumes or consistency groups point to each other, it is referred to as a coupling.We assume that the links between the local <strong>and</strong> remote <strong>XIV</strong> storage systems have alreadybeen established, as discussed in 4.11.2, “Remote mirror target configuration” on page 118.5.1.1 Volume mirroring setup <strong>and</strong> activationVolumes or consistency groups that participate in mirror operations are configured in pairs.These pairs are called peers. One peer is the source of the data to be replicated <strong>and</strong> the otheris the target. The source has the role of master <strong>and</strong> is the controlling entity in the mirror. Thetarget has the role of slave, which is controlled by operations performed by the master.When initially configured, one volume is considered the source (master role <strong>and</strong> resides atthe primary system) <strong>and</strong> the other is the target (slave role <strong>and</strong> resides at the secondarysystem). This designation is associated with the volume <strong>and</strong> its <strong>XIV</strong> system <strong>and</strong> does notchange. During various operations the role may change (master or slave), but one system isalways the primary <strong>and</strong> the other is always the secondary.To create a mirror you can use the <strong>XIV</strong> GUI or the XCLI.Using the GUI for volume mirroring setupIn the GUI select the primary <strong>XIV</strong> <strong>and</strong> select Remote Mirroring in the GUI, as shown inFigure 5-1.Figure 5-1 Selecting Remote MirroringTo create a mirror:1. Select Create Mirror, as shown in Figure 5-2, <strong>and</strong> specify the source volume or master forthe mirror pair (Figure 5-3 on page 127).Figure 5-2 Selecting Create MirrorThere are also other way to create a mirror pair. If you are in the Volumes <strong>and</strong> Snapshotslist panel you can right-click a volume <strong>and</strong> select Create Mirror there.126 <strong>IBM</strong> <strong>XIV</strong> <strong>Storage</strong> <strong>System</strong>: <strong>Copy</strong> <strong>Services</strong> <strong>and</strong> <strong>Migration</strong>
The Create Mirror dialogue box is displayed (Figure 5-3).Figure 5-3 Create Mirror parameters2. Complete the following information:– Sync TypeSelect Sync as the sync type if for synchronous mirroring. (We discuss asynchronousmirroring in Chapter 6, “Asynchronous Remote Mirroring” on page 149.)– Master CG / VolumeThis is the volume or consistency group at the local site to be mirrored. You can selectthe volume or consistency groups from a list. The consistency groups are shown inbold <strong>and</strong> they are at the end of the list.– Target <strong>System</strong>This is the <strong>XIV</strong> at the remote site that will contain the slave volumes. You can select thetarget system from a list of known targets.– Create slaveIf you have not yet created target volumes at the remote <strong>XIV</strong>, you can check mark theCreate Slave option. In this case you also must select the storage pool where thevolume must be created at the target <strong>XIV</strong>. This pool must already exit at the target <strong>XIV</strong>.The remote <strong>XIV</strong> will automatically create a target volume of the same size as thesource volume.If selected, the slave volume will be created automatically. If left unselected you mustcreate the volume manually.If you specified a consistency group instead of a volume this option is not available. Aslave consistency group must already exist at the remote site.– Slave PoolThis is the storage pool on the <strong>XIV</strong> at the remote site that will contain the mirrored slavevolumes. This pool must already exit. This option is only available if you check markedthe Create Slave option.Chapter 5. Synchronous Remote Mirroring 127
– Slave CG / VolumeThis is the name of the slave volume or consistency group. If you selected the CreateSlave option, the default is to use the same name as the source, but this can bechanged. If you did not check mark the Create Slave option, you can select the targetvolume or a consistency group from a list.If a target volume already exists in the remote <strong>XIV</strong> it must have exactly the same sizeas the source volume, otherwise a mirror cannot be set up. In this case use the Resizefunction of the <strong>XIV</strong> to adjust the capacity of the target volume to match the capacity ofthe source volume.Once mirroring is active, you can resize the source volume <strong>and</strong> the target volume willbe automatically resized accordingly.3. Once all the appropriate entries have been completed, click Create.A coupling is created <strong>and</strong> is in st<strong>and</strong>by (inactive) mode, as shown in Figure 5-4. In thisstate data is not yet copied from the source to the target volume.Figure 5-4 Coupling on the primary <strong>XIV</strong> in st<strong>and</strong>by (Inactive) modeA corresponding coupling is automatically created on the secondary <strong>XIV</strong>, <strong>and</strong> it is also inst<strong>and</strong>by (Inactive) mode, as shown in Figure 5-5.Figure 5-5 Coupling on the secondary <strong>XIV</strong> in st<strong>and</strong>by (Inactive) modeRepeat steps 1–3 to create additional couplings.Using XCLI for volume mirroring setupTip: When working with the XCLI session or the XCLI comm<strong>and</strong> the windows look thesame <strong>and</strong> you could address the wrong <strong>XIV</strong> system with your comm<strong>and</strong>. Therefore, itmight be good to always first issue a config_get comm<strong>and</strong> to verify that you are talking tothe right <strong>XIV</strong> system.To do this:1. Open an XCLI session on the <strong>XIV</strong> at the local site (primary <strong>XIV</strong>) <strong>and</strong> run themirror_create comm<strong>and</strong> (Example 5-1).Example 5-1 Create remote mirror coupling>> mirror_create target="<strong>XIV</strong> MN00035" vol="itso_win2008_vol2"slave_vol="itso_win2008_vol2" remote_pool="test_pool" create_slave=yesComm<strong>and</strong> executed successfully.128 <strong>IBM</strong> <strong>XIV</strong> <strong>Storage</strong> <strong>System</strong>: <strong>Copy</strong> <strong>Services</strong> <strong>and</strong> <strong>Migration</strong>
2. On the primary <strong>XIV</strong>, to list the couplings run the mirror_list comm<strong>and</strong> (Example 5-2).Note the status of Initializing is used when the coupling is in st<strong>and</strong>by (inactive) or isinitializing.Example 5-2 Listing mirror couplings>> mirror_listName Mirror Type Mirror Object Role Remote <strong>System</strong> Remote Peer Active Status Link Upitso_win2008_vol1 sync_best_effort Volume Master <strong>XIV</strong> MN00035 itso_win2008_vol1 no Initializing yesitso_win2008_vol2 sync_best_effort Volume Master <strong>XIV</strong> MN00035 itso_win2008_vol2 no Initializing yes3. On the secondary <strong>XIV</strong>, to list the couplings run the mirror_list comm<strong>and</strong>, as shown inExample 5-3. Note that the status of Initializing is used when the coupling is in st<strong>and</strong>by(inactive) or initializing.Example 5-3 Newly created slave volumes>> mirror_listName Mirror Type Mirror Object Role Remote <strong>System</strong> Remote Peer Active Status Link Upitso_win2008_vol1 sync_best_effort Volume Slave <strong>XIV</strong> MN00019 itso_win2008_vol1 no Initializing yesitso_win2008_vol2 sync_best_effort Volume Slave <strong>XIV</strong> MN00019 itso_win2008_vol2 no Initializing yesRepeat steps 1–3 to create additional mirror couplings.Activating the remote mirror coupling using the GUITo activate the mirror, proceed as follows:1. On the Primary <strong>XIV</strong> go the Remote Mirroring menu <strong>and</strong> highlight all the couplings that youwant to activate, right-click, <strong>and</strong> select Activate, as shown in Figure 5-6.Figure 5-6 Activating a mirror couplingFigure 5-7 shows the three couplings (itso_win2008_vol1, itso_win2008_vol2, <strong>and</strong>itso_win2008_vol3) in various states.Figure 5-7 Remote mirroring statuses on the primary <strong>XIV</strong>Chapter 5. Synchronous Remote Mirroring 129
2. On the Secondary <strong>XIV</strong> go to the Remote Mirroring menu to see the statuses of thecouplings (Figure 5-8). Note that due to the time lapse between Figure 5-7 on page 129<strong>and</strong> Figure 5-8 being taken they do show different statuses.Figure 5-8 Remote mirroring statuses on the secondary <strong>XIV</strong>3. Repeat steps 1–2 until all required couplings are activated <strong>and</strong> aresynchronized/consistent.Activating the remote mirror coupling using the XCLIProceed as follows:1. On the primary <strong>XIV</strong> run the mirror_activate comm<strong>and</strong> (Example 5-4).Example 5-4 Activating the mirror coupling>> mirror_activate vol=itso_win2008_vol3Comm<strong>and</strong> executed successfully.2. On the primary <strong>XIV</strong> run the mirror_list comm<strong>and</strong> to see the status of the couplings(Example 5-5).Example 5-5 List remote mirror statuses on the primary <strong>XIV</strong>>> mirror_listName Mirror Type Mirror Object Role Remote <strong>System</strong> Remote Peer Active Status Link Upitso_win2008_vol1 sync_best_effort Volume Master <strong>XIV</strong> MN00035 itso_win2008_vol1 yes Synchronized yesitso_win2008_vol2 sync_best_effort Volume Master <strong>XIV</strong> MN00035 itso_win2008_vol2 yes Synchronized yesitso_win2008_vol3 sync_best_effort Volume Master <strong>XIV</strong> MN00035 itso_win2008_vol3 yes Synchronized yes3. On the secondary <strong>XIV</strong> run the mirror_list comm<strong>and</strong> to see the status of the couplings(Example 5-6).Example 5-6 List remote mirror statuses on the secondary <strong>XIV</strong>>> mirror_listName Mirror Type Mirror Object Role Remote <strong>System</strong> Remote Peer Active Status Link Upitso_win2008_vol1 sync_best_effort Volume Slave <strong>XIV</strong> MN00019 itso_win2008_vol1 yes Consistent yesitso_win2008_vol2 sync_best_effort Volume Slave <strong>XIV</strong> MN00019 itso_win2008_vol2 yes Consistent yesitso_win2008_vol3 sync_best_effort Volume Slave <strong>XIV</strong> MN00019 itso_win2008_vol3 yes Consistent yes4. Repeat steps 1–3 to activate additional couplings.5.1.2 Consistency group setup <strong>and</strong> configuration<strong>IBM</strong> <strong>XIV</strong> <strong>Storage</strong> <strong>System</strong> leverages its consistency group capability to allow for mirroringnumerous volumes at once.Setting a consistency group to be mirrored is done by first creating a consistency group, thensetting it to be mirrored, <strong>and</strong> only then populating it with volumes. A consistency group mustbe created at the primary <strong>XIV</strong> <strong>and</strong> a corresponding consistency group at the secondary <strong>XIV</strong>.The names of the consistency groups can be different. When creating a consistency group,you also must specify the storage pool.130 <strong>IBM</strong> <strong>XIV</strong> <strong>Storage</strong> <strong>System</strong>: <strong>Copy</strong> <strong>Services</strong> <strong>and</strong> <strong>Migration</strong>
To create a mirrored consistency group first create a CG on the primary <strong>and</strong> secondary <strong>XIV</strong><strong>Storage</strong> <strong>System</strong>. Then select the CG at the primary <strong>and</strong> specify Create Mirror, as shown inFigure 5-9.Figure 5-9 Create Mirror CGThe Create Mirror dialog shown in Figure 5-10 is displayed. Be sure to specify the mirroringparameters that match the volumes that will be part of that CG.Figure 5-10 Sync mirrored CGNow you can add mirrored volumes to this consistency group.All volumes that you are going to add to the consistency group must be in that pool on theprimary <strong>XIV</strong> <strong>and</strong> in one pool at the secondary <strong>XIV</strong>. Adding a new volume pair to a mirroredconsistency group requires the volumes to be mirrored exactly as the other volumes withinthis consistency group.Important: All volumes that you want to add to a mirroring consistency group must bedefined in the same pool at the primary site <strong>and</strong> must be in one pool at the secondary site.Chapter 5. Synchronous Remote Mirroring 131
Adding a mirrored volume to a mirrored CGAdding a volume to a CG requires that:► The volume is on the same system as the consistency group.► The volume belongs to the same storage pool as the consistency group.► The comm<strong>and</strong> must be issued only on the master CG.► The comm<strong>and</strong> must not be run during initialization of volume or CG.► The volume mirroring settings must be identical to those of the CG:– Mirroring type– Mirroring role– Mirroring status– Mirroring target– Target poolAlso, mirrors for volumes must be activated before volumes can be added to a mirroredconsistency group.It is possible to add a mirrored volume to a non-mirrored consistency group <strong>and</strong> have thisvolume retain its mirroring settings.Removing a volume from a mirrored consistency groupWhen removing a volume from a mirrored consistency group, the corresponding peer volumewill be removed from the peer consistency group. Mirroring is retained with the sameconfiguration as the consistency group from which it was removed.Synchronous mirroring <strong>and</strong> snapshot consistency groupA volume can be in only one consistency group. Because consistency groups can be used forsnapshot (see 1.3, “Snapshots consistency group” on page 23) <strong>and</strong> Remote Mirroring,confusion can arise. Define separate <strong>and</strong> specific CG for snapshot <strong>and</strong> Remote Mirroring.5.1.3 Coupling activation, deactivation, <strong>and</strong> deletionMirroring can be manually activated <strong>and</strong> deactivated per volume or CG pair. When it isactivated, the mirror is in active mode. When it is deactivated, the mirror is in inactive mode.These modes have the following functions:► ActiveMirroring is functioning <strong>and</strong> the data is being written to both the master <strong>and</strong> the slavepeers.► InactiveMirroring is deactivated. The data is not being written to the slave peer, but writes to themaster volume are being recorded <strong>and</strong> can later be synchronized with the slave volume.Inactive mode is used mainly when maintenance is performed at the secondary site or onthe secondary <strong>XIV</strong>. In this mode, the slave volumes do not generate alerts that themirroring has failed.132 <strong>IBM</strong> <strong>XIV</strong> <strong>Storage</strong> <strong>System</strong>: <strong>Copy</strong> <strong>Services</strong> <strong>and</strong> <strong>Migration</strong>
The mirror has the following characteristics:► When a mirror is created, it is always initially in inactive mode.► A Mirror can only be deleted when its is in inactive mode.► Transitions between the two states can only be performed from the <strong>XIV</strong> with the master.► In a DR situation, a role change changes the slave peers (at the secondary system) to amaster role (so that production can resume at the secondary). When the primary site isrecovered, <strong>and</strong> before the link is resumed, the master must be changed to a slave(change_role).DeletionWhen a mirror pair (volume or consistency group) is inactive, the mirror relationship can bedeleted. When a mirror relationship has been deleted, the <strong>XIV</strong> forgets everything about therelation. If you want to set up the mirror again, the <strong>XIV</strong> must do an initial copy again from thesource to the target.Note that when the mirror is deleted, the slave volume becomes a normal volume again, butthe volume is locked, which means that it is write protected. To enable writing to the volumego to the Volumes list panel. Right-click the volume <strong>and</strong> select Unlock.The slave volume must also be formatted before it can be part of a new mirror. Formattingalso requires that all snapshots of that volume be deleted.5.2 Disaster recoveryThere are two broad categories of disaster, one that destroys the primary (local) site or thedata there <strong>and</strong> one that makes the primary site or the data there unavailable but that leavesthe data intact. However, within these broad categories there are a number of situations thatmay exist. Some of these <strong>and</strong> the recovery procedures are considered below:►►►A disaster that makes the <strong>XIV</strong> at the primary site unavailable but the site itself <strong>and</strong> theservers there are still availableIn this scenario the volumes/CG on the <strong>XIV</strong> at the secondary site can be switched tomaster volumes/CG, servers at the primary site can be redirected to the <strong>XIV</strong> at thesecondary site, <strong>and</strong> normal operations can start again. When the <strong>XIV</strong> at the primary site isrecovered the data can be mirrored from the secondary site back to the primary site.When it is synchronized the peer roles can be switched back to the master at the primarysite <strong>and</strong> the slave at the secondary site <strong>and</strong> the servers redirected back to the local site.A disaster that makes the entire primary site <strong>and</strong> data unavailableIn this scenario, the st<strong>and</strong>by (inactive) servers at the secondary site are activated <strong>and</strong>attached to the secondary <strong>XIV</strong> to continue normal operations. This requires changing therole of the slave peers to become master peers.After the primary site is recovered, the data at the secondary site can be mirrored back tothe primary site to become synchronized once again. If desired, a planned site switch canthen take place to resume production activities at the primary site. See 5.3, “Role reversal”on page 134, for details related to this process.A disaster that breaks all links between the two sites but both site remain runningIn this scenario the primary site continues to operate as normal. When the links arereestablished the data at the primary site can be resynchronized with the secondary site.See 5.4, “Resynchronization after link failure” on page 136, for more details.Chapter 5. Synchronous Remote Mirroring 133
5.3 Role reversalWith synchronous mirroring, roles can be modified by either switching or changing.Switching roles must be initiated on the master volume or consistency group when remotemirroring is operational. As the task name implies, it switches the master role to the slave role<strong>and</strong> at the same time the slave role to the master role.Changing roles can be performed at any time (when a pair is active or inactive) for the slave,<strong>and</strong> for the master when the coupling is inactive. A change role reverts only the role of thatpeer.5.3.1 Switching rolesSwitching roles exchanges the roles of master <strong>and</strong> slave volumes or CGs. It can beperformed after the remote mirroring function is in operation <strong>and</strong> the pair is synchronized.After switching roles, the master volume or CG becomes the slave volume or CG <strong>and</strong> viceversa. There are two typical reasons for switching roles. These are:► Drills/DR testsDrills can be performed to test the functioning of the secondary site. In a drill, anadministrator simulates a disaster <strong>and</strong> tests that all procedures are operating smoothly<strong>and</strong> that documentation is accurate.► Scheduled maintenanceTo perform maintenance at the primary site, operations can be switched to the secondarysite some time before the maintenance. This switchover cannot be performed if the master<strong>and</strong> slave volumes or CG are not synchronized/consistent.Normally, switching the roles requires shutting down the servers at the primary site first,changing SAN zoning <strong>and</strong> <strong>XIV</strong> LUN masking to allow access to the secondary site volumes,<strong>and</strong> then restarting the servers with access to the secondary (remote) <strong>XIV</strong>. However, incertain clustered environments this takeover could be automated.5.3.2 Change roleIn a disaster at the primary site, a role change at the secondary site is the normal recoveryaction.Assuming that the primary site is down <strong>and</strong> the secondary site will become the mainproduction site, changing roles is performed at the remote (now production) site first. Later,when the primary site is up again <strong>and</strong> communication is reestablished you also change therole at the primary site to a slave to be able to establish remote mirroring from the secondarysite back to the normal production (primary) site.134 <strong>IBM</strong> <strong>XIV</strong> <strong>Storage</strong> <strong>System</strong>: <strong>Copy</strong> <strong>Services</strong> <strong>and</strong> <strong>Migration</strong>
Changing the slave peer roleThe role of the slave volume or consistency group can be changed to the master role, asshown in Figure 5-11. After this changeover, the following is true:►►►The slave volume or consistency group is now the master.The coupling has the status of unsynchronized.The coupling remains inactive, meaning that the remote mirroring is deactivated. Thisensures an orderly activation when the role of the peer on the other site is changed.Figure 5-11 Change role of a slave consistency groupThe new master volume or consistency group (at the secondary site) starts to accept writecomm<strong>and</strong>s from local hosts. Because coupling is not active, in the same way as for anymaster volume, metadata maintain a record of which write operations must be sent to theslave volume when communication resumes.After changing the slave to the master, an administrator must change the original master tothe slave role before communication resumes. If both peers are left with the same role(master), mirroring cannot be restarted.Slave peer consistencyWhen the user is changing the slave volume or consistency group to a master volume ormaster consistency group <strong>and</strong> a snapshot of the last consistent state exists that wasproduced during the process of resynchronizing (as a result of a broken link, for instance), thesystem reverts the slave to the last consistent snapshot.Changing the master peer roleWhen coupling is inactive, the master volume or consistency group can change roles. Aftersuch a change the master volume or consistency group becomes the slave volume orconsistency group.Unsynchronized master becoming a slave volume or consistency groupWhen a master volume (or consistency group) is inactive, it is also in an unsynchronizedstate, <strong>and</strong> it might have a backlog of uncommitted data. The uncommitted changes willpotentially be lost when the volume (CG) becomes a slave volume (CG), as this data must bereverted to match the data on the peer volume, which is now the new master volume. In thiscase, an event is created, summarizing the size of the changes that were lost. Theuncommitted data has now switched its semantics, <strong>and</strong> instead of representing updates thatthe primary peer (former master, now slave) needs to update on the secondary peer (oldslave, new master), metadata now represents updates that must be replicated from thesecondary to the primary.Upon re-establishing the connection, the primary volume or consistency group (current slavevolume/CG) updates the secondary volume/CG (new master volume/CG) with thisChapter 5. Synchronous Remote Mirroring 135
uncommitted data, <strong>and</strong> it is the responsibility of the secondary peer to synchronize theseupdates to primary peer.Reconnection when both sides have the same roleSituations where both sides are configured to the same role can only occur when one sidewas changed. The roles must be changed to have one master <strong>and</strong> one slave (volume orconsistency group). Change the volume roles as appropriate on both sides before the link isresumed.If the link is resumed <strong>and</strong> both sides have the same role, the coupling will not becomeoperational. To solve this problem, the user must use the change role function on one of thevolumes <strong>and</strong> then activate the coupling.5.4 Resynchronization after link failureWhen synchronization between the peers has been interrupted, for example, by a failure of alllinks or the pairs have been suspended by a comm<strong>and</strong>, you probably want to resume themirroring after the problems were solved.Resynchronization can be performed in any direction given that one peer has the master role<strong>and</strong> the other the slave role. When there is a temporary failure of all links from the primary <strong>XIV</strong>to the secondary <strong>XIV</strong>, you re-establish the mirroring in the original direction after the links areup again.Also, if you suspended mirroring for a disaster recovery test at the secondary site, you mightwant to reset the changes made to the secondary site during the tests <strong>and</strong> re-establishmirroring from the primary to the secondary site.If there was a disaster <strong>and</strong> production is now running on the secondary site, re-establishmirroring first from the secondary site to the primary site <strong>and</strong> later on switch mirroring to theoriginal direction from the primary <strong>XIV</strong> to the secondary <strong>XIV</strong>.In any case, the slave peers usually are in a consistent state up to the moment whenresynchronization starts. During the resynchronization process, the peers (volumes orconsistency group) are inconsistent. To preserve consistency, the <strong>XIV</strong> at the slave sideautomatically creates a snapshot of the involved volumes or, in case of a consistency group, asnapshot of the entire consistency group before transmitting any data to the slave volumes.5.4.1 Last consistent snapshotBefore a resynchronization process is initiated, a snapshot of the slave volumes orconsistency groups is created. A snapshot is created to ensure the usability of the slavevolumes/CG in case of a primary site disaster during the resynchronization process. If themaster volume/CG is destroyed before resynchronization is completed, the slave volume/CGmight be inconsistent because it might have been only partially updated with the changes thatwere made to the master volume. To h<strong>and</strong>le this situation, the secondary <strong>XIV</strong> always createsa snapshot of the last consistent slave volume/CG after reconnecting to the secondary <strong>XIV</strong><strong>and</strong> before starting the resynchronization process. No snapshot is created for couplings thatare in the initialization state. The snapshot is preserved until a volume pair is synchronizedagain, or in case of remote mirror consistency groups, until all volumes of the consistencygroup are synchronized.136 <strong>IBM</strong> <strong>XIV</strong> <strong>Storage</strong> <strong>System</strong>: <strong>Copy</strong> <strong>Services</strong> <strong>and</strong> <strong>Migration</strong>
5.4.2 Last consistent snapshot timestampA timestamp is taken when the coupling between the master <strong>and</strong> slave volumes orconsistency group becomes non-operational. This timestamp specifies the last time that theslave volumes/CG was consistent with the master (Figure 5-12).If there is a disaster at the primary (master) site, the snapshot taken at the secondary site canbe used to restore the slave volumes to a consistent state, ready for production.Important: You must delete the mirror relation at the secondary site before you can restorethe last consistent snapshot to the target volumes.Figure 5-12 Snapshot during a resync5.5 Synchronous mirror step-by-step scenarioIn 5.1, “Synchronous mirroring configuration” on page 126, we explained the steps required toset up, operate, <strong>and</strong> deactivate the mirror.In this section, we go through a scenario to demonstrate synchronous mirroring. We assumethat all configuration has taken place for us to start configuring the remote mirroringcouplings. In particular, we assume that:► A host server exists <strong>and</strong> has volumes assigned at the local site.► Two <strong>XIV</strong> systems have been connected to each other over FC or iSCSI.► A st<strong>and</strong>by server exists at the remote site.Note: When using the XCLI comm<strong>and</strong>s quotation marks (“ “) must be used to enclosenames that include spaces. If they are used for names without spaces the comm<strong>and</strong> stillworks. The examples in this scenario contain a mixture of comm<strong>and</strong>s with <strong>and</strong> withoutquotation marks.This scenario discusses the following phases:► Setup <strong>and</strong> configurationPerform initial setup, activate coupling, write data to three volumes, <strong>and</strong> prove that thedata has been written <strong>and</strong> that the volumes are synchronized.► Simulating a disaster at the local siteThe link is broken between the two sites to simulate that the local site is unavailable, theslave volumes are changed to master volumes, the st<strong>and</strong>by server at the remote site hasLUNs mapped to it on the <strong>XIV</strong> at the remote site, <strong>and</strong> new data is written.Chapter 5. Synchronous Remote Mirroring 137
►►The local site recoveryThe old master volumes at the local site are changed to slave volumes <strong>and</strong> data ismirrored back from the remote site to the local site.Failback to the local siteWhen the data is synchronized the volume roles are switched back to the original roles(that is, master volumes at the local site <strong>and</strong> slave volumes at the remote site) <strong>and</strong> theoriginal production server (at the local site) is used.5.5.1 Phase 1: setup <strong>and</strong> configurationIn our sample scenario, we have a Windows 2008 server with three LUNs at the local site <strong>and</strong>communication has been configured between the <strong>XIV</strong>s at the local <strong>and</strong> remote sites.After the couplings have been created <strong>and</strong> activated, as explained under 5.1, “Synchronousmirroring configuration” on page 126, the environment will be as illustrated in Figure 5-13.LocalSiteRemoteSiteProductionWindows 2008ServerActiveInactiveSt<strong>and</strong>byWindows 2008ServerFC LinkData FlowFC LinkData MirroringFC LinkPrimary<strong>XIV</strong>Secondary<strong>XIV</strong>Figure 5-13 Environment with remote mirroring activated138 <strong>IBM</strong> <strong>XIV</strong> <strong>Storage</strong> <strong>System</strong>: <strong>Copy</strong> <strong>Services</strong> <strong>and</strong> <strong>Migration</strong>
5.5.2 Phase 2: disaster at local siteIn this phase of the scenario we simulate a disaster at the local site. All communication hasbeen lost between the primary <strong>and</strong> secondary sites due to a complete power failure or adisaster. This is depicted in Figure 5-14.LocalSiteRemoteSiteProductionWindows 2008ServerSt<strong>and</strong>byWindows 2008ServerFC LinkData FlowFC LinkPrimary<strong>XIV</strong>Secondary<strong>XIV</strong>Figure 5-14 Primary site disasterRole changeover at the secondary site using the GUIWe now change roles for the slave volumes at the secondary site <strong>and</strong> make them mastervolumes so that the st<strong>and</strong>by server can write to them.1. On the secondary <strong>XIV</strong> go to the Remote Mirroring menu <strong>and</strong> right-click a coupling <strong>and</strong>select Change Role (Figure 5-15).Figure 5-15 Remote mirror change roleChapter 5. Synchronous Remote Mirroring 139
Example 5-8 List mirror couplingsFigure 5-15 on page 139 shows that the synchronization status is still consistent for thecouplings that are yet to be changed. This is because this is the last known state. Whenthe role is changed the coupling is automatically deactivated.Role changeover at the secondary site using the XCLIWe now change roles for the slave volumes at the secondary site <strong>and</strong> make them mastervolumes so that the st<strong>and</strong>by server can write to them.1. On the secondary <strong>XIV</strong> open an XCLI session <strong>and</strong> run the mirror_change_role comm<strong>and</strong>(Example 5-7).Example 5-7 Remote mirror change role>> mirror_change_role vol=itso_win2008_vol2 new_role=masterWarning: ARE_YOU_SURE_YOU_WANT_TO_CHANGE_THE_PEER_ROLE_TO_MASTER Y/N: YComm<strong>and</strong> executed successfully.2. To view the status of the coupling run the mirror_list comm<strong>and</strong>, as shown inExample 5-8.>> mirror_listName Mirror Type Mirror Object Role Remote <strong>System</strong> Remote Peer Active Status Link Upitso_win2008_vol1 sync_best_effort Volume Master <strong>XIV</strong> MN00019 itso_win2008_vol1 no Unsynchronized yesitso_win2008_vol2 sync_best_effort Volume Master <strong>XIV</strong> MN00019 itso_win2008_vol2 no Unsynchronized yesitso_win2008_vol3 sync_best_effort Volume Slave <strong>XIV</strong> MN00019 itso_win2008_vol3 yes Consistent yesExample 5-8 shows that the synchronization status is still consistent for one of thecouplings that is yet to be changed. This is because this reflects the last known state.When the role is changed, the coupling is automatically deactivated.3. Repeat steps 1–2 to change roles on other volumes.140 <strong>IBM</strong> <strong>XIV</strong> <strong>Storage</strong> <strong>System</strong>: <strong>Copy</strong> <strong>Services</strong> <strong>and</strong> <strong>Migration</strong>
Map volumes on st<strong>and</strong>by server <strong>and</strong> continue workingAt this point we map the relevant mirrored volumes to the st<strong>and</strong>by server. For details on howto do this mapping refer to <strong>IBM</strong> <strong>XIV</strong> <strong>Storage</strong> <strong>System</strong>: Architecture, Implementation, <strong>and</strong>Usage, SG24-7659. Once the volumes are mapped, we continue working as normal. This issimulated by adding additional data to the server, as illustrated in Figure 5-16.Figure 5-16 Additional data added to the st<strong>and</strong>by serverEnvironment with production now at the secondary siteFigure 5-17 illustrates production at the secondary site.LocalSiteRemoteSiteProductionWindows 2008ServerActiveSt<strong>and</strong>byWindows 2008ServerFC LinkData FlowFC LinkData FlowPrimary<strong>XIV</strong>Secondary<strong>XIV</strong>Figure 5-17 Production at secondary siteChapter 5. Synchronous Remote Mirroring 141
5.5.3 Phase 3: recovery of the primary siteIn this phase the primary site is recovered <strong>and</strong> communication between the primary <strong>and</strong>secondary sites is restored. We assume that it was not totally damaged <strong>and</strong> that the data atthe local site is still there (so we can do a resync). Data is being written from the st<strong>and</strong>byserver to the secondary <strong>XIV</strong>. At the primary site the original Windows 2008 production serveris now switched off, as illustrated in Figure 5-18.LocalSiteRemoteSiteProductionWindows 2008ServerDownActiveSt<strong>and</strong>byWindows 2008ServerFC LinkFC LinkData FlowMirroring InactiveFC LinkPrimary<strong>XIV</strong>Secondary<strong>XIV</strong>Figure 5-18 Primary site recoveryRole changeover at the primary site using the GUIWe are now going to change roles for the master volumes at the primary site <strong>and</strong> make themslave volumes. Before doing this, ensure that the original production server is shut down.1. On the primary <strong>XIV</strong> go to the Remote Mirroring menu. The synchronization status willprobably be inactive. Select one coupling (if you select several couplings, you cannotchange the role), right-click, <strong>and</strong> select Change Role, as shown in Figure 5-19.Figure 5-19 Change master volumes to slave volumes on the primary <strong>XIV</strong>142 <strong>IBM</strong> <strong>XIV</strong> <strong>Storage</strong> <strong>System</strong>: <strong>Copy</strong> <strong>Services</strong> <strong>and</strong> <strong>Migration</strong>
2. You will be prompted to confirm the role change. Select OK to confirm (Figure 5-20).Figure 5-20 Roll change confirmationOnce you have confirmed, the role is changed to slave, as shown in Figure 5-21.Figure 5-21 New role as slave volume3. Repeat steps 1–2 for all the volumes that must be changed.Role changeover at the primary site using the XCLIWe now change roles for the master volumes at the primary site with the XCLI <strong>and</strong> makethem slave volumes. Before doing this, ensure that the original production server is shutdown.1. On the primary <strong>XIV</strong> open an XCLI session <strong>and</strong> run the mirror_change_role comm<strong>and</strong>(Example 5-9).Example 5-9 Change master volumes to slave volumes on the primary <strong>XIV</strong>>> mirror_change_role vol=itso_win2008_vol2Warning: ARE_YOU_SURE_YOU_WANT_TO_CHANGE_THE_PEER_ROLE_TO_SLAVE Y/N: YComm<strong>and</strong> executed successfully.Example 5-10 List mirror couplings2. To view the status of the coupling run the mirror_list comm<strong>and</strong>, as shown inExample 5-10.>> mirror_listName Mirror Type Mirror Object Role Remote <strong>System</strong> Remote Peer Active Status Link Upitso_win2008_vol1 sync_best_effort Volume Slave <strong>XIV</strong> MN00035 itso_win2008_vol1 no Inconsistent yesitso_win2008_vol2 sync_best_effort Volume Slave <strong>XIV</strong> MN00035 itso_win2008_vol2 no Inconsistent yesitso_win2008_vol3 sync_best_effort Volume Master <strong>XIV</strong> MN00035 itso_win2008_vol3 no Unsynchronized yes3. Repeat steps 1–2 to change other couplings.Chapter 5. Synchronous Remote Mirroring 143
Reactivating the remote mirror coupling using the GUITo reactivate the remote mirror coupling using the GUI:1. On the secondary <strong>XIV</strong> go the Remote Mirroring menu <strong>and</strong> highlight all the couplings thatyou want to activate. Right-click <strong>and</strong> select Activate, as illustrated in Figure 5-22 <strong>and</strong>Figure 5-23.Figure 5-22 Reactivating a mirror couplingFigure 5-23 Synchronization status2. On the primary <strong>XIV</strong> go to the Remote Mirroring menu to check the statuses of thecouplings (Figure 5-24). Note that due to the time lapse between Figure 5-23 <strong>and</strong>Figure 5-24 being taken they do show different statuses.Figure 5-24 Remote mirroring statuses on the secondary (local) <strong>XIV</strong>3. Repeat steps 1–2 until all required couplings are reactivated <strong>and</strong> synchronized.144 <strong>IBM</strong> <strong>XIV</strong> <strong>Storage</strong> <strong>System</strong>: <strong>Copy</strong> <strong>Services</strong> <strong>and</strong> <strong>Migration</strong>
Reactivating the remote mirror coupling using the XCLITo reactivate the remote mirror coupling using the XCLI:1. On the secondary (remote) <strong>XIV</strong> run the mirror_activate comm<strong>and</strong>, as shown inExample 5-11.Example 5-11 Reactivating the mirror coupling>> mirror_activate vol=itso_win2008_vol2Comm<strong>and</strong> executed successfully.2. On the secondary <strong>XIV</strong> run the mirror_list comm<strong>and</strong> to see the status of the couplings,as illustrated in Example 5-12.Example 5-12 List remote mirror statuses on the secondary <strong>XIV</strong>>> mirror_listName Mirror Type Mirror Object Role Remote <strong>System</strong> Remote Peer Active Status Link Upitso_win2008_vol1 sync_best_effort Volume Master <strong>XIV</strong> MN00019 itso_win2008_vol1 yes Synchronized yesitso_win2008_vol2 sync_best_effort Volume Master <strong>XIV</strong> MN00019 itso_win2008_vol2 yes Synchronized yesitso_win2008_vol3 sync_best_effort Volume Master <strong>XIV</strong> MN00019 itso_win2008_vol3 no Unsynchronized yes3. On the primary <strong>XIV</strong> run the mirror_list comm<strong>and</strong> to see the status of the couplings, asshown in Example 5-13.Example 5-13 List remote mirror statuses on the primary <strong>XIV</strong>>> mirror_listName Mirror Type Mirror Object Role Remote <strong>System</strong> Remote Peer Active Status Link Upitso_win2008_vol1 sync_best_effort Volume Slave <strong>XIV</strong> MN00035 itso_win2008_vol1 yes Consistent yesitso_win2008_vol2 sync_best_effort Volume Slave <strong>XIV</strong> MN00035 itso_win2008_vol2 yes Consistent yesitso_win2008_vol3 sync_best_effort Volume Master <strong>XIV</strong> MN00035 itso_win2008_vol3 no Unsynchronized yes4. Repeat steps 1–3 to activate additional couplings.Environment with remote mirroring reactivatedFigure 5-25 illustrates production at the secondary (remote) site.LocalSiteRemoteSiteProductionWindows 2008ServerDown ActiveSt<strong>and</strong>byWindows 2008ServerFC LinkFC LinkData FlowData MirroringFC LinkPrimary<strong>XIV</strong>Secondary<strong>XIV</strong>Figure 5-25 Mirroring reactivatedChapter 5. Synchronous Remote Mirroring 145
5.5.4 Phase 4: switching production back to the primary siteAt this stage we have mirroring reactivated with production at the secondary site. We nowwant to switch production back to the primary site. This involves doing the following:► Shut down the servers.► Switch peer roles.► Switch from the st<strong>and</strong>by server to the original production server.Role switchover using the GUITo switch over the role using the GUI:1. At the secondary site, ensure that all the volumes for the st<strong>and</strong>by server are synchronized<strong>and</strong> shut down the servers.2. On the secondary <strong>XIV</strong> go to the Remote Mirroring menu, highlight the required coupling,<strong>and</strong> select Switch Roles (Figure 5-26).Figure 5-26 Switch roles3. You are prompted for confirmation. Select OK. Refer to Figure 5-27 <strong>and</strong> Figure 5-28 onpage 147.Figure 5-27 Switch role confirmation146 <strong>IBM</strong> <strong>XIV</strong> <strong>Storage</strong> <strong>System</strong>: <strong>Copy</strong> <strong>Services</strong> <strong>and</strong> <strong>Migration</strong>
Figure 5-28 Switch role to slave volume on the secondary <strong>XIV</strong>4. Go to the Remote Mirroring menu on the primary <strong>XIV</strong> <strong>and</strong> check the status of the coupling.It must show the peer volume as a master volume (Figure 5-29).Figure 5-29 Switch role to master volume on the primary <strong>XIV</strong>5. Reassign volumes back to the production server at the primary site <strong>and</strong> power it on again.Continue to work as normal. Figure 5-30 on page 148 shows that all the new data is nowback at the primary (local) site.Role switchover using the XCLITo switch over the role using the XCLI:1. At the secondary site, ensure that all the volumes for the st<strong>and</strong>by server are synchronized<strong>and</strong> shut down the servers.2. On the secondary <strong>XIV</strong> open an XCLI session <strong>and</strong> run the mirror_switch_roles comm<strong>and</strong>,as shown in Example 5-14.Example 5-14 Switch from master volume to slave volume on secondary <strong>XIV</strong>>> mirror_switch_roles vol=itso_win2008_vol2Comm<strong>and</strong> executed successfully.3. On the secondary <strong>XIV</strong>, to list the mirror coupling run the mirror_list comm<strong>and</strong>(Example 5-15).Example 5-15 Mirror statuses on the secondary <strong>XIV</strong>>> mirror_listName Mirror Type Mirror Object Role Remote <strong>System</strong> Remote Peer Active Status Link Upitso_win2008_vol1 sync_best_effort Volume Slave <strong>XIV</strong> MN00019 itso_win2008_vol1 yes Consistent yesitso_win2008_vol2 sync_best_effort Volume Slave <strong>XIV</strong> MN00019 itso_win2008_vol2 yes Consistent yesitso_win2008_vol3 sync_best_effort Volume Master <strong>XIV</strong> MN00019 itso_win2008_vol3 no Unsynchronized yes4. On the primary <strong>XIV</strong> run the mirror_list comm<strong>and</strong> to list the mirror couplings, as shownin Example 5-16.Example 5-16 Mirror statuses on the primary <strong>XIV</strong>>> mirror_listName Mirror Type Mirror Object Role Remote <strong>System</strong> Remote Peer Active Status Link Upitso_win2008_vol1 sync_best_effort Volume Master <strong>XIV</strong> MN00035 itso_win2008_vol1 yes Synchronized yesitso_win2008_vol2 sync_best_effort Volume Master <strong>XIV</strong> MN00035 itso_win2008_vol2 yes Synchronized yesitso_win2008_vol3 sync_best_effort Volume Master <strong>XIV</strong> MN00035 itso_win2008_vol3 no Unsynchronized yesChapter 5. Synchronous Remote Mirroring 147
5. Reassign volumes back to the production server at the primary (local) site <strong>and</strong> power it onagain. Continue to work as normal. Figure 5-30 shows that all the new data in now back atthe local site.Figure 5-30 Production server with mirrored data reassigned at the local siteEnvironment back to its production stateThe environment is now back to its production state with mirroring from the primary site to thesecondary site, as shown in Figure 5-31.LocalSiteRemoteSiteProductionWindows 2008ServerActiveInactiveSt<strong>and</strong>byWindows 2008ServerFC LinkData FlowFC LinkData MirroringFC LinkPrimary<strong>XIV</strong>Secondary<strong>XIV</strong>Figure 5-31 Environment back to production state148 <strong>IBM</strong> <strong>XIV</strong> <strong>Storage</strong> <strong>System</strong>: <strong>Copy</strong> <strong>Services</strong> <strong>and</strong> <strong>Migration</strong>
6Chapter 6.Asynchronous Remote MirroringThis chapter describes the basic characteristics, options, <strong>and</strong> available interfaces forasynchronous Remote Mirroring. It also includes step-by-step procedures for setting up <strong>and</strong>removing the mirror.Asynchronous mirroring is the volume or consistency group synchronization attained througha periodic, recurring activity that takes a snapshot of a designated source <strong>and</strong> updates adesignated target with differences between that snapshot <strong>and</strong> the last replicated version ofthe source. Unlike other implementations, <strong>XIV</strong> asynchronous mirroring supports multipleconsistency groups with different recovery point objectives. <strong>XIV</strong> asynchronous mirroringsupports multiple targets, 512 mirrored pairs, scheduling, event reporting, <strong>and</strong> statisticscollection.Asynchronous mirroring enables replication between two <strong>XIV</strong> volumes or consistency groups(CG) that does not suffer from the latency inherent to synchronous mirroring, thereby yieldingbetter system responsiveness <strong>and</strong> offering greater flexibility for implementing disasterrecovery solutions.Note: GUI <strong>and</strong> XCLI illustrations included in this chapter were created with an earlyversion of the 10.2.1 code, available at the time of writing. There could be minordifferences with the code that was publicly released.© <strong>Copy</strong>right <strong>IBM</strong> Corp. 2010. All rights reserved. 149
6.1 Asynchronous mirroring configurationThe mirroring configuration process involves configuring volumes <strong>and</strong> CGs. When a pair ofvolumes or consistency groups point to each other, it is referred to as a mirror.We assume that the links between the local <strong>and</strong> remote <strong>XIV</strong> storage systems have alreadybeen established, as discussed in 4.11.2, “Remote mirror target configuration” on page 118.6.1.1 Volume mirroring setup <strong>and</strong> activationVolumes or consistency groups that participate in mirror operations are configured in pairs.These pairs are called peers. One peer is the source of the data to be replicated <strong>and</strong> the otheris the target. The source has the role of master <strong>and</strong> is the controlling entity in the mirror. Thetarget has the role of slave, which is controlled by operations performed by the master.When initially configured, one volume is considered the source (resides at the primarysystem) <strong>and</strong> the other is the target (resides at the secondary system). This designation isassociated with the volume <strong>and</strong> its <strong>XIV</strong> system <strong>and</strong> does not change. During variousoperations the role may change (master or slave) but one system is always the primary <strong>and</strong>the other is always the secondary.Asynchronous mirroring is initiated at defined intervals. This is the sync job schedule. A syncjob entails synchronization of data updates recorded on the master since the last successfulsynchronization. The sync job schedule will be defined for both the primary <strong>and</strong> secondarysystem peers in the mirror. This provides a schedule for each peer <strong>and</strong> will be used when thepeer takes on the role of master. The purpose of the schedule specification on the slave is toset a default schedule for an automated failover scenario.A schedule set as NEVER means that no sync jobs will be automatically scheduled. See 6.6,“Detailed asynchronous mirroring process” on page 173.The <strong>XIV</strong> GUI automatically creates schedules based on the RPO selected for the mirror beingcreated. The interval can be set in the Mirror Properties panel or must be explicitly specifiedthrough the XCLI.Tip: <strong>XIV</strong> allows you to set a specific RPO <strong>and</strong> schedule interval for each mirror coupling.Slave volumes must be formatted before they are configured as part of a mirror. This meansthat the volume must not have any snapshots <strong>and</strong> must be unlocked.To create a mirror you can use the <strong>XIV</strong> GUI or the XCLI. Both methods are illustrated in thefollowing sections.150 <strong>IBM</strong> <strong>XIV</strong> <strong>Storage</strong> <strong>System</strong>: <strong>Copy</strong> <strong>Services</strong> <strong>and</strong> <strong>Migration</strong>
Using the GUI for volume mirror setupTo create a mirror select the master peer (volume or CG) <strong>and</strong> select Create Mirror(Figure 6-1).Figure 6-1 Select volume to be mirroredThen specify Sync Type as Async, select the slave peer (volume or CG), <strong>and</strong> specify an RPOvalue. Set the Schedule Management field to <strong>XIV</strong> Internal to create automatic synchronizationusing scheduled sync jobs, as shown in Figure 6-2.Figure 6-2 Create MirrorChapter 6. Asynchronous Remote Mirroring 151
The slave volume must be unlocked <strong>and</strong> created as formatted, which also means that itcannot have any Snapshots.When creating a mirror, the slave peer (volume or CG) can also be created automatically onthe target <strong>XIV</strong> <strong>System</strong>. To do this, select Create Slave <strong>and</strong> specify the slave pool name <strong>and</strong>the slave volume or CG name, as shown in Figure 6-3.Figure 6-3 Create Mirror <strong>and</strong> slave volumeIf schedule type External is selected when creating a mirror, no sync jobs will run for thismirror <strong>and</strong> the interval will be set to Never, as illustrated in Figure 6-4.Figure 6-4 Mirror with external schedule152 <strong>IBM</strong> <strong>XIV</strong> <strong>Storage</strong> <strong>System</strong>: <strong>Copy</strong> <strong>Services</strong> <strong>and</strong> <strong>Migration</strong>
When volumes are to be placed in a consistency group, they must all have the same mirroringproperties. Using the Mirror Properties panel, the Never interval can be changed to match theother volumes created (Figure 6-5).Figure 6-5 Mirror PropertiesThe Mirroring panel shows the current status of the mirrors. The synchronization of the mirrormust to be initiated manually using the Activate action, as seen in Figure 6-7 on page 155.Notice, as shown in Figure 6-6, that the selected RPO is displayed for the mirrors created.Figure 6-6 Mirroring status inactiveNote that mirrors of the sync type do not have an RPO value.Chapter 6. Asynchronous Remote Mirroring 153
Using XCLI for volume mirroring setupTip: When working with the XCLI session or the XCLI comm<strong>and</strong> the windows look thesame <strong>and</strong> you could address the wrong <strong>XIV</strong> system with your comm<strong>and</strong>. Therefore, itmight be good to always first issue a config_get comm<strong>and</strong> to verify that you are talking tothe right <strong>XIV</strong> system.Example 6-1 illustrates the use of XCLI comm<strong>and</strong>s to set up a mirror volume.Example 6-1 XCLI comm<strong>and</strong>s for mirror volume setup-- Mirror HS1_1 (select slave volume)schedule_create schedule="xiv_gui_schedule_30_1257877700437" interval=00:00:30schedule_create schedule="xiv_gui_schedule_30_1257877700437" interval=00:00:30mirror_create target="WSC_1300331" vol="HS1_1" slave_vol="HS1_1"type=ASYNC_INTERVAL rpo=90 remote_rpo=90schedule="xiv_gui_schedule_30_1257877700437"remote_schedule="xiv_gui_schedule_30_1257877700437"-- Mirror HS1_2 (create slave volume)schedule_create schedule="xiv_gui_schedule_30_1257877742375" interval=00:00:30schedule_create schedule="xiv_gui_schedule_30_1257877742375" interval=00:00:30mirror_create target="WSC_1300331" vol="HS1_2" slave_vol="HS1_2" remote_pool="HSPool1" create_slave=yes type=ASYNC_INTERVAL rpo=90 remote_rpo=90schedule="xiv_gui_schedule_30_1257877742375"remote_schedule="xiv_gui_schedule_30_1257877742375"-- Mirror HS1_3 (never schedule)mirror_create target="WSC_1300331" vol="HS1_3" slave_vol="HS1_3"type=ASYNC_INTERVAL rpo=90 remote_rpo=90 schedule="never" remote_schedule="never"-- Mirror HS1_4 (Sync)mirror_create target="WSC_1300331" vol="HS1_4" slave_vol="HS1_4"-- Change Schedule HS1_3 (master)schedule_create schedule="xiv_gui_schedule_30_1257878091625" interval=00:00:30mirror_change_schedule vol="HS1_3" schedule="xiv_gui_schedule_30_1257878091625"-- Change Schedule HS1_3 (slave)schedule_create schedule="xiv_gui_schedule_30_1257878091625" interval=00:00:30mirror_change_schedule vol="HS1_3" schedule="xiv_gui_schedule_30_1257878091625"154 <strong>IBM</strong> <strong>XIV</strong> <strong>Storage</strong> <strong>System</strong>: <strong>Copy</strong> <strong>Services</strong> <strong>and</strong> <strong>Migration</strong>
Activating the remote mirror coupling using the GUITo activate the mirror, on the primary <strong>XIV</strong> go the Remote Mirroring menu <strong>and</strong> highlight all thecouplings that you want to activate, right-click, <strong>and</strong> select Activate, as shown in Figure 6-7.Figure 6-7 Activate mirrorAs seen in Figure 6-8, the Mirror panel now shows the status of the active mirrors as RPOOK. All the async mirrors have the same mirroring status. Note that Sync Mirrors show thestatus as synchronized.Figure 6-8 Mirror status active6.1.2 Consistency group configuration<strong>IBM</strong> <strong>XIV</strong> <strong>Storage</strong> <strong>System</strong> leverages its consistency group capability to allow for mirroringnumerous volumes at once. The system creates snapshots of the master consistency groupsat user-configured intervals <strong>and</strong> synchronizes these point-in-time snapshots with the slave.Setting the consistency group to be mirrored is done by first creating a consistency group,then setting it to be mirrored, <strong>and</strong> only then populating it with volumes. A consistency groupmust be created at the primary <strong>XIV</strong> <strong>and</strong> a corresponding consistency group at the secondary<strong>XIV</strong>. The names of the consistency groups can be different. When creating a consistencygroup, you also must specify the storage pool.All volumes that you are going to add to the consistency group must be in that pool on theprimary <strong>XIV</strong> <strong>and</strong> in one pool at the secondary <strong>XIV</strong>. Adding a new volume pair to a mirroredChapter 6. Asynchronous Remote Mirroring 155
consistency group requires the volumes to be mirrored exactly as the other volumes withinthis consistency group.Important: All volumes that you want to add to a mirroring consistency group must bedefined in the same pool at the primary site <strong>and</strong> must be in one pool at the secondary site.It is possible to add a mirrored volume to a non-mirrored consistency group <strong>and</strong> have thisvolume retain its mirroring settings.To create a mirrored consistency group first create a CG on the primary <strong>and</strong> secondary <strong>XIV</strong><strong>Storage</strong> <strong>System</strong>. Then select the primary CG <strong>and</strong> specify Create Mirror (Figure 6-9).Figure 6-9 Create mirrored CGThe consistency group must not contain any volume when you create the mirror, <strong>and</strong> be sureto specify mirroring parameters that match the volumes that will be part of this CG, as shownin Figure 6-10. The status of the new mirrored CG is now displayed in the Mirroring panel.Figure 6-10 Async mirrored CG156 <strong>IBM</strong> <strong>XIV</strong> <strong>Storage</strong> <strong>System</strong>: <strong>Copy</strong> <strong>Services</strong> <strong>and</strong> <strong>Migration</strong>
Adding a mirrored volume to a mirrored consistency groupThe mirrored volume <strong>and</strong> the mirrored consistency group must have the following attributes:► The volume is on the same system as the consistency group.► The volume belongs to the same storage pool as the consistency group.► Both the volume <strong>and</strong> the consistency group do not have outst<strong>and</strong>ing sync jobs, eitherscheduled or manual.► The volume <strong>and</strong> consistency group have the same synchronization status.► The volume’s <strong>and</strong> consistency group’s special snapshot (known as last_replicatedsnapshot) have identical timestamps. This means that the volumes must have the sameschedule <strong>and</strong> at least one interval has passed since the creation of the mirrors.For more information about asynchronous mirroring special snapshots refer to 6.5.4,“Mirroring special snapshots” on page 172.Also, mirrors for volumes must be activated before volumes can be added to a mirroredconsistency group. This activation results in the initial copy being completed <strong>and</strong> sync jobsbeing run to create the special last_replicated snapshots (refer to Figure 6-7 on page 155).As seen in Figure 6-11, the Mirror panel now shows the status of the active mirrors as RPO OK.All the async mirrors <strong>and</strong> the mirrored CG have the same mirroring status. Note that syncmirrors shows the status as synchronized.Figure 6-11 Mirror status activeTo add volumes to the mirrored CG the mirroring parameters must be identical, including thelast_replicated timestamps. The RPO <strong>and</strong> schedule will be changed to match the values setfor the mirrored consistency group. The volumes must have the same status (RPO OK). It ispossible that during the process the status may change or the last_replicated timestamp maynot be updated yet. If an error occurs verify the status <strong>and</strong> repeat the operation.Chapter 6. Asynchronous Remote Mirroring 157
Go to the Mirroring panel <strong>and</strong> verify the RPO <strong>and</strong> status for the volumes to be added to theCG. Select each volume <strong>and</strong> specify to add to the consistency group (Figure 6-12).Figure 6-12 Volumes <strong>and</strong> snapshotsThen specify the mirrored consistency group, as shown in Figure 6-13.Figure 6-13 Select CGThe Mirroring panel now shows the consistency group as a group of volumes, all with thesame status for both the master CG (Figure 6-14) <strong>and</strong> the slave CG (Figure 6-15 onpage 159).Figure 6-14 Master CG status158 <strong>IBM</strong> <strong>XIV</strong> <strong>Storage</strong> <strong>System</strong>: <strong>Copy</strong> <strong>Services</strong> <strong>and</strong> <strong>Migration</strong>
Figure 6-15 Slave CG statusThe Consistency Groups panel shows the last_replicated snapshots, <strong>and</strong> if the sync job iscurrently running there will be a most_recent snapshot, as can be seen in Figure 6-16.Figure 6-16 Mirrored CG: most_recent snapshotRemoving a volume from a mirrored consistency groupWhen removing a volume from a mirrored consistency group, the corresponding peer volumewill be removed from the peer consistency group. Mirroring is retained with the sameconfiguration as the consistency group from which it was removed. All ongoing consistencygroups’ sync jobs keep running.Asynchronous mirroring <strong>and</strong> snapshot consistency groupsA volume can be in only one consistency group. Because consistency groups can be used forsnapshot <strong>and</strong> Remote Mirroring, confusion can arise. Define separate <strong>and</strong> specific CG forsnapshot <strong>and</strong> Remote Mirroring.XCLI comm<strong>and</strong>s for consistency group configurationExample 6-2 illustrates the use of XCLI comm<strong>and</strong>s for configuring consistency groups.Example 6-2 XCLI comm<strong>and</strong>s for CG configuration-- Activate async Mirrorsmirror_activate vol="HS1_1"mirror_activate vol="HS1_2"mirror_activate vol="HS1_3"Chapter 6. Asynchronous Remote Mirroring 159
-- Activate Mirror CGmirror_activate cg="HS_Pool1_CG"-- add volume to CG with changing RPOmirror_change_schedule vol="HS1_3" schedule="xiv_gui_schedule_30_1258729268234"schedule_delete schedule="xiv_gui_schedule_300_1258145098468"mirror_change_schedule vol="HS1_3" schedule="xiv_gui_schedule_30_1258729268234"mirror_change_rpo vol="HS1_3" rpo=90 remote_rpo=90cg_add_vol cg="HS_Pool1_CG" vol="HS1_3"-- Primary Mirror Status>> mirror_list -tlocal_peer_name,sync_type,current_role,target_name,remote_peer_name,active,sync_state,schedule_name,last_replicated_snapshot_time,specified_rpoName Mirror Type Role Remote <strong>System</strong> Remote Peer Active StatusSchedule Name Last Replicated RPOHS1_1 async_interval Master WSC_1300331 HS1_1 yes RPO OKxiv_gui_schedule_30 2009-11-11 16:41:30 0:01:30HS1_2 async_interval Master WSC_1300331 HS1_2 yes RPO OKxiv_gui_schedule_30 2009-11-11 16:41:30 0:01:30HS1_3 async_interval Master WSC_1300331 HS1_3 yes RPO OKxiv_gui_schedule_30 2009-11-11 16:41:30 0:01:30HS_Pool1_CG async_interval Master WSC_1300331 HS_Pool1_CG yes RPO OKxiv_gui_schedule_30 2009-11-11 16:41:30 0:01:30-- Secondary Mirror Status>> mirror_list -tlocal_peer_name,sync_type,current_role,target_name,remote_peer_name,active,sync_state,schedule_name,last_replicated_snapshot_time,specified_rpoName Mirror Type Role Remote <strong>System</strong> Remote Peer Active StatusSchedule Name Last Replicated RPOHS1_1 async_interval Slave WSC_6000639 HS1_1 yes RPO OKxiv_gui_schedule_30 2009-11-11 16:42:05 0:01:30HS1_2 async_interval Slave WSC_6000639 HS1_2 yes RPO OKxiv_gui_schedule_30 2009-11-11 16:42:05 0:01:30HS1_3 async_interval Slave WSC_6000639 HS1_3 yes RPO OKxiv_gui_schedule_30 2009-11-11 16:42:05 0:01:30HS_Pool1_CG async_interval Slave WSC_6000639 HS_Pool1_CG yes RPO OKxiv_gui_schedule_30 2009-11-11 16:42:05 0:01:30>> sync_job_listJob Object Local Peer Source Target State Part of CGJob TypeVolume HS1_1 last-replicated-HS1_1 most-recent-HS1_1 active yesscheduledVolume HS1_2 last-replicated-HS1_2 most-recent-HS1_2 active yesscheduledVolume HS1_3 last-replicated-HS1_3 most-recent-HS1_3 active yesscheduledCG HS_Pool1_CG last-replicated-HS1_1 most-recent-HS1_1 active noscheduled-- Remove from Mirrored Consistency Groupcg_remove_vol vol="HS1_3"160 <strong>IBM</strong> <strong>XIV</strong> <strong>Storage</strong> <strong>System</strong>: <strong>Copy</strong> <strong>Services</strong> <strong>and</strong> <strong>Migration</strong>
6.1.3 Coupling activation, deactivation, <strong>and</strong> deletionMirroring can be manually activated <strong>and</strong> deactivated per volume or CG pair. When it isactivated, the mirror is in active mode. When it is deactivated, the mirror is in inactive mode.These modes have the following functions:► ActiveMirroring is functioning <strong>and</strong> the data is being written to the master <strong>and</strong> copied to the slavepeers at regular intervals.► InactiveMirroring is deactivated. The data is not being replicated to the slave peer, but writes to themaster peer are being recorded <strong>and</strong> can later be replicated to the slave volume. Inactivemode is used mainly when maintenance is performed on the secondary <strong>XIV</strong> system.The mirror has the following characteristics:► When a mirror is created, it is always initially in inactive mode.► A mirror can only be deleted when its is in inactive mode.► Transitions between the two states can only be performed from the <strong>XIV</strong> with the master.► In a DR situation a role change changes the slave peers (at the secondary system) to amaster role (so that production can resume at the secondary). However, until the primarysite is recovered, the role of its volumes cannot be changed from master to slave. In thiscase, both sides have the same role. When the primary site is recovered <strong>and</strong> before thelink is resumed, you must first change the role from master to slave at the primary (seealso 6.3, “Resynchronization after link failure” on page 169, <strong>and</strong> 6.4, “Disaster recovery”on page 169).The mirroring is terminated by deactivating the mirror <strong>and</strong> is required for the following actions:► Terminating or deleting the mirroring► Stopping the mirroring process– For a planned network outage– To reduce network b<strong>and</strong>width– For a planned recovery testThe deactivation pauses a running sync job <strong>and</strong> no new sync jobs will be created as long asthe active state of the mirroring is not restored. However, the deactivation does not cancel thestatus check by the master <strong>and</strong> the slave. The synchronization status of the deactivatedmirror is calculated as though the mirror was active.Deactivating a mirror results in the synchronization status becoming RPO_Lagging when thespecified RPO time is exceeded. This means that the last-replicated snapshot is older thanthe specified RPO.Chapter 6. Asynchronous Remote Mirroring 161
Change RPO <strong>and</strong> intervalThe required RPO can be changed as illustrated in Figure 6-17 <strong>and</strong> the GUI selects a newinterval for the schedule. For example, as shown in Figure 6-18, the RPO was changed to 1hour (01:00:00). The schedule selected is 15 min. This schedule can then be changed fromthe Properties panel. There is a selection list of available intervals, as shown in Figure 6-19on page 163.Figure 6-17 Change RPOFigure 6-18 New RPO value162 <strong>IBM</strong> <strong>XIV</strong> <strong>Storage</strong> <strong>System</strong>: <strong>Copy</strong> <strong>Services</strong> <strong>and</strong> <strong>Migration</strong>
Figure 6-19 Change CG intervalUsing XCLI comm<strong>and</strong>s to change RPO <strong>and</strong> intervalExample 6-3 illustrates the use of XCLI comm<strong>and</strong>s to change the RPO <strong>and</strong> interval.Example 6-3 XCLI comm<strong>and</strong>s for changing RPO <strong>and</strong> interval-- change RPO to 1 Hr <strong>and</strong> adjust schedule timemirror_change_rpo cg="HS_Pool1_CG" rpo=3600 remote_rpo=3600schedule_change schedule="xiv_gui_schedule_30_1258144725093" interval=00:15:00schedule_rename schedule="xiv_gui_schedule_30_1258144725093"new_name="xiv_gui_schedule_900_1258144924875"---- on secondaryschedule_create schedule="xiv_gui_schedule_900_1258144924875" interval=00:15:00mirror_change_schedule cg="HS_Pool1_CG"schedule="xiv_gui_schedule_900_1258144924875"schedule_delete schedule="xiv_gui_schedule_30_1258144725093"-- change schedule time to 5 minschedule_change schedule="xiv_gui_schedule_900_1258144924875" interval=00:05:00schedule_rename schedule="xiv_gui_schedule_900_1258144924875"new_name="xiv_gui_schedule_300_1258145098468"---- on secondaryschedule_create schedule="xiv_gui_schedule_300_1258145098468" interval=00:05:00mirror_change_schedule cg="HS_Pool1_CG"schedule="xiv_gui_schedule_300_1258145098468"schedule_delete schedule="xiv_gui_schedule_900_1258144924875"Chapter 6. Asynchronous Remote Mirroring 163
Deactivation on the masterTo deactivate a mirror select Deactivate, as shown in Figure 6-20.Figure 6-20 Mirror CG deactivateThe activation state changes to inactive, as shown in Figure 6-21. Subsequently, thereplication pauses (<strong>and</strong> records where it paused). Upon activation, the replication resumes.Note that an ongoing sync job resumes upon activation. No new sync job will be created untilthe next interval.Figure 6-21 Mirror CG inactiveDeactivation on the slaveDeactivation is not available, regardless of the state of the mirror. However, the peer role canbe changed to master, which sets the status to inactive.Note that for consistency group mirroring, deactivation pauses all running sync jobspertaining to the consistency group.164 <strong>IBM</strong> <strong>XIV</strong> <strong>Storage</strong> <strong>System</strong>: <strong>Copy</strong> <strong>Services</strong> <strong>and</strong> <strong>Migration</strong>
Using XCLI comm<strong>and</strong>s for deactivation <strong>and</strong> activationExample 6-4 shows XCLI comm<strong>and</strong>s for CG deactivation <strong>and</strong> activation.Example 6-4 XCLI comm<strong>and</strong>s for CG deactivation <strong>and</strong> activation-- Deactivate Mirrored CGmirror_deactivate cg="HS_Pool1_CG"-- Activate Mirrored CGmirror_activate cg="HS_Pool1_CG"DeletionWhen a mirror pair (volume pairs or a consistency group) is inactive, the mirror relationshipcan be deleted. When the mirror is deleted, the <strong>XIV</strong> forgets everything about the mirror. If youwant to set up the mirror again, the <strong>XIV</strong> must do an initial copy again from the source to thetarget volume.When the mirror is part of a consistency group the mirror first must be removed from themirrored CG <strong>and</strong> the last_replicated CG for the master <strong>and</strong> the slave must be disb<strong>and</strong>ed. Thissnapshot CG is recreated with only the current volumes after the next interval completes. Thelast_replicated snapshots for the mirror can now be deleted, allowing a new mirror to becreated.Note that when the mirror is deleted, the slave volume becomes a normal volume again, butthe volume is locked, which means that it is write protected. To enable writing to the volumego to the Volumes list panel, select the volume, right-click it, <strong>and</strong> select Unlock.The slave volume must also be formatted before it can be part of a new mirror. Formattingalso requires all snapshots of that volume to be deleted.XCLI comm<strong>and</strong>s for mirror deletionExample 6-5 illustrates the use of XCLI comm<strong>and</strong>s for mirror deletion.Example 6-5 XCLI comm<strong>and</strong>s for mirror deletion-- delete Mirrorcg_remove_vol vol="HS2_3"mirror_deactivate vol="HS2_3"mirror_delete vol="HS2_3"-- Format slave volumesnap_group_disb<strong>and</strong> snap_group="last-replicated-HS_Pool2_CG"snapshot_delete snapshot="last-replicated-HS2_3"vol_unlock vol="HS2_3"vol_format vol="HS2_3"-- Delete snapshots on Mastersnap_group_disb<strong>and</strong> snap_group="last-replicated-HS_Pool2_CG"snapshot_delete snapshot="last-replicated-HS2_3"Chapter 6. Asynchronous Remote Mirroring 165
6.2 Role reversalChanging roles can be performed at any time (when a pair is active or inactive) for the slave,<strong>and</strong> for the master when the mirror is inactive. A change role reverts only the role of that peer.The single operation to switch roles is only available for synchronous mirrors. However, thedirection of the mirror can be reversed by following a process of multiple change roleoperations.Change roleIn a disaster at the primary site, a role change at the secondary site is the normal recoveryaction.Assuming that the local site is down <strong>and</strong> that the remote site will become the main productionsite, changing roles is performed at the remote (now production) site first. Later, when theprimary site is up again <strong>and</strong> communication is re-established, you also change the role at theprimary site to a slave to be able to establish mirroring from the secondary site back to theprimary site. This completes a switch role operation.Changing the slave peer roleThe role of the slave volume or consistency group can be changed to the master role, asshown in Figure 6-22.Figure 6-22 Change role of a slave consistency groupAs shown in Figure 6-23, you are then prompted to confirm the role change (role reverse).Figure 6-23 Verify change role166 <strong>IBM</strong> <strong>XIV</strong> <strong>Storage</strong> <strong>System</strong>: <strong>Copy</strong> <strong>Services</strong> <strong>and</strong> <strong>Migration</strong>
After this changeover, the following is true:► The slave volume or consistency group is now the master.► The last_replicated snapshot is restored to the volumes► The coupling has the status of inactive (Figure 6-24).Figure 6-24 Slave becomes master►The coupling remains in inactive mode (Figure 6-25). This means that remote mirroring isdeactivated. This ensures an orderly activation when the role of the peer on the other siteis changed.Figure 6-25 Original master becomes inactiveThe new master volume or consistency group starts to accept write comm<strong>and</strong>s from localhosts. Because coupling is not active, in the same way as for any master volume, a log ismaintained of which write operations must be sent to the slave volume when communicationresumes.After changing the slave to the master, an administrator also must change the original masterto the slave role before communication resumes (Figure 6-26). If both peers are left in thesame role (master), mirroring cannot be restarted.Figure 6-26 Change role of a master consistency groupChapter 6. Asynchronous Remote Mirroring 167
Slave peer consistencyWhen the user is changing the slave volume or consistency group to a master volume ormaster consistency group, they may not be in a consistent state. Therefore, the volumes areautomatically restored to the last_replicated snapshot.Changing the master peerWhen a peer role is changed from slave to master, then the mirror automatically becomesinactive because both volumes are a master (Figure 6-25 on page 167). When coupling isinactive, the master volume or consistency group can change roles. After such a change themaster volume or consistency group becomes the slave volume or consistency group(Figure 6-27).Figure 6-27 Original master becomes slaveUnsynchronized master becoming a slave volume or consistency groupWhen a master volume (or consistency group) is inactive, it is also not consistent with theprevious slave. Any changes made after the last replicated snapshot time will be lost whenthe volume (CG) becomes a slave volume (CG). The data will be restored to the lastreplicated snapshot to match the data on the peer volume, which is now the new mastervolume.Upon re-establishing the connection, the primary volume or consistency group (current slavevolume/CG) is updated from the secondary volume/CG (new master volume/CG) with datathat was written to the secondary volume after the last replicated snapshot timestamp.Reconnection when both sides have the same roleSituations where both sides are configured to the same role can only occur when one sidewas changed. The roles must be changed to have one master <strong>and</strong> one slave (volume orconsistency group). Change the volume roles as appropriate on both sides before the link isresumed.If the link is resumed <strong>and</strong> both sides have the same role, the coupling does not becomeoperational. The user must use the change role function on one of the volumes <strong>and</strong> thenactivate the mirroring.Peer reverts to last_replicated snapshot. See 6.5.4, “Mirroring special snapshots” onpage 172.168 <strong>IBM</strong> <strong>XIV</strong> <strong>Storage</strong> <strong>System</strong>: <strong>Copy</strong> <strong>Services</strong> <strong>and</strong> <strong>Migration</strong>
Using XCLI comm<strong>and</strong>s to change rolesFigure 6-28 shows an example of using XCLI comm<strong>and</strong>s to change roles.-- Slave change rolemirror_change_role cg="HS_Pool1_CG"-- Master change rolemirror_change_role cg="HS_Pool1_CG"-- Activate new Mastermirror_activate cg="HS_Pool1_CG"Figure 6-28 XCLI change roles6.3 Resynchronization after link failureWhen a link failure occurs, the primary system must start tracking changes to the mirrorsource volumes so that these changes can be copied to the secondary once recovered.When recovering from a link failure, the following steps are taken to synchronize the data:► Asynchronous mirroring sync jobs proceed as scheduled. Sync jobs are restarted <strong>and</strong> anew most_recent snapshot is taken. See 6.5.4, “Mirroring special snapshots” onpage 172.► The primary system copies the changed data to the secondary volume. Depending onhow much data must be copied, this operation could take a long time, <strong>and</strong> the statusremains RPO_Lagging.6.4 Disaster recoveryThere are two broad categories of disaster:► One that destroys the primary (local) site or destroys the data there► One that makes the primary site or the data there unavailable, but that leaves the dataintactHowever, within these broad categories there are a number of situations that may exist. Someof these <strong>and</strong> the recovery procedures are considered below:►A disaster that makes the <strong>XIV</strong> at the primary site unavailable, but leaves the site itself <strong>and</strong>the servers there still availableIn this scenario the volumes/CG on the <strong>XIV</strong> at the secondary site can be switched tomaster volumes/CG, servers at the primary site can be redirected to the <strong>XIV</strong> at thesecondary site, <strong>and</strong> normal operations can start again. When the <strong>XIV</strong> at the primary site isrecovered the data can be mirrored from the secondary site back to the primary site. A fullinitialization of the data is usually not needed.Only changes that take place at the secondary site are transferred to the primary site. Ifdesired, a planned site switch can then take place to resume production activities at theprimary site. See 6.2, “Role reversal” on page 166, for details related to this process.Chapter 6. Asynchronous Remote Mirroring 169
►►A disaster that makes the whole of the local site <strong>and</strong> data unavailable.In this scenario, the st<strong>and</strong>by (inactive) servers at the secondary site are activated <strong>and</strong>attached to the secondary <strong>XIV</strong> to continue normal operations. This requires changing therole of the slave peers to become master peers.After the primary site is recovered, the data at the secondary site can be mirrored back tothe primary site. This most likely requires a full initialization of the primary site because thelocal volumes may not contain any data. See 6.1, “Asynchronous mirroring configuration”on page 150, for details related to this process.When initialization completes the peer roles can be switched back to master at the primarysite <strong>and</strong> the slave at secondary site. The servers are then redirected back to the primarysite. See 6.2, “Role reversal” on page 166, for details related to this process.A disaster that breaks all links between the two sites but both sites remain runningIn this scenario the primary site continues to operate as normal. When the links arereestablished the data at the primary site can be resynchronized with the secondary site.Only the changes since the previous last_replicated snapshot are sent to the remote site.6.5 Mirroring processThis section explains the overall asynchronous mirroring process, from initialization tooutgoing operations. The asynchronous mirroring process generates snapshots of the masterat user-configured intervals <strong>and</strong> synchronizes these snapshots with the slave (see “Snapshotlife-cycle” on page 172).6.5.1 Initialization processThe mirroring process starts with an initialization phase:1. Read requests are served from the master. Upon each write operation to the master, themaster writes the data locally (primary site) <strong>and</strong> acknowledges the write operation.2. Before any actual synchronization of a master can commence, a most_recent snapshot ofthe master is created. This snapshot determines the scope of replication for theinitialization phase <strong>and</strong> the data to be replicated can be determined.170 <strong>IBM</strong> <strong>XIV</strong> <strong>Storage</strong> <strong>System</strong>: <strong>Copy</strong> <strong>Services</strong> <strong>and</strong> <strong>Migration</strong>
3. The most_recent data is copied to the slave <strong>and</strong> a Last_Replicated snapshot of the slaveis taken (Figure 6-29).Initialization Job completesMaster peermost_recentInitialization Sync JobSlave peerlast_replicatedData to be replicatedLocalsi teRemotesiteFigure 6-29 Initialization process completes4. The most_recent snapshot on the master is renamed to last_replicated. This snapshot isidentical to the data in the last_replicated snapshot on the slave (Figure 6-30).Master’s last_replicated snapshot createdInitialization phase endsMaster peermost_recent > last_replicatedSlave peerlast_replicatedlast_replicatedLocalsiteRem otesiteFigure 6-30 Ready for ongoing operation5. Sync jobs can now be run to create periodic consistent copies of the master volumes orconsistency groups on the slave system. See 6.6, “Detailed asynchronous mirroringprocess” on page 173.Chapter 6. Asynchronous Remote Mirroring 171
6.5.2 Mirroring ongoing operationFollowing the completion of the initialization phase, the master examines the synchronizationstatus at scheduled intervals <strong>and</strong> determines the scope of the synchronization. The followingprocess occurs whenever a synchronization is started:1. A snapshot of the master is created.2. The master calculates the differences between the master snapshot <strong>and</strong> the most recentmaster snapshot that is synchronized with the slave.3. The master establishes a synchronization process called a sync job that replicates thedifferences from the master to the slave. Only data differences are replicated.Details of this process can be found in 6.6, “Detailed asynchronous mirroring process” onpage 173.6.5.3 Mirroring consistency groupsThe synchronization status of the consistency group is determined by the status of allvolumes pertaining to this consistency group.► The activation <strong>and</strong> deactivation of a consistency group affects all of its volumes.► Role updates concerning a consistency group affect all of its volumes.►►It is impossible to directly activate, deactivate, or update the role of a given volume within aconsistency group.It is not possible to directly change the schedule of an individual volume within aconsistency group.6.5.4 Mirroring special snapshotsThe status of the synchronization process <strong>and</strong> the scope of the sync job are determinedthrough the use of the following two special snapshots:► Most_recent snapshotThis snapshot is the most recent taken of the master system, either a volume orconsistency group. This snapshot is taken prior to the creation of a new sync job. Thisentity is maintained on the master system only.► Last_replicated snapshotThis is the most recent snapshot that has been fully synchronized with the slave system.This snapshot is duplicated from the most_recent snapshot after the sync job is complete.This entity is maintained on both the master <strong>and</strong> the slave systems.Snapshot life-cycleThroughout the sync job life cycle, the most_recent <strong>and</strong> last_replicated snapshots are created<strong>and</strong> deleted to denote the completion of significant mirroring stages.172 <strong>IBM</strong> <strong>XIV</strong> <strong>Storage</strong> <strong>System</strong>: <strong>Copy</strong> <strong>Services</strong> <strong>and</strong> <strong>Migration</strong>
This mechanism bears the following characteristics <strong>and</strong> limitations:► The last_replicated snapshots have two available time stamps:– On the master system: the time that the last_replicated snapshot is copied from themost_recent snapshot– On the slave system: the time that the last_replicated snapshot is copied from themaster system► No snapshot is created during the initialization phase.► Snapshots are deleted only after newer snapshots are created.► A failure in creating a last-replicated snapshot caused by space depletion is h<strong>and</strong>led in adesignated process. See 6.8, “Pool space depletion” on page 182, for additionalinformation.► Snapshots that are created by the snap now operation are retained <strong>and</strong> automaticallynamed by the system. This is identical to the last_replicated snapshot until a new sync jobruns.Table 6-1 indicates which snapshot is created for a given sync job phase.Table 6-1 Snapshots <strong>and</strong> sync job phasesSync jobphaseMost_RecentsnapshotLast_ReplicatedsnapshotDetails1 New intervalstarts.Created onthe mastersystemThe most_recent snapshot is createdonly if there is no sync job running.2 Calculate thedifferences.The difference between themost_recent snapshot <strong>and</strong> thelast_replicated snapshot is transferredfrom the master system to the slavesystem.3 The sync job iscomplete.Created on theslave systemThe last_replicated snapshot on theslave system is created from thesnapshot that has just been mirrored.4 Following thecreation of thelast_Replicatedsnapshot.Created on themaster systemThe last_replicated snapshot on themaster system is created from themost_recent snapshot.6.6 Detailed asynchronous mirroring processAfter initialization is complete sync job schedules become active (unless schedule =never orType = external is specified for the mirror). This starts a specific process that replicates aconsistent set of data from the master to the slave. This process uses special snapshots topreserve the state of the master <strong>and</strong> slave during the synchronization process. This allowsthe changed data to be quantified <strong>and</strong> provides synchronous data points that can be used fordisaster recovery. See 6.5.4, “Mirroring special snapshots” on page 172.Chapter 6. Asynchronous Remote Mirroring 173
The sync job runs <strong>and</strong> the mirror status is maintained at the master system. If a previous syncjob is running, a new sync job will not start. The following actions are taken at the beginning ofeach interval:1. Most_recent snapshot is taken of the volume or consistency group:a. Host I/O is halted.b. The snapshot is taken to provide a consistent set of data to be replicated.c. Host I/O resumes.2. Changed data is copied to the slave:a. The difference between the most_recent <strong>and</strong> last_replicated snapshots is determined.b. This changed data is replicated to the slave.Refer to Figure 6-31.Sync job startsThe sync job data isbeing replicatedSync JobMaster peermost_recentSlave peerlast_replicat edlast_replicatedData to be replicatedLocalsiteRemotesiteFigure 6-31 Sync job starts174 <strong>IBM</strong> <strong>XIV</strong> <strong>Storage</strong> <strong>System</strong>: <strong>Copy</strong> <strong>Services</strong> <strong>and</strong> <strong>Migration</strong>
3. A new last_replicated snapshot is created on the slave. This snapshot preserves theconsistent data for later recovery actions if needed. Refer to Figure 6-32.Sync Job completed…<strong>and</strong> a new last_replicatedsnapshot is created thatrepresents the updated slavepeer’s state.Master peermost_recentSlave peerlast_replicat edlast_replicatedLocalsiteRemotesiteFigure 6-32 Sync job completes4. The most recent_snapshot is renamed on the master (Figure 6-33):a. The most recent data is now equivalent to the data on the slave.b. Previous snapshots are deleted.c. The most_recent snapshot is renamed to last_replicated.New master last_replicated snapshot createdIn one transaction - the master first deletes the currentlast_replicated snapshot (8)<strong>and</strong> the master then creates a new last_replicatedsnapshot from the most_recent snapshot (9).Interval sync process is now completeThe master <strong>and</strong> slave peers have an identical ‘restoretime point ‘ to which they can be reverted. This facilitatesamong other things mirror peer switching.Master peermost_recent > last_repli catedSlav e peerlast_replicatedlast_replicatedLocalsiteRemotesiteFigure 6-33 New master’s last replicated snapshotThe next sync job can now be run at the next defined interval.Chapter 6. Asynchronous Remote Mirroring 175
Mirror synchronization statusSynchronization status is checked periodically <strong>and</strong> is independent of the mirroring process ofscheduling sync jobs. Refer to Figure 6-34 for a view of the synchronization states.Sync Job starts <strong>and</strong>replicat es to Slave theMaster state at t 0Example: RPO = IntervalMasterSlaveIntervalt 0t 0’IntervalIn terv alt 2t 1t 1’Intervalt 3Intervalt4Intervalt nRPO_OKRPO_LaggingRPO_OKIf RPO is equal to or lower than thedifference between the current time(when the check is run) <strong>and</strong> thetimestamp of thelast_replicated_snapshot, then thestatus will be set to RPO_OKIf RPO is higher than the differencebetween the current time (when thecheck is calculated) <strong>and</strong> the timestamp ofthe last_replicated_snapshot, then thestatus will be set to RPO_LAGGINGFigure 6-34 Synchronization statesThe possible synchronization states are:► InitializationSynchronization does not start until the initialization completes.► RPO_OKSynchronization has completed within the specified sync job interval time (RPO).► RPO_LaggingSynchronization has completed but took longer than the specified interval time (RPO).6.7 Asynchronous mirror step-by-step illustrationIn the previous sections, the steps taken to set up, synchronize, <strong>and</strong> remove mirroring,utilizing both the GUI <strong>and</strong> the XCLI were explained. In this section we provide anasynchronous mirror step-by-step illustration.6.7.1 Mirror initializationAt this point, we are continuing after the setup illustrated in 6.1, “Asynchronous mirroringconfiguration” on page 150, which assumes that the Fibre Channel ports have been properlydefined as source <strong>and</strong> targets, the Ethernet switch has been updated to jumbo frames, <strong>and</strong> allthe physical paths are in place.176 <strong>IBM</strong> <strong>XIV</strong> <strong>Storage</strong> <strong>System</strong>: <strong>Copy</strong> <strong>Services</strong> <strong>and</strong> <strong>Migration</strong>
Mirrored volumes have been placed into a mirrored consistency group <strong>and</strong> the mirror hasbeen initialized <strong>and</strong> has a status of RPO OK. See Figure 6-35 <strong>and</strong> Figure 6-36.Figure 6-35 Master status after setupFigure 6-36 Slave status after setup6.7.2 Remote backup scenarioOne possible scenario related to the remote site is to provide a consistent copy of data that isused as a periodic backup. This backup copy could be copied to tape or used for data-miningactivities that do not require the most current data.This is accomplished by creating a duplicate of the last_replicated snapshot of the slaveconsistency group. This new snapshot can then be mounted to hosts <strong>and</strong> backed up to tapeor used for other purposes.Chapter 6. Asynchronous Remote Mirroring 177
GUI steps to duplicate a snapshot groupFrom the Consistency Groups panel select Duplicate, as shown in Figure 6-37.Figure 6-37 Duplicate last_replicated snapshotA new snapshot is created with the same timestamp as the last_replicated snapshot(Figure 6-38).Figure 6-38 Duplicate snapshotXCLI comm<strong>and</strong> to duplicate a snapshot groupFigure 6-39 illustrates the snap_group_duplicate comm<strong>and</strong>.-- Duplicate last_replicatedsnap_group_duplicate snap_group="last-replicated-HS_Pool1_CG"Figure 6-39 XCLI to duplicate a snapshot group178 <strong>IBM</strong> <strong>XIV</strong> <strong>Storage</strong> <strong>System</strong>: <strong>Copy</strong> <strong>Services</strong> <strong>and</strong> <strong>Migration</strong>
6.7.3 DR testing scenarioIt is important to verify disaster recovery procedures. This can be accomplished by using theremote volumes with hosts at the recovery site to verify that the data is consistent <strong>and</strong> that nodata is missing (due to volumes not being mirrored). This process is partly related to makingslave volumes available to the hosts, but it also includes processes external to the <strong>XIV</strong> systemcomm<strong>and</strong>s. For example, the software available on the remote hosts <strong>and</strong> user access tothose hosts must also be verified. This example only covers the <strong>XIV</strong> system comm<strong>and</strong>s.GUI steps for DR testingThe process begins by changing the role of the slave volumes to master volumes. This resultsin the mirror being deactivated. The remote hosts can now access the remote volumes. SeeFigure 6-40, Figure 6-41, <strong>and</strong> Figure 6-42 on page 180.Figure 6-40 Change slave role to masterFigure 6-41 Verify change roleChapter 6. Asynchronous Remote Mirroring 179
Figure 6-42 New master volumesAfter the testing is complete the remote volumes are returned to their previous slave role SeeFigure 6-43, Figure 6-44, <strong>and</strong> Figure 6-45 on page 181.Figure 6-43 Change role back to slaveFigure 6-44 Verify change role180 <strong>IBM</strong> <strong>XIV</strong> <strong>Storage</strong> <strong>System</strong>: <strong>Copy</strong> <strong>Services</strong> <strong>and</strong> <strong>Migration</strong>
Figure 6-45 Slave role restoredAny changes made during the testing are removed by restoring the last_replicated snapshot,<strong>and</strong> new updates from the local site will be transferred to the remote site when the mirror isactivated again (Figure 6-46 through Figure 6-48).Figure 6-46 Activate mirror at local siteFigure 6-47 Master activeFigure 6-48 Slave activeChapter 6. Asynchronous Remote Mirroring 181
XCLI comm<strong>and</strong>s for DR testingFigure 6-49 shows the steps <strong>and</strong> the corresponding XCLI comm<strong>and</strong>s required for DR testing.-- Change Slave to Mastermirror_change_role cg="HS_Pool1_CG">> mirror_list -tlocal_peer_name,sync_type,current_role,target_name,remote_peer_name,activeName Mirror Type Role Remote <strong>System</strong> Remote Peer ActiveHS1_1 async_interval Master WSC_6000639 HS1_1 noHS1_2 async_interval Master WSC_6000639 HS1_2 noHS1_3 async_interval Master WSC_6000639 HS1_3 noHS_Pool1_CG async_interval Master WSC_6000639 HS_Pool1_CG no-- Change back to Slavemirror_change_role cg="HS_Pool1_CG">> mirror_list -tlocal_peer_name,sync_type,current_role,target_name,remote_peer_name,activeName Mirror Type Role Remote <strong>System</strong> Remote Peer ActiveHS1_1 async_interval Slave WSC_6000639 HS1_1 noHS1_2 async_interval Slave WSC_6000639 HS1_2 noHS1_3 async_interval Slave WSC_6000639 HS1_3 noHS_Pool1_CG async_interval Slave WSC_6000639 HS_Pool1_CG no-- Activate Master on local Sitemirror_activate cg="HS_Pool1_CG">> mirror_list -tlocal_peer_name,sync_type,current_role,target_name,remote_peer_name,activeName Mirror Type Role Remote <strong>System</strong> Remote Peer ActiveHS1_1 async_interval Slave WSC_6000639 HS1_1 yesHS1_2 async_interval Slave WSC_6000639 HS1_2 yesHS1_3 async_interval Slave WSC_6000639 HS1_3 yesHS_Pool1_CG async_interval Slave WSC_6000639 HS_Pool1_CG yesFigure 6-49 XCLI duplicate a snapshot group6.8 Pool space depletionThe asynchronous mirroring process relies on special snapshots (most_recent,last_replicated) that require <strong>and</strong> consume space from the pool snapshot reserve. Anadequate amount of snapshot space depends on the workload characteristics <strong>and</strong> theintervals that you set for sync jobs. Observing your application over time allows you toeventually fine tune the percentage of pool space to reserve for snapshots. Initially, aconservative figure is to allocate 30% of the pool space to snapshots.Tip: Set appropriate pool alert thresholds to be warned ahead of time <strong>and</strong> be able to takeproactive measures to avoid any serious pool space depletion situations.182 <strong>IBM</strong> <strong>XIV</strong> <strong>Storage</strong> <strong>System</strong>: <strong>Copy</strong> <strong>Services</strong> <strong>and</strong> <strong>Migration</strong>
The <strong>XIV</strong> system has a sophisticated built-in process to cope with spool space depletion onthe slave or on the master before it eventually deactivates the mirror. If a pool does not haveenough free space to accommodate the storage requirements warranted by a new host write,the system progressively deletes snapshots within that pool until enough space is madeavailable for successful completion of the write request.Chapter 6. Asynchronous Remote Mirroring 183
184 <strong>IBM</strong> <strong>XIV</strong> <strong>Storage</strong> <strong>System</strong>: <strong>Copy</strong> <strong>Services</strong> <strong>and</strong> <strong>Migration</strong>
7Chapter 7.Data migrationThis chapter introduces the <strong>XIV</strong> <strong>Storage</strong> <strong>System</strong> embedded data migration function, which isused to migrate data from a non-<strong>XIV</strong> storage system to the <strong>XIV</strong> <strong>Storage</strong> <strong>System</strong>. The <strong>XIV</strong>data migration function is included in the base <strong>XIV</strong> software <strong>and</strong> is very easy to deploy. Thischapter includes usage examples <strong>and</strong> troubleshooting information.At a very high level, the steps to migrate to <strong>XIV</strong> using the <strong>XIV</strong> Data <strong>Migration</strong> function are:1. Establish connectivity between source device <strong>and</strong> <strong>XIV</strong>. The source storage device musthave Fibre Channel connectivity with the <strong>XIV</strong>.2. Collect configuration. Detail the configuration of the LUNs to be migrated.3. Perform data migration:– Stop/unconfigure all I/O from source-original LUNs.– Start data migration in <strong>XIV</strong>.– Activate new LUNs through <strong>XIV</strong>.– Start all I/O on new <strong>XIV</strong> LUNs.Note that all images of the <strong>XIV</strong> GUI shown in this chapter used Version 2.4.2 of the <strong>XIV</strong> GUI.If you are still using an earlier version, certain panels may look slightly different.© <strong>Copy</strong>right <strong>IBM</strong> Corp. 2010. All rights reserved. 185
1514131211109876543210OKACID /Diag2Channel11Gb/s2 4D u a lPo rte dDriv e ChannelOK21OK2Ho s tChannelsCh 2Ch 14Gb/s1 2DC41ABDC1 2 144Gb /sCh 1Ch 2Ho s tChannels2OK12OKDu alPorte dDriv e Channel14Gb/s22Channel2ID /Dia gACOK7.1 OverviewWhatever the reason for your data migration, it is always desirable to avoid or minimizedisruption to your business applications. Whereas there are many options available formigrating data from one storage system to another, the <strong>XIV</strong> <strong>Storage</strong> <strong>System</strong> includes a datamigration feature that enables the easy movement of data from an existing storage system tothe <strong>XIV</strong> <strong>Storage</strong> <strong>System</strong>. This feature enables the production environment to continuefunctioning during the data transfer with only one brief period of downtime for your businessapplications. Figure 7-1 illustrates a high-level view of what the data migration environmentcould look like.Module 92 41 3<strong>XIV</strong> Port 4 Initiator ModeModule 8Host Server2 41 3Module 72 41 3Non-<strong>XIV</strong> Disk <strong>System</strong>FC416SAN SwitchModule 62 41 3Module 52 41 3Module 42 41 3<strong>XIV</strong> port 4 Initiator Mode<strong>XIV</strong> <strong>Storage</strong> <strong>System</strong>Figure 7-1 Data migration simple viewThe <strong>IBM</strong> <strong>XIV</strong> Data <strong>Migration</strong> solution offers a smooth data transfer, because it:► Requires only a single short outage to switch LUN ownership. This enables the immediateconnection of a host server to the <strong>XIV</strong> <strong>Storage</strong> <strong>System</strong>, providing the user with directaccess to all the data before it has been copied to the <strong>XIV</strong> <strong>Storage</strong> <strong>System</strong>.► Synchronizes data between the two storage systems using transparent copying to the <strong>XIV</strong><strong>Storage</strong> <strong>System</strong> as a background process with minimal performance impact.► Supports data migration from practically all storage vendors.► Must be set up using Fibre Channel.► Can be used to migrate SAN boot volumes.The <strong>XIV</strong> <strong>Storage</strong> <strong>System</strong> manages the data migration by simulating host behavior. Whenconnected to the storage device containing the source data, <strong>XIV</strong> looks <strong>and</strong> behaves like aSCSI initiator, which in common terms means that it acts like a host server. After theconnection is established, the storage device containing the source data believes that it is186 <strong>IBM</strong> <strong>XIV</strong> <strong>Storage</strong> <strong>System</strong>: <strong>Copy</strong> <strong>Services</strong> <strong>and</strong> <strong>Migration</strong>
eceiving read requests from a host, when in fact it is the <strong>XIV</strong> <strong>Storage</strong> <strong>System</strong> doing ablock-by-block copy of the data, which the <strong>XIV</strong> is then writing onto an <strong>XIV</strong> volume.During the background copy process, the host server is connected to the <strong>XIV</strong> <strong>Storage</strong><strong>System</strong>. The <strong>XIV</strong> <strong>Storage</strong> <strong>System</strong> h<strong>and</strong>les all read <strong>and</strong> write requests from the host server,even if the data is not resident on the <strong>XIV</strong> <strong>Storage</strong> <strong>System</strong>. In other words, during the datamigration, the data transfer is transparent to the host <strong>and</strong> the data is available for immediateaccess.It is important that the connections between the two storage systems remain intact during theentire migration process. If at any time during the migration process the communicationbetween the storage systems fails, the process also fails. In addition, if communication failsafter the migration reaches synchronised status, writes from the host will fail if the sourceupdating option was chosen. The situation is further explained in the 7.2, “H<strong>and</strong>ling I/Orequests” on page 187. The process of migrating data is performed at a volume level, as abackground process.The data migration facility in <strong>XIV</strong> firmware revisions 10.1 <strong>and</strong> later supports the following:► Up to four migration targets can be configured on an <strong>XIV</strong> (where a target is either onecontroller in an active/passive storage device or one active/active storage device). <strong>XIV</strong>firmware revision 10.2 increased the number of targets to 16. The target definitions areused for both Remote Mirroring (RM) <strong>and</strong> data migration (DM). Both DM <strong>and</strong> RM functionscan be active at the same time. As already stated, an active/passive storage device withtwo controllers uses two target definitions unless only one of the controllers is used for themigration.► The <strong>XIV</strong> can communicate with host LUN IDs ranging from 0 to 512 (in decimal). Thisdoes not necessarily mean that the non-<strong>XIV</strong> disk system can provide LUN IDs in thatrange. You may be restricted by the ability of the non-<strong>XIV</strong> storage controller to use only 16or 256 LUN IDs depending on hardware vendor <strong>and</strong> device.► Up to 4000 LUNs can be concurrently migrated.Important: During the discussion in this chapter, the source system in a data migrationscenario is referred to as a target when setting up paths between the <strong>XIV</strong> <strong>Storage</strong> <strong>System</strong><strong>and</strong> the donor storage (the non-<strong>XIV</strong> storage). This terminology is also used in RemoteMirroring, <strong>and</strong> both functions share the same terminology for setting up paths fortransferring data.7.2 H<strong>and</strong>ling I/O requestsThe <strong>XIV</strong> <strong>Storage</strong> <strong>System</strong> h<strong>and</strong>les all I/O requests for the host server during the data migrationprocess. All read requests are h<strong>and</strong>led based on where the data currently resides. Forexample, if the data has already been written to the <strong>XIV</strong> <strong>Storage</strong> <strong>System</strong>, it is read from thatlocation. However, if the data has not yet been migrated to the <strong>IBM</strong> <strong>XIV</strong> storage, the readrequest comes from the host to the <strong>XIV</strong> <strong>Storage</strong> <strong>System</strong>, which in turn retrieves the data fromthe source storage device <strong>and</strong> provides it to the host server.The <strong>XIV</strong> <strong>Storage</strong> <strong>System</strong> h<strong>and</strong>les all host server write requests <strong>and</strong> the non-<strong>XIV</strong> disk systemis now transparent to the host. All write requests are h<strong>and</strong>led using one of two user-selectablemethods, chosen when defining the data migration. The two methods are known as sourceupdating <strong>and</strong> no source updating.Chapter 7. Data migration 187
An example of selecting which method to use is shown in Figure 7-2. The check box must beselected to enable source updating, shown here as Keep Source Updated. Without this boxchecked, changed data from write operations is only written to the <strong>XIV</strong>.Figure 7-2 Keep Source Updated check boxSource updatingThis method for h<strong>and</strong>ling write requests ensures that both storage systems (<strong>XIV</strong> <strong>and</strong> non-<strong>XIV</strong>storage) are updated when a write I/O is issued to the LUN being migrated. By doing this thesource system remains updated during the migration process, <strong>and</strong> the two storage systemsremain in sync after the background copy process completes. Similar to synchronous RemoteMirroring, the write comm<strong>and</strong>s are only acknowledged by the <strong>XIV</strong> <strong>Storage</strong> <strong>System</strong> to the hostafter writing the new data to the local <strong>XIV</strong> volume, then writing to the source storage device,<strong>and</strong> then receiving an acknowledgement from the non-<strong>XIV</strong> storage device.An important aspect of selecting this option is that if there is a communication failure betweenthe target <strong>and</strong> the source storage systems or any other error that causes a write to fail to thesource system, the <strong>XIV</strong> <strong>Storage</strong> <strong>System</strong> also fails the write operation to the host. By failingthe update, the systems are guaranteed to remain consistent. Change managementrequirements determine whether you choose to use this option.No source updatingThis method for h<strong>and</strong>ling write requests ensures that only the <strong>XIV</strong> volume is updated when awrite I/O is issued to the LUN being migrated. This method for h<strong>and</strong>ling write requestsdecreases the latency of write I/O operations because write requests are only written to the<strong>XIV</strong> volume <strong>and</strong> are not written to the non-<strong>XIV</strong> storage system. It must be clearly understoodthat this limits your ability to back out a migration, unless you have another way of recoveringupdates that were written to the volume being migrated after migration began. If the host isbeing shutdown for the duration of the migration then this risk is mitigated.Multi-pathing with data migrationsThere are essentially two types of enterprise storage systems when it comes to multi-pathing:►Active/active: These are storage systems where volumes can be active on all of thestorage system controllers at the same time (whether there are two controllers or more).These systems support IO activity to any given volume down two or more paths. Thesetypes of systems typically support load balancing capabilities between the paths with pathfailover <strong>and</strong> recovery in the event of a path failure. The <strong>XIV</strong> is such a device <strong>and</strong> can utilize188 <strong>IBM</strong> <strong>XIV</strong> <strong>Storage</strong> <strong>System</strong>: <strong>Copy</strong> <strong>Services</strong> <strong>and</strong> <strong>Migration</strong>
►this technology during data migrations. Examples of <strong>IBM</strong> products that are active/activestorage servers are the DS6000, DS8000, ESS F20, ESS 800, <strong>and</strong> SVC. Note that theDS6000 <strong>and</strong> SVC are examples of storage servers that have preferred controllers on aLUN-by-LUN basis, but that if attached hosts ignore this preference, a potentialconsequence is the risk of a small performance penalty.If your non-<strong>XIV</strong> disk system supports active/active then you can carefully configuremultiple paths from <strong>XIV</strong> to non-<strong>XIV</strong> disk. The <strong>XIV</strong> load balances the migration traffic acrossthose paths <strong>and</strong> it automatically h<strong>and</strong>les path failures.Active/passive: These are storage platforms where any given volume can be active ononly one controller at a time. These storage devices do not support I/O activity to anygiven volume down multiple paths at the same time. Most support active volumes on oneor more controllers at the same time, but any given volume can only be active on onecontroller at a time. An example of an <strong>IBM</strong> product that is an active/passive storage deviceis the DS4700.Migrating from an active/active storage deviceIf your non-<strong>XIV</strong> disk system supports active/active LUN access then you can configuremultiple paths from <strong>XIV</strong> to the non-<strong>XIV</strong> disk system. The <strong>XIV</strong> load balances the migrationtraffic across these paths. This may lead to the temptation to configure more than twoconnections or to increase the initialization speed to a very large value to speed up themigration. However, the <strong>XIV</strong> only synchronizes one volume at a time per target (with fourtargets, this means that four volumes could be being copied at once). This means that thespeed of the migration from each target is determined by the ability of the non-<strong>XIV</strong> storagedevice to read from the LUN currently being migrated. Unless the non-<strong>XIV</strong> storage device hasstriped the volume across multiple RAID arrays, the migration speed is unlikely to exceed250–300 MBps (<strong>and</strong> could be much less), but this is totally dependant on the non-<strong>XIV</strong> storagedevice.Important: If multiple paths are created between an <strong>XIV</strong> <strong>and</strong> an active/active storagedevice, the same SCSI LUN IDs must be used for each LUN on each path, or datacorruption may occur.Migrating from an active/passive storage deviceBecause of the active/active nature of <strong>XIV</strong>, special considerations must be made whenmigrating data from an active/passive storage device to <strong>XIV</strong>. A single path is configuredbetween any given non-<strong>XIV</strong> storage device controller <strong>and</strong> the <strong>XIV</strong> system. Many users decideto perform migrations with the host applications offline, due to the single path.►Define the target to the <strong>XIV</strong> per non-<strong>XIV</strong> storage controller (controller, not port). Defineonly one path from that controller to the <strong>XIV</strong>. All volumes active on the controller can bemigrated using the defined target for that controller. For example, suppose the non-<strong>XIV</strong>storage device contains two controllers (A <strong>and</strong> B):– Define one target (called, for example, CX-A) with one path between the <strong>XIV</strong> <strong>and</strong> onecontroller on the non-<strong>XIV</strong> storage device (for example, controller A). All volumes activeon this controller can be migrated by using this target. When defining the <strong>XIV</strong> initiator tothe controller, be sure to define it as not supporting fail-over. By doing so, volumes thatare passive on the A controller are not presented to the <strong>XIV</strong>. Check your non-<strong>XIV</strong>storage device documentation for how to do this.– Define another target (called, for example, CX-B) with one path between the <strong>XIV</strong> <strong>and</strong>controller B. All volumes active down the B controller can be migrated to the <strong>XIV</strong> byusing this target. When defining the <strong>XIV</strong> initiator to the controller, be sure to define it asnot supporting failover. By doing so, volumes that are passive on the B controller areChapter 7. Data migration 189
not presented to the <strong>XIV</strong>. Check your non-<strong>XIV</strong> storage device documentation for how todo this.Note: Certain examples shown in this chapter are from a DS4000 active/passive migrationwith each DS4000 controller defined independently as a target to the <strong>XIV</strong> <strong>Storage</strong> <strong>System</strong>.If you define a DS4000 controller as a target do not define the alternate controller as asecond port on the first target. Doing so causes unexpected issues such as migrationfailure, preferred path errors on the DS4000, or very slow migration progress.7.3 Data migration stepsThe high-level steps required when migrating a volume from a non-<strong>XIV</strong> system to the <strong>IBM</strong> <strong>XIV</strong><strong>Storage</strong> <strong>System</strong> are:1. Initial connection setup:– Zone or cable the <strong>XIV</strong> to the non-<strong>XIV</strong> storage device.– Define <strong>XIV</strong> to a non-<strong>XIV</strong> storage device (as a host).– Define a non-<strong>XIV</strong> storage device to <strong>XIV</strong> (as a migration device).2. Define the host being migrated to the <strong>XIV</strong> (using WWPNs).3. Create <strong>and</strong> activate a data migration volume on <strong>XIV</strong>.– Perform pre-migration tasks for the host being migrated:• Back up your data.• Shut down your host or application or unmount the file system.• Zone host to <strong>XIV</strong>.• Update host drivers.– Define <strong>and</strong> test the data migration volume.• On non-<strong>XIV</strong> storage, map volumes away from host <strong>and</strong> map them instead to <strong>XIV</strong>.• On <strong>XIV</strong>, create data migration <strong>and</strong> test it.4. Activate data migration.– On <strong>XIV</strong>, activate data migration.– On <strong>XIV</strong>, map volumes to host.– Bring the host online <strong>and</strong> detect volumes.5. Complete the data migration on <strong>XIV</strong>.– On <strong>XIV</strong>, monitor the migration.– On <strong>XIV</strong>, delete the migration.Each step is further explained in the sections that follow.7.3.1 Initial connection setupFor the initial connection setup, start by zoning or cabling <strong>XIV</strong> to the system being migrated.190 <strong>IBM</strong> <strong>XIV</strong> <strong>Storage</strong> <strong>System</strong>: <strong>Copy</strong> <strong>Services</strong> <strong>and</strong> <strong>Migration</strong>
Zone or cable the <strong>XIV</strong> to the non-<strong>XIV</strong> storage deviceBecause the non-<strong>XIV</strong> storage device views the <strong>XIV</strong> as a host, the <strong>XIV</strong> must connect to thenon-<strong>XIV</strong> storage system as a SCSI initiator. Therefore, the physical connection from the <strong>XIV</strong>must be from initiator ports on the <strong>XIV</strong> (which by default for Fibre Channel is port 4 on eachactive interface module). The initiator ports on the <strong>XIV</strong> can be directly attached to the non-<strong>XIV</strong>storage (without an intervening switch) or they may be fabric attached (it which case they willneed to be zoned to the non-<strong>XIV</strong> storage system). Two physical connections from twoseparate modules on two separate fabrics are recommended for redundancy (althoughredundant pathing will not be possible on active/passive controllers).It is also possible that the host may be attached via one medium (such as iSCSI), whereasthe migration occurs via the other (such as Fibre Channel). The host-to-<strong>XIV</strong> connectionmethod <strong>and</strong> the data migration connection method are independent of each other.Depending on the non-<strong>XIV</strong> storage device vendor <strong>and</strong> device, it may be easier to zone the<strong>XIV</strong> to the ports where the volumes being migrated are already present. In this manner noreconfiguration of the non-<strong>XIV</strong> storage device may be required. For example, in EMCSymmetrix/DMX environments, it is easier to zone the fiber adapters (FAs) to the <strong>XIV</strong> wherethe volumes are already mapped.At the completion of this step you will have:1. Run cables from port 4 on each selected <strong>XIV</strong> interface module to either a fabric switch ordirectly to the non-<strong>XIV</strong> storage (if the non-<strong>XIV</strong> storage has free host ports <strong>and</strong> it supportsdirect attach).2. Zoned the <strong>XIV</strong> initiator ports (whose WWPNs end in 3) to the selected non-<strong>XIV</strong> storagedevice host ports using single initiator zoning (each zone contains one initiator port <strong>and</strong>one target port).Chapter 7. Data migration 191
Figure 7-3 depicts a fabric-attached configuration. It shows that module 4 port 4 is zoned to aport on the non-<strong>XIV</strong> storage via fabric A. Module 7 port 4 is zoned to a port on the non-<strong>XIV</strong>storage via fabric B.Figure 7-3 Fabric attachedDefine <strong>XIV</strong> to the non-<strong>XIV</strong> storage device (as a host)Once the physical connection between the <strong>XIV</strong> <strong>and</strong> non-<strong>XIV</strong> storage device is complete, the<strong>XIV</strong> initiator (WWPN) must be defined on the non-<strong>XIV</strong> storage device. The process to achievethis is vendor <strong>and</strong> device dependent because you must use the non-<strong>XIV</strong> storage devicemanagement interface. Therefore, refer to the non-<strong>XIV</strong> storage vendor’s documentation forhow to configure initiators to the storage device.If you have already zoned the <strong>XIV</strong> to the non-<strong>XIV</strong> storage device, then the WWPNs of the <strong>XIV</strong>initiator ports (that end in the number 3) will appear in the WWPN drop-down list. If they arenot there then you must manually add them (though this strongly suggests either the need tomap a LUN0, or that the SAN zoning has not been done correctly).The <strong>XIV</strong> must be defined as a Linux or Windows host to the non-<strong>XIV</strong> storage device. If thenon-<strong>XIV</strong> device offers several variants of Linux, you can choose SuSE Linux or RedHat Linuxor Linux x86. This defines the correct SCSI protocol flags for communication between the <strong>XIV</strong><strong>and</strong> non-<strong>XIV</strong> storage device. The principal criterion is that the host type must start LUNnumbering with LUN ID 0. If the non-<strong>XIV</strong> storage device is active/passive, check to seewhether the host type selected affects LUN failover between controllers, such as DS4000(see 7.12.5, “<strong>IBM</strong> DS3000/DS4000/DS5000” on page 227, for more details).There may also be other vendor-dependant settings. Section 7.12, “Device-specificconsiderations” on page 223, contains additional information.192 <strong>IBM</strong> <strong>XIV</strong> <strong>Storage</strong> <strong>System</strong>: <strong>Copy</strong> <strong>Services</strong> <strong>and</strong> <strong>Migration</strong>
Define non-<strong>XIV</strong> storage device to <strong>XIV</strong> (as a migration target)Once the physical connectivity is made <strong>and</strong> the <strong>XIV</strong> has been defined to the non-<strong>XIV</strong> storagestorage device, the non-<strong>XIV</strong> storage device must be defined on the <strong>XIV</strong>. This includes definingthe storage device object, defining the WWPN ports on the non-<strong>XIV</strong> storage device, <strong>and</strong>defining the connectivity between the <strong>XIV</strong> <strong>and</strong> the non-<strong>XIV</strong> storage device.1. In the <strong>XIV</strong> GUI go to the Remote <strong>Migration</strong> Connectivity panel.2. Right-click <strong>and</strong> choose Add Target, which brings up the menu shown in Figure 7-4. Thechoices that must be configured are:– Target Name: Type in a name of your own choice.– Target Protocol: Choose FC from the pull-down menu.Click Define.Figure 7-4 Defining the non-<strong>XIV</strong> storage deviceTip: The data migration target is represented by an image of a generic rack. If you mustdelete or rename the migration device do so by right-clicking the image of that rack.3. On the dark shaded box that is part of the defined target, right-click <strong>and</strong> choose Add Port(Figure 7-5).Figure 7-5 Defining the target porta. Enter the WWPN of the first (fabric A) port on the non-<strong>XIV</strong> storage device zoned to the<strong>XIV</strong>. There is no drop-down menu of WWPNs, so you must manually type or paste inthe correct WWPN. Be careful not to make a mistake. It is not necessary to use fullcolons to separate every second number. It makes no difference if you enter a WWPNas 10:00:00:c9:12:34:56:78 or 100000c912345678.b. Click Add.Chapter 7. Data migration 193
4. Enter another port (repeating step 3) for those storage devices that support active/activemulti-pathing. This could be the WWPN that is zoned to the <strong>XIV</strong> on a separate fabric.5. Connect the <strong>XIV</strong> <strong>and</strong> non-<strong>XIV</strong> storage ports that are zoned to one another. This is done byclicking <strong>and</strong> dragging from port 4 on the <strong>XIV</strong> to the port (WWPN) on the non-<strong>XIV</strong> storagedevice to where the <strong>XIV</strong> is zoned. In Figure 7-6 the mouse started at module 9 port 4 <strong>and</strong>has nearly reached the target port. The connection is currently colored blue <strong>and</strong> turns redwhen the mouse connects to port 1 on the target.Figure 7-6 Dragging a connection between <strong>XIV</strong> <strong>and</strong> migration target194 <strong>IBM</strong> <strong>XIV</strong> <strong>Storage</strong> <strong>System</strong>: <strong>Copy</strong> <strong>Services</strong> <strong>and</strong> <strong>Migration</strong>
In Figure 7-7 the connection from module 9 port 4 to port 1 on the non-<strong>XIV</strong> storage device iscurrently active, as noted by the green color of the connecting line. This means that thenon-<strong>XIV</strong> storage system <strong>and</strong> <strong>XIV</strong> are connected <strong>and</strong> communicating (indicating that SANzoning was done correctly. The correct <strong>XIV</strong> initiator port was selected. The correct targetWWPN was entered <strong>and</strong> selected, <strong>and</strong> LUN 0 was detected on the target device). If there isan issue with the path, the connection line is red.Figure 7-7 Non-<strong>XIV</strong> storage device definedTip: Depending on the storage controller, ensuring that LUN0 is visible on the non-<strong>XIV</strong>storage device down the controller path that you are defining helps ensure properconnectivity between the non-<strong>XIV</strong> storage device <strong>and</strong> the <strong>XIV</strong>. Connections from <strong>XIV</strong> toDS4000 or EMC DMX or Hitachi HDS devices require a real disk device to be mapped asLUN0. However, the <strong>IBM</strong> ESS 800, for instance, does not need a LUN to be allocated tothe <strong>XIV</strong> for the connection to become active (turn green in the GUI). The same is true forEMC CLARiiON.7.3.2 Define the host being migrated to the <strong>XIV</strong>Prior to performing data migrations <strong>and</strong> allocating the volumes to the hosts, the host must bedefined on the <strong>XIV</strong>. Volumes are then mapped to the hosts or clusters. If the host is to be amember of a cluster, then the cluster must be defined first. However, a host can be movedeasily from or added to a cluster at any time. This also requires that the host be zoned to your<strong>XIV</strong> target ports via the SAN fabric.1. To define a cluster (optional):a. In the <strong>XIV</strong> GUI go to the floating menu Host <strong>and</strong> Clusters Host <strong>and</strong> Clusters.b. Choose Add Cluster from the top menu bar.Chapter 7. Data migration 195
c. Name: Enter a cluster name in the provided space.d. Click OK.2. To define a host:a. In the <strong>XIV</strong> GUI go to the floating menu Host <strong>and</strong> Clusters Hosts <strong>and</strong> Clusters.b. Choose Add Host from the top menu bar.i. Name: Enter a host name.ii. Cluster: If the host is part of a cluster, choose the cluster from the drop-down menu.iii. Click Add.iv. Select the host <strong>and</strong> right-click to bring up a menu, from which you choose AddPort.i. Port Type: Choose FC from the drop-down menu.ii. Port Name: This is a drop-down menu of WWPNs that are logged into the <strong>XIV</strong> butthat have not been assigned to a host. WWPNs can be chosen from the drop-downmenu or entered manually.iii. Click Add.iv. Repeat the above steps to add all the HBAs of the host being defined.7.3.3 Creating <strong>and</strong> activating a data migration volumePerform the steps explained below.Perform pre-migration tasks for the host being migratedTo perform pre-migration tasks:1. Back up the volumes being migrated.A full restorable backup must be created prior to any data migration activity. It is a bestpractice to verify the backup <strong>and</strong> to verify that all the data is restorable <strong>and</strong> that there areno backup media errors.2. Shut down the application/host.Before the actual migration can begin the application must be quiesced. This ensures thatthe application data is in a consistent state. Because the host may need to be rebooted anumber of times prior to the application data being available again, also consider thefollowing steps:– Set applications to not automatically start when the host operating system restarts.– Stop file systems from being automatically remounted on boot. For UNIX®-basedoperating systems consider commenting out all affected file system mount points in thefstab or vfstab.Note: In clustered environments you could work with only one node until the migrationis complete, so consider shutting down all other nodes in the cluster.3. Perform a point-in-time copy of the volume on the non-<strong>XIV</strong> storage device (if that functionis available on the non-<strong>XIV</strong> storage). This point-in-time copy is a gold copy of the data thatis quiesced prior to starting the data migration process. Do this before changing any hostdrivers or installing new host software, particularly if you are going to migrate boot fromSAN volumes.196 <strong>IBM</strong> <strong>XIV</strong> <strong>Storage</strong> <strong>System</strong>: <strong>Copy</strong> <strong>Services</strong> <strong>and</strong> <strong>Migration</strong>
4. Zone the host to <strong>XIV</strong>. The host must be directed (via SAN fabric zoning) to the <strong>XIV</strong> insteadof the non-<strong>XIV</strong> storage system. This is because the <strong>XIV</strong> is acting as a proxy between thehost <strong>and</strong> the non-<strong>XIV</strong> storage system. The host must no longer access the non-<strong>XIV</strong>storage system once the data migration is activated. The host must perform all I/O throughthe <strong>XIV</strong>.5. Perform host administrative procedures. The host must be configured using the <strong>XIV</strong> hostattachment procedures. These may include removing any existing/non-<strong>XIV</strong> multi-pathingsoftware <strong>and</strong> installing the native multi-pathing drivers <strong>and</strong> recommended patches asstated in the <strong>XIV</strong> Host Attachment Guides. Install the most current HBA driver <strong>and</strong>firmware at this time. One or more reboots may be required. Documentation <strong>and</strong> othersoftware can be found here:http://www.ibm.com/support/search.wss?q=ssg1*&tc=STJTAG+HW3E0&rs=1319&dc=D400&dtmDefine <strong>and</strong> test data migration volumeTo do this:1. Allocate the non-<strong>XIV</strong> volume to <strong>XIV</strong>.The volumes being migrated to the <strong>XIV</strong> must be allocated via LUN mapping to the <strong>XIV</strong>.The LUN ID presented to the <strong>XIV</strong> must be a decimal value from 0 to 512. If it useshexadecimal LUN numbers then the LUN IDs can range from 0x0 to 0x200, but must beconverted to decimal when entered into the <strong>XIV</strong> GUI. The <strong>XIV</strong> does not recognize a hostLUN ID above 512 (decimal). Figure 7-8 shows LUN mapping using a DS4700. It depictsthe <strong>XIV</strong> as a host called <strong>XIV</strong>_<strong>Migration</strong>_Host with four DS4700 logical drives mapped tothe <strong>XIV</strong> as LUN IDs 0 to 3.Figure 7-8 Non-<strong>XIV</strong> LUNs defined to <strong>XIV</strong>When mapping volumes to the <strong>XIV</strong> it is very important to note the LUN IDs allocated bythe non-<strong>XIV</strong> storage. The methodology to do this varies by vendor <strong>and</strong> device <strong>and</strong> isdocumented in greater detail in 7.12, “Device-specific considerations” on page 223.Important: You must unmap the volumes away from the host during this step, even ifyou plan to power the host off during the migration. The non-<strong>XIV</strong> storage only presentsthe migration LUNs to the <strong>XIV</strong>. Do not allow a possibility for the host to detect the LUNsfrom both the <strong>XIV</strong> <strong>and</strong> the non-<strong>XIV</strong> storage.2. Define data migration object/volume.Once the volume being migrated to the <strong>XIV</strong> is allocated to the <strong>XIV</strong>, a new data migration(DM) volume can be defined. The source volume from the non-<strong>XIV</strong> storage system <strong>and</strong><strong>XIV</strong> volume must be exactly the same size.Chapter 7. Data migration 197
Important: You cannot use the <strong>XIV</strong> data migration function to migrate data to a sourcevolume in an <strong>XIV</strong> remote mirror pair. If you need to do this, migrate the data first <strong>and</strong>then create the remote mirror after the migration is completed.If you want to manually create the volumes on the <strong>XIV</strong>, consult 7.5, “Manually creating themigration volume” on page 207. Preferably, instead continue with the next step, discussedin the following section<strong>XIV</strong> volume automatically createdThe <strong>XIV</strong> has the ability to determine the size of the non-<strong>XIV</strong> volume <strong>and</strong> create the <strong>XIV</strong>quickly when the data migration object is defined. This method is easy, which helps avoidpotential issues when manually calculating the real block size of a volume.1. In the <strong>XIV</strong> GUI go to the floating menu Remote <strong>Migration</strong>.2. Right-click <strong>and</strong> choose Define Data <strong>Migration</strong>. This brings up a panel like that shown inFigure 7-9.– Destination Pool: Choose the pool from the drop-down menu where the volume will becreated.– Destination Name: Enter a user-defined name. This will be the name of the local <strong>XIV</strong>volume.– Source Target <strong>System</strong>: Choose the already defined non-<strong>XIV</strong> storage device from thedrop-down menu.Important: If the non-<strong>XIV</strong> device is active/passive, then the source target systemmust represent the controller (or service processor) on the non-<strong>XIV</strong> device thatcurrently owns the source LUN being migrated. This means that you must check,from the non-<strong>XIV</strong> storage, which controller is presenting the LUN to the <strong>XIV</strong>.Figure 7-9 Define Data <strong>Migration</strong> object/volume– Source LUN: Enter the decimal value of the host LUN ID as presented to the <strong>XIV</strong> fromthe non-<strong>XIV</strong> storage system. Certain storage devices present the LUN ID as hex. Thenumber in this field must be the decimal equivalent. Ensure that you do not accidentallyuse internal identifiers that you may also see on the source storage systems198 <strong>IBM</strong> <strong>XIV</strong> <strong>Storage</strong> <strong>System</strong>: <strong>Copy</strong> <strong>Services</strong> <strong>and</strong> <strong>Migration</strong>
management panels. In Figure 7-8 on page 197, the correct values to use are in theLUN column (numbered 0 to 3).– Keep Source Updated: Check this if the non-<strong>XIV</strong> storage system source volume is tobe updated with writes from the host. In this manner all writes from the host will bewritten to the <strong>XIV</strong> volume, as well as the non-<strong>XIV</strong> source volume, until the datamigration object is deleted.Click Define <strong>and</strong> the migration appears as shown in Figure 7-10.Figure 7-10 Defined data migration object/volume3. Test the data migration object. Right-click to select the created data migration object <strong>and</strong>choose Test Data <strong>Migration</strong>. If there are any issues with the data migration object the testfails, reporting the issue found. See Figure 7-11.Figure 7-11 Test Data <strong>Migration</strong>Tip: If you are migrating volumes from an MSCS cluster that is still active, then testing amigration may fail due to the reservations placed on the source LUN by MSCS. You mustbring the cluster down to get the test to succeed.Chapter 7. Data migration 199
7.3.4 Create <strong>and</strong> activate a data migration volume on <strong>XIV</strong>Once the data migration volume has been tested the process of the actual data migration canbegin. When data migration is initiated, the data is copied sequentially in the background fromthe non-<strong>XIV</strong> storage system volume to the <strong>XIV</strong>. The host reads <strong>and</strong> writes data to the <strong>XIV</strong>storage system without being aware of the background I/O being performed.Note: Once activated, the data migration can be deactivated, but after deactivating thedata migration the host is no longer able to read or write to the migration volume <strong>and</strong> allhost I/O stops. Do not deactivate the migration with host I/O running. If you want toab<strong>and</strong>on the data migration prior to completion consult the back-out process described insection 7.10, “Backing out of a data migration” on page 219.1. Activate the data migration.Right-click to select the data migration object/volume <strong>and</strong> choose Activate. This beginsthe data migration process where data is copied in the background from the non-<strong>XIV</strong>storage system to the <strong>XIV</strong>. Activate all volumes being migrated so that they can beaccessed by the host. The host has read <strong>and</strong> write access to all volumes, but thebackground copy occurs serially volume by volume. If two targets (such as non-<strong>XIV</strong>1 <strong>and</strong>non-<strong>XIV</strong>2) are defined with four volumes each, two volumes are actively copied in thebackground—one volume from non-<strong>XIV</strong>1 <strong>and</strong> another from non-<strong>XIV</strong>2. All eight volumesare accessible by the hosts.Figure 7-12 shows the menu choices when right-clicking the data migration. Note the TestData <strong>Migration</strong>, Delete Data <strong>Migration</strong>, <strong>and</strong> Activate menu items, as these are themost-used comm<strong>and</strong>s.Figure 7-12 Activate data migration2. Allocate volumes to the host.Once the data migration has been started, you can use the <strong>XIV</strong> GUI or XCLI to map themigration volumes to the host. When mapping volumes to hosts on the <strong>XIV</strong>, LUN ID 0 isreserved for <strong>XIV</strong> in-b<strong>and</strong> communication. This means that the first LUN ID that younormally use is LUN ID 1. This includes boot-from-SAN hosts. You may also choose to usethe same LUN IDs as were used on the non-<strong>XIV</strong> storage, but this is not m<strong>and</strong>atory.Important: The host cannot read the data on the non-<strong>XIV</strong> volume until the datamigration has been activated. The <strong>XIV</strong> does not pass through (proxy) I/O for a migrationthat is inactive. If you use the XCLI dm_list comm<strong>and</strong> to display the migrations, ensurethat the word Yes appears in the Active column for every migration.200 <strong>IBM</strong> <strong>XIV</strong> <strong>Storage</strong> <strong>System</strong>: <strong>Copy</strong> <strong>Services</strong> <strong>and</strong> <strong>Migration</strong>
3. Bring the host server online.Once the volumes have been mapped to the host server, the host can be brought online.When the host boots up successfully <strong>and</strong> volume visibility has been verified, theapplication can be brought up <strong>and</strong> operations verified.Note: In clustered environments, it is usually recommended that only one node of thecluster be initially brought online after the migration is started, <strong>and</strong> that all other nodesbe offline until the migration is complete. Once complete, update all other nodes (driver,host attachment package, <strong>and</strong> so on), as the primary node was during the initial outage(see step 5 in “Perform pre-migration tasks for the host being migrated” on page 196).4. Data migration progress.Figure 7-13 shows the progress of the data migrations. The status bar can be toggledbetween GB remaining, percent complete, <strong>and</strong> hours/minutes remaining. Figure 7-13shows four data migrations, one of which has started background copy <strong>and</strong> three of whichhave not. Only one migrations is being copied at this same time because there is only onetarget (ITSO_DS4700_Ctrl_B).Figure 7-13 Data migration progress7.3.5 Complete the data migration on <strong>XIV</strong>To complete the data migration, perform the following sequence of steps:1. SynchronizationAfter all of a volume’s data has been copied, the data migration achieves synchronizationstatus. After synchronization is achieved, all read requests are served by the <strong>XIV</strong> <strong>Storage</strong><strong>System</strong>. If source updating was selected the <strong>XIV</strong> will continue to write data to both itself<strong>and</strong> the outgoing storage system until the data migration is deleted. Figure 7-14 depicts acompleted migration.Figure 7-14 Data migration complete2. Delete data migration. Once the synchronization has been achieved, the data migrationobject can be safely deleted without host interruption.Chapter 7. Data migration 201
Important: If this is an online migration, do not deactivate the data migration prior todeletion, as this causes host I/O to stop <strong>and</strong> possibly causes data corruption.Right-click to select the data migration volume <strong>and</strong> choose Delete Data <strong>Migration</strong>, asshown in Figure 7-15. This can be done without host/server interruption.Figure 7-15 Delete Data <strong>Migration</strong>Deleting an inactive or unsynchronized data migrationFor safety purposes, you cannot delete an inactive or unsynchronized data migration from theData <strong>Migration</strong> panel. An unfinished data migration can only be deleted by deleting therelevant volume from the Volumes Volumes & Snapshots section in the <strong>XIV</strong> GUI.7.4 Comm<strong>and</strong>-line interfaceAll of the <strong>XIV</strong> GUI operation steps can be performed using the <strong>XIV</strong> comm<strong>and</strong>-line interface(XCLI) either through direct comm<strong>and</strong> execution or through batch files containing numerouscomm<strong>and</strong>s. This is especially helpful in migration scenarios involving numerous LUNs. Thissection lists the XCLI comm<strong>and</strong> equivalent of the GUI steps shown above. A full description ofall the XCLI comm<strong>and</strong>s can be found in the XCLI Users Guide available at the following <strong>IBM</strong>Web site:http://publib.boulder.ibm.com/infocenter/ibmxiv/r2/topic/com.ibm.help.xiv.doc/docs/GC27-2213-02.pdfEvery comm<strong>and</strong> issued in the <strong>XIV</strong> GUI is logged in a text file with the correct syntax. This isvery helpful for creating scripts. If you are running the <strong>XIV</strong> GUI under Microsoft Windows, lookfor a file titled guicomm<strong>and</strong>s_< todays date >.txt, which will be found in the following folder:C:\Documents <strong>and</strong> Settings\ < Windows user ID >\Application Data\<strong>XIV</strong>\GUI10\logs202 <strong>IBM</strong> <strong>XIV</strong> <strong>Storage</strong> <strong>System</strong>: <strong>Copy</strong> <strong>Services</strong> <strong>and</strong> <strong>Migration</strong>
All of the comm<strong>and</strong>s given on the next few pages are effectively in the order in which youmust execute them, starting with the comm<strong>and</strong>s to list all current definitions (which will alsobe needed when you start to delete migrations).► List targets.Syntaxtarget_list► List target ports.Syntaxtarget_port_list► List target connectivity.Syntaxtarget_connectivity_list► List clusters.Syntaxcluster_list► List hosts.Syntaxhost_list► List volumes.Syntaxvol_list► List data migrations.Syntaxdm_list► Define target (Fibre Channel only).Syntaxtarget_define target= protocol=FC xiv_features=noExampletarget_define target=DMX605 protocol=FC xiv_features=no► Define target port (Fibre Channel only).►►►►SyntaxExampletarget_port_add fcaddress=target=target_port_add fcaddress=0123456789012345 target=DMX605Define target connectivity (Fibre Channel only).Syntaxtarget_connectivity_definelocal_port=1:FC_Port: fcaddress= target=Exampletarget_connectivity_define local_port=1:FC_Port:5:4fcaddress=0123456789012345 target=DMX605Define cluster (optional).Syntaxcluster_create cluster=Examplecluster_create cluster=Exch01Define host (if adding host to a cluster).Syntaxhost_define host= cluster=Examplehost_define host=Exch01N1 cluster=Exch01Define host (if not using cluster definition).Syntaxhost_define host=Examplehost_define host=Exch01Chapter 7. Data migration 203
►►►►►►►►Define host port (Fibre Channel host bus adapter port).Syntaxhost_add_port host= fcaddress=Examplehost_add_port host=Exch01 fcaddress=123456789abcdef1Create <strong>XIV</strong> volume using decimal GB volume size.Syntaxvol_create vol= size= pool=Examplevol_create vol=Exch01_sg01_db size=17 pool=ExchangeCreate <strong>XIV</strong> volume using 512 byte blocks.Syntaxvol_create vol= size_blocks=pool=Examplevol_create vol=Exch01_sg01_db size_blocks=32768pool=ExchangeDefine data migration.If you want the local volume to be automatically created:Syntaxdm_define target= vol= lun= source_updating=create_vol=yes pool=Exampledm_define target=DMX605 vol=Exch01_sg01_db lun=5source_updating=no create_vol=yes pool=ExchangeIf the local volume was pre-created:Syntaxdm_define target= vol=lun=source_updating=Exampledm_define target=DMX605 vol=Exch01_sg01_db lun=5source_updating=noTest data migration object.Syntaxdm_test vol=Exampledm_test vol=Exch_sg01_dbActivate data migration object.Syntaxdm_activate vol=Exampledm_activate vol=Exch_sg01_dbMap volume to host/cluster.– Map to host:Syntaxmap_vol host= vol= lun=Examplemap_vol host=Exch01 vol=Exch01_sg01_db lun=1– Map to cluster:Syntaxmap_vol host= vol= lun=Examplemap_vol host=Exch01 vol=Exch01_sg01_db lun=1Delete data migration object.If the data migration is synchronized <strong>and</strong> thus completed:Syntaxdm_delete vol=Exampledm_delete vol=Exch01_sg01_db204 <strong>IBM</strong> <strong>XIV</strong> <strong>Storage</strong> <strong>System</strong>: <strong>Copy</strong> <strong>Services</strong> <strong>and</strong> <strong>Migration</strong>
►►►►If the data migration is not complete it must be deleted by removing the correspondingvolume from the Volume <strong>and</strong> Snapshot menu (or via the vol_delete comm<strong>and</strong> below).Delete volume (not normally needed).Challenged volume delete (cannot be done via a script, as this comm<strong>and</strong> must beacknowledged):Syntaxvol_delete vol=Examplevol_delete vol=Exch_sg01_dbIf you want to perform an unchallenged volume deletion:Syntaxvol_delete -y vol=Examplevol_delete -y vol=Exch_sg01_dbDelete target connectivity.Syntaxtarget_connectivity_deletelocal_port=1:FC_Port: fcaddress= target=Exampletarget_connectivity_delete local_port=1:FC_Port:5:4fcaddress=0123456789012345 target=DMX605Delete target port.Fibre ChannelSyntaxExampleDelete target.SyntaxExampletarget_port_delete fcaddress= target=target_port_delete fcaddress=0123456789012345 target=DMX605target_delete target=target_delete target=DMX6057.4.1 Using XCLI scripts or batch filesIn order to execute a XCLI batch job, it is best to use the XCLI (versus the XCLI Session).Setting environment variables in WindowsYou can remove the need to specify user <strong>and</strong> password information for every comm<strong>and</strong> bymaking that information an environment variable. Example 7-1 shows how this is done usinga Windows comm<strong>and</strong> prompt. First the <strong>XIV</strong>_XCLIUSER variable is set to admin, then the<strong>XIV</strong>_XCLIPASSWORD is set to adminadmin. Then both variables are confirmed as set. Ifnecessary, change the user ID <strong>and</strong> password to suit your setup.Example 7-1 Setting environment variables in Microsoft WindowsC:\>set <strong>XIV</strong>_XCLIUSER=adminC:\>set <strong>XIV</strong>_XCLIPASSWORD=adminadminC:\>set | find "<strong>XIV</strong>"<strong>XIV</strong>_XCLIPASSWORD=adminadmin<strong>XIV</strong>_XCLIUSER=adminTo make these changes permanent:1. Right-click the My Computer icon <strong>and</strong> select Properties.2. Click the Advanced tab.3. Click Environment Variables.Chapter 7. Data migration 205
4. Click New for a new system variable.5. Create the <strong>XIV</strong>_XCLIUSER variable with the relevant user name.6. Click New again to create the <strong>XIV</strong>_XCLIPASSWORD variable with the relevant password.Setting environment variables in UNIXIf your are using a UNIX-based operating system export the environment variables as shownin Example 7-2 (which in this example is AIX®). In this example the user <strong>and</strong> passwordvariables are set to admin <strong>and</strong> adminadmin <strong>and</strong> then confirmed as being set.Example 7-2 Setting environment variables in UNIXroot@dolly:/tmp/<strong>XIV</strong>GUI# export <strong>XIV</strong>_XCLIUSER=adminroot@dolly:/tmp/<strong>XIV</strong>GUI# export <strong>XIV</strong>_XCLIPASSWORD=adminadminroot@dolly:/tmp/<strong>XIV</strong>GUI# env | grep <strong>XIV</strong><strong>XIV</strong>_XCLIPASSWORD=adminadmin<strong>XIV</strong>_XCLIUSER=adminTo make these changes permanent update the relevant profile, making sure that you exportthe variables to make them environment variables.7.4.2 Sample scriptsWith the environment variables set, a script or batch file like the one in Example 7-3 can berun from the shell or comm<strong>and</strong> prompt in order to define the data migration pairings.Example 7-3 Data migration definition batch filexcli -m 10.10.0.10 dm_define vol=MigVol_1 target=DS4200_CTRL_A lun=4source_updating=no create_vol=yes pool=test_poolxcli -m 10.10.0.10 dm_define vol=MigVol_2 target=DS4200_CTRL_A lun=5source_updating=no create_vol=yes pool=test_poolxcli -m 10.10.0.10 dm_define vol=MigVol_3 target=DS4200_CTRL_A lun=7source_updating=no create_vol=yes pool=test_poolxcli -m 10.10.0.10 dm_define vol=MigVol_4 target=DS4200_CTRL_A lun=9source_updating=no create_vol=yes pool=test_poolxcli -m 10.10.0.10 dm_define vol=MigVol_5 target=DS4200_CTRL_A lun=11source_updating=no create_vol=yes pool=test_poolxcli -m 10.10.0.10 dm_define vol=MigVol_6 target=DS4200_CTRL_A lun=13source_updating=no create_vol=yes pool=test_poolxcli -m 10.10.0.10 dm_define vol=MigVol_7 target=DS4200_CTRL_A lun=15source_updating=no create_vol=yes pool=test_poolxcli -m 10.10.0.10 dm_define vol=MigVol_8 target=DS4200_CTRL_A lun=17source_updating=no create_vol=yes pool=test_poolxcli -m 10.10.0.10 dm_define vol=MigVol_9 target=DS4200_CTRL_A lun=19source_updating=no create_vol=yes pool=test_poolxcli -m 10.10.0.10 dm_define vol=MigVol_10 target=DS4200_CTRL_A lun=21source_updating=no create_vol=yes pool=test_poolWith the data migration defined via the script or batch job above, an equivalent script or batchjob to execute the data migrations then must be run, as shown in Example 7-4.Example 7-4 Activate data migration batch filexcli -m 10.10.0.10 dm_activate vol=MigVol_1xcli -m 10.10.0.10 dm_activate vol=MigVol_2xcli -m 10.10.0.10 dm_activate vol=MigVol_3206 <strong>IBM</strong> <strong>XIV</strong> <strong>Storage</strong> <strong>System</strong>: <strong>Copy</strong> <strong>Services</strong> <strong>and</strong> <strong>Migration</strong>
xcli -m 10.10.0.10 dm_activate vol=MigVol_4xcli -m 10.10.0.10 dm_activate vol=MigVol_5xcli -m 10.10.0.10 dm_activate vol=MigVol_6xcli -m 10.10.0.10 dm_activate vol=MigVol_7xcli -m 10.10.0.10 dm_activate vol=MigVol_8xcli -m 10.10.0.10 dm_activate vol=MigVol_9xcli -m 10.10.0.10 dm_activate vol=MigVol_107.5 Manually creating the migration volumeThe local <strong>XIV</strong> volume can be pre-created before defining the data migration object. This is notthe recommended option due to it being prone to manual calculation errors. This requires thesize of the source volume on the non-<strong>XIV</strong> storage device to be known in 512 byte blocks, asthe two volumes (source <strong>and</strong> <strong>XIV</strong> volume) must be exactly the same size. Finding the actualsize of a volume in blocks or bytes can be difficult, as certain storage devices do not show theexact volume size. This may require you to rely on the host operating system to provide thereal volume size, but this is also not always reliable.For an example of the process to determine exact volume size, consider ESS 800 volume00F-FCA33 depicted in Figure 7-23 on page 217. The size reported by the ESS 800 Web GUIis 10 GB, which suggests that the volume is 10,000,000,000 bytes in size (because the ESS800 displays volume sizes using decimal counting). The AIX bootinfo -s hdisk2 comm<strong>and</strong>reports the volume as 9,536 GiB, which is 9,999,220,736 bytes (because there are1,073,741,824 bytes per GiB). Both of these values are too small. When the volumeproperties are viewed on the volume information panel of the ESS 800 <strong>Copy</strong> <strong>Services</strong> GUI, itcorrectly reports the volume as being 19,531,264 sectors, which is 10,000,007,168 bytes(because there are 512 bytes per sector). If we created a volume that is 19,531,264 blocks insize this will be correct. When the <strong>XIV</strong> automatically created a volume to migrate the contentsof 00F-FCA33 it did create it as 19,531,264 blocks. Of the three information sources that wereconsidered to manually calculate volume size, only one of them must have been correct.Using the automatic volume creation eliminates this uncertainty.If you are confident that you have determined the exact size, then when creating the <strong>XIV</strong>volume, choose the Blocks option from the Volume Size drop-down menu <strong>and</strong> enter the sizeof the <strong>XIV</strong> volume in blocks. If your sizing calculation was correct, this creates an <strong>XIV</strong> volumethat is the same size as the source (non-<strong>XIV</strong> storage device) volume. Then you can define amigration:1. In the <strong>XIV</strong> GUI go to the floating menu Remote <strong>Migration</strong>.2. Right-click <strong>and</strong> choose Define Data <strong>Migration</strong> (Figure 7-9 on page 198).– Destination Pool: Choose the pool from the drop-down menu where the volume wascreated.– Destination Name: Chose the pre-created volume from the drop-down menu.– Source Target <strong>System</strong>: Choose the already defined non-<strong>XIV</strong> storage device from thedrop-down menu.Important: If the non-<strong>XIV</strong> device is active/passive, the source target system mustrepresent the controller (or service processor) on the non-<strong>XIV</strong> device that currentlyowns the source LUN being migrated. This means that you must check from thenon-<strong>XIV</strong> storage, which controller is presenting the LUN to the <strong>XIV</strong>.Chapter 7. Data migration 207
– Source LUN: Enter the decimal value of the LUN as presented to the <strong>XIV</strong> from thenon-<strong>XIV</strong> storage system. Certain storage devices present the LUN ID as hex. Thenumber in this field must be the decimal equivalent.– Keep Source Updated: Check this if the non-<strong>XIV</strong> storage system source volume is tobe updated with writes from the host. In this manner all writes from the host will bewritten to the <strong>XIV</strong> volume, as well as the non-<strong>XIV</strong> source volume until the datamigration object is deleted.Click Define.3. Test the data migration object. Right-click to select the created data migration volume <strong>and</strong>choose Test Data <strong>Migration</strong>. If there are any issues with the data migration object the testfails reporting the issue that was found. See Figure 7-11 on page 199 for an example ofthe panel.If the volume that you created is too small or too large you will receive an error message whenyou do a test data migration, as shown in Figure 7-16. If you try <strong>and</strong> activate the migration youwill get the same error message. You must delete the volume that you manually created onthe <strong>XIV</strong> <strong>and</strong> create a new correctly sized one. This is because you cannot resize a volumethat is in a data migration pair, <strong>and</strong> you cannot delete a data migration pair unless it hascompleted the background copy. Delete the volume <strong>and</strong> then investigate why your sizecalculation was wrong. Then create a new volume <strong>and</strong> a new migration <strong>and</strong> test it again.Figure 7-16 <strong>XIV</strong> volume wrong size for migration7.6 Changing <strong>and</strong> monitoring the progress of a migrationIt is possible to speed up or slow down the migration process, as well as monitor its rate.208 <strong>IBM</strong> <strong>XIV</strong> <strong>Storage</strong> <strong>System</strong>: <strong>Copy</strong> <strong>Services</strong> <strong>and</strong> <strong>Migration</strong>
7.6.1 Changing the synchronization rateThere is only one tunable parameter that determines the speed at which migration data istransferred between the <strong>XIV</strong> <strong>and</strong> defined targets. There are two other tunable parameters thatapply to <strong>XIV</strong> Remote Mirroring (RM):► max_initialization_rateThe rate (in MBps) at which data is transferred between the <strong>XIV</strong> <strong>and</strong> defined targets. Thedefault rate is 100 MBps <strong>and</strong> can be configured on a per-target basis. In other words, onetarget can be set to 100 MBps while another is set to 50 MBps. In this example a total of150 MBps (100+50) transfer rate is possible. If the transfer rate that you are seeing islower than the initialization rate, this may indicate that you are exceeding the capabilities ofthe non-<strong>XIV</strong> disk system to operate at that rate. If the migration is not being done withattached hosts off-line, consider dropping the initialization rate to a very low numberinitially to ensure that there that the volume of migration I/O does not interfere with otherhosts using the non-<strong>XIV</strong> disk system. Then slowly increase the number while checking toensure that response times are not affected on other attached hosts. If you set themax_initialization_rate to zero, then you will stop the background copy, but hosts will stillbe able to access all activated migration volumes.► max_syncjob_rateThis parameter (which is in MBps) is used in <strong>XIV</strong> remote mirroring for synchronizingmirrored snapshots. It is not normally relevant to data migrations. However, themax_initialization_rate cannot be greater than the max_syncjob_rate, which in turn cannotbe greater than the max_resync_rate. In general, there is no reason to ever increase thisrate.► max_resync_rateThis parameter (which is in MBps) is again used for <strong>XIV</strong> remote mirroring only. It is notnormally relevant to data migrations. This parameter defines the resync rate for mirroredpairs. Once remotely mirrored volumes are synchronized, a resync is required if thereplication is stopped for any reason. It is this resync where only the changes are sentacross the link that this parameter affects. The default rate is 300 MBps. There is nominimum or maximum rate. However, setting the value to 400 or more in a 4 Gbpsenvironment does not show any increase in throughput. In general, there is no reason toever increase this rate.Increasing the max_initialization_rate parameter may decrease the time required to migratethe data. However, doing so may impact existing production servers on the non-<strong>XIV</strong> storagedevice. By increasing the rate parameters, more outgoing disk resources will be used to servemigrations <strong>and</strong> less for existing production I/O. Be aware of how these parameters affectmigrations as well as production. You could always choose to only set this to a higher valueduring off-peak production periods.Chapter 7. Data migration 209
The rate parameters can only be set using XCLI, not via the <strong>XIV</strong> GUI. The current ratesettings are displayed by using the -x parameter, so run the target_list -x comm<strong>and</strong>. If thesetting is changed, the change takes place on the fly with immediate effect so there is noneed to deactivate/activate the migrations (doing so blocks host I/O). In Example 7-5 we firstdisplay the target list <strong>and</strong> then confirm the current rates using the -x parameter. The exampleshows that the initialization rate is still set to the default value (100 MBps). We then increasethe initialization rate to 200 MBps. We could then observe the completion rate, as shown inFigure 7-13 on page 201, to see whether it has improved.Example 7-5 Displaying <strong>and</strong> changing the maximum initialization rate>> target_listName SCSI Type ConnectedNextrazap ITSO ESS800 FC yes>> target_list -x target="Nextrazap ITSO ESS800">> target_config_sync_rates target="Nextrazap ITSO ESS800" max_initialization_rate=200Comm<strong>and</strong> executed successfully.Important: Just because the initialization rate has been increased does not mean that theactual speed of the copy increases. The outgoing disk system or the SAN fabric may wellbe the limiting factor. In addition, you may cause host system impact by over-committingtoo much b<strong>and</strong>width to migration I/O.7.6.2 Monitoring migration speedIf you want to monitor the speed of the migration you can use the Data <strong>Migration</strong> panel, asshown in Figure 7-13 on page 201. The status bar can be toggled between GB remaining,percent complete, or hours/minutes remaining. However, if you change themax_initialization_rate, you may want to see what affect this change has on the throughputrate in MBps. To do this you will must use an external tool. This is because the performancestatistics displayed using the <strong>XIV</strong> GUI or using <strong>XIV</strong> Top do not include data migration I/O (the210 <strong>IBM</strong> <strong>XIV</strong> <strong>Storage</strong> <strong>System</strong>: <strong>Copy</strong> <strong>Services</strong> <strong>and</strong> <strong>Migration</strong>
ack end copy). They do, however, show incoming I/O rates from hosts using LUNs that arebeing migrated.7.6.3 Monitoring migration via the <strong>XIV</strong> event logThe <strong>XIV</strong> event log can be used to confirm when a migration started <strong>and</strong> finished. From the<strong>XIV</strong> GUI go to Monitor Events. On the Events panel use the Type drop-down menu toselect dm <strong>and</strong> then click Filter. In Figure 7-17 the events for a single migration are displayed.In this example the events must be read from bottom to top. You can sort the events by date<strong>and</strong> time by clicking the Date column in the Events panel.Figure 7-17 <strong>XIV</strong> Event GUI7.6.4 Monitoring migration speed via the fabricIf you have a Brocade-based SAN, use the portperfshow comm<strong>and</strong> <strong>and</strong> verify the throughputrate of the initiator ports on the <strong>XIV</strong>. If you have two fabrics you may need to connect to twodifferent switches. If multiple paths are defined between <strong>XIV</strong> <strong>and</strong> non-<strong>XIV</strong> disk system, the<strong>XIV</strong> load balances across those ports. This means that you must aggregate the throughputnumbers from each initiator port to see total throughput. Example 7-6 shows the output of theportperfshow comm<strong>and</strong>. The values shown are the combined send <strong>and</strong> receive throughput inMBps for each port. In this example port 0 is the <strong>XIV</strong> Initiator port <strong>and</strong> port 1 is a DS4800 hostport. The max_initialization_rate was set to 50 MBps.Example 7-6 Brocade portperfshow comm<strong>and</strong>FB1_RC6_PDC:admin> portperfshow0 1 2 3 4 5 6 7 8 9 10 11 12 13 14 15 Total======================================================================================50m 50m 14m 14m 2.4m 848k 108k 34k 0 937k 0 27m 3.0m 0 949k 3.0m 125mIf you have a Cisco-based SAN, start Device Manager for the relevant switch <strong>and</strong> then selectInterface Monitor FC Enabled.7.6.5 Monitoring migration speed via the non-<strong>XIV</strong> storageThe ability to display migration throughput varies by non-<strong>XIV</strong> storage device. For example, ifyou are migrating from a DS4000 you could use the performance monitoring panels in theDS4000 <strong>System</strong> Manager to monitor the throughput. In the DS4000 <strong>System</strong> Manager GUI, goto <strong>Storage</strong> Subsystem Monitor Performance. Display the volumes being migrated <strong>and</strong>the throughput for the relevant controllers. You can then determine what percentage of I/O isChapter 7. Data migration 211
eing generated by the migration process. In Figure 7-18 you can see that one volume isbeing migrated using a max_initialization_rate of 50 MBps. This represents the bulk of the I/Obeing serviced by the DS4000 in this example.Figure 7-18 Monitoring a DS4000 migration7.7 Thick-to-thin migrationWhen the <strong>XIV</strong> migrates data from a LUN on a non-<strong>XIV</strong> disk system to an <strong>XIV</strong> volume, it readsevery block of the source LUN, regardless of contents. However, when it comes to writing thisdata into the <strong>XIV</strong> volume, the <strong>XIV</strong> only writes blocks that contain data. Blocks that contain onlyzeroes are not written <strong>and</strong> do not take any space on the <strong>XIV</strong>. This is called a thick-to-thinmigration, <strong>and</strong> it occurs regardless of whether you are migrating the data into a thinprovisioning pool or a regular pool.While the migration background copy is being processed, the value displayed in the Usedcolumn of the Volumes <strong>and</strong> Snapshots panel drops every time that empty blocks aredetected. When the migration is completed, you can check this column to determine howmuch real data was actually written into the <strong>XIV</strong> volume. In Figure 7-19 the used space on theWindows2003_D volume is 4 GB. However, the Windows file system using this disk shown inFigure 7-21 on page 214 shows only 1.4 GB of data. This could lead you to conclude wronglythat the thick-to-thin capabilities of the <strong>XIV</strong> do not work.Figure 7-19 Thick-to-thin resultsThe reason that this has occurred is that when file deletions occur at a file-system level, thedata is not removed. The file system re-uses this effectively free space but does not writezeros over the old data (as doing so generates a large amount of unnecessary I/O). The endresult is that the <strong>XIV</strong> effectively copies old <strong>and</strong> deleted data during the migration. It must beclearly understood that this makes no difference to the speed of the migration, as theseblocks have to be read into the <strong>XIV</strong> cache regardless of what they contain.If you are not planning to use the thin provisioning capability of the <strong>XIV</strong>, this is not an issue.Only be concerned if your migration plan specifically requires you to be adopting thinprovisioning.212 <strong>IBM</strong> <strong>XIV</strong> <strong>Storage</strong> <strong>System</strong>: <strong>Copy</strong> <strong>Services</strong> <strong>and</strong> <strong>Migration</strong>
Writing zeros to recover spaceOne way to recover space before you start a migration is to use a utility to write zeros acrossall free space. In a UNIX environment you could use a simple script like the one shown inExample 7-7 to write large empty files across your file system. You may need to run thesecomm<strong>and</strong>s many times to use all the empty space.Example 7-7 Writing zeros across your file system# The next comm<strong>and</strong> will write a 1 GB mytestfile.outdd if=/dev/zero of=mytestfile.out bs=1000 count=1000000# The next comm<strong>and</strong> will free the file allocation spacerm mytestfile.outIn a Windows environment you can use a Microsoft tool known as sdelete to write zerosacross deleted files. You can find this tool in the sysinternals section of Microsoft Technet.Here is the current URL:http://technet.microsoft.com/en-us/sysinternals/bb897443.aspxIf you instead choose to write zeros to recover space after the migration, you must initiallygenerate large amounts of empty files, which may initially appear to be counter-productive. Ittakes several days for the used space value to decrease after the script or application is run.This is because recovery of empty space runs as a background task.7.8 Resizing the <strong>XIV</strong> volume after migrationBecause of the way that <strong>XIV</strong> distributes data, the <strong>XIV</strong> allocates space in 17 GB portions(which are exactly 17,179,869,184 bytes or 16 GiB). When creating volumes using the <strong>XIV</strong>GUI this aspect of the <strong>XIV</strong> design becomes readily apparent when you enter a volume size<strong>and</strong> it gets rounded up to the next 17 GB cutoff.Chapter 7. Data migration 213
If you chose to allow the <strong>XIV</strong> to determine the size of the migration volume, then you may findthat a small amount of extra space is consumed for every volume that was created. Unlessthe volume sizes being used on the non-<strong>XIV</strong> storage device were created in multiples of16 GiB, then it is likely that the volumes automatically created by the <strong>XIV</strong> will reserve more<strong>XIV</strong> disk space than is actually made available to the volume. An example of the <strong>XIV</strong> volumeproperties of such an automatically created volume is shown in Figure 7-20. In this examplethe Windows2003_D drive is 53 GB in size, but the size on disk is 68 GB on the <strong>XIV</strong>.Figure 7-20 Properties of a migrated volumeWhat this means is that we can resize that volume to 68 GB (as shown in the <strong>XIV</strong> GUI) <strong>and</strong>make the volume 15 GB larger without effectively consuming any more space on the <strong>XIV</strong>. InFigure 7-21 we can see that the migrated Windows2003_D drive is 53 GB in size(53,678,141,440 bytes).Figure 7-21 Windows D drive at 53 GB214 <strong>IBM</strong> <strong>XIV</strong> <strong>Storage</strong> <strong>System</strong>: <strong>Copy</strong> <strong>Services</strong> <strong>and</strong> <strong>Migration</strong>
To resize a volume go to the Volumes Volumes & Snapshots panel, right-click to selectthe volume, then choose the Resize option. Change the sizing method drop-down fromBlocks to GB <strong>and</strong> the volume size is automatically moved to the next multiple of 17 GB. Wecan also use XCLI comm<strong>and</strong>s, as shown in Example 7-8.Example 7-8 Resize the D drive using XCLI>> vol_resize vol=Windows2003_D size=68Warning: ARE_YOU_SURE_YOU_WANT_TO_ENLARGE_VOLUME Y/N: YComm<strong>and</strong> executed successfully.Because this example is for a Microsoft Windows 2003 basic NTFS disk, we can use thediskpart utility to extend the volume, as shown in Example 7-9.Example 7-9 Exp<strong>and</strong>ing a Windows volumeC:\>diskpartDISKPART> list volumeVolume ### Ltr Label Fs Type Size Status Info---------- --- ----------- ----- ---------- ------- --------- --------Volume 0 C NTFS Partition 34 GB Healthy <strong>System</strong>Volume 4 D Windows2003 NTFS Partition 64 GB HealthyDISKPART> select volume 4Volume 4 is the selected volume.DISKPART> extendDiskPart successfully extended the volumeWe can now confirm that the volume has indeed grown by displaying the volume properties.In Figure 7-22 we can see that the disk is now 68 GB (68,713,955,328 bytes).Figure 7-22 Windows 2003 D drive has grown to 64 GBIn terms of when to do the re-size, a volume cannot be resized while it is part of a datamigration. This means that the migration process must have completed <strong>and</strong> the migration forChapter 7. Data migration 215
that volume must have been deleted before the volume can be resized. For this reason youmay choose to defer the resize until after the migration of all relevant volumes has beencompleted. This also separates the resize change from the migration change. Depending onthe operating system using that volume, you may not get any benefit from doing this re-size.7.9 TroubleshootingThis section lists common errors that are encountered during data migrations using the <strong>XIV</strong>data migration facility.7.9.1 Target connectivity failsThe connections (link line) between the <strong>XIV</strong> <strong>and</strong> non-<strong>XIV</strong> disks system on the migrationconnectivity panel remain colored red or the link shows as down. There are several reasonsthis can happen:►►►►►On the <strong>Migration</strong> Connectivity panel, verify that the status of the <strong>XIV</strong> initiator port is OK(Online). If not, check the connections between the <strong>XIV</strong> <strong>and</strong> the SAN switch.Verify that the Fibre Channel ports on the non-<strong>XIV</strong> storage device are enabled <strong>and</strong> online.Check whether SAN zoning is incorrect or incomplete. Verify the SAN fabric zoningbetween the <strong>XIV</strong> <strong>and</strong> non-<strong>XIV</strong> storage device.Perhaps the <strong>XIV</strong> WWPN is not properly defined to the non-<strong>XIV</strong> storage device target port.The <strong>XIV</strong> WWPN must be defined as a Linux or Windows host.– If the <strong>XIV</strong> initiator port is defined as a Linux host to the non-<strong>XIV</strong> storage device, changethe definition to a Windows host. Delete the link (line connections) between the <strong>XIV</strong><strong>and</strong> non-<strong>XIV</strong> storage device ports <strong>and</strong> redefine the link. This is storage devicedependent <strong>and</strong> is caused by how the non-<strong>XIV</strong> storage device presents a pseudoLUN-0 if a real volume is not presented as LUN 0.– If the <strong>XIV</strong> initiator port is defined as a Windows host to the non-<strong>XIV</strong> storage device,change the definition to a Linux host. Delete the link (line connections) between the<strong>XIV</strong> <strong>and</strong> non-<strong>XIV</strong> storage device ports <strong>and</strong> redefine the link. This is storage devicedependent <strong>and</strong> is caused by how the non-<strong>XIV</strong> storage device presents a pseudoLUN-0 if a real volume is not presented as LUN 0.– If the above two attempts are not successful, assign a real disk/volume to LUN 0 <strong>and</strong>present to the <strong>XIV</strong>. The volume assigned to LUN-0 can be a very small unused volumeor a real volume that will be migrated.Offline/Online the <strong>XIV</strong> Fiber channel port: Go to the <strong>Migration</strong> Connectivity panel, highlightthe port in question, right-click, <strong>and</strong> choose Configure. Choose No in the second rowdrop-down menu (Enabled) <strong>and</strong> click Configure. Repeat the process, choosing Yes forEnabled.216 <strong>IBM</strong> <strong>XIV</strong> <strong>Storage</strong> <strong>System</strong>: <strong>Copy</strong> <strong>Services</strong> <strong>and</strong> <strong>Migration</strong>
7.9.2 Remote volume LUN is unavailableThis error typically occurs when defining a DM <strong>and</strong> the LUN ID specified in the Source LUNfield is not responding to the <strong>XIV</strong>. This can occur for several reasons:►►►►►►►The LUN ID (host LUN ID or SCSI ID) specified is not allocated to the <strong>XIV</strong> on the portsidentified in the target definition (using the <strong>Migration</strong> Connectivity panel). You must log onto the non-<strong>XIV</strong> storage device to confirm.The LUN ID is not allocated to the <strong>XIV</strong> on all ports specified in the target definition. Forexample, if the target definition has two links from the non-<strong>XIV</strong> storage device to the <strong>XIV</strong>,the volume must be allocated down both paths using the same LUN ID. The <strong>XIV</strong> looks forthe LUN ID specified on the first defined path. If it does not have access to the LUN it willfail even if the LUN is allocated down the second path. The LUN must be allocated downall paths as defined in the target definition. If two links are defined from the target(non-<strong>XIV</strong>) storage device to the <strong>XIV</strong>, then the LUN must be allocated down both paths.Incorrect LUN ID: Do not confuse a non-<strong>XIV</strong> storage device's internal LUN ID with theSCSI LUN ID (host LUN ID) that is presented to the <strong>XIV</strong>. This is a very common oversight.The source LUN must be the LUN ID (decimal) as presented to the <strong>XIV</strong>.The Source LUN ID field is expecting a decimal number. Certain vendors present the LUNID in hex. This must be translated to decimal. Therefore, if LUN ID 10 is on a vendor thatdisplays its IDs in hex, the LUN ID in the DM define is 16 (hex 10). An example of ahexadecimal LUN number is shown in Figure 7-23, taken from an ESS 800. In thisexample you can see LUN 000E, 000F, <strong>and</strong> 0010. These are entered into the <strong>XIV</strong> datamigration definitions as LUNs 14, 15, <strong>and</strong> 16, respectively. See 7.12, “Device-specificconsiderations” on page 223, for more details.The LUN ID allocated to the <strong>XIV</strong> has been allocated to an incorrect <strong>XIV</strong> WWPN. Makesure that the proper volume is allocated to the correct <strong>XIV</strong> WWPNs.If multiple DM targets are defined, the wrong target may have been chosen when the DMwas defined.Sometimes when volumes are added after the initial connectivity is defined the volume isnot available. Go to the <strong>Migration</strong> Connectivity panel <strong>and</strong> delete the links between the <strong>XIV</strong><strong>and</strong> non-<strong>XIV</strong> storage device. Only delete the links. There is no need to delete anythingelse. Once all links are deleted, recreate the links. Go back to the DM panel <strong>and</strong> recreatethe DM. (See item 5 under in “Define non-<strong>XIV</strong> storage device to <strong>XIV</strong> (as a migrationtarget)” on page 193).Figure 7-23 ESS 800 LUN numbersChapter 7. Data migration 217
►The volume on the source non-<strong>XIV</strong> storage device may not have been initialized orlow-level formatted. If the volume has data on it then this is not the case. However, if youare assigning new volumes from the non-<strong>XIV</strong> storage device then perhaps these newvolumes have not completed the initialization process. On ESS 800 storage theinitialization process can be displayed from the Modify Volume Assignments panel. InFigure 7-23 on page 217 the volumes are still 0% background formatted, so they will notbe accessible by the <strong>XIV</strong>. So for ESS 800, keep clicking Refresh Status on the ESS 800Web GUI until the formatting message disappears.7.9.3 Local volume is not formattedThis error occurs when a volume that already exists is chosen as the destination name <strong>and</strong>has already been written either from a host or a previous DM process that has since beenremoved from the DM panel. To get around this error do one of the following tasks:► Use another volume as a migration destination.► Delete the volume that you are trying to migrate to <strong>and</strong> then create it again.►Go to the Volumes Volumes <strong>and</strong> Snapshots panel. Right-click to select the volume<strong>and</strong> choose Format. Warning: This deletes all data currently on the volume withoutrecovery. A warning message is displayed to challenge the request.7.9.4 Host server cannot access the <strong>XIV</strong> migration volumeThis error occurs if you attempt to read the contents of a volume on a non-<strong>XIV</strong> storage devicevia an <strong>XIV</strong> data migration without activating the data migration. This happens if you performthe migration without following the correct order of steps, in that the host will not attempt toaccess the volume until the <strong>XIV</strong> shows that the migration is initializing <strong>and</strong> active (even if theprogress percentage only shows 0%) or fully synchronized.7.9.5 Remote volume cannot be readThis error occurs when a volume is defined down the passive path on an active/passivemulti-pathing storage device. This can occur in several cases:►►Two paths were defined on a target (non-<strong>XIV</strong> storage device) that only supportsactive/passive multi-pathing. <strong>XIV</strong> is an active/active storage device. Defining two paths onany given target from an active/passive multi-pathing storage device is not supported.Redefine the target with only one path. Another target can be defined with one connectionto the other controller. For example, if the non-<strong>XIV</strong> storage device has two controllers, butthe volume can only be active on one at time, controller A can be defined as one target onthe <strong>XIV</strong> <strong>and</strong> controller B can be defined as a different target. In this manner, all volumesthat are active on controller A can be migrated down the <strong>XIV</strong> A target <strong>and</strong> all volumesactive on the B controller can be migrated down the <strong>XIV</strong> B target.When defining the <strong>XIV</strong> initiator to an active/passive multi-pathing non-<strong>XIV</strong> storage device,certain storage devices allow the initiator to be defined as not supporting failover. The <strong>XIV</strong>initiator should be configured to the non-<strong>XIV</strong> storage device in this manner. Whenconfigured as such, the volume on the passive controller is not presented to the initiator(<strong>XIV</strong>). The volume is only presented down the active controller.Refer to “Multi-pathing with data migrations” on page 188 <strong>and</strong> 7.12, “Device-specificconsiderations” on page 223, for additional information.218 <strong>IBM</strong> <strong>XIV</strong> <strong>Storage</strong> <strong>System</strong>: <strong>Copy</strong> <strong>Services</strong> <strong>and</strong> <strong>Migration</strong>
7.9.6 LUN is out of range<strong>XIV</strong> currently supports migrating data from LUNs with a LUN ID less than 513 (decimal). Thisis usually not an issue, as most non-<strong>XIV</strong> storage devices, by default, present volumes on aninitiator basis. For example, if there are three hosts connected to the same port on a non-<strong>XIV</strong>storage device, each host can be allocated volumes starting at the same LUN ID. So formigration purposes you must either map one host at a time (<strong>and</strong> then re-use the LUN IDs forthe next host) or use different sequential LUN numbers for migration. For example, if threehosts each have three LUNs, each host’s LUNs mapped using LUN IDs 20, 21, <strong>and</strong> 22, thenfor migration purposes, migrate them as LUN IDs 30, 31, 32 (first host); 33, 34, 35 (secondhost); <strong>and</strong> 36, 37, 38 (third host). Then from the <strong>XIV</strong> you can again map them to each host asLUN IDs 20, 21, <strong>and</strong> 22 (as they were from the non-<strong>XIV</strong> storage).If migrating from an EMC Symmetrix or DMX there are special considerations. Refer to7.12.2, “EMC Symmetrix <strong>and</strong> DMX” on page 224.7.10 Backing out of a data migrationFor change management purposes, you may be required to document a back-out procedure.There are four possible points in the migration process where a back-out may occur.7.10.1 Back-out prior to migration being defined on the <strong>XIV</strong>If a data migration definition does not exist yet, then no action must be taken on the <strong>XIV</strong>. Youcan simply zone the host server back to the non-<strong>XIV</strong> storage system <strong>and</strong> un-map the hostserver’s LUNs away from the <strong>XIV</strong> <strong>and</strong> back to the host server, taking care to ensure that thecorrect LUN order is preserved.7.10.2 Back-out after a data migration has been defined but not activatedIf the data migration definition exists but has not been activated, then you can follow the samesteps as described in 7.10.1, “Back-out prior to migration being defined on the <strong>XIV</strong>” onpage 219. To remove the inactive migration from the migration list you must delete the <strong>XIV</strong>volume that was going to receive the migrated data.7.10.3 Back-out after a data migration has been activated but is not completeIf the data migration shows in the GUI with a status of initialization or the XCLI shows it asactive=yes, then the background copy process has been started. If you deactivate themigration in this state you will block any I/O passing through the <strong>XIV</strong> from the host server tothe migration LUN on the <strong>XIV</strong> <strong>and</strong> to the LUN on the non-<strong>XIV</strong> disk system. You must shutdown the host server or its applications first. After doing this you can deactivate the datamigration <strong>and</strong> then if desired you can delete the <strong>XIV</strong> data migration volume. Then restore theoriginal LUN masking <strong>and</strong> SAN fabric zoning <strong>and</strong> bring your host back up.Important: If you chose to not allow source updating <strong>and</strong> write I/O has occurred after themigration started, then the contents of the LUN on the non-<strong>XIV</strong> storage device will notcontain the changes from those writes. Underst<strong>and</strong>ing the implications of this is importantin a back-out plan.Chapter 7. Data migration 219
7.10.4 Back-out after a data migration has reached the synchronised stateIf the data migration shows in the GUI as having a status of synchronised, then thebackground copy has completed. In this case back-out can still occur because the datamigration is not destructive to the source LUN on the non-<strong>XIV</strong> storage device. Simply reversethe process by shutting down the host server or applications <strong>and</strong> restore the original LUNmasking <strong>and</strong> switch zoning settings. You may need to also reinstall the relevant host servermulti-path software for access to the non-<strong>XIV</strong> storage device.Important: If you chose to not allow source updating <strong>and</strong> write I/O has occurred during themigration or after it has completed, then the contents of the LUN on the non-<strong>XIV</strong> storagedevice do not contain the changes from those writes. Underst<strong>and</strong>ing the implications of thisis important in a back-out plan.7.11 <strong>Migration</strong> checklistThere are three separate stages to a migration cut over. First, prepare the environment for theimplementation of the <strong>XIV</strong>. Second, cut over your hosts. Finally, remove any old devices <strong>and</strong>definitions as part of a clean up stage.For site setup, the high-level process is:1. Install <strong>XIV</strong> <strong>and</strong> cable it into the SAN.2. Pre-populate SAN zones in switches.3. Pre-populate the host/cluster definitions in the <strong>XIV</strong>.4. Define <strong>XIV</strong> to non-<strong>XIV</strong> disk as a host.5. Define non-<strong>XIV</strong> disk to <strong>XIV</strong> as a migration target <strong>and</strong> confirm paths.Then for each host the high-level process is:1. Update host drivers <strong>and</strong> then shut down the host.2. Disconnect/un-zone the host from non-<strong>XIV</strong> storage <strong>and</strong> then zone the host to <strong>XIV</strong>.3. Map the host LUNs away from the host instead of mapping them to the <strong>XIV</strong>.4. Create <strong>XIV</strong> data migration (DM).5. Map <strong>XIV</strong> DM volumes to the host.6. Bring up the host.When all data on the non-<strong>XIV</strong> disk system has been migrated, perform site clean up:1. Delete all SAN zones related to the non-<strong>XIV</strong> disk.2. Delete all LUNs on non-<strong>XIV</strong> disk <strong>and</strong> remove it from the site.220 <strong>IBM</strong> <strong>XIV</strong> <strong>Storage</strong> <strong>System</strong>: <strong>Copy</strong> <strong>Services</strong> <strong>and</strong> <strong>Migration</strong>
Table 7-1 Physical site setupTable 7-1 shows the site setup checklist.TaskNumberCompletedWhere toperformTask1 Site Install <strong>XIV</strong>.2 Site Run fiber cables from SAN switches to <strong>XIV</strong> for host connections<strong>and</strong> migration connections.3 Non-<strong>XIV</strong> storage Select host ports on the non-<strong>XIV</strong> storage to be used for migrationtraffic. These ports do not have to be dedicated ports. Run newcables if necessary.4 Fabric switches Create switch aliases for each <strong>XIV</strong> Fibre Channel port <strong>and</strong> anynew non-<strong>XIV</strong> ports added to the fabric.5 Fabric switches Define SAN zones to connect hosts to <strong>XIV</strong> (but do not activate thezones). You can do this by cloning the existing zones from host tonon-<strong>XIV</strong> disk <strong>and</strong> swapping non-<strong>XIV</strong> aliases for new <strong>XIV</strong> aliases.6 Fabric switches Define <strong>and</strong> activate SAN zones to connect non-<strong>XIV</strong> storage to <strong>XIV</strong>initiator ports (unless direct connected).7 Non-<strong>XIV</strong> storage If necessary, create a small LUN to be used as LUN0 to allocateto the <strong>XIV</strong>.8 Non-<strong>XIV</strong> storage Define the <strong>XIV</strong> on the non-<strong>XIV</strong> storage device, mapping LUN0 totest the link.9 <strong>XIV</strong> Define non-<strong>XIV</strong> storage to the <strong>XIV</strong> as a migration target <strong>and</strong> addports. Confirm that links are green <strong>and</strong> working.10 <strong>XIV</strong> Change the max_initialization_rate depending on the non-<strong>XIV</strong>disk. You may want to start at a smaller value <strong>and</strong> increase it if noissues are seen.11 <strong>XIV</strong> Define all the host servers to the <strong>XIV</strong> (cluster first if using clusteredhosts). Use a host listing from the non-<strong>XIV</strong> disk to get the WWPNsfor each host.12 <strong>XIV</strong> Create storage pools as required. Ensure that there is enoughpool space for all the non-<strong>XIV</strong> disk LUNs being migrated.Once the site setup is complete, the host migrations can begin. Table 7-2 shows the hostmigration check list. Repeat this check list for every host. Task numbers that are colored redmust be performed with the host application offline.Table 7-2 Host <strong>Migration</strong> to <strong>XIV</strong> task listTasknumberCompleted?Where toperformTask1 Host From the host, determine the volumes to be migrated <strong>and</strong> their relevant LUNIDs <strong>and</strong> hardware serial numbers or identifiers.2 Host If the host is remote from your location, confirm that you can power the hostback on after shutting it down (using tools such as an RSA card orBladeCenter® manager).3 Non-<strong>XIV</strong><strong>Storage</strong>Get the LUN IDs of the LUNs to be migrated from non-<strong>XIV</strong> storage device.Convert from hex to decimal if necessary.Chapter 7. Data migration 221
TasknumberCompleted?Where toperformTask4 Host Shut down the application.5 Host Set the application to not start automatically at reboot. This helps whenperforming administrative functions on the server (upgrades of drivers, patches,<strong>and</strong> so on).6 Host UNIX servers: Comment out disk mount points on affected disks in the mountconfiguration file. This helps with system reboots while configuring for <strong>XIV</strong>.7 Host Shut down affected servers.8 Fabric Change the active zoneset to exclude the SAN zone that connects the hostserver to non-<strong>XIV</strong> storage <strong>and</strong> include the SAN zone for the host server to <strong>XIV</strong>storage. The new zone should have been created during site setup.9 Non-<strong>XIV</strong>storage10 Non-<strong>XIV</strong>storageUnmap source volumes from the host server.Map source volumes to the <strong>XIV</strong> host definition (created during site setup).11 <strong>XIV</strong> Create data migration pairing (<strong>XIV</strong> volumes created on the fly).12 <strong>XIV</strong> Test <strong>XIV</strong> migration for each volume.13 <strong>XIV</strong> Start <strong>XIV</strong> migration <strong>and</strong> verify it. If you want, wait for migration to finish.14 Host Boot the server. (Be sure that the server is not attached to any storage.)15 Host If co-existence of non-<strong>XIV</strong> <strong>and</strong> <strong>XIV</strong> multi-path software is not allowed, removenon-<strong>XIV</strong> multi-pathing software.16 Host Install patches, update drivers, <strong>and</strong> HBA firmware as necessary.17 Host Install the <strong>XIV</strong> Host Attachment Kit. (Be sure to note prerequisites.)18 Host Shut down the host server.19 <strong>XIV</strong> Map <strong>XIV</strong> volumes to the host server. (Use original LUN IDs.)20 Host Boot the server.21 Host Verify that the LUNs are available <strong>and</strong> that pathing is correct.22 Host UNIX servers: Update mount points for new disks in the mount configuration fileif they have changed.23 Host Start the application.24 Host Set the application to start automatically if this was previously changed.25 <strong>XIV</strong> Monitor the migration if it is not already completed.26 <strong>XIV</strong> When the volume is synchronized delete the data migration (do not deactivatethe migration).27 Non-<strong>XIV</strong><strong>Storage</strong>Un-map migration volumes away from <strong>XIV</strong> if you must free up LUN IDs.28 <strong>XIV</strong> Consider re-sizing the migrated volumes to the next 17 GB boundary if the hostoperating system is able to use new space on a re-sized volume.29 Host If <strong>XIV</strong> volume was re-sized, use host procedures to utilize the extra space.222 <strong>IBM</strong> <strong>XIV</strong> <strong>Storage</strong> <strong>System</strong>: <strong>Copy</strong> <strong>Services</strong> <strong>and</strong> <strong>Migration</strong>
TasknumberCompleted?Where toperformTask30 Host If non-<strong>XIV</strong> storage device drivers <strong>and</strong> other supporting software were notremoved earlier, remove them when convenient.When all the hosts <strong>and</strong> volumes have been migrated there are two site clean up tasks left, asshown in Table 7-3.Table 7-3 Site cleanup check listTask number Completed? Where to perform Task1 <strong>XIV</strong> Delete migration paths<strong>and</strong> targets.2 Fabric Delete all zonesrelated to non-<strong>XIV</strong>storage including thezone for <strong>XIV</strong> migration.3 Non-<strong>XIV</strong> storage Delete all LUNs <strong>and</strong>perform secure datadestruction if required.7.12 Device-specific considerationsThe <strong>XIV</strong> supports migration from practically any SCSI storage device that has Fibre Channelinterfaces. This section contains device-specific information, but it is not an exhaustive list.Ensure that the following requirements are understood for your storage device:LUN0LUN numberingMultipathingDefinitionsDo we need to specifically map a LUN to LUN ID zero? Thisdetermines whether you will have a problem defining the paths.Does the storage device GUI or CLI use decimal or hexadecimal LUNnumbering? This determines whether you must do a conversion whenentering LUN numbers into the <strong>XIV</strong> GUI.Is the device active/active or active/passive? This determines whetheryou define the storage device as a single target or as one target perinternal controller or service processor.Does the device have specific requirements when defining hosts?Converting hexadecimal LUN IDs to decimal LUN IDsWhen mapping volumes to the <strong>XIV</strong> it is very important to note the LUN IDs allocated by thenon-<strong>XIV</strong> storage. The methodology to do this varies by vendor <strong>and</strong> device. If the device useshexadecimal LUN numbering then it is also important to underst<strong>and</strong> how to converthexadecimal numbers into decimal numbers, to enter into the <strong>XIV</strong> GUI.Using a spreadsheet to convert hex to decimalMicrosoft Excel <strong>and</strong> Open Office both have a spreadsheet formula known as hex2dec. If, forexample, you enter a hexadecimal value into spreadsheet cell location A4, then the formula toconvert the contents of that cell to decimal is =hex2dec(A4). If this formula does not appear towork in Excel then add the Analysis ToolPak (within Excel go to the Tools menu Addins Select Analysis ToolPak).Chapter 7. Data migration 223
Using Microsoft calculator to convert hex to decimalStart the calculator with the following steps:1. Selecting Program Files Programs Accessories Calculator.2. From the View drop-down menu change from St<strong>and</strong>ard to Scientific.3. Select Hex.4. Enter a hexadecimal number <strong>and</strong> then select Dec.The hexadecimal number will have been converted to decimal.Given that the <strong>XIV</strong> supports migration from almost any storage device, it is impossible to listthe methodology to get LUN IDs from each one.7.12.1 EMC CLARiiONThe following considerations were identified specifically for EMC CLARiiON:► LUN0There is no requirement to map a LUN to LUN ID 0 for the CLARiiON to communicate withthe <strong>XIV</strong>.► LUN numberingThe EMC CLARiiON uses decimal LUN numbers for both the CLARiiON ID <strong>and</strong> the hostID (LUN number).► MultipathingThe EMC CLARiiON is an active/passive storage device. This means that each storageprocessor (SP-A <strong>and</strong> SP-B) must be defined as a separate target to the <strong>XIV</strong>. You couldchoose to move LUN ownership of all the LUNs that you are migrating to a specific SP <strong>and</strong>simply define only that SP as a target. Moving a LUN away from the SP that owns it isknown as trespassing. Have only one path to each SP.► Requirements when defining the <strong>XIV</strong>If migrating from an EMC CLARiiON use the settings shown in Table 7-4 to define the <strong>XIV</strong>to the CLARiiON. Ensure that Auto-trespass is disabled for every <strong>XIV</strong> initiator port(WWPN) registered to the Clariion.Table 7-4 Defining an <strong>XIV</strong> to the EMC CLARiiONInitiator informationRecommended settingInitiator typeHBA typeArray CommPathCLARiiON OpenHostEnabledFailover mode 0Unit serial numberArray7.12.2 EMC Symmetrix <strong>and</strong> DMXThe considerations discussed in this section were identified specifically for EMC Symmetrix<strong>and</strong> DMX.224 <strong>IBM</strong> <strong>XIV</strong> <strong>Storage</strong> <strong>System</strong>: <strong>Copy</strong> <strong>Services</strong> <strong>and</strong> <strong>Migration</strong>
LUN0There is a requirement for the EMC Symmetrix or DMX to present a LUN ID 0 to the <strong>XIV</strong> inorder for the <strong>XIV</strong> <strong>Storage</strong> <strong>System</strong> to communicate with the EMC Symmetrix or DMX. In manyinstallations, the VCM device is allocated to LUN-0 on all FAs <strong>and</strong> is automatically presentedto all hosts. In these cases, the <strong>XIV</strong> connects to the DMX with no issues. However, in newerinstallations, the VCM device is no longer presented to all hosts <strong>and</strong> therefore a real LUN-0 isrequired to be presented to the <strong>XIV</strong> in order for the <strong>XIV</strong> to connect to the DMX. This LUN-0can be a dummy device of any size that will not be migrated or an actual device that will bemigrated.LUN numberingThe EMC Symmetrix <strong>and</strong> DMX, by default, does not present volumes in the range of 0 to 512decimal. The Symmetrix/DMX presents volumes based on the LUN ID that was given thevolume when the volume was placed on the FA port. If a volume was placed on the FA with aLUN ID of 90, this is how it is presented to the host by default. The Symmetrix/DMX alsopresents the LUN IDs in hex. Thus, LUN ID 201 equates to decimal 513, which is greater than512 <strong>and</strong> is outside of the <strong>XIV</strong>'s range. There are two disciplines for migrating data from aSymmetrix/DMX where the LUN ID is greater than 512 (decimal).Re-map the volumeOne way to migrate a volume with a LUN ID higher than 512 is to re-map the volume in one oftwo ways:► Map the volume to a free FA or an FA that has available LUN ID slots less than hex 200(decimal 512). In most cases this can be done without interruption to the productionserver. The <strong>XIV</strong> is zoned <strong>and</strong> the target defined to the FA port with the lower LUN ID.►Re-map the volume to a lower LUN ID, one that is less than 200 hex. However, thisrequires that the host be shut down while the change is taking place <strong>and</strong> is therefore notthe best option.LUN-OffsetWith EMC Symmetrix Enginuity code 68 - 71 code, there is an EMC method of presentingLUN IDs to hosts other than the LUN ID given to the volume when placed on the FA. In theSymmetrix/DMX world, a volume is given a unique LUN ID when configured on an FA. Eachvolume on an FA must have a unique LUN ID. The default method (<strong>and</strong> a best practice ofpresenting volumes to a host) is to use the LUN ID given to the volume when placed on theFA. In other words, if 'vol1' was placed on an FA with an ID of 7A (hex (0x07a) decimal 122),this is the LUN ID that is presented to the host. Using the lunoffset option of the symmaskcomm<strong>and</strong>, a volume can be presented to a host (WWPN initiator) with a different LUN ID thanwas assigned the volume when placed on the FA. Because it is done at the initiator level, theproduction server can keep the high LUNs (above 128) while being allocated to the <strong>XIV</strong> usinglower LUN IDs (below 512 decimal).Migrating volumes that were used by HP-UXFor HP-UX hosts attached to EMC Symmetrix there is a setting known asVolume_Set_Addressing that can be enabled on a per-FA basis. This is required for HP-UXhost connectivity but is not compatible with any other host types (including <strong>XIV</strong>). IfVolume_Set_Addressing (also referred to as the V bit setting) is enabled on an FA, then the<strong>XIV</strong> will not be able to access anything but LUN 0 on that FA. To avoid this issue, map theHP-UX host volumes to a different FA that is not configured specifically for HP-UX. Then zonethe <strong>XIV</strong> migration port to this FA instead of the FA being used by HP-UX.MultipathingThe EMC Symmetrix <strong>and</strong> DMX are active/active storage devices.Chapter 7. Data migration 225
7.12.3 HDS TagmaStore USPIn this section we discuss HDS TagmaStore USP.LUN0There is a requirement for the HDS TagmaStore Universal <strong>Storage</strong> Platform (USP) to presenta LUN ID 0 to the <strong>XIV</strong> in order for the <strong>XIV</strong> <strong>Storage</strong> <strong>System</strong> to communicate with the HDSdevice.LUN numberingThe HDS USP uses hexadecimal LUN numbers.MultipathingThe HDS USP is an active/active storage device.7.12.4 HP EVAThe following requirements were determined after migration from a HP EVA 4400 <strong>and</strong> 8400.LUN0There is no requirement to map a LUN to LUN ID 0 for the HP EVA to communicate with the<strong>XIV</strong>. This is because by default the HP EVA presents a special LUN known as the ConsoleLUN as LUN ID 0.LUN numberingThe HP EVA uses decimal LUN numbers.MultipathingThe HP EVA 4000/6000/8000 are active/active storage devices. For HP EVA 3000/5000, theinitial firmware release was active/passive, but a firmware upgrade to VCS Version 4.004made it active/active capable. For more details see the following Web site:http://h21007.www2.hp.com/portal/site/dspp/menuitem.863c3e4cbcdc3f3515b49c108973a801?ciid=aa08d8a0b5f02110d8a0b5f02110275d6e10RCRDRequirements when connecting to <strong>XIV</strong>Define the <strong>XIV</strong> as a Linux host.To check the LUN IDs assigned to a specific host:1. Log in into Comm<strong>and</strong> View EVA.h.2. Select the storage on which you are working.3. Click the Hosts icon.4. Select the specific host.5. Click the Presentation tab.6. Here you will see the LUN name <strong>and</strong> the LUN ID presented.To present EVA LUNs to <strong>XIV</strong>:1. Create the host alias for <strong>XIV</strong> <strong>and</strong> add the <strong>XIV</strong> initiator ports that are zoned to EVA.2. From the Comm<strong>and</strong> View EVA, select the active Vdisk that must be presented to <strong>XIV</strong>.3. Click the Presentation tab.226 <strong>IBM</strong> <strong>XIV</strong> <strong>Storage</strong> <strong>System</strong>: <strong>Copy</strong> <strong>Services</strong> <strong>and</strong> <strong>Migration</strong>
4. Click Present.5. Select the <strong>XIV</strong> host Alias created.6. Click the Assign LUN button on top.7. Specify the LUN ID that you want to specify for <strong>XIV</strong>. Usually this is the same as waspresented to the host when it was accessing the EVA.7.12.5 <strong>IBM</strong> DS3000/DS4000/DS5000The following considerations were identified specifically for DS4000 but apply for all models ofD3000, DS4000, <strong>and</strong> DS5000 (for purposes of migration they are functionally all the same).For ease of reading, only the DS4000 is referenced.LUN0There is a requirement for the DS4000 to present a LUN on LUN ID 0 to the <strong>XIV</strong> to allow the<strong>XIV</strong> to communicate with the DS4000. It may be easier to create a new 1 GB LUN on theDS4000 just to satisfy this requirement. This LUN does not need to have any data on it.LUN numberingFor all DS4000 models, the LUN ID used in mapping is a decimal value between 0 to 15 or 0to 255 (depending on model). This means that no hex-to-decimal conversion is necessary.Figure 7-8 on page 197 shows an example of how to display the LUN IDs.Defining the DS4000 to the <strong>XIV</strong> as a targetThe DS4000 is an active/passive storage device. This means that each controller on theDS4000 must be defined as a separate target to the <strong>XIV</strong>. You must take note of whichvolumes are currently using which controllers as the active controller.Preferred path errorsThe following issues can occur if you have misconfigured a migration from a DS4000. Youmay initially notice that the progress of the migration is very slow. The DS4000 event log maycontain errors, such as the one shown in Figure 7-24. If you see the migration volume failbetween the A <strong>and</strong> B controllers, this means that the <strong>XIV</strong> is defined to the DS4000 as a hostthat supports ADT/RDAC (which you should immediately correct) <strong>and</strong> that either the <strong>XIV</strong>target definitions have paths to both controllers or that you are migrating from the wrongcontroller.Figure 7-24 DS4000 LUN fail overChapter 7. Data migration 227
In Example 7-10 the XCLI comm<strong>and</strong>s show that the target called ITSO_DS4700 has two ports,one from controller A (201800A0B82647EA) <strong>and</strong> one from controller B (201900A0B82647EA).This is not the correct configuration <strong>and</strong> should not be used.Example 7-10 Incorrect definition, as target has ports to both controllers>> target_listName SCSI Type ConnectedITSO_DS4700 FC yes>> target_port_list target=ITSO_DS4700_Ctrl_BTarget Name Port Type Active WWPN iSCSI Address iSCSI PortITSO_DS4700 FC yes 201800A0B82647EA 0ITSO_DS4700 FC yes 201900A0B82647EA 0Instead, two targets should have been defined, as shown in Example 7-11. In this example,two separate targets have been defined, each target having only one port for the relevantcontroller.Example 7-11 Correct definitions for a DS4700> target_listName SCSI Type ConnectedITSO_DS4700_ctrl_A FC yesITSO_DS4700_ctrl_B FC yes>> target_port_list target=ITSO_DS4700_Ctrl_ATarget Name Port Type Active WWPN iSCSI Address iSCSI PortITSO_DS4700 FC yes 201800A0B82647EA 0>> target_port_list target=ITSO_DS4700_Ctrl_ATarget Name Port Type Active WWPN iSCSI Address iSCSI PortITSO_DS4700 FC yes 201900A0B82647EA 0Defining the <strong>XIV</strong> to the DS4000 as a hostUse the DS <strong>Storage</strong> Manager to check the profile of the DS4000 <strong>and</strong> select a host type forwhich ADT is disabled or failover mode is RDAC. To display the profile from the DS <strong>Storage</strong>Manager choose <strong>Storage</strong> Subsystem View Profile All. Then go to the bottom of theProfile panel. The profile may vary according to NVRAM version. In Example 7-12 select thehost type for which ADT status is disabled (Windows 2000).Example 7-12 Earlier NVRAM versionsHOST TYPELinuxWindows 2000/Server 2003/Server 2008 Non-ClusteredADT STATUSEnabledDisabledIn Example 7-13 choose the host type that specifies RDAC (Windows 2000).Example 7-13 Later NVRAM versionsHOST TYPELinuxWindows 2000/Server 2003/Server 2008 Non-ClusteredFAILOVER MODEADTRDAC228 <strong>IBM</strong> <strong>XIV</strong> <strong>Storage</strong> <strong>System</strong>: <strong>Copy</strong> <strong>Services</strong> <strong>and</strong> <strong>Migration</strong>
You can now create a host definition on the DS4000 for the <strong>XIV</strong>. If you have zoned the <strong>XIV</strong> toboth DS4000 controllers you can add both <strong>XIV</strong> initiator ports to the host definition. Thismeans that the host properties should look similar to Figure 7-25. After mapping yourvolumes to the <strong>XIV</strong> migration host, you must take note of which controller each volume isowned by. When you define the data migrations on the <strong>XIV</strong>, the migration should point to thetarget that matches the controller that owns the volume being migrated.Figure 7-25 <strong>XIV</strong> defined to the DS4000 as a host.7.12.6 <strong>IBM</strong> ESS E20/F20/800The following considerations were identified for ESS 800.LUN0There is no requirement to map a LUN to LUN ID 0 for the ESS to communicate with the <strong>XIV</strong>.LUN numberingThe LUN IDs used by the ESS are in hexadecimal, so they must be converted to decimalwhen entered as <strong>XIV</strong> data migrations. It is not possible to specifically request certain LUNIDs. In Example 7-14 there are 18 LUNs allocated by an ESS 800 to an <strong>XIV</strong> host calledNextraZap_ITSO_M5P4. You can clearly see that the LUN IDs are hex. The LUN IDs given inthe right-h<strong>and</strong> column were added to the output to show the hex-to-decimal conversionneeded for use with <strong>XIV</strong>. An example of how to view LUN IDs using the ESS 800 Web GUI isshown in Figure 7-23 on page 217.Restriction: The ESS can only allocate LUN IDs in the range 0 to 255 (hex 00 to FF). Thismeans that only 256 LUNs can be migrated at one time.Example 7-14 Listing ESS 800 LUN IDs using ESSCLIC:\esscli -s 10.10.1.10 -u storwatch -p specialist list volumeaccess -d"host=NextraZap_ITSO_M5P4"Tue Nov 03 07:20:36 EST 2009 <strong>IBM</strong> ESSCLI 2.4.0Volume LUN Size(GB) Initiator Host------ ---- -------- ---------------- -------------------100e 0000 10.0 5001738000230153 NextraZap_ITSO_M5P4 (LUN ID is 0)100f 0001 10.0 5001738000230153 NextraZap_ITSO_M5P4 (LUN ID is 1)1010 0002 10.0 5001738000230153 NextraZap_ITSO_M5P4 (LUN ID is 2)Chapter 7. Data migration 229
1011 0003 10.0 5001738000230153 NextraZap_ITSO_M5P4 (LUN ID is 3)1012 0004 10.0 5001738000230153 NextraZap_ITSO_M5P4 (LUN ID is 4)1013 0005 10.0 5001738000230153 NextraZap_ITSO_M5P4 (LUN ID is 5)1014 0006 10.0 5001738000230153 NextraZap_ITSO_M5P4 (LUN ID is 6)1015 0007 10.0 5001738000230153 NextraZap_ITSO_M5P4 (LUN ID is 7)1016 0008 10.0 5001738000230153 NextraZap_ITSO_M5P4 (LUN ID is 8)1017 0009 10.0 5001738000230153 NextraZap_ITSO_M5P4 (LUN ID is 9)1018 000a 10.0 5001738000230153 NextraZap_ITSO_M5P4 (LUN ID is 10)1019 000b 10.0 5001738000230153 NextraZap_ITSO_M5P4 (LUN ID is 11)101a 000c 10.0 5001738000230153 NextraZap_ITSO_M5P4 (LUN ID is 12)101b 000d 10.0 5001738000230153 NextraZap_ITSO_M5P4 (LUN ID is 13)101c 000e 10.0 5001738000230153 NextraZap_ITSO_M5P4 (LUN ID is 14)101d 000f 10.0 5001738000230153 NextraZap_ITSO_M5P4 (LUN ID is 15)101e 0010 10.0 5001738000230153 NextraZap_ITSO_M5P4 (LUN ID is 16)101f 0011 10.0 5001738000230153 NextraZap_ITSO_M5P4 (LUN ID is 17)MultipathingThe ESS 800 is an active/active storage device. You can define multiple paths from the <strong>XIV</strong> tothe ESS 800 for migration. Ideally, connect to more than one host bay in the ESS 800.Because each <strong>XIV</strong> host port is defined as a separate host system, ensure that the LUN IDused for each volume is the same. There is a check box on the Modify Volume Assignmentspanel titled “Use same ID/LUN in source <strong>and</strong> target” that will assist you. Figure 7-28 onpage 236 shows a good example of two <strong>XIV</strong> host ports with the same LUN IDs.Requirements when defining the <strong>XIV</strong>Define each <strong>XIV</strong> host port to the ESS 800 as a Linux x86 host.7.12.7 <strong>IBM</strong> DS6000 <strong>and</strong> DS8000The following considerations were identified for DS6000 <strong>and</strong> DS8000.LUN0There is no requirement to map a LUN to LUN ID 0 for a DS6000 or DS8000 to communicatewith the <strong>XIV</strong>.LUN numberingThe DS6000 <strong>and</strong> DS8000 use hexadecimal LUN IDs. These can be displayed using DSCLIwith the showvolgrp -lunmap xxx comm<strong>and</strong>, where xxx is the volume group created to assignvolumes to the <strong>XIV</strong> for data migration. Do not use the Web GUI to display LUN IDs.Multipathing with DS6000The DS6000 is an active/active storage device, but each controller has dedicated host ports,whereas each LUN has a preferred controller. If I/O for a particular LUN is sent to host portsof the non-preferred controller, the LUN will not fail over, but that I/O may experience a smallperformance penalty. This may lead you to consider migrating volumes with even LSSnumbers (such as volumes 0000 <strong>and</strong> 0200) from the upper controller <strong>and</strong> volumes with oddLSS numbers (such as volumes 0100 <strong>and</strong> 0300) from the lower controller. However, this is nota robust solution. Define the DS6000 as a single target with one path to each controller.230 <strong>IBM</strong> <strong>XIV</strong> <strong>Storage</strong> <strong>System</strong>: <strong>Copy</strong> <strong>Services</strong> <strong>and</strong> <strong>Migration</strong>
Multipathing with DS8000The DS8000 is an active/active storage device. You can define multiple paths from the <strong>XIV</strong> tothe DS8000 for migration. Ideally, connect to more than one I/O bay in the DS8000.Requirements when defining the <strong>XIV</strong>In Example 7-15 a volume group is created used a type of SCSI Map 256, which is the correcttype for a RedHat Linux host type. A starting LUN ID of 8 is chosen to show how hexadecimalnumbering is used. The range of valid LUN IDs for this volume group are 0 to FF (0 to 255 indecimal). An extra LUN is then added to the volume group to show how specific LUN IDs canbe selected by volume. Two host connections are then created using the Red Hat Linux hosttype. By using the same volume group ID for both connections, we ensure that the LUNnumbering used by each defined path will be the same.Example 7-15 Listing DS6000 <strong>and</strong> DS8000 LUN IDsdscli> mkvolgrp -type scsimap256 -volume 0200-0204 -LUN 8 migrVGCMUC00030I mkvolgrp: Volume group V18 successfully created.dscli> chvolgrp -action add -volume 0205 -lun 0E V18CMUC00031I chvolgrp: Volume group V18 successfully modified.dscli> showvolgrp -lunmap V18Name migrVGID V18Type SCSI Map 256Vols 0200 0201 0202 0203 0204 0205==============LUN Mapping===============vol lun========0200 08 (comment: use decimal value 08 in <strong>XIV</strong> GUI)0201 09 (comment: use decimal value 09 in <strong>XIV</strong> GUI)0202 0A (comment: use decimal value 10 in <strong>XIV</strong> GUI)0203 0B (comment: use decimal value 11 in <strong>XIV</strong> GUI)0204 0C (comment: use decimal value 12 in <strong>XIV</strong> GUI)- 0D0205 0E (comment: use decimal value 14 in <strong>XIV</strong> GUI)dscli> mkhostconnect -wwname 5001738000230153 -hosttype LinuxRHEL -volgrp V18 <strong>XIV</strong>_M5P4CMUC00012I mkhostconnect: Host connection 0020 successfully created.dscli> mkhostconnect -wwname 5001738000230173 -hosttype LinuxRHEL -volgrp V18 <strong>XIV</strong>_M7P4CMUC00012I mkhostconnect: Host connection 0021 successfully created.dscli> lshostconnectName ID WWPN HostType Profile portgrp volgrpID===========================================================================================<strong>XIV</strong>_M5P4 0020 5001738000230153 LinuxRHEL Intel - Linux RHEL 0 V18<strong>XIV</strong>_M7P4 0021 5001738000230173 LinuxRHEL Intel - Linux RHEL 0 V187.13 Sample migrationHere is a specific example migration.Chapter 7. Data migration 231
Using <strong>XIV</strong> DM to migrate an AIX file system from ESS 800 to <strong>XIV</strong>In this example we migrate a file system on an AIX host using ESS 800 disks to <strong>XIV</strong>. First weselect a volume group to migrate. In Example 7-16 we select a volume group calledESS_VG1. The lsvg comm<strong>and</strong> shows that this volume group has one file system mounted on/mnt/redbk. The df -k comm<strong>and</strong> shows that the file system is 20 GiB in size <strong>and</strong> is 46%used.Example 7-16 Selecting a file systemroot@dolly:/mnt/redbk# lsvg -l ESS_VG1ESS_VG1:LV NAME TYPE LPs PPs PVs LV STATE MOUNT POINTloglv00 jfs2log 1 1 1 open/syncd N/Afslv00 jfs2 20 20 3 open/syncd /mnt/redbkroot@dolly:/mnt/redbk# df -kFilesystem 1024-blocks Free %Used Iused %Iused Mounted on/dev/fslv00 20971520 11352580 46% 17 1% /mnt/redbkWe now determine which physical disks must be migrated. In Example 7-17 we use the lspvcomm<strong>and</strong>s to determine that hdisk3, hdisk4, <strong>and</strong> hdisk5 are the relevant disks for this VG.The lsdev -Cc disk comm<strong>and</strong> confirms that they are located on an <strong>IBM</strong> ESS 2105. We thenuse the lscfg comm<strong>and</strong> to determine the hardware serial numbers of the disks involved.Example 7-17 Determine the migration disksroot@dolly:/mnt/redbk# lspvhdisk1 0000d3af10b4a189 rootvg activehdisk3 0000d3afbec33645 ESS_VG1 activehdisk4 0000d3afbec337b5 ESS_VG1 activehdisk5 0000d3afbec33922 ESS_VG1 activeroot@dolly:~/sddpcm# lsdev -Cc diskhdisk0 Available 11-08-00-2,0 Other SCSI Disk Drivehdisk1 Available 11-08-00-4,0 16 Bit LVD SCSI Disk Drivehdisk2 Available 11-08-00-4,1 16 Bit LVD SCSI Disk Drivehdisk3 Available 17-08-02 <strong>IBM</strong> MPIO FC 2105hdisk4 Available 17-08-02 <strong>IBM</strong> MPIO FC 2105hdisk5 Available 17-08-02 <strong>IBM</strong> MPIO FC 2105root@dolly:/mnt# lscfg -vpl hdisk3 | egrep "Model|Serial"Machine Type <strong>and</strong> Model......2105800Serial Number...............00FFCA33root@dolly:/mnt# lscfg -vpl hdisk4 | egrep "Model|Serial"Machine Type <strong>and</strong> Model......2105800Serial Number...............010FCA33root@dolly:/mnt# lscfg -vpl hdisk5 | egrep "Model|Serial"Machine Type <strong>and</strong> Model......2105800Serial Number...............011FCA33232 <strong>IBM</strong> <strong>XIV</strong> <strong>Storage</strong> <strong>System</strong>: <strong>Copy</strong> <strong>Services</strong> <strong>and</strong> <strong>Migration</strong>
These volumes are currently allocated from an <strong>IBM</strong> ESS 800. In Figure 7-26 we use the ESSWeb GUI to confirm that the volume serial numbers match with those determined inExample 7-17 on page 232. Note that the LUN IDs here are those used by ESS 800 with AIXhosts (IDs 500F, 5010, <strong>and</strong> 5011). They are not correct for the <strong>XIV</strong> <strong>and</strong> will be changed whenwe re-map them to the <strong>XIV</strong>.Figure 7-26 LUNs allocated to AIX from the ESS 800Because we now know the source hardware we can create connections between the ESS800 <strong>and</strong> the <strong>XIV</strong> <strong>and</strong> the <strong>XIV</strong> <strong>and</strong> Dolly (our host server). First, in Example 7-18 we identifythe existing zones that connect Dolly to the ESS 800. We have two zones, one for each AIXHBA. Each zone contains the same two ESS 800 HBA ports.Example 7-18 Existing zoning on the SAN Fabriczone: ESS800_dolly_fcs010:00:00:00:c9:53:da:b350:05:07:63:00:c9:0c:2150:05:07:63:00:cd:0c:21zone: ESS800_dolly_fcs010:00:00:00:c9:53:da:b250:05:07:63:00:c9:0c:2150:05:07:63:00:cd:0c:21We now create two new zones. The first zone connects the initiator ports on the <strong>XIV</strong> to theESS 800. The second <strong>and</strong> third zones connects the target ports on the <strong>XIV</strong> to Dolly (for useafter the migration). These are shown in Example 7-19. All six ports on the <strong>XIV</strong> clearly musthave been cabled into the SAN fabric.Example 7-19 New zoning on the SAN Fabriczone: ESS800_nextrazap50:05:07:63:00:c9:0c:2150:05:07:63:00:cd:0c:2150:01:73:80:00:23:01:5350:01:73:80:00:23:01:73zone: nextrazap_dolly_fcs010:00:00:00:c9:53:da:b350:01:73:80:00:23:01:4150:01:73:80:00:23:01:51Chapter 7. Data migration 233
zone: nextrazap_dolly_fcs110:00:00:00:c9:53:da:b250:01:73:80:00:23:01:6150:01:73:80:00:23:01:71We then create the migration connections between the <strong>XIV</strong> <strong>and</strong> the ESS 800. An example ofusing the <strong>XIV</strong> GUI to do this was shown in “Define target connectivity (Fibre Channel only).”on page 203. In Example 7-20 we use the XCLI to define a target, then the ports on thattarget, then the connections between <strong>XIV</strong> <strong>and</strong> the target (ESS 800). Finally, we check that thelinks are active=yes <strong>and</strong> up=yes. We can use two ports on the ESS 800 because it is anactive/active storage device.Example 7-20 Connecting ESS 800 to <strong>XIV</strong> for migration using XCLI>> target_define protocol=FC target=ESS800 xiv_features=noComm<strong>and</strong> executed successfully.>> target_port_add fcaddress=50:05:07:63:00:c9:0c:21 target=ESS800Comm<strong>and</strong> executed successfully.>> target_port_add fcaddress=50:05:07:63:00:cd:0c:21 target=ESS800Comm<strong>and</strong> executed successfully.>> target_connectivity_define local_port=1:FC_Port:5:4fcaddress=50:05:07:63:00:c9:0c:21 target=ESS800Comm<strong>and</strong> executed successfully.>> target_connectivity_define local_port=1:FC_Port:7:4fcaddress=50:05:07:63:00:cd:0c:21 target=ESS800Comm<strong>and</strong> executed successfully.>> target_connectivity_listTarget Name Remote Port FC Port IP Interface Active UpESS800 5005076300C90C21 1:FC_Port:5:4 yes yesESS800 5005076300CD0C21 1:FC_Port:7:4 yes yesWe now define the <strong>XIV</strong> as a host to the ESS 800. In Figure 7-27 we have defined the twoinitiator ports on the <strong>XIV</strong> (with WWPNs that end in 53 <strong>and</strong> 73) as Linux (x86) hosts calledNextra_Zap_5_4 <strong>and</strong> NextraZap_7_4.Figure 7-27 Define the <strong>XIV</strong> to the ESS 800 as a host234 <strong>IBM</strong> <strong>XIV</strong> <strong>Storage</strong> <strong>System</strong>: <strong>Copy</strong> <strong>Services</strong> <strong>and</strong> <strong>Migration</strong>
Finally, we can define the AIX host to the <strong>XIV</strong> as a host using the <strong>XIV</strong> GUI or XCLI. InExample 7-21 we use the XCLI to define the host <strong>and</strong> then add two HBA ports to that host.Example 7-21 Define Dolly to the <strong>XIV</strong> using XCLI>> host_define host=dollyComm<strong>and</strong> executed successfully.>> host_add_port fcaddress=10:00:00:00:c9:53:da:b3 host=dollyComm<strong>and</strong> executed successfully.>> host_add_port fcaddress=10:00:00:00:c9:53:da:b2 host=dollyComm<strong>and</strong> executed successfully.Once the zoning changes have been done <strong>and</strong> connectivity <strong>and</strong> correct definitions confirmedbetween <strong>XIV</strong> to ESS <strong>and</strong> <strong>XIV</strong> to AIX host, we take an outage on the volume group <strong>and</strong> relatedfile systems that are going to be migrated. In Example 7-22 we unmount the file system, varyoff the volume group, <strong>and</strong> then export the volume group. Finally, we rmdev the hdisk devices.Example 7-22 Removing the non-<strong>XIV</strong> file systemroot@dolly:/# umount /mnt/redbkroot@dolly:/# varyoffvg ESS_VG1root@dolly:/# exportvg ESS_VG1root@dolly:/# rmdev -dl hdisk3hdisk3 deletedroot@dolly:/# rmdev -dl hdisk4hdisk4 deletedroot@dolly:/# rmdev -dl hdisk5hdisk5 deletedIf the Dolly host no longer needs access to any LUNs on the ESS 800 we remove the SANzoning that connects Dolly to the ESS 800. In Example 7-18 on page 233 this was the zonecalled ESS800_dolly_fcs0.Chapter 7. Data migration 235
We now allocate the ESS 800 LUNS to the <strong>XIV</strong>, as shown in Figure 7-28, where volumeserials 00FFCA33, 010FCA33, <strong>and</strong> 011FCA33 have been unmapped from the host calledDolly <strong>and</strong> remapped to the <strong>XIV</strong> definitions called NextraZap_5_4 <strong>and</strong> NextraZap_7_4. We donot allow the volumes to be presented to both the host <strong>and</strong> the <strong>XIV</strong>. Note that the LUN IDs inthe Host Port column are correct for use with <strong>XIV</strong> because they start with zero <strong>and</strong> are thesame for both NextraZap Initiator ports.Figure 7-28 LUNs allocated to the <strong>XIV</strong>We now create the DMs <strong>and</strong> run a test on each LUN. The <strong>XIV</strong> GUI or XCLI could be used. InExample 7-23 the comm<strong>and</strong>s to create, test, <strong>and</strong> activate one of the three migrations isshown. We must run each comm<strong>and</strong> for hdisk3 <strong>and</strong> hdisk4 also.Example 7-23 Creating one migration> dm_define target="ESS800" vol=”dolly_hdisk3” lun=0 source_updating=yes create_vol=yes pool=AIXComm<strong>and</strong> executed successfully.> dm_test vol=”dolly_hdisk3”Comm<strong>and</strong> executed successfully.> dm_activate vol=”dolly_hdisk3”Comm<strong>and</strong> executed successfully.After we create <strong>and</strong> activate all three migrations, the <strong>Migration</strong> panel in the <strong>XIV</strong> GUI looks asshown in Figure 7-29. Note that the remote LUN IDs are 0, 1, <strong>and</strong> 2, which must match theLUN numbers seen in Figure 7-28.Figure 7-29 <strong>Migration</strong> has started236 <strong>IBM</strong> <strong>XIV</strong> <strong>Storage</strong> <strong>System</strong>: <strong>Copy</strong> <strong>Services</strong> <strong>and</strong> <strong>Migration</strong>
Now that the migration has been started we can map the volumes to the AIX host definitionon the <strong>XIV</strong>, as shown in Figure 7-30, where the AIX host is called Dolly.Figure 7-30 Map the <strong>XIV</strong> volumes to the hostNow we can bring the volume group back online. Because this AIX host was already usingSDDPCM, we can install the <strong>XIV</strong>PCM (the AIX host attachment kit) at any time prior to thechange. In Example 7-24 we confirm that SDDPCM is in use <strong>and</strong> that the <strong>XIV</strong> definition fileset is installed. We then run cfgmgr to detect the new disks. We then confirm that the disksare visible using the lsdev -Cc disk comm<strong>and</strong>.Example 7-24 Rediscovering the disksroot@dolly:~# lslpp -L | grep -i sdddevices.sddpcm.53.rte 2.2.0.4 C F <strong>IBM</strong> SDD PCM for AIX V53root@dolly:/# lslpp -L | grep 2810disk.fcp.2810.rte 1.1.0.1 C F <strong>IBM</strong> 2810<strong>XIV</strong> ODM definitionsroot@dolly:/# cfgmgr -l fcs0root@dolly:/# cfgmgr -l fcs1root@dolly:/# lsdev -Cc diskhdisk1 Available 11-08-00-4,0 16 Bit LVD SCSI Disk Drivehdisk2 Available 11-08-00-4,1 16 Bit LVD SCSI Disk Drivehdisk3 Available 17-08-02 <strong>IBM</strong> 2810<strong>XIV</strong> Fibre Channel Diskhdisk4 Available 17-08-02 <strong>IBM</strong> 2810<strong>XIV</strong> Fibre Channel Diskhdisk5 Available 17-08-02 <strong>IBM</strong> 2810<strong>XIV</strong> Fibre Channel DiskA final check before bringing the volume group back ensures that the Fibre Channel pathingfrom the host to the <strong>XIV</strong> is set up correctly. We can use the AIX lspath comm<strong>and</strong> againsteach hdisk, as shown in Example 7-25. Note that in this example the host can connect toport 2 on each of the <strong>XIV</strong> modules 4, 5, 6, <strong>and</strong> 7 (which is confirmed by checking the last twodigits of the WWPN).Example 7-25 Using the lspath comm<strong>and</strong>root@dolly:~/# lspath -l hdisk5 -s available -F"connection:parent:path_status:status"5001738000230161,3000000000000:fscsi1:Available:Enabled5001738000230171,3000000000000:fscsi1:Available:Enabled5001738000230141,3000000000000:fscsi0:Available:Enabled5001738000230151,3000000000000:fscsi0:Available:EnabledChapter 7. Data migration 237
We can also use a script provided by the <strong>XIV</strong> Host Attachment Kit for AIX, called xiv_devlist.An example of the output is shown in Example 7-26.Example 7-26 Using xiv_devlistroot@dolly:~# xiv_devlist<strong>XIV</strong> devices===========Device Vol Name <strong>XIV</strong> Host Size Paths <strong>XIV</strong> ID Vol ID------------------------------------------------------------------------------hdisk3 dolly_hdisk3 dolly 10.0GB 4/4 MN00023 8940hdisk4 dolly_hdisk4 dolly 10.0GB 4/4 MN00023 8941hdisk5 dolly_hdisk5 dolly 10.0GB 4/4 MN00023 8942Non-<strong>XIV</strong> devices===============Device Size Paths-----------------------------------hdisk1 N/A 1/1hdisk2 N/A 1/1We can also use the <strong>XIV</strong> GUI to confirm connectivity by going to the Hosts <strong>and</strong> Clusters Host Connectivity panel. An example is shown in Figure 7-31, where the connections matchthose seen in Example 7-25 on page 237.Figure 7-31 Host connectivity panelHaving confirmed that the disks have been detected <strong>and</strong> that the paths are good, we can nowbring the volume group back online. In Example 7-27 we import the VG, confirm that thePVIDs match those seen in Example 7-17 on page 232, <strong>and</strong> then mount the file system.Example 7-27 Bring the VG back onlineroot@dolly:/# /usr/sbin/importvg -y'ESS_VG1' hdisk3ESS_VG1root@dolly:/# lsvg -l ESS_VG1ESS_VG1:LV NAME TYPE LPs PPs PVs LV STATE MOUNT POINTloglv00 jfs2log 1 1 1 closed/syncd N/Afslv00 jfs2 20 20 3 closed/syncd /mnt/redbkroot@dolly:/# lspvhdisk1 0000d3af10b4a189 rootvg activehdisk3 0000d3afbec33645 ESS_VG1 activehdisk4 0000d3afbec337b5 ESS_VG1 activehdisk5 0000d3afbec33922 ESS_VG1 activeroot@dolly:/# mount /mnt/redbkroot@dolly:/mnt/redbk# df -kFilesystem 1024-blocks Free %Used Iused %Iused Mounted on/dev/fslv00 20971520 11352580 46% 17 1% /mnt/redbk238 <strong>IBM</strong> <strong>XIV</strong> <strong>Storage</strong> <strong>System</strong>: <strong>Copy</strong> <strong>Services</strong> <strong>and</strong> <strong>Migration</strong>
Once the sync is complete it is time to delete the migrations. Do not leave the migrations inplace any longer than they need to be. We can use multiple selection to perform the deletion,as shown in Figure 7-32, taking care to delete <strong>and</strong> not deactivate the migration.Figure 7-32 Deletion of the synchronized data migrationNow at the ESS 800 Web GUI we can un-map the three ESS 800 LUNs from the Nextra_Zaphost definitions. This frees up the LUN IDs to be reused for the next volume group migration.After the migrations are deleted, a final suggested task is to re-size the volumes on the <strong>XIV</strong> tothe next 17 GB cutoff. In this example we migrate ESS LUNs that are 10 GB in size. However,the <strong>XIV</strong> commits 17 GB of disk space because all space is allocated in 17 GB portions. Forthis reason it is better to resize the volume on the <strong>XIV</strong> GUI from 10 GB to 17 GB so that all theallocated space on the <strong>XIV</strong> is available to the operating system. This presumes that theoperating system can tolerate a LUN size growing, which in the case of AIX is true.We must unmount any file systems <strong>and</strong> vary off the volume group before we start. Then wego to the volumes section of the <strong>XIV</strong> GUI, right-click to select the 10 GB volume, <strong>and</strong> selectthe Resize option. The current size appears. In Figure 7-33 the size is shown in 512 byteblocks because the volume was automatically created by the <strong>XIV</strong> based on the size of thesource LUN on the ESS 800. If we multiply 19531264 by 512 bytes we get 10,000,007,168bytes, which is 10 GB.Figure 7-33 Starting volume size in blocksWe change the sizing methodology to GB <strong>and</strong> the size immediately changes to 17 GB, asshown in Figure 7-34. If the volume was already larger than 17 GB, then it will change to thenext interval of 17 GB. For example, a 20 GB volume shows as 34 GB.Figure 7-34 Size changed to GBChapter 7. Data migration 239
We then get a warning message. The volume is increasing in size. Click OK to continue.Now the volume is really 17 GB <strong>and</strong> no space is being wasted on the <strong>XIV</strong>. The new size isshown in Figure 7-35.Figure 7-35 Resized volumesVary on the VG again to update AIX that the volume size has changed. In Example 7-28 weimport the VG, which detects that the source disks have grown in size. We then run the chvg-g comm<strong>and</strong> to grow the volume group, then confirm that the file system can still be used.Example 7-28 Importing larger disksroot@dolly:~# /usr/sbin/importvg -y'ESS_VG1' hdisk30516-1434 varyonvg: Following physical volumes appear to be grown in size.Run chvg comm<strong>and</strong> to activate the new space.hdisk3 hdisk4 hdisk5ESS_VG1root@dolly:~# chvg -g ESS_VG1root@dolly:~# mount /mnt/redbkroot@dolly:/mnt/redbk# df -kFilesystem 1024-blocks Free %Used Iused %Iused Mounted on/dev/fslv00 20971520 11352580 46% 17 1% /mnt/redbkWe can now resize the file system to take advantage of the extra space. In Example 7-29 theoriginal size of the file system in 512 byte blocks is shown.Example 7-29 Displaying the current size of the file systemChange/Show Characteristics of an Enhanced Journaled File <strong>System</strong>Type or select values in entry fields.Press Enter AFTER making all desired changes.[Entry Fields]File system name/mnt/redbkNEW mount point[/mnt/redbk]SIZE of file systemUnit Size512bytesNumber of units [41943040]240 <strong>IBM</strong> <strong>XIV</strong> <strong>Storage</strong> <strong>System</strong>: <strong>Copy</strong> <strong>Services</strong> <strong>and</strong> <strong>Migration</strong>
We change the number of 512 byte units to 83886080 because this is 40 GB in size, asshown in Example 7-30.Example 7-30 Growing the file systemSIZE of file systemUnit Size512bytes+Number of units [83886080]The file system has now grown. In Example 7-31 we can see the file system has grown from20 GB to 40 GB.Example 7-31 Displaying the enlarged file systemroot@dolly:~# df -k/dev/fslv00 41943040 40605108 4% 7 1% /mnt/redbkChapter 7. Data migration 241
242 <strong>IBM</strong> <strong>XIV</strong> <strong>Storage</strong> <strong>System</strong>: <strong>Copy</strong> <strong>Services</strong> <strong>and</strong> <strong>Migration</strong>
8Chapter 8.SVC migration with <strong>XIV</strong>This chapter discusses data migration considerations for the <strong>XIV</strong> <strong>Storage</strong> <strong>System</strong> when usedin combination with the <strong>IBM</strong> SAN Volume Controller (SVC). It presumes that you have anexisting SVC <strong>and</strong> that you are replacing back-end disk controllers with a new <strong>XIV</strong> or simplyadding an <strong>XIV</strong> as a new managed disk controller.The combination of SVC <strong>and</strong> <strong>XIV</strong> allows a client to benefit from the high-performance gridarchitecture of the <strong>XIV</strong> while retaining the business benefits delivered by the SVC (such ashigher performance via disk aggregation, multivendor <strong>and</strong> multi-device copy services, <strong>and</strong>data migration functions).The order of the sections in this chapter address each of the requirements of animplementation plan in the order in which they arise. This chapter does not, however, discussphysical implementation requirements (such as power requirements), as they are alreadyaddressed in the book <strong>IBM</strong> <strong>XIV</strong> <strong>Storage</strong> <strong>System</strong>: Architecture, Implementation, <strong>and</strong> Usage,SG24-76599, found here:http://www.redbooks.ibm.com/Redbooks.nsf/RedbookAbstracts/sg247659.html?Open© <strong>Copy</strong>right <strong>IBM</strong> Corp. 2010. All rights reserved. 243
8.1 Steps to take when using SVC migration with <strong>XIV</strong>There are six considerations when placing a new <strong>XIV</strong> behind an SVC:► “<strong>XIV</strong> <strong>and</strong> SVC interoperability” on page 244► “Zoning setup” on page 245► “Volume size considerations for <strong>XIV</strong> with SVC” on page 248► “Using an <strong>XIV</strong> for SVC quorum disks” on page 253► “Configuring an <strong>XIV</strong> for attachment to SVC” on page 255► “Data movement strategy overview” on page 2598.2 <strong>XIV</strong> <strong>and</strong> SVC interoperabilityBecause SVC-attached hosts do not communicate directly with the <strong>XIV</strong>, there are only twointeroperability considerations:► 8.2.1, “Firmware versions” on page 244► 8.2.2, “<strong>Copy</strong> functions” on page 2458.2.1 Firmware versionsThe SVC <strong>and</strong> <strong>XIV</strong> both have minimum firmware requirements. Whereas the versions givenhere are current at the time of writing, they may have since changed. Confirm them by visitingthe <strong>IBM</strong> <strong>System</strong>s <strong>Storage</strong> Interoperation Center (SSIC) at:http://www.ibm.com/systems/support/storage/config/ssic/index.jspSVC firmwareThe first SVC firmware version that supported <strong>XIV</strong> was 4.3.0.1. However, the SVC clustershould be on at least SVC firmware Version 4.3.1.4 or more preferably the most recent levelavailable from <strong>IBM</strong>. You can display the SVC firmware version by viewing the clusterproperties in the SVC GUI or by using the svcinfo lscluster comm<strong>and</strong> specifying the nameof the cluster. The SVC in Example 8-1 is on SVC code level 4.3.1.5.Example 8-1 Displaying the SVC cluster code level using SVC CLI<strong>IBM</strong>_2145:SVCSTGDEMO:admin> svcinfo lscluster SVCSTGDEMOcode_level 4.3.1.5 (build 9.16.0903130000)<strong>XIV</strong> firmwareThe <strong>XIV</strong> should be on at least <strong>XIV</strong> firmware Version 10.0.0.a. The <strong>XIV</strong> firmware version isshown on the All <strong>System</strong>s front page of the <strong>XIV</strong> GUI. The <strong>XIV</strong> in Figure 8-1 is on version10.0.1.b (circled on the upper right in red).Figure 8-1 Figure 8-1Version 10.0.1.b244 <strong>IBM</strong> <strong>XIV</strong> <strong>Storage</strong> <strong>System</strong>: <strong>Copy</strong> <strong>Services</strong> <strong>and</strong> <strong>Migration</strong>
The <strong>XIV</strong> firmware version can also be displayed by using an XCLI comm<strong>and</strong> as shown inExample 8-2, where the example machine is on <strong>XIV</strong> firmware Version 10.0.1.b.Example 8-2 Displaying the <strong>XIV</strong> firmware versionxcli -m 10.0.0.1 -u admin -p adminadmin version_getVersion10.0.1.bNote that an upgrade from <strong>XIV</strong> 10.0.x.x code levels to 10.1.x.x code levels is not concurrent(meaning that the <strong>XIV</strong> is unavailable for I/O during the upgrade).8.2.2 <strong>Copy</strong> functionsThe <strong>XIV</strong> has many advanced copy <strong>and</strong> remote mirror capabilities, but for <strong>XIV</strong> volumes beingused as SVC MDisks (including image mode VDisk/MDisks), none of these functions can beused. If copy <strong>and</strong> mirror functions are needed, they should be performed using the equivalentfunctional capabilities in the SVC (such as SVC Flash<strong>Copy</strong> <strong>and</strong> SVC Metro <strong>and</strong> GlobalMirror). This is because <strong>XIV</strong> copy functions are not aware of un-destaged write cache dataresident in the SVC cache. Whereas it is possible to disable SVC write-cache (when creatingVDisks), this method is not supported by <strong>IBM</strong> for VDisks resident on <strong>XIV</strong>.8.2.3 TPC with <strong>XIV</strong> <strong>and</strong> SVC<strong>XIV</strong> code levels 10.1.0.a <strong>and</strong> later support the use of Tivoli <strong>Storage</strong> Productivity Center (TPC)via an embedded SMI-S agent in the <strong>XIV</strong>. Subsequently, if you want to use TPC in conjunctionwith <strong>XIV</strong> then you your <strong>XIV</strong> must be code level 10.1.0.a (or later). TPC itself must be Version4.1 (or later). Refer to the “Recommended Software Levels for SAN Volume Controller”documentation for your SVC code level to identify the latest recommended TPC for Disksoftware version via the following Web site:http://www.ibm.com/storage/support/21458.3 Zoning setupOne of the first tasks when implementing <strong>XIV</strong> is to add the <strong>XIV</strong> to the SAN fabric so that theSVC cluster can communicate with the <strong>XIV</strong> over the Fibre Channel. The <strong>XIV</strong> can have up to24 Fibre Channel host ports. Each <strong>XIV</strong> reports a single World Wide Node Name (WWNN)that is the same for every <strong>XIV</strong> Fibre Channel host port. Each port also has a unique <strong>and</strong>persistent World Wide Port Name (WWPN), which means that we can potentially zone 24unique WWPNS from an <strong>XIV</strong> to an SVC cluster. However, the current SVC firmware has arequirement that one SVC cluster cannot detect more than 16 WWPNs per WWNN, so at thistime there is no value in zoning more than 16 ports to the SVC. Because the <strong>XIV</strong> can have upto six interface modules with four ports per module, it is better to use just two ports on eachmodule (allowing up to 12 ports total).Chapter 8. SVC migration with <strong>XIV</strong> 245
When a partially populated <strong>XIV</strong> has a hardware upgrade to add usable capacity, more datamodules are added. At particular points in the upgrade path, the <strong>XIV</strong> will get more usableFibre Channel ports. In each case, we use half the available ports to communicate with anSVC cluster (we do this to facilitate growth as modules are added). Depending on the totalusable capacity of the <strong>XIV</strong>, not all interface modules have active Fibre Channel ports.Table 8-1 shows which modules will have active ports as capacity grows. You can also seehow many <strong>XIV</strong> ports we zone to the SVC as capacity grows.Table 8-1 <strong>XIV</strong> host ports as capacity grows<strong>XIV</strong> modulesTotal usablecapacity (TB)Total <strong>XIV</strong>host ports<strong>XIV</strong> hostports to zoneto an SVCclusterActiveinterfacemodulesInactiveinterfacemodules6 27.26 8 4 4:5 69 43.09 16 8 4:5:7:8 6:910 50.29 16 8 4:5:7:8 6:911 54.65 20 10 4:5:7:8:9 612 61.74 20 10 4:5:7:8:9 613 66.16 24 12 4:5:6:7:8:914 73.24 24 12 4:5:6:7:8:915 79.11 24 12 4:5:6:7:8:9Another way to view the activation state of the <strong>XIV</strong> interface modules is shown in Table 8-2.As additional capacity is added to an <strong>XIV</strong>, additional <strong>XIV</strong> host ports become available. Wherea module is shown as inactive, this refers only to the host ports, not the data disks.Table 8-2 <strong>XIV</strong> host ports as capacity growsModule 27 TB 43 TB 50 TB 54 TB 61 TB 66 TB 73 TB 79 TBModule 9host portsModule 8host portsModule 7host portsModule 6host portsModule 5host portsModule 4host portsNot present Inactive Inactive Active Active Active Active ActiveNot present Active Active Active Active Active Active ActiveNot present Active Active Active Active Active Active ActiveInactive Inactive Inactive Inactive Inactive Active Active ActiveActive Active Active Active Active Active Active ActiveActive Active Active Active Active Active Active Active8.3.1 Capacity on dem<strong>and</strong>If the <strong>XIV</strong> has the Capacity on Dem<strong>and</strong> (CoD) feature, then all Fibre Channel interface portsare present <strong>and</strong> active (usable) at the time of install, regardless of how much usable capacityhas been purchased.246 <strong>IBM</strong> <strong>XIV</strong> <strong>Storage</strong> <strong>System</strong>: <strong>Copy</strong> <strong>Services</strong> <strong>and</strong> <strong>Migration</strong>
8.3.2 Determining <strong>XIV</strong> WWPNs<strong>XIV</strong> WWPNs are in the format 50:01:73:8x:xx:xx:RR:MP which break out as follows:5 The WWPN format (1, 2, or 5, where <strong>XIV</strong> is always format 5)0:01:73:8 The IEEE OID for <strong>IBM</strong> (formerly registered to <strong>XIV</strong>)x:xx:xxDetermined by <strong>IBM</strong> manufacturing <strong>and</strong> unique for every <strong>XIV</strong> rackRR Rack ID (starts at 01)M Module ID (ranges from 4 to 9)P Port ID (0 to 3, although port numbers are 1–4)91909392 Module 991 8190 8093 8392 82 Module 871707372 Module 761606362 Module 691 5190 5093 5392 52 Module 541404342 Module 4Port 2 Port 4Port 1 Port 3Figure 8-2 <strong>XIV</strong> WWPN determinationIn Figure 8-2, the MP value (module/port, which make up the last two digits of the WWPN) isshown in each small box. The diagram represents the patch panel found at the rear of the <strong>XIV</strong>rack.To display the <strong>XIV</strong> WWPNs use the back view on the <strong>XIV</strong> GUI or the XCLI fc_port_listcomm<strong>and</strong>.In the output example shown in Example 8-3 the four ports in module 4 are listed.Example 8-3 Listing <strong>XIV</strong> Fibre Channel host portsfc_port_listComponent ID Status Currently Functioning WWPN1:FC_Port:4:4 OK yes 50017380003501431:FC_Port:4:3 OK yes 50017380003501421:FC_Port:4:2 OK yes 50017380003501411:FC_Port:4:1 OK yes 5001738000350140Chapter 8. SVC migration with <strong>XIV</strong> 247
8.3.3 Hardware dependenciesThere are two Fibre Channel HBAs in each <strong>XIV</strong> interface module. From a physicalperspective:► Ports 1 <strong>and</strong> 2 are on the left-h<strong>and</strong> HBA (viewed from the rear).► Ports 3 <strong>and</strong> 4 are on the right-h<strong>and</strong> HBA (viewed from the rear).From a configuration perspective:► Ports 1, 2, <strong>and</strong> 3 are in SCSI target mode by default.► Port 4 is set to SCSI initiator mode by default (for <strong>XIV</strong> replication <strong>and</strong> data migration).For availability <strong>and</strong> performance use ports 1 <strong>and</strong> 3 for SVC <strong>and</strong> general host traffic. If youhave two fabrics, place port 1 in the first fabric <strong>and</strong> port 3 in the second fabric.8.3.4 Sharing an <strong>XIV</strong> with another SVC cluster or non-SVC hostsIt is possible to share <strong>XIV</strong> host ports between an SVC cluster <strong>and</strong> non-SVC hosts, or betweentwo different SVC clusters. Simply zone the <strong>XIV</strong> host ports 1 <strong>and</strong> 3 on each <strong>XIV</strong> module toboth SVC <strong>and</strong> non-SVC hosts as required.You can instead choose to use ports 2 <strong>and</strong> 4, although in principle these are reserved for datamigration <strong>and</strong> remote mirroring. For that reason port 4 on each module is by default in initiatormode. If you want to change the mode of port 4 to target mode, you can do so easily from the<strong>XIV</strong> GUI or XCLI. However, you may also need an RPQ from <strong>IBM</strong>. Contact your <strong>IBM</strong> <strong>XIV</strong>representative to discuss this.8.3.5 Zoning rulesThe <strong>XIV</strong>-to-SVC zone should simply contain all the <strong>XIV</strong> ports in that fabric <strong>and</strong> all the SVCports in that fabric. In other words one big zone. This recommendation is relatively unique toSVC. If you zone individual hosts directly to the <strong>XIV</strong> (instead of via SVC), then you shouldalways use single-initiator zones where each switch zone contains just one host (initiator)HBA WWPN <strong>and</strong> up to six <strong>XIV</strong> host port WWPNs.For SVC, ensure that the following rules are followed:► With current SVC firmware levels, no more than 16 WWPNs from a single WWNN shouldbe zoned to an SVC cluster. Because the <strong>XIV</strong> has only one WWNN, this means that nomore than 16 <strong>XIV</strong> host ports should be zoned to a specific SVC cluster. If you use therecommendations in Table 8-1 on page 246 this restriction should not be an issue.► All nodes in an SVC cluster must be able to see the same set of <strong>XIV</strong> host ports. Operationin a mode where two nodes see a different set of host ports on the same <strong>XIV</strong> will result inthe controller showing on the SVC as degraded <strong>and</strong> the system error log will request arepair action. If the one big zone per fabric rule is followed, then this requirement is met.8.4 Volume size considerations for <strong>XIV</strong> with SVCThere are several considerations when migrating data onto <strong>XIV</strong> using SVC. Volume sizes isclearly an important one.248 <strong>IBM</strong> <strong>XIV</strong> <strong>Storage</strong> <strong>System</strong>: <strong>Copy</strong> <strong>Services</strong> <strong>and</strong> <strong>Migration</strong>
8.4.1 SCSI queue depth considerationsThe SVC uses one <strong>XIV</strong> host port as a preferred port for each MDisk (assigning them in around-robin fashion). A best practice is to therefore configure sufficient volumes on the <strong>XIV</strong> toensure that:► Each <strong>XIV</strong> host port will receive closely matching I/O levels.► The SVC will utilize the deep queue depth of each <strong>XIV</strong> host port.Ideally, the number of MDisks presented by the <strong>XIV</strong> to the SVC should be a multiple of thenumber of <strong>XIV</strong> host ports, from one to four. However, there is good math to support this.The <strong>XIV</strong> can h<strong>and</strong>le a queue depth of 1400 per Fibre Channel host port <strong>and</strong> a queue depth of256 per mapped volume per host port:target port:volume tuple. However, the SVC sets thefollowing internal limits:► The maximum queue depth per MDisk is 60.► The maximum queue depth per target host port on an <strong>XIV</strong> is 1000.Based on this knowledge, we can determine an ideal number of <strong>XIV</strong> volumes to map to theSVC for use as MDisks by using this algorithm:Q = ((P x C) / N) / MThis breaks out as follows:QThe calculated queue depth for each MDiskPThe number of <strong>XIV</strong> host ports (unique WWPNs) visible to the SVCcluster (should be 4, 8, 10, or 12 depending on the number of modulesin the <strong>XIV</strong>)N The number of nodes in the SVC cluster (2, 4, 6, or 8)MThe number of volumes from the <strong>XIV</strong> to the SVC cluster (detected asMDisks)C1000 (which is the maximum SCSI queue depth that an SVC will usefor each <strong>XIV</strong> host port)If a 2-node SVC cluster is being used with 12 ports on <strong>IBM</strong> <strong>XIV</strong> <strong>System</strong> <strong>and</strong> 48 MDisks, thisyields a queue depth that as follows:Q = ((12 ports*1000)/2 nodes)/48 MDisks = 125Because 125 is greater than 60, the SVC uses a queue depth of 60 per MDisk. If a 4-nodeSVC cluster is being used with 12 host ports on the <strong>IBM</strong> <strong>XIV</strong> <strong>System</strong> <strong>and</strong> 48 MDisks, thisyields a queue depth that as follows:Q = ((12 ports*1000)/4 nodes)/48 MDisks = 62Because 62 is greater than 60, the SVC uses a queue depth of 60 per MDisk.Chapter 8. SVC migration with <strong>XIV</strong> 249
This leads to the following recommended volume sizes <strong>and</strong> quantities for 2-node <strong>and</strong> 4-nodeSVC clusters.Table 8-3 <strong>XIV</strong> volume size <strong>and</strong> quantity recommendationModulesTotal usablecapacity(TB)<strong>XIV</strong>hostportsVolumesize(GB)VolumequantityRatio ofvolumesto <strong>XIV</strong> hostportsApproximateleftover space(TB)6 27.26 4 1632 16 4 1.149 43.09 8 1632 26 3.3 0.6510 50.29 8 1632 30 3.7 1.3211 54.65 10 1632 33 3.3 0.7912 61.74 10 1632 37 3.7 1.3513 66.16 12 1632 40 3.3 0.8714 73.24 12 1632 44 3.7 1.4215 79.11 12 1632 48 4.0 0.76If you have a 6-node or 8-node cluster, the formula suggests that you must use much larger<strong>XIV</strong> volumes. However, currently available SVC firmware does not support an MDisk largerthan 2 TB, so it is simpler to continue to use the 1632 GB volume size. When using 1632 GBvolumes, there is leftover space. That space could be used for testing or for non-SVCdirect-attach hosts. If you map the remaining space to the SVC as an odd sized volume thenVDisk striping is not balanced, meaning that I/O is not be evenly striped across all <strong>XIV</strong> hostports.Tip: If you only provision part of the usable space of the <strong>XIV</strong> to be allocated to the SVC,then the calculations above no longer work. You should instead size your MDisks to ensurethat at least two (<strong>and</strong> up to four) MDisks are created for each host port on the <strong>XIV</strong>.8.4.2 <strong>XIV</strong> volume sizesAll volume sizes shown on the <strong>XIV</strong> GUI use decimal counting (10 9 ), meaning that 1 GB =1,000,000,000 bytes. However, a GB using binary counting (using 2 30 bytes, more accuratelyreferred to as a GiB) counts 1 GiB as 1,073,741,824 bytes (ideally called a GiB to differentiateit from a GB where size is calculated using decimal counting).►►By default the SVC uses MiB <strong>and</strong> GiB (binary counting method) when displaying MDisk<strong>and</strong> VDisk sizes. However, the SVC still uses the term MB in the SVC GUI <strong>and</strong> MB or GBin the SVC CLI output when displaying volume <strong>and</strong> disk sizes (the SVC CLI displayscapacity in whatever unit it decides is the most human readable).By default the <strong>XIV</strong> uses GB (decimal counting method) in the <strong>XIV</strong> GUI <strong>and</strong> CLI outputwhen displaying volume sizes.250 <strong>IBM</strong> <strong>XIV</strong> <strong>Storage</strong> <strong>System</strong>: <strong>Copy</strong> <strong>Services</strong> <strong>and</strong> <strong>Migration</strong>
It also must be clearly understood that a volume created on an <strong>XIV</strong> is created in 17 GBincrements, which are not exactly 17 GB. In fact, the size of an <strong>XIV</strong> 17 GB volume can bedescribed in four ways:GB17 GB (decimal), as shown in the <strong>XIV</strong> GUI, but actually rounded downto the nearest GB (see the number of bytes below).GiB 16 GiB (binary counting where 1 GiB = 2 30 bytes). This is exactly 16GiB.Bytes17,179,869,184 bytes.Blocks33,554,432 blocks (each block being 512 bytes).Thus, <strong>XIV</strong> is using binary sizing when creating volumes, but displaying it in decimal <strong>and</strong> thenrounding it down.The recommended volume size for <strong>XIV</strong> volumes presented to the SVC is 1632 GB (as viewedon the <strong>XIV</strong> GUI). There is nothing special about this volume size, it simply divides nicely tocreate on average four <strong>XIV</strong> volumes per <strong>XIV</strong> host port (for queue depth purposes).The size of a 1632 GB volume (as viewed on the <strong>XIV</strong> GUI) can be stated in four ways:GB1632 GB (decimal), as shown in the <strong>XIV</strong> GUI, but rounded down to thenearest GB (see the number of bytes below).GiB1520 GiB (binary counting where 1 GiB = 2 30 bytes). This is exactly1520 GiB.Bytes1,632,087,572,480 bytes.Blocks3,187,671,040 blocks (each block being 512 bytes).Note that the SVC reports each MDisk presented by <strong>XIV</strong> as 1520 GiB. Figure 8-3 shows whatthe <strong>XIV</strong> reports.Figure 8-3 An <strong>XIV</strong> volume sized for use with SVCIf you right-click the volume in the <strong>XIV</strong> GUI <strong>and</strong> display properties, you will be able to see thatthis volume is 3,187,671,040 blocks. If you multiply 3,187,671,040 by 512 (because there are512 bytes in a SCSI block) you will get 1,632,087,572,480 bytes. If you divide that by1,073,741,824 (the number of bytes in a binary GiB), then you will get 1520 GiB, which isexactly what the SVC reports for the same volume (MDisk), as shown in Example 8-4.Example 8-4 An <strong>XIV</strong> volume mapped to the SVC<strong>IBM</strong>_2145:SVCSTGDEMO:admin>svcinfo lsmdisk -bytesid name status mode capacity ctrl_LUN_# controller_name9 mdisk9 online unmanaged 1632087572480 0000000000000007 <strong>XIV</strong><strong>IBM</strong>_2145:SVCSTGDEMO:admin>svcinfo lsmdiskid name status mode capacity ctrl_LUN_# controller_name9 mdisk9 online unmanaged 1520.0GB 0000000000000007 <strong>XIV</strong>Chapter 8. SVC migration with <strong>XIV</strong> 251
8.4.3 Creating <strong>XIV</strong> volumes that are exactly the same size as SVC VDisksTo create an <strong>XIV</strong> volume that is exactly the same size as an existing SVC VDisk you can usethe process documented in 8.10.1, “Create image mode destination volumes on the <strong>XIV</strong>” onpage 267. This is only for a transition to or from image mode.8.4.4 SVC 2TB volume limitThe <strong>XIV</strong> can create volumes of any size up to the entire capacity of the <strong>XIV</strong>. However, in thecurrent release of SVC firmware (including release 5.1), the largest MDisk that an SVC c<strong>and</strong>etect is 2 TiB in size (which is 2048 GiB). To create this volume on the <strong>XIV</strong>, create a volumesized 2199 GB (because 2199 GB = 2048 GiB). However, the recommended volume size forSVC is 1632 GB (1520 GiB).In Figure 8-4 there are three volumes that will be mapped to the SVC. The first volume is2199 GB (2 TiB), but the other two are larger than that.Figure 8-4 <strong>XIV</strong> volumes larger than 2 TiBWhen presented to the SVC, the SVC reports all three as being 2 TiB (2048 GiB), as shownin Example 8-5.Example 8-5 2 TiB volume size limit on SVC<strong>IBM</strong>_2145:SVCSTGDEMO:admin>svcinfo lsmdiskid name status mode capacity9 mdisk9 online unmanaged 2048.0GB10 mdisk10 online unmanaged 2048.0GB11 mdisk11 online unmanaged 2048.0GBBecause there was no benefit in using larger volume sizes do not follow this example. Alwaysensure that volumes presented by the <strong>XIV</strong> to the SVC are 2199 GB or smaller (when viewedon the <strong>XIV</strong> GUI or XCLI).8.4.5 MDisk group creationAll volumes presented by the <strong>XIV</strong> to the SVC are represented on the SVC as MDisks <strong>and</strong>should be placed into one managed disk group. All VDisks created in this managed diskgroup should be created as striped <strong>and</strong> striped across all MDisks in the group. This ensuresthat we stripe SVC host I/O evenly across all the <strong>XIV</strong> host ports.8.4.6 SVC MDisk group extent sizesSVC MDisk groups have a fixed extent size. This extent size affects the maximum size of anSVC cluster. When migrating SVC data from other disk technology to <strong>XIV</strong>, change the extentsize at the same time. This not only allows for larger sized SVC clusters, but also ensures that252 <strong>IBM</strong> <strong>XIV</strong> <strong>Storage</strong> <strong>System</strong>: <strong>Copy</strong> <strong>Services</strong> <strong>and</strong> <strong>Migration</strong>
the data from each extent best utilizes the striping mechanism in the <strong>XIV</strong>. Because the <strong>XIV</strong>divides each volume into 1 MB partitions, the MDisk group extent size in MB should exceedthe maximum number of disks that are likely to exist in a single <strong>XIV</strong> footprint. For manycustomers this means that an extent size of 256 MB is acceptable (because 256 MB covers256 disks where a single <strong>XIV</strong> rack has only 180 disks). However, strongly consider using anextent size of 1024 MB because this covers the possibility of a 5-rack <strong>XIV</strong> with 900 disks.In terms of the available SVC extent sizes <strong>and</strong> the effect on maximum SVC cluster size, seeTable 8-4.Table 8-4 SVC extent size <strong>and</strong> cluster sizeMDisk groupextent sizeMaximum SVCcluster size16 MB 64 TB32 MB 128 TB64 MB 256 TB128 MB 512 TB256 MB 1024 TB512 MB 2048 TB1024 MB 4096 TB2048 MB 8192 TB8.5 Using an <strong>XIV</strong> for SVC quorum disksThe SVC cluster uses three MDisks as quorum disks. It uses a small area on each of theseMDisks to store important SVC cluster management information. If you are replacing non-<strong>XIV</strong>disk storage with <strong>XIV</strong>, ensure that you relocate the quorum disks before removing the MDisks.Review the tip at the following Web site:http://www.ibm.com/support/docview.wss?uid=ssg1S1003311To determine whether removing a managed disk controller requires quorum disk relocation,run a script to find the MDisks that are being used as quorum disks, as shown inExample 8-6. This script can be run safely without modification. Example 8-6 shows twoMDisks on the DS6800 <strong>and</strong> one MDisk on the DS4700.Example 8-6 Identifying the quorum disks<strong>IBM</strong>_2145:SVCSTGDEMO:admin>svcinfo lsmdisk -nohdr | while read id name status modemdisk_grp_id mdisk_grp_name capacity ctrl_LUN controller_name mdisk_UID; dosvcinfo lsmdisk $id | while read key value; do if [ "$key" == "quorum_index" ];then if [ "$value" != "" ]; then echo "Quorum index $value : mdisk $id ($name),status=$status, controller=$controller_name"; fi; fi; done; doneQuorum index 0 : mdisk 0 (mdisk0), status=online, controller=DS6800_1Quorum index 1 : mdisk 1 (mdisk1), status=online, controller=DS6800_1Quorum index 2 : mdisk 2 (mdisk2), status=online, controller=DS4700Chapter 8. SVC migration with <strong>XIV</strong> 253
If your SVC uses firmware Version 5.1 or later, we simply use the svcinfo lsquorumcomm<strong>and</strong>, as shown in Example 8-7.Example 8-7 Using the svcinfo lsquorum comm<strong>and</strong> on SVC code level 5.1 <strong>and</strong> later<strong>IBM</strong>_2145:mycluster:admin>svcinfo lsquorumquorum_index status id name controller_id controller_name active0 online 0 mdisk0 0 DS6800_1 yes1 online 1 mdisk1 1 DS6800_1 no2 online 2 mdisk2 2 DS4700 noTo move the quorum disk function, we specify three MDisks that will become quorum disks.Depending on your MDisk group extent size, each selected MDisk must have between 272MB <strong>and</strong> 1024 MB of free space. Execute the svctask setquorum comm<strong>and</strong>s before you startmigration. If all available MDisk space has been allocated to VDisks then you will not be ableto use that MDisk as a quorum disk. Table 8-5 shows the amount of space needed on eachMDisk.Table 8-5 Quorum disk space requirements for each of the three quorum MDisksExtent size (in MB)Number of extentsneeded by quorumAmount of space per MDiskneeded by quorum16 17 272 MB32 9 288 MB64 5 320 MB128 3 384 MB256 2 512 MB1024 1 1024 MB2048 1 2048 MBIn Example 8-8 there are three free MDisks. They are 1520 GiB in size (1632 GB).Example 8-8 New <strong>XIV</strong> MDisks detected by SVC<strong>IBM</strong>_2145:SVCSTGDEMO:admin>svcinfo lsmdisk -filtervalue mode=unmanagedid name status mode capacity9 mdisk9 online unmanaged 1520.0 GB10 mdisk10 online unmanaged 1520.0 GB11 mdisk11 online unmanaged 1520.0 GBIn Example 8-9 the MDisk group is created using an extent size of 1024 MB.Example 8-9 Creating an MDIsk group<strong>IBM</strong>_2145:SVCSTGDEMO:admin>svctask mkmdiskgrp -name <strong>XIV</strong> -mdisk 9:10:11 -ext 1024MDisk Group, id [4], successfully created254 <strong>IBM</strong> <strong>XIV</strong> <strong>Storage</strong> <strong>System</strong>: <strong>Copy</strong> <strong>Services</strong> <strong>and</strong> <strong>Migration</strong>
In Example 8-10 the MDisk group has 4,896,262,717,440 free bytes (1520 GiB x 3).Example 8-10 Listing the free capacity of the MDisk group<strong>IBM</strong>_2145:SVCSTGDEMO:admin>svcinfo lsmdiskgrp -bytes 4free_capacity 4896262717440All three MDisks are set to be quorum disks, as shown in Example 8-11.Example 8-11 Setting <strong>XIV</strong> MDisks as quorum disks<strong>IBM</strong>_2145:SVCSTGDEMO:admin>svctask setquorum -quorum 0 mdisk9<strong>IBM</strong>_2145:SVCSTGDEMO:admin>svctask setquorum -quorum 1 mdisk10<strong>IBM</strong>_2145:SVCSTGDEMO:admin>svctask setquorum -quorum 2 mdisk11The MDisk group has now lost free space, as shown in Example 8-12.Example 8-12 Listing free space in the MDisk group<strong>IBM</strong>_2145:SVCSTGDEMO:admin>svcinfo lsmdiskgrp -bytes 4free_capacity 4893041491968This means that free capacity fell by 3,221,225,472 bytes, which is 3 GiB or 1 GiB per quorumMDisk.Note: In this example all three quorum disks were placed on a single <strong>XIV</strong>. This may not bean ideal configuration. The Web tip referred to at the start of this section has more detailsabout best practice, but in short you should try <strong>and</strong> use more than one managed diskcontroller if possible.8.6 Configuring an <strong>XIV</strong> for attachment to SVCFirst we must configure the <strong>XIV</strong>.8.6.1 <strong>XIV</strong> setup stepsThe <strong>XIV</strong> GUI is remarkably easy to use, so we do not reproduce a series of <strong>XIV</strong> GUI images.This section provides the setup steps using the <strong>XIV</strong> XCLI. They are reproduced mainly toshow the flow of comm<strong>and</strong>s rather than to indicate a preference for XCLI over the <strong>XIV</strong> GUI.1. Define the SVC cluster to the <strong>XIV</strong> as in Example 8-13. An SVC cluster consists of severalnodes, with each SVC node being defined as a separate host.Example 8-13 Define the SVC Cluster to the <strong>XIV</strong>cluster_create cluster="SVC_Cluster1"Chapter 8. SVC migration with <strong>XIV</strong> 255
2. Define the SVC nodes to the <strong>XIV</strong> (as members of the cluster), as shown in Example 8-14.By defining each node as a separate host, we can get more information about individualSVC nodes from the <strong>XIV</strong> performance statistics display.Example 8-14 Define the SVC nodes to the <strong>XIV</strong>host_define host="SVC_Node1" cluster="SVC_Cluster1"host_define host="SVC_Node2" cluster="SVC_Cluster1"3. Add the SVC host ports to the host definition of the first SVC node, as shown inExample 8-15.Example 8-15 Define the WWPNs of the first SVC nodehost_add_port host="SVC_Node1" fcaddress="5005076801101234"host_add_port host="SVC_Node1" fcaddress="5005076801201234"host_add_port host="SVC_Node1" fcaddress="5005076801301234"host_add_port host="SVC_Node1" fcaddress="5005076801401234"4. Add the SVC host ports to the host definition of the second SVC node, as shown inExample 8-16.Example 8-16 Define the WWPNs of the second SVC nodehost_add_port host="SVC_Node2" fcaddress="5005076801105678"host_add_port host="SVC_Node2" fcaddress="5005076801205678"host_add_port host="SVC_Node2" fcaddress="5005076801305678"host_add_port host="SVC_Node2" fcaddress="5005076801405678"5. Repeat steps 3 <strong>and</strong> 4 for each SVC I/O group. If you only have two nodes then you onlyhave one I/O group.6. Create a storage pool. In Example 8-17 the comm<strong>and</strong> shown creates a pool with 8160 GBof space <strong>and</strong> no snapshot space. The total size of the pool is determined by the volumesize that you choose to use. We do not need snapshot space because we cannot use <strong>XIV</strong>snapshots with SVC MDisks.Example 8-17 Create a pool on the <strong>XIV</strong>pool_create pool="SVCDemo" size=8160 snapshot_size=0Important: You must not use <strong>XIV</strong> thin provisioning pools with SVC. You must only useregular pools. The comm<strong>and</strong> shown in Example 8-17 creates a regular pool (where thesoft size is the same as the hard size. This does not stop you from using thinprovisioned VDisks on the SVC.7. Create the volumes in the pool, as shown in Example 8-18.Example 8-18 Create <strong>XIV</strong> volumes for use by the SVCvol_create size=1632 pool="SVCDemo" vol="SVCDemo_1"vol_create size=1632 pool="SVCDemo" vol="SVCDemo_2"vol_create size=1632 pool="SVCDemo" vol="SVCDemo_3"vol_create size=1632 pool="SVCDemo" vol="SVCDemo_4"vol_create size=1632 pool="SVCDemo" vol="SVCDemo_5"256 <strong>IBM</strong> <strong>XIV</strong> <strong>Storage</strong> <strong>System</strong>: <strong>Copy</strong> <strong>Services</strong> <strong>and</strong> <strong>Migration</strong>
8. Map the volumes to the SVC cluster using available LUN IDs (starting at zero), as shownin Example 8-19.Example 8-19 Map <strong>XIV</strong> volumes to the SVC clustermap_vol cluster="SVC_Cluster1" vol="SVCDemo_1" lun="0"map_vol cluster="SVC_Cluster1" vol="SVCDemo_2" lun="1"map_vol cluster="SVC_Cluster1" vol="SVCDemo_3" lun="2"map_vol cluster="SVC_Cluster1" vol="SVCDemo_4" lun="3"map_vol cluster="SVC_Cluster1" vol="SVCDemo_5" lun="4"Important: Only map volumes to the SVC cluster (not to individual nodes in thecluster). This ensures that each SVC node sees the same LUNs with the same LUNIDs. You must not allow a situation where two nodes in the same SVC cluster havedifferent LUN mappings.Tip: The <strong>XIV</strong> GUI normally reserves LUN ID 0 for in-b<strong>and</strong> management. The SVCcannot take advantage of this, but is not affected either way. In Example 8-19 westarted the mapping with LUN ID 0, but if you used the GUI you will find that by defaultyou start with LUN ID 1.9. If necessary, change the system name for <strong>XIV</strong> so that it matches the controller name usedon the SVC. In Example 8-20 we use the config_get comm<strong>and</strong> to determine the machinetype <strong>and</strong> serial number. Then we use the config_set comm<strong>and</strong> to set the system_name.Whereas the <strong>XIV</strong> allows a long name with spaces, SVC can only use 15 characters withno spaces.Example 8-20 Setting the <strong>XIV</strong> system name>> config_getmachine_serial_number=6000081machine_type=2810system_name=<strong>XIV</strong> 6000081timezone=-39600ups_control=yes>> config_set name=system_name value="<strong>XIV</strong>_28106000081"The <strong>XIV</strong> configuration tasks are now complete.8.6.2 SVC setup stepsAssuming that the SVC is zoned to the <strong>XIV</strong>, we now switch to the SVC <strong>and</strong> run the followingSVC CLI comm<strong>and</strong>s:1. Detect the <strong>XIV</strong> volumes:svctask detectmdiskChapter 8. SVC migration with <strong>XIV</strong> 257
2. List the newly detected MDisks, as shown in Example 8-21, where there are five freeMDisks. They are 1520 GiB in size (1632 GB).Example 8-21 New <strong>XIV</strong> MDisks detected by SVC<strong>IBM</strong>_2145:SVCSTGDEMO:admin>svcinfo lsmdisk -filtervalue mode=unmanagedid name status mode capacity ctrl_LUN_# controller_name9 mdisk9 online unmanaged 1520.0GB 0000000000000000 controller210 mdisk10 online unmanaged 1520.0GB 0000000000000001 controller211 mdisk11 online unmanaged 1520.0GB 0000000000000002 controller212 mdisk12 online unmanaged 1520.0GB 0000000000000003 controller213 mdisk13 online unmanaged 1520.0GB 0000000000000004 controller23. Create an MDisk group, as shown in Example 8-22, where an MDisk group is createdusing an extent size of 1024 MB.Example 8-22 Create the MDisk group<strong>IBM</strong>_2145:SVCSTGDEMO:admin>svctask mkmdiskgrp -name <strong>XIV</strong> -mdisk 9:10:11:12:13 -ext 1024MDisk Group, id [4], successfully createdImportant: Adding a new managed disk group to the SVC may result in the SVCreporting that you have exceeded the virtualization license limit. Whereas this does notaffect operation of the SVC, you continue to receive this error message until thesituation is corrected (by either removing the MDisk Group or increasing thevirtualization license). If the non-<strong>XIV</strong> disk is not being replaced by the <strong>XIV</strong> then ensurethat an additional license has been purchased. Then increase the virtualization limitusing the svctask chlicense -virtualization xx comm<strong>and</strong> (where xx specifies thenew limit in TB).4. Relocate quorum disks if required as documented in “Using an <strong>XIV</strong> for SVC quorum disks”on page 253.5. Rename the controller from its default name. A managed disk controller is given a nameby the SVC such as controller0 or controller1 (depending on how many controllers havealready been detected). Because the <strong>XIV</strong> can have a system name defined for it, aim toclosely match the two names. Note, however, that the controller name used by SVCcannot have spaces <strong>and</strong> cannot be more than 15 characters long. In Example 8-23controller number 2 is renamed to match the system name used by the <strong>XIV</strong> itself (whichwas set in Example 8-20 on page 257).Example 8-23 Rename the <strong>XIV</strong> controller definition at the SVC<strong>IBM</strong>_2145:SVCSTGDEMO:admin>svcinfo lscontrollerid controller_name ctrl_s/n vendor_id product_id_low product_id_high0 controller0 13008300000 <strong>IBM</strong> 17505001 controller1 NETAPP LUN2 controller2 <strong>IBM</strong> 2810<strong>XIV</strong>- LUN-0<strong>IBM</strong>_2145:SVCSTGDEMO:admin>svctask chcontroller -name "<strong>XIV</strong>_28106000081" 2258 <strong>IBM</strong> <strong>XIV</strong> <strong>Storage</strong> <strong>System</strong>: <strong>Copy</strong> <strong>Services</strong> <strong>and</strong> <strong>Migration</strong>
Example 8-24 Rename the MDisks6. Rename all the SVC MDisks from their default names (such as mdisk9 <strong>and</strong> mdisk10) tomatch the volume names used on the <strong>XIV</strong>. An example of this is shown in Example 8-24(limited to just two MDisks). You can match the ctrl_LUN_# value to the LUN ID assignedwhen mapping the volume to the SVC (for reference also see Example 8-18 on page 256).Be aware that the ctrl_LUN field displays LUN IDs using hexadecimal numbering, whereasthe <strong>XIV</strong> displays them using decimal numbering. This means that <strong>XIV</strong> LUN ID 10 displaysas ctrl_LUN ID A.<strong>IBM</strong>_2145:SVCSTGDEMO:admin>svcinfo lsmdisk -filtervalue mdisk_grp_id=4id name status mode mdisk_grp_id capacity ctrl_LUN_# controller_name9 mdisk9 online managed 4 1520.0GB 0000000000000000 <strong>XIV</strong>_2810600008110 mdisk10 online managed 4 1520.0GB 0000000000000001 <strong>XIV</strong>_28106000081<strong>IBM</strong>_2145:SVCSTGDEMO:admin>svctask chmdisk -name SVCDemo_1 mdisk9<strong>IBM</strong>_2145:SVCSTGDEMO:admin>svctask chmdisk -name SVCDemo_2 mdisk10<strong>IBM</strong>_2145:SVCSTGDEMO:admin>svcinfo lsmdisk -filtervalue mdisk_grp_id=4id name status mode mdisk_grp_id capacity ctrl_LUN_# controller_name9 SVCDemo_1 online managed 4 1520.0GB 0000000000000000 <strong>XIV</strong>_2810600008110 SVCDemo_2 online managed 4 1520.0GB 0000000000000001 <strong>XIV</strong>_28106000081Now we must follow one of the migration strategies, as described in the 8.7, “Data movementstrategy overview” on page 259.8.7 Data movement strategy overviewThere are three possible data movement strategies that we detail in this section <strong>and</strong> insubsequent sections.8.7.1 Using SVC migration to move dataYou can use st<strong>and</strong>ard SVC migration to move data from MDisks presented by a non-<strong>XIV</strong> diskcontroller to MDisks resident on the <strong>XIV</strong>. This process does not require a host outage, butdoes not allow the MDisk group extent size to be changed. At a high level, the process is asfollows:1. We start with existing VDisks in an existing MDisk Group. We must confirm the extent sizeof that MDisk group. We call this the source MDisk group.2. We create 1632 GB sized volumes on the <strong>XIV</strong> <strong>and</strong> map these to the SVC.3. We detect these new MDisks <strong>and</strong> use them to create an MDisk group. We call this thetarget Mdisk group. The target MDisk group must use the same extent size as the sourceMDisk group.4. We migrate each VDisk from the source MDisk group to the target MDisk group.5. When all the VDisks are migrated we can choose to delete the source MDisks <strong>and</strong> thesource MDisk group (in preparation for removing the non-<strong>XIV</strong> storage).We discuss this method in greater depth in 8.8, “Using SVC migration to move data to <strong>XIV</strong>” onpage 261.Chapter 8. SVC migration with <strong>XIV</strong> 259
8.7.2 Using VDisk mirroring to move the dataWe can use the VDisk copy (mirror) function introduced in SVC firmware Version 4.3 to createtwo copies of the data, one in the source MDisk group <strong>and</strong> one in the target MDisk group. Wethen remove the VDisk copy in the source MDisk group <strong>and</strong> retain the VDisk copy present inthe target MDisk group. This process does not require a host outage <strong>and</strong> allows us to move toa larger MDisk group extent size. However, it also uses additional SVC cluster memory <strong>and</strong>CPU while the multiple copies are managed by the SVC.At a high level the process is as follows:1. We start with existing VDisks in an existing MDisk Group. The extent size of that MDiskgroup is not relevant. We call this MDisk group the source MDisk group.2. We create 1632 GB sized volumes on the <strong>XIV</strong> <strong>and</strong> map these to the SVC.3. We detect these <strong>XIV</strong> MDisks <strong>and</strong> create an MDisk group using an extent size of 1024 MB.We call this MDisk group the target Mdisk group.4. For each VDisk in the source MDisk group, we create a VDisk copy in the target MDiskgroup.5. When the two copies are in sync we remove the VDisk copy that exists in the sourceMDisk group (which is normally copy 0 since it existed first, as opposed to copy 1, whichwe created for migration purposes).6. When all the VDisks have been successfully copied from the source MDisk group to thetarget MDisk group, we can choose to delete the source MDisks <strong>and</strong> the source MDiskgroup (in preparation for removing the non-<strong>XIV</strong> storage) or split the VDisk copies <strong>and</strong>retain copy 0 for as long as necessary.We discuss this method in greater depth in 8.9, “Using VDisk mirroring to move the data” onpage 263.8.7.3 Using SVC migration with image modeThis migration method is used when:► The extent size must be changed but VDisk mirroring cannot be used, perhaps becausethe SVC nodes are already constrained for CPU <strong>and</strong> memory. Because the SVC must beon 4.3 code to support <strong>XIV</strong> (SVC code level 4.3 being the level that brought in VDiskmirroring), having downlevel SVC firmware is not a valid reason.► We want to move the VDisks from one SVC cluster to a different one.► We want to move the data away from the SVC without using <strong>XIV</strong> migration.In these cases we can migrate the VDisks to image mode <strong>and</strong> take an outage to do therelocation <strong>and</strong> extent re-size. There will be a host outage, although it can kept very short(potentially in the order of seconds or minutes).At a high level the process is as follows:1. We start with existing VDisks in an existing MDisk group. Possibly the extent size of thisMDisk group is small (say 16 MB). We call this the source MDisk group.2. We create <strong>XIV</strong> volumes that are the same size (or larger) than the existing VDisks. Thismay need extra steps, as the <strong>XIV</strong> volumes must be created using 512 byte blocks. Wemap these specially sized volumes to the SVC.260 <strong>IBM</strong> <strong>XIV</strong> <strong>Storage</strong> <strong>System</strong>: <strong>Copy</strong> <strong>Services</strong> <strong>and</strong> <strong>Migration</strong>
3. We migrate each VDisk to image mode using these new volumes (presented asunmanaged MDisks). The new volumes move into the source MDisk group as imagemode MDisks <strong>and</strong> the VDisks become image mode VDisks.4. We can now remove all the Image Mode MDisks from the source MDisk group. This is thedisruptive part of this process. They are now unmanaged MDisks, but the data on thesevolumes is intact. We could at this point map these volumes to a different SVC cluster orwe could remove them from the SVC altogether (in which case the process is complete).5. We create a new managed disk group that contains only the image mode VDisks, butusing the recommended extent size (1024 MB) <strong>and</strong> present the VDisks back to the hosts.We call this the transition MDisk group. The host downtime is now over.6. We create another new managed disk group using free space on the <strong>XIV</strong>, using the samelarge extent size (1024 MB). We call this the target MDisk group.7. We migrate the image mode VDisks to managed mode VDisks, moving the data from thetransition MDisk group created in step 5 to the target MDisk Group created in step 6. TheMDisks themselves are already on the <strong>XIV</strong>.8. When the process is complete, we can delete the source MDisks <strong>and</strong> the source MDiskgroup (which represent space on the non-<strong>XIV</strong> storage controller) <strong>and</strong> the transitional <strong>XIV</strong>volumes (which represent space on the <strong>XIV</strong>).9. We can then use the transitional volume space on the <strong>XIV</strong> to create more 1632 GBvolumes to present to the SVC. These can be added into the existing MDisk group or usedto create a new one.This method is detailed in greater depth in 8.10, “Using SVC migration with image mode” onpage 267.8.8 Using SVC migration to move data to <strong>XIV</strong>This process migrates data from a source MDisk Group to a target Mdisk group using thesame Mdisk group extent size. These is no interruption to host I/O.8.8.1 Determine the required extent size <strong>and</strong> VDisk c<strong>and</strong>idatesWe must determine the extent size of the source MDisk group. In Example 8-25 MDisk GroupID 1 is the source group <strong>and</strong> has an extent size of 256.Example 8-25 Listing MDisk groups<strong>IBM</strong>_2145:SVCSTGDEMO:admin>svcinfo lsmdiskgrpid name status mdisk_count vdisk_count capacity extent_size free_capacity0 MDG_DS6800 online 2 0 399.5GB 16 399.5GB1 Source_GRP online 1 1 50.0GB 256 45.0GBWe then must identify the VDisks that we are migrating. We can filter by MDisk Group ID, asshown in Example 8-26, where there is only one VDisk that must be migrated.Example 8-26 Listing VDisks filtered by MDisk group<strong>IBM</strong>_2145:SVCSTGDEMO:admin>svcinfo lsvdisk -filtervalue mdisk_grp_id=1id name status mdisk_grp_id mdisk_grp_name capacity type5 migrateme online 1 Source_GRP 5.00GB stripedChapter 8. SVC migration with <strong>XIV</strong> 261
8.8.2 Create the MDisk groupWe must create volumes on the <strong>XIV</strong> <strong>and</strong> map them to the SVC cluster. Presuming that wehave done this, we then detect them on the SVC, as shown in Example 8-27.Example 8-27 Detecting new MDisks<strong>IBM</strong>_2145:SVCSTGDEMO:admin>svctask detectmdisk<strong>IBM</strong>_2145:SVCSTGDEMO:admin>svcinfo lsmdiskc<strong>and</strong>idateid910111213<strong>IBM</strong>_2145:SVCSTGDEMO:admin>svcinfo lsmdisk -filtervalue mode=unmanagedid name status mode capacity ctrl_LUN_# controller_name9 mdisk9 online unmanaged 1520.0GB 0000000000000007 <strong>XIV</strong>10 mdisk10 online unmanaged 1520.0GB 0000000000000008 <strong>XIV</strong>11 mdisk11 online unmanaged 1520.0GB 0000000000000009 <strong>XIV</strong>12 mdisk12 online unmanaged 1520.0GB 000000000000000A <strong>XIV</strong>13 mdisk13 online unmanaged 1520.0GB 000000000000000B <strong>XIV</strong>We then create an Mdisk group called <strong>XIV</strong>_Target using the new <strong>XIV</strong> MDisks, with the sameextent size as the source group. In Example 8-28 it is 256.Example 8-28 Creating an MDisk group<strong>IBM</strong>_2145:SVCSTGDEMO:admin>svctask mkmdiskgrp -name <strong>XIV</strong>_Target -mdisk 9:10:11:12:13 -ext 256MDisk Group, id [2], successfully createdWe confirm the new MDisk group is present. In Example 8-29 we are filtering by using thenew ID of 2.Example 8-29 Checking the newly created MDisk group<strong>IBM</strong>_2145:SVCSTGDEMO:admin>svcinfo lsmdiskgrp -filtervalue id=2id name status mdisk_count vdisk_count capacity extent_size free_capacity2 <strong>XIV</strong>_Target online 5 1 7600.0GB 256 7600.0GB8.8.3 <strong>Migration</strong>Now we are ready to migrate the VDisks. In Example 8-30 we migrate VDisk 5 into MDiskgroup 2 <strong>and</strong> then confirm that the migration is running.Example 8-30 Migrating a VDisk<strong>IBM</strong>_2145:SVCSTGDEMO:admin>svctask migratevdisk -mdiskgrp 2 -vdisk 5<strong>IBM</strong>_2145:SVCSTGDEMO:admin>svcinfo lsmigratemigrate_type MDisk_Group_<strong>Migration</strong>progress 0migrate_source_vdisk_index 5migrate_target_mdisk_grp 2max_thread_count 4migrate_source_vdisk_copy_id 0262 <strong>IBM</strong> <strong>XIV</strong> <strong>Storage</strong> <strong>System</strong>: <strong>Copy</strong> <strong>Services</strong> <strong>and</strong> <strong>Migration</strong>
When the lsmigrate comm<strong>and</strong> returns no output, the migration is complete. Once all Vdiskshave been migrated out of the Mdisk group, we can remove the source MDisks <strong>and</strong> thenremove the source Mdisk group, as shown in Example 8-31.Example 8-31 Removing non-<strong>XIV</strong> MDisks <strong>and</strong> MDisk group<strong>IBM</strong>_2145:SVCSTGDEMO:admin>svcinfo lsmdisk -filtervalue mdisk_grp_id=1id name status mode capacity ctrl_LUN_# controller_name8 mdisk8 online managed 50.0GB 00000000000000070 DS6800_1<strong>IBM</strong>_2145:SVCSTGDEMO:admin>svctask rmmdisk -mdisk 8 1<strong>IBM</strong>_2145:SVCSTGDEMO:admin>svctask rmmdiskgrp 1Important: Scripts that use VDisk names or IDs will not be affected by the use of VDiskmigration, as the VDisk names <strong>and</strong> IDs do not change.8.9 Using VDisk mirroring to move the dataThis process mirrors data from a source MDisk group to a target Mdisk group using a differentextent size <strong>and</strong> with no interruption to the host.8.9.1 Determine the required extent size <strong>and</strong> VDisk c<strong>and</strong>idatesWe must determine the source MDisk group. In Example 8-32 MDisk group ID 1 is thesource.Example 8-32 Listing the MDisk groups<strong>IBM</strong>_2145:SVCSTGDEMO:admin>svcinfo lsmdiskgrpid name status mdisk_count vdisk_count capacity extent_size free_capacity0 MDG_DS68 online 2 0 399.5GB 16 399.5GB1 Source online 1 1 50.0GB 256 45.0GBWe then must identify the VDisks that we are migrating. In Example 8-33 we filter by ID.Example 8-33 Filter VDisks by MDisk group<strong>IBM</strong>_2145:SVCSTGDEMO:admin>svcinfo lsvdisk -filtervalue mdisk_grp_id=1id name status mdisk_grp_id mdisk_grp_name capacity type5 migrateme online 1 Source_GRP 5.00GB stripedChapter 8. SVC migration with <strong>XIV</strong> 263
8.9.2 Create the MDisk groupWe must create volumes on the <strong>XIV</strong> <strong>and</strong> map them to the SVC cluster. Presuming that wehave done this, we then detect them on the SVC, as shown in Example 8-34.Example 8-34 Detecting new MDisks <strong>and</strong> creating an MDisk group<strong>IBM</strong>_2145:SVCSTGDEMO:admin>svctask detectmdisk<strong>IBM</strong>_2145:SVCSTGDEMO:admin>svcinfo lsmdiskc<strong>and</strong>idateid910111213<strong>IBM</strong>_2145:SVCSTGDEMO:admin>svcinfo lsmdisk -filtervalue mode=unmanagedid name status mode capacity ctrl_LUN_# controller_name9 mdisk9 online unmanaged 1520.0GB 0000000000000007 <strong>XIV</strong>10 mdisk10 online unmanaged 1520.0GB 0000000000000008 <strong>XIV</strong>11 mdisk11 online unmanaged 1520.0GB 0000000000000009 <strong>XIV</strong>12 mdisk12 online unmanaged 1520.0GB 000000000000000A <strong>XIV</strong>13 mdisk13 online unmanaged 1520.0GB 000000000000000B <strong>XIV</strong>We then create an MDisk group called <strong>XIV</strong>_Target using the new <strong>XIV</strong> MDisks (with the sameextent size as the source group, in this example 256), as shown in Example 8-35.Example 8-35 Creating an MDisk group<strong>IBM</strong>_2145:SVCSTGDEMO:admin>svctask mkmdiskgrp -name <strong>XIV</strong>_Target -mdisk 9:10:11:12:13 -ext 256MDisk Group, id [2], successfully createdWe confirm that the new MDisk group is present. In Example 8-36 we are filtering by usingthe new ID of 2.Example 8-36 Checking the newly created MDisk group<strong>IBM</strong>_2145:SVCSTGDEMO:admin>svcinfo lsmdiskgrp -filtervalue id=2id name status mdisk_count vdisk_count capacity extent_size free_capacity2 <strong>XIV</strong>_Target online 5 1 7600.0GB 256 7600.0GB8.9.3 Set up the IO group for mirroringThe IO group requires reserved memory for mirroring. First check to see whether this hasbeen done. In Example 8-37 it has not been setup yet on I/O group 0.Example 8-37 Checking the I/O group for mirroring<strong>IBM</strong>_2145:SVCSTGDEMO:admin>svcinfo lsiogrp 0id 0name io_grp0node_count 2vdisk_count 6host_count 2flash_copy_total_memory 20.0MBflash_copy_free_memory 20.0MBremote_copy_total_memory 20.0MB264 <strong>IBM</strong> <strong>XIV</strong> <strong>Storage</strong> <strong>System</strong>: <strong>Copy</strong> <strong>Services</strong> <strong>and</strong> <strong>Migration</strong>
emote_copy_free_memory 20.0MBmirroring_total_memory 0.0MBmirroring_free_memory 0.0MBWe must assign space for mirroring. Assigning 20 MB will support 40 TB of mirrors. InExample 8-38 we do this on I/O group 0 <strong>and</strong> confirm that it is done.Example 8-38 Setting up the I/O group for VDisk mirroring<strong>IBM</strong>_2145:SVCSTGDEMO:admin>svctask chiogrp -size 20 -feature mirror 0<strong>IBM</strong>_2145:SVCSTGDEMO:admin>svcinfo lsiogrp 0id 0name io_grp0node_count 2vdisk_count 6host_count 2flash_copy_total_memory 20.0MBflash_copy_free_memory 20.0MBremote_copy_total_memory 20.0MBremote_copy_free_memory 20.0MBmirroring_total_memory 20.0MBmirroring_free_memory 20.0MB8.9.4 Create the mirrorNow we create the mirror. In Example 8-39 we create a mirror copy of VDisk 5 into MDiskgroup 2. Remember Mdisk group 2 has a different extent size than Mdisk group 1.Example 8-39 Creating the VDisk mirror<strong>IBM</strong>_2145:SVCSTGDEMO:admin>svctask addvdiskcopy -mdiskgrp 2 5Vdisk [5] copy [1] successfully createdIn Example 8-40 we can see the two copies (<strong>and</strong> also that they are not yet in sync).Example 8-40 Monitoring mirroring progress<strong>IBM</strong>_2145:SVCSTGDEMO:admin>svcinfo lsvdiskcopy 5vdisk_id vdisk_name copy_id status sync primary mdisk_grp_id mdisk_grp_name capacity5 migrateme 0 online yes yes 1 SOURCE_GRP 5.00GB5 migrateme 1 online no no 2 <strong>XIV</strong>_Target 5.00GBIn Example 8-41 we display the progress percentage for a specific VDisk.Example 8-41 Checking the VDisk sync<strong>IBM</strong>_2145:SVCSTGDEMO:admin>svcinfo lsvdisksyncprogress 5vdisk_id vdisk_name copy_id progress estimated_completion_time5 migrateme 0 1005 migrateme 1 30 090831110818Chapter 8. SVC migration with <strong>XIV</strong> 265
In Example 8-42 we display the progress of all out-of-sync mirrors. If a mirror has reached100% it is not listed unless we specify that particular VDisk.Example 8-42 Displaying all VDisk mirrors<strong>IBM</strong>_2145:SVCCLUSTER_DC1:admin>svcinfo lsvdisksyncprogressvdisk_id vdisk_name copy_id progress estimated_completion_time21 arielle_8 1 42 09110519365624 mitchell_17 1 83 09110518543232 sharon_1 1 3 091106083130If copying is going too slowly, you could choose set a higher syncrate when you create thecopy.You can also increase the syncrate from the default value of 50 (which equals 2 MBps) to 100(which equals 64 MBps). This change affects the VDisk itself <strong>and</strong> isvalid for any future copies.Example 8-43 shows the syntax.Example 8-43 Changing the VDisk sync rate<strong>IBM</strong>_2145:SVCSTGDEMO:admin>svctask chvdisk -syncrate 100 5Once the estimated completion time passes, we can confirm that the copy process iscomplete for VDisk 5. In Example 8-44 the sync is complete.Example 8-44 VDisk sync completed<strong>IBM</strong>_2145:SVCSTGDEMO:admin>svcinfo lsvdisksyncprogress 5vdisk_id vdisk_name copy_id progress estimated_completion_time5 migrateme 0 1005 migrateme 1 1008.9.5 Validating a VDisk copyIf you want to confirm that the data between the two VDisk copies is the same, you can run avalidate. This compares the two copies. The comm<strong>and</strong> itself completes immediately, but thevalidate runs in the background. In Example 8-45 a validate against VDisk 5 is started <strong>and</strong>then monitored until it is complete. This validation step is not m<strong>and</strong>atory <strong>and</strong> is normally onlyneeded if an event occurred that makes you doubt the validity of the mirror. It is documentedhere in case you want to add an extra layer of certainty to your change.Example 8-45 Validating a VDisk mirror<strong>IBM</strong>_2145:SVCSTGDEMO:admin>svctask repairvdiskcopy -validate 5<strong>IBM</strong>_2145:SVCSTGDEMO:admin>svcinfo lsrepairvdiskcopyprogress 5vdisk_id vdisk_name copy_id task progress est_completion5 migrateme 0 validate 57 0911031559275 migrateme 1 validate 57 091103155927<strong>IBM</strong>_2145:SVCSTGDEMO:admin>svcinfo lsrepairvdiskcopyprogress 5vdisk_id vdisk_name copy_id task progress est_completion5 migrateme 05 migrateme 1266 <strong>IBM</strong> <strong>XIV</strong> <strong>Storage</strong> <strong>System</strong>: <strong>Copy</strong> <strong>Services</strong> <strong>and</strong> <strong>Migration</strong>
8.9.6 Removing the VDisk copyNow that the sync is complete, we can remove copy 0 from the VDisk so that the VDiskcontinues to use only copy 1 (which should be on the <strong>XIV</strong>). We have two methods ofachieving this. We can either split the copies or we can just remove one copy.Removing a VDisk copyIn Example 8-46, we remove copy 0 from VDisk 5. This effectively discards the VDisk copy onthe source MDisk group. This is simple <strong>and</strong> quick but has one disadvantage, which is that youmust mirror the data back if you decide to back out the change.Example 8-46 Removing VDisk copy<strong>IBM</strong>_2145:SVCSTGDEMO:admin>svctask rmvdiskcopy -copy 0 5Splitting the VDisk copiesIn Example 8-47 we split the VDisk copies, moving copy 0 (which is on the source MDiskgroup) to become a new unmapped VDisk. This means that copy 1 (which is on the target <strong>XIV</strong>MDisk group) continues to be accessed by the host as VDisk 5. The advantage of doing thisis that the original VDisk copy remains available if we decide to back out (although it may nolonger be in sync once we split the copies). An additional step is needed to discreetly deletethe new VDisk that was created when we performed the split.Example 8-47 Splitting the VDisk copies<strong>IBM</strong>_2145:SVCSTGDEMO:admin>svctask splitvdiskcopy -copy 0 -name mgrate_old 5Virtual Disk, id [6], successfully createdImportant: Scripts that use VDisk names or IDs should not be affected by the use of VDiskmirroring, as the VDisk names <strong>and</strong> IDs do not change. However, if you choose to split theVDisk copies <strong>and</strong> continue to use copy 0, it will be a totally new VDisk with a new name<strong>and</strong> a new ID.8.10 Using SVC migration with image modeThis process converts VDisks on non-<strong>XIV</strong> storage to image mode MDisks on the <strong>XIV</strong> that canthen be reassigned to a different SVC or released from the SVC altogether. Because of thisextra step, the <strong>XIV</strong> requires sufficient space to hold both transitional volumes (for image modeMDisks) <strong>and</strong> the final destination volumes (for managed mode MDisks).8.10.1 Create image mode destination volumes on the <strong>XIV</strong>On the <strong>XIV</strong> we must create one new volume for each SVC VDisk that we are migrating (whichmust be the same size as the source VDisk, or larger). These are to allow transition of theVDisk to image mode. To do this, we must determine the size of the VDisk so that we cancreate a matching <strong>XIV</strong> volume.Chapter 8. SVC migration with <strong>XIV</strong> 267
When an SVC volume is created we normally specify a size in GiB (binary GB). For instance,Example 8-48 creates a 10 GiB Vdisk in Mdisk group 1.Example 8-48 Create a transitional VDisksvctask mkvdisk -mdiskgrp 1 -iogrp 0 -name migrateme -size 10 -unit gbNow to make a matching <strong>XIV</strong> volume we can either make an <strong>XIV</strong> volume that is larger thanthe source VDisk or one that is exactly the same size. The easy solution is to create a largervolume. Because the <strong>XIV</strong> creates volumes in 16 GiB portions (that display in the GUI asrounded decimal 17 GB chunks), we could create a 17 GB LUN using the <strong>XIV</strong> <strong>and</strong> then mapit to the SVC (in this example the SVC host is defined by the <strong>XIV</strong> as svcstgdemo) <strong>and</strong> use thenext free LUN ID, which in Example 8-49 is LUN ID 12 (it is different every time).Example 8-49 <strong>XIV</strong> comm<strong>and</strong>s to create transitional volumesvol_create size=17 pool="SVC_MigratePool" vol="ImageMode"map_vol host="svcstgdemo" vol="ImageMode" lun="12"The drawback of using a larger volume size is that we eventually end up using extra space.So it is better to create a volume that is exactly the same size. To do this we must know thesize of the VDisk in bytes (by default the SVC shows the VDisk size in GiB, even though itsays GB). In Example 8-50 we first choose to display the size of the VDisk in GB.Example 8-50 Displaying a VDisk size in GB<strong>IBM</strong>_2145:SVCSTGDEMO:admin>svcinfo lsvdisk -filtervalue mdisk_grp_id=1id name status mdisk_grp_id mdisk_grp_name capacity6 migrateme online 1 MGR_MDSK_GRP 10.00GBExample 8-51 displays the size of the same VDisk in bytes.Example 8-51 Displaying a VDisk size in bytes<strong>IBM</strong>_2145:SVCSTGDEMO:admin>svcinfo lsvdisk -filtervalue mdisk_grp_id=1 -bytesid name status mdisk_grp_id mdisk_grp_name capacity6 migrateme online 1 MGR_MDSK_GRP 10737418240Now that we know the size of the source VDisk in bytes, we can divide this by 512 to get thesize in blocks (there are always 512 bytes in a st<strong>and</strong>ard SCSI block). 10,737,418,240 bytesdivided by 512 bytes per block is 20,971,520 blocks. This is the size that we use on the <strong>XIV</strong> tocreate our image mode transitional volume.Example 8-52 shows an XCLI comm<strong>and</strong> run on an <strong>XIV</strong> to create a volume using blocks.Example 8-52 Create an <strong>XIV</strong> volume using blocksvol_create size_blocks=20971520 pool="SVC_MigratePool" vol="ImageBlocks"268 <strong>IBM</strong> <strong>XIV</strong> <strong>Storage</strong> <strong>System</strong>: <strong>Copy</strong> <strong>Services</strong> <strong>and</strong> <strong>Migration</strong>
The <strong>XIV</strong> GUI volume creation panel is shown in Figure 8-5. (We must change the GBdrop-down to blocks.)Figure 8-5 Creating an <strong>XIV</strong> volume using blocksHaving created the volume, on the <strong>XIV</strong> we now map it to the SVC (using the <strong>XIV</strong> GUI orXCLI).Then, on the SVC, we can detect it as an unmanaged MDisk using the svctask detectmdiskcomm<strong>and</strong>.8.10.2 Migrate the VDisk to image modeWe now migrate the source VDisk to image mode using the MDisk that we created fortransition. These examples show an MDisk that is 16 GiB (17 GB on the <strong>XIV</strong> GUI). Thisexample also shows what will eventually happen if you do not exactly match sizes.In Example 8-53 we first identify the source VDisk number (by listing VDisks per MDiskgroup) <strong>and</strong> then identify the c<strong>and</strong>idate MDisk (by looking for unmanaged MDisks).Example 8-53 Identifying c<strong>and</strong>idates<strong>IBM</strong>_2145:SVCSTGDEMO:admin>svcinfo lsvdisk -filtervalue mdisk_grp_id=1id name status mdisk_grp_id mdisk_grp_name capacity5 migrateme online 1 MGR_MDSK_GRP 10.00GB<strong>IBM</strong>_2145:SVCSTGDEMO:admin>svcinfo lsmdisk -filtervalue mode=unmanagedid name status mode capacity ctrl_LUN_# controller_name9 mdisk9 online unmanaged 16.0GB 00000000000000C <strong>XIV</strong>In Example 8-53 we identified a source VDisk(5) sized 10 GiB <strong>and</strong> a target MDisk(9) sized16 GiB.Now we migrate the VDisk into image mode without changing MDisk groups (we stay ingroup 1, which is where the source VDisk is currently located). The target MDisk must beunmanaged to be able to do this. If we migrate to a different MDisk group, the extent size ofthe target group must be the same as the source group. The advantage of using the samegroup is simplicity, but it does mean that the MDisk group contains MDisks from two differentcontrollers (which is not the best option for normal operations). Example 8-54 shows thecomm<strong>and</strong> to start the migration.Example 8-54 Migrate a VDisk to image modesvctask migratetoimage -vdisk 5 -mdisk 9 -mdiskgrp 1Chapter 8. SVC migration with <strong>XIV</strong> 269
In Example 8-55, we monitor the migration <strong>and</strong> wait for it to complete (no response meansthat it is complete). We then confirm that the MDisk shows as in image mode <strong>and</strong> the VDiskshows as image type.Example 8-55 Monitoring the migration<strong>IBM</strong>_2145:SVCSTGDEMO:admin>svcinfo lsmigrate<strong>IBM</strong>_2145:SVCSTGDEMO:admin><strong>IBM</strong>_2145:SVCSTGDEMO:admin>svcinfo lsmdiskid name status mode mdisk_grp_id mdisk_grp_name capacity9 mdisk9 online image 1 MGR_MDSK_GRP 16.0GB<strong>IBM</strong>_2145:SVCSTGDEMO:admin>svcinfo lsvdiskid name status mdisk_grp_id mdisk_grp_name capacity type5 migrateme online 1 MGR_MDSK_GRP 10.00GB imageWe must confirm that the VDisk is in image mode or data loss will occur in the next step. Atthis point we must take an outage.8.10.3 Outage stepAt the SVC we un-map the volume (which disrupts the host) <strong>and</strong> then remove the VDisk. Atthe host we must have unmounted the volume (or shut down the host) to ensure that any datacached at the host has been flushed to the SVC. However, at the SVC itself, if there is stillwrite data in cache for this VDisk, then you will get a not empty message. You can checkwhether this is the case by displaying the fast_write_state for the VDisk with an svcinfolsvdisk comm<strong>and</strong>. You must wait for the data to flush out of cache, which may take severalminutes.The comm<strong>and</strong>s shown in Example 8-56 apply to a host whose Host ID is 2 <strong>and</strong> the VDisk IDis 5.Example 8-56 Removing the source VDisk<strong>IBM</strong>_2145:SVCSTGDEMO:admin>svctask rmvdiskhostmap -host 2 5<strong>IBM</strong>_2145:SVCSTGDEMO:admin>svctask rmvdisk 5<strong>IBM</strong>_2145:SVCSTGDEMO:admin>svcinfo lsmdiskid name status mode mdisk_grp_id mdisk_grp_name capacity9 mdisk9 online unmanaged 16.0GBThe MDisk is now unmanaged (even though it contains customer data) <strong>and</strong> could be mappedto a different SVC cluster or simply mapped directly to a non-SVC host.8.10.4 Bring the VDisk onlineWe now create a new managed disk group with an extent size of 1024, but no MDisks. Wecould have done this earlier, but it is a very quick step. In Example 8-57 we create MDiskgroup 2.Example 8-57 Creating a new MDisk group<strong>IBM</strong>_2145:SVCSTGDEMO:admin>svctask mkmdiskgrp -name image1024 -ext 1024MDisk Group, id [2], successfully created270 <strong>IBM</strong> <strong>XIV</strong> <strong>Storage</strong> <strong>System</strong>: <strong>Copy</strong> <strong>Services</strong> <strong>and</strong> <strong>Migration</strong>
We now use the unmanaged MDisk to create an image mode VDisk in the new MDisk group<strong>and</strong> map it to the relevant host. Notice in Example 8-58 that the host ID is 2 <strong>and</strong> the VDisknumber changed to 10.Example 8-58 Creating the image mode VDisk<strong>IBM</strong>_2145:SVC:admin>svctask mkvdisk -mdiskgrp 2 -iogrp 0 -vtype image -mdisk 9 -name migratedVirtual Disk, id [10], successfully created<strong>IBM</strong>_2145:SVC:admin>svctask mkvdiskhostmap -host 2 10Virtual Disk to Host map, id [2], successfully createdWe can now reboot the host (or scan for new disks) <strong>and</strong> the LUN will return with data intact.Important: The VDisk ID <strong>and</strong> VDisk names were both changed in this example. Scriptsthat use the VDisk name or ID (such as those used to automatically create flashcopies)must be changed to reflect the new name <strong>and</strong> ID.8.10.5 <strong>Migration</strong> from image mode to managed modeWe now must migrate the VDisks from image mode on individual image mode MDisks tostriped mode VDisks in a managed mode MDisk group.First we create a new managed disk group using volumes on the <strong>XIV</strong> intended to be used asthe final destination. In Example 8-59, five volumes, each 1632 GB, were created on the <strong>XIV</strong><strong>and</strong> mapped to the SVC. These are detected as 1520 GiB (because 1632 GB on the <strong>XIV</strong> GUIequals 1520 GiB on the SVC GUI). At a certain point the MDisks must also be renamed fromthe default names given by the SVC using the svctask chmdisk -name comm<strong>and</strong>.Example 8-59 Listing free MDisks<strong>IBM</strong>_2145:SVCSTGDEMO:admin>svcinfo lsmdisk -filtervalue mode=unmanagedid name status mode capacity ctrl_LUN_# controller14 mdisk14 online unmanaged 1520.0GB 0000000000000007 <strong>XIV</strong>15 mdisk15 online unmanaged 1520.0GB 0000000000000008 <strong>XIV</strong>16 mdisk16 online unmanaged 1520.0GB 0000000000000009 <strong>XIV</strong>17 mdisk17 online unmanaged 1520.0GB 000000000000000A <strong>XIV</strong>18 mdisk18 online unmanaged 1520.0GB 000000000000000B <strong>XIV</strong>We create a MDisk group using an extent size of 1024 MB with the five free MDisks. InExample 8-60 MDisk group 3 is created.Example 8-60 Creating target MDisk group<strong>IBM</strong>_2145:SVCSTGDEMO:admin>svctask mkmdiskgrp -name <strong>XIV</strong>_Target -mdisk 14:15:16:17:18 -ext 1024MDisk Group, id [3], successfully createdWe then migrate the image mode VDisk (in our case VDisk 5) into the new MDisk group (inour case group 3), as shown in Example 8-61.Example 8-61 Migrating the VDisk<strong>IBM</strong>_2145:SVCSTGDEMO:admin>svctask migratevdisk -mdiskgrp 3 -vdisk 5Chapter 8. SVC migration with <strong>XIV</strong> 271
The VDisk moves from being in image mode in MDisk group 1 to being in managed mode inMDisk group 3. Notice in Example 8-62 that it is now 16 GB instead of 10 GB. This is becausewe migrated it initially onto a 16 GB image mode MDisk. We should have created a 10 GBimage mode MDisk.Example 8-62 VDisk space usage<strong>IBM</strong>_2145:SVCSTGDEMO:admin>svcinfo lsvdiskid name status mdisk_grp_id mdisk_grp_name capacity5 migrated online 3 <strong>XIV</strong>_Target 16.00GBIn Example 8-63, we monitor the migration <strong>and</strong> wait for it to complete (no response meansthat it is complete).Example 8-63 Checking that the migrate is complete<strong>IBM</strong>_2145:SVCSTGDEMO:admin>svcinfo lsmigrate<strong>IBM</strong>_2145:SVCSTGDEMO:admin>We can clean up the transitional MDisk (which should now be unmanaged), as shown inExample 8-64.Example 8-64 Removing the transitional MDisks <strong>and</strong> MDisk groups<strong>IBM</strong>_2145:SVCSTGDEMO:admin>svctask rmmdisk -mdisk 9 2<strong>IBM</strong>_2145:SVCSTGDEMO:admin>svctask rmmdiskgrp 28.10.6 Remove image mode MDisksWe can then unmap <strong>and</strong> delete the transition volume on the <strong>XIV</strong> to free up the space <strong>and</strong>reuse that space for other migrations. The XCLI comm<strong>and</strong>s shown in Example 8-65 are runon the <strong>XIV</strong> (you can also use the <strong>XIV</strong> GUI).Example 8-65 Unmapping <strong>and</strong> deleting the transitional volumeunmap_vol host="svcstgdemo" vol="ImageMode"vol_delete vol="ImageMode"8.10.7 Use transitional space as managed spaceProvided that all volumes are migrated from non-<strong>XIV</strong> disk to <strong>XIV</strong> disks, we can now take thespace on the <strong>XIV</strong> that was reserved for the transitional image mode MDisks <strong>and</strong> create new1632 GB volumes to assign to the SVC. These volumes can be put into the existing MDiskgroup or a new MDisk group.8.10.8 Remove non-<strong>XIV</strong> MDisksThe non-<strong>XIV</strong> disk controllers MDisks still exist. We can remove these MDisks <strong>and</strong> their MDiskgroup. Then using the non-<strong>XIV</strong> disk interface we can un-map these LUNS from the SVC <strong>and</strong>reuse or remove the non-<strong>XIV</strong> disk controller.272 <strong>IBM</strong> <strong>XIV</strong> <strong>Storage</strong> <strong>System</strong>: <strong>Copy</strong> <strong>Services</strong> <strong>and</strong> <strong>Migration</strong>
8.11 Future configuration tasksThe section documents additional tasks that may be necessary after installation <strong>and</strong>migration is complete.8.11.1 Adding additional capacity to the <strong>XIV</strong>If <strong>and</strong> when additional capacity is added to a partially populated <strong>XIV</strong>, take the following steps:1. <strong>IBM</strong> adds the additional modules as a hardware upgrade (known as an MES). Theadditional capacity appears as free space once the <strong>IBM</strong> Service Representative hascompleted the process to equip these modules.Note: If the <strong>XIV</strong> has the Capacity on Dem<strong>and</strong> (CoD) feature, then no hardware changeor license key is necessary to use available capacity that has not yet been purchased.The customer simply starts using additional capacity as required until all availableusable space is allocated. The billing process to purchase this capacity occursafterwards.2. From the Pools section of the <strong>XIV</strong> GUI, right-click the relevant pool <strong>and</strong> resize it dependingon how the new capacity will be split between any pools. If all the space on the <strong>XIV</strong> isdedicated to a single SVC then there must be only one pool.3. From the Volumes by Pools section of the <strong>XIV</strong> GUI, add new volumes of 1632 GB until nomore volumes can be created. (There will be space left over, which can be used as scratchspace for testing <strong>and</strong> for non-SVC hosts.)4. From the Host section of the <strong>XIV</strong> GUI, map these new volumes to the relevant SVCcluster. This completes the <strong>XIV</strong> portion of the upgrade.5. From the SVC, detect <strong>and</strong> then add the new MDisks to the existing managed disk group.Alternatively, a new managed disk group could be created. Remember that every MDiskuses a different <strong>XIV</strong> host port, so a new MDisk group ideally contains several MDisks tospread the Fibre Channel traffic.6. If new volumes are added to an existing managed disk group, it may be desirable torebalance the existing extents across the new space.To explain why an extent rebalance may be desirable, the SVC uses one <strong>XIV</strong> host port as apreferred port for each MDisk. If a VDisk is striped across eight MDisks, then I/O from thatVDisk will be potentially striped across eight separate I/O ports on the <strong>XIV</strong>. If the space onthese eight MDisks is fully allocated, then when new capacity is added to the MDisk group,new VDisks will only be striped across the new MDisks. If additional capacity supplying onlytwo new MDisks is added, then I/O for VDisks striped across just those two MDisks is onlydirected to two host ports on the <strong>XIV</strong>. This means that the performance characteristics ofthese VDisks may be slightly different, despite the fact that all <strong>XIV</strong> volumes effectively havethe same back end disk performance. The extent rebalance script is located here:http://www.alphaworks.ibm.com/tech/svctools8.11.2 Using additional <strong>XIV</strong> host portsIf additional <strong>XIV</strong> host ports are zoned to an SVC, then the SVC automatically rebalances itspreferences across all available <strong>XIV</strong> host ports (provided that we do not exceed the currentSVC limit of 16 WWPNs per WWNN). Depending on the number of modules in an <strong>XIV</strong>, not allChapter 8. SVC migration with <strong>XIV</strong> 273
the additional Fibre Channel ports are active. However, they are enabled as more modulesare added.The suggested host port to capacity ratios are shown in Table 8-6.Table 8-6 <strong>XIV</strong> host port ratio as capacity growsTotal <strong>XIV</strong> modulesCapacity allocatedto one SVC cluster (TB)<strong>XIV</strong> host portszoned to one SVC cluster6 27 49 43 810 50 811 54 1012 61 1013 66 1214 73 1215 79 12To use additional <strong>XIV</strong> host ports, run a cable from the SAN switch to the <strong>XIV</strong> <strong>and</strong> attach to therelevant port on the <strong>XIV</strong> patch panel. Then zone the new <strong>XIV</strong> host port to the SVC cluster viathe SAN switch. No comm<strong>and</strong>s must be run on the <strong>XIV</strong>.8.12 Underst<strong>and</strong>ing the SVC controller path valuesIf you display the detailed description of a controller as seen by SVC, for each controller hostport you will see a path value. Because each MDisk has a preferred <strong>XIV</strong> host port, thepath_count is the number of MDisks using that port multiplied by the number of SVC nodes(commonly 2 or 4). In Example 8-66 the SVC cluster has two nodes <strong>and</strong> can access six <strong>XIV</strong>volumes (MDisks), so 6 volumes times 2 nodes means 12 paths. These 12 paths will bedistributed in a round-robin fashion across all accessible <strong>XIV</strong> host ports. Because in thisexample there are six <strong>XIV</strong> ports zoned to the SVC, there will be two paths per port.We can confirm is that the SVC is utilizing all six <strong>XIV</strong> interface modules. In Example 8-66 <strong>XIV</strong>interface modules 4 through 9 are all clearly zoned to the SVC (because the WWPN ending in71 is from <strong>XIV</strong> module 7, the module with WWPN ending in 61 is from <strong>XIV</strong> module 6, <strong>and</strong> soon. To decode the WWPNs use the process described in 8.3.2, “Determining <strong>XIV</strong> WWPNs”on page 247.Example 8-66 Path count as seen by SVC<strong>IBM</strong>_2145:SVCSTGDEMO:admin> svcinfo lscontroller 2id 2controller_name <strong>XIV</strong>WWNN 5001738000510000mdisk_link_count 6max_mdisk_link_count 12degraded novendor_id <strong>IBM</strong>product_id_low 2810<strong>XIV</strong>product_id_highLUN-0274 <strong>IBM</strong> <strong>XIV</strong> <strong>Storage</strong> <strong>System</strong>: <strong>Copy</strong> <strong>Services</strong> <strong>and</strong> <strong>Migration</strong>
product_revision 10.0ctrl_s/nallow_quorum yesWWPN 5001738000510171path_count 2max_path_count 2WWPN 5001738000510161path_count 2max_path_count 2WWPN 5001738000510182path_count 2max_path_count 2WWPN 5001738000510151path_count 2max_path_count 2WWPN 5001738000510141path_count 2max_path_count 2WWPN 5001738000510191path_count 2max_path_count 28.13 SVC with <strong>XIV</strong> implementation checklistTable 8-7 contains a checklist that can be used when implementing <strong>XIV</strong> behind SVC. Itpresumes that the <strong>XIV</strong> has already been installed by the <strong>IBM</strong> Service Representative.Table 8-7 <strong>XIV</strong> implementation checklistTasknumberCompleted?Where toperformTask1 SVC Increase SVC virtualization license if required.2 <strong>XIV</strong> Get <strong>XIV</strong> WWPNs.3 SVC Get SVC WWPNs.4 Fabric Zone <strong>XIV</strong> to SVC (one big zone).5 <strong>XIV</strong> Define the SVC cluster as a cluster.6 <strong>XIV</strong> Define the SVC nodes as hosts.7 <strong>XIV</strong> Add the SVC ports to the hosts.8 <strong>XIV</strong> Create a storage pool.9 <strong>XIV</strong> Create 1632 GB volumes in the pool.10 <strong>XIV</strong> Map the volumes to the SVC cluster.11 <strong>XIV</strong> Rename the <strong>XIV</strong>.12 SVC Detect the MDisk.13 SVC Rename the <strong>XIV</strong> controller.14 SVC Rename the <strong>XIV</strong> MDisks.Chapter 8. SVC migration with <strong>XIV</strong> 275
TasknumberCompleted?Where toperformTask15 SVC Create an MDisk group.16 SVC Relocate the quorum disks if necessary.17 SVC Identify VDisks to migrate.18 SVC Mirror or migrate your data to <strong>XIV</strong>.19 SVC Monitor migration.20 SVC Remove non-<strong>XIV</strong> MDisks.21 SVC Remove non-<strong>XIV</strong> MDisk group.22 Non-<strong>XIV</strong><strong>Storage</strong>Unmap LUNs from SVC.23 SAN Remove zone that connects SVC to non-<strong>XIV</strong>disk.24 SVC Clear 1630 error that will have been generatedby task 23 (unzoning non-<strong>XIV</strong> disk from SVC).276 <strong>IBM</strong> <strong>XIV</strong> <strong>Storage</strong> <strong>System</strong>: <strong>Copy</strong> <strong>Services</strong> <strong>and</strong> <strong>Migration</strong>
Related publicationsThe publications listed in this section are considered particularly suitable for a more detaileddiscussion of the topics covered in this book.<strong>IBM</strong> Redbooks publicationsFor information about ordering this publication, refer to “How to get <strong>IBM</strong> Redbookspublications” on page 278. This document might be available in softcopy only:► <strong>IBM</strong> <strong>XIV</strong> <strong>Storage</strong> <strong>System</strong>: Architecture, Implementation, <strong>and</strong> Usage, SG24-7659► Introduction to <strong>Storage</strong> Area Networks, SG24-5470Other publicationsThese publications are also relevant as further information sources:► <strong>IBM</strong> <strong>XIV</strong> <strong>Storage</strong> <strong>System</strong> Installation <strong>and</strong> Service Manual, GA32-0590► <strong>IBM</strong> <strong>XIV</strong> <strong>Storage</strong> <strong>System</strong> XCLI Manual, GC27-2213► <strong>IBM</strong> <strong>XIV</strong> <strong>Storage</strong> <strong>System</strong> Introduction <strong>and</strong> Theory of Operations, GC27-2214► <strong>IBM</strong> <strong>XIV</strong> <strong>Storage</strong> <strong>System</strong> Host <strong>System</strong>, GC27-2215► <strong>IBM</strong> <strong>XIV</strong> <strong>Storage</strong> <strong>System</strong> Model 2810 Installation Planning Guide, GC52-1327-01► <strong>IBM</strong> <strong>XIV</strong> <strong>Storage</strong> <strong>System</strong> Pre-Installation Network Planning Guide for CustomerConfiguration, GC52-1328-01► XCLI Reference Guide, GC27-2213-00► Host <strong>System</strong> Attachment Guide for Windows- Installation Guidehttp://publib.boulder.ibm.com/infocenter/ibmxiv/r2/index.jsp► The iSCSI User Guidehttp://download.microsoft.com/download/a/e/9/ae91dea1-66d9-417c-ade4-92d824b871af/uguide.doc► AIX 5L <strong>System</strong> Management Concepts: Operating <strong>System</strong> <strong>and</strong> Deviceshttp://publib16.boulder.ibm.com/pseries/en_US/aixbman/admnconc/hotplug_mgmt.htm#mpioconcepts► <strong>System</strong> Management Guide: Operating <strong>System</strong> <strong>and</strong> Devices for AIX 5Lhttp://publib16.boulder.ibm.com/pseries/en_US/aixbman/baseadmn/manage_mpio.htm► Host <strong>System</strong> Attachment Guide for Linux, which can be found at the <strong>XIV</strong> <strong>Storage</strong> <strong>System</strong>Information Centerhttp://publib.boulder.ibm.com/infocenter/ibmxiv/r2/index.jsp► Sun StorEdge Traffic Manager Software 4.4 Release Noteshttp://dlc.sun.com/pdf/819-5604-17/819-5604-17.pdf© <strong>Copy</strong>right <strong>IBM</strong> Corp. 2010. All rights reserved. 277
► Fibre Channel SAN Configuration Guidehttp://www.vmware.com/pdf/vi3_35/esx_3/r35u2/vi3_35_25_u2_san_cfg.pdf► Basic <strong>System</strong> Administration (VMware Guide)http://www.vmware.com/pdf/vi3_35/esx_3/r35u2/vi3_35_25_u2_admin_guide.pdf► Configuration of iSCSI initiators with VMware ESX 3.5 Update 2http://www.vmware.com/pdf/vi3_35/esx_3/r35u2/vi3_35_25_u2_iscsi_san_cfg.pdf► ESX Server 3 Configuration Guidehttp://www.vmware.com/pdf/vi3_35/esx_3/r35u2/vi3_35_25_u2_3_server_config.pdfOnline resourcesThese Web sites are also relevant as further information sources:► <strong>IBM</strong> <strong>XIV</strong> <strong>Storage</strong> Web sitehttp://www.ibm.com/systems/storage/disk/xiv/index.html► <strong>System</strong> <strong>Storage</strong> Interoperability Center (SSIC)http://www.ibm.com/systems/support/storage/config/ssic/index.jsp► <strong>Storage</strong> Networking Industry Association (SNIA) Web sitehttp://www.snia.org/► <strong>IBM</strong> Director Software Download Matrix pagehttp://www.ibm.com/systems/management/director/downloads.html► <strong>IBM</strong> Director documentationhttp://www.ibm.com/systems/management/director/How to get <strong>IBM</strong> Redbooks publicationsYou can search for, view, or download <strong>IBM</strong> Redbooks publications, Redpapers, Technotes,draft publications <strong>and</strong> Additional materials, as well as order hardcopy <strong>IBM</strong> Redbookspublications, at this Web site:ibm.com/redbooksHelp from <strong>IBM</strong><strong>IBM</strong> Support <strong>and</strong> downloadsibm.com/support<strong>IBM</strong> Global <strong>Services</strong>ibm.com/services278 <strong>IBM</strong> <strong>XIV</strong> <strong>Storage</strong> <strong>System</strong>: <strong>Copy</strong> <strong>Services</strong> <strong>and</strong> <strong>Migration</strong>
IndexSymbols_Define_Target_(Legacy 193_Pre-Data_<strong>Migration</strong>_Steps 196_Toc227991967 191_Toc227991968 191_Toc227991969 192_Toc227991970 193_Toc227991971 195_Toc227991972 196_Toc227991973 196_Toc227991974 197_Toc227991975 200_Toc227991976 201_Toc227991977 201_Toc227991978 202Aactivation states 81Active Directory 45Active/Active188active/active 187–189, 194, 218, 223active/cctive 188Active/Passive 189active/passive 187, 189, 191, 218, 223ADT 227–228application-consistent data 107, 109Asynchronous mirroring 71–75, 127, 149–150, 157, 159,169–170automatic deletion 6, 8, 21–23Bbackground copy 66, 187–188, 200, 208backup xi, 1, 6, 9backup script 34, 36Ccache 212c<strong>and</strong>idate MDisk 269Capacity on Dem<strong>and</strong> (CoD 246cctive/passive 189CG 72cg_list 31change role 77, 100, 134, 136, 142, 166clone 46cluster 195–196, 199, 201communication failure 111config_get 128Consistency Group 23consistency group 8, 24, 77, 92, 172add volume 93, 103, 132configuration 155create 23–24delete 32exp<strong>and</strong> 25given volume 172maximum number 112new snapshots 28other volumes 156remove volume 94, 104, 132, 159setup 130<strong>Storage</strong> Pool 24–25synchronization status 157, 172consistency group (CG) 7–8, 23–25, 27, 72, 76–77, 93,126–127, 130–132, 149consistent state 130copy functions xi, 1copy on write 5copy pairs 118<strong>Copy</strong>-on-Write 46coupling 72, 126crash consistency 94Create Mirror 126Create Slave 127DD3000 227data corruption protection 110Data <strong>Migration</strong> 185–187, 193target 187data migration xi, 1, 118, 185–187back-out 200, 219–220checklist 220monitoring 208object 197–200, 207steps 190, 201, 218–219synchronization 201Data <strong>Migration</strong> (DM) volume 197Data Protection for Exchange Server 55deactivation 111define connections 119delete snapshot 6, 19deletion priority 6, 8, 11–13dependent writes 94designation 77Destination Name 198, 207Destination Pool 198, 207detectmdisk 257, 262, 264Device Manager 211Disaster Recovery 133, 169Disaster Recovery (DR) 72, 75, 77, 133, 136, 149, 173,179Disaster Recovery protection 110diskpart 215dm_list 200, 203DR test 100, 109, 134© <strong>Copy</strong>right <strong>IBM</strong> Corp. 2010. All rights reserved. 279
DR testingGUI steps 179DS4000 190, 192, 195, 227DS5000 227DS6000 189, 230DS8000 189, 230–231DSMagent 60duplicate 6, 9–10Duplicate Snapshot 6, 8–10, 110duplicate snapshot 6, 9, 11creation date 6, 10–11creation time 6Eenvironment variables 205–206ESS 189, 195, 207, 229Ethernet 113Ethernet switch 176event log 211, 227Exchange Server 45extent size 252–254new managed disk group 261Ffail-over 188–189, 218failure 72fan-in 89fan-out 89fc_port_config 117fc_port_list 113, 117Fibre Channel 113Fibre Channel (FC) 71, 86, 91Fibre Channel ports 91, 116, 176FLASHCOPYMANAGER 59GGiB 250–252Graphical User InterfaceRemote Mirroring performance statistics 112Graphical User Interface (GUI) 8, 11, 91, 113GUI example 176GUI step 178HHost Attachment Kit 58Host Attachment Procedure 197host server 186–187, 201I/O requests 187host_add_port host 256I<strong>IBM</strong> Tivoli <strong>Storage</strong> Flash<strong>Copy</strong> Manager 41<strong>IBM</strong> Tivoli <strong>Storage</strong> Manager V6 42<strong>IBM</strong> <strong>XIV</strong>data migration solution 186storage 187image mode 245, 252, 260, 267<strong>Migration</strong> 271SVC migration 267initialization 78, 97initialization rate 90, 209–210initializing state 129initiator 113–114, 116, 186, 189, 191Instant Restore 63Instant Restore (IR) 62interval 73IO group 264ipinterface_list 113–114iSCSI 113iSCSI ports 91KKB 5Keep Source Updated 188, 199, 208Llast consistent snapshot 136timestamp 137last_consistent 135last_replicated 100last_replicated snapshot 100–101, 157, 167–168, 172Level 1.0 58–60license 258, 273, 275linkfailure 136link failure 169link status 79link utilization 79Linux x86 192, 230local site 72, 79, 88, 127–128, 133, 166, 170, 181Master volumes 138old Master volumes 138lock Snapshot 35Logical Unit Number (LUN) 77, 92LUN ID 187, 197–198, 200LUN mapping 197LUN numbering 192, 223LUN0 192, 195, 221, 223MMachinePool Editor 51managed mode 267, 271–272map_vol host 268Master 72, 77Master peer 78, 107–108, 133, 151, 168master peeractual data 108Deactivate <strong>XIV</strong> remote mirroring 108remote mirroring 108<strong>XIV</strong> remote mirroring 108Master role 74, 76–77, 96, 126, 133–134, 136, 161, 166Master volume 5, 10, 15–16, 73, 78, 81, 101, 132,134–136, 167–168periodic consistent copies 171master volume 5, 9, 14280 <strong>IBM</strong> <strong>XIV</strong> <strong>Storage</strong> <strong>System</strong>: <strong>Copy</strong> <strong>Services</strong> <strong>and</strong> <strong>Migration</strong>
actual data 98additional Snapshot 110Changing role 101Deactivate <strong>XIV</strong> remote mirroring 109, 111duplicate snapshot 9, 20identical copy 80Reactivate <strong>XIV</strong> remote mirroring 111<strong>XIV</strong> remote mirroring 104max_initialization_rate 209–211max_resync_rate 209–210max_syncjob_rate 209–210MDisk 249, 251MDisk group 252–254free capacity 255image mode VDisk 271MDisks 245, 249–250metadata 5, 10, 100Microsoft Excel 223Microsoft Exchange Server 46Microsoft SQL Server 46Microsoft Volume Shadow <strong>Copy</strong> <strong>Services</strong> (VSS) 41migrationspeed 189, 208Mirrorinitialization 78ongoing operation 78mirroractivation 97delete 106reactivation 102resynchronization 102Mirror coupling 92, 96deactivate 99mirror coupling 97mirror_activate 145mirror_change_role 140mirror_create_snapshot 72mirror_lis 129mirror_list 145, 147mirror_list comm<strong>and</strong> 129–130mirror_statistics_get 112mirrored Cgmirrored volume 105Mirrored consistency groupmirrored volume 104Mirroringstatistics 112status 79mirroringactivation 126setup 126target 86mirroring schemes 75most_recent 100most_recent Snapshot 159, 169–170, 172MSCS Cluster 199Multipathing 223–225, 230MySQL 31–32, 34NN10116 45naming convention 9no source updating 187–188normal operation 87, 91, 133, 169data flow 91OOK button 13–14ongoing operation 78Open Office 223operating system (OS) 46–47, 51, 68, 70original data 46exact read-only copy 46full copy 46original snapshot 6, 9, 12duplicate snapshot points 6mirror copy 21Ppeer 72, 76designations 77role 77pointer 5, 15, 34Point-in-Time (PIT) 74Point-in-Time (PiT) 74point-in-time copy 196port configuration 115port role 117portperfshow 211ports 116, 176power loss consistency 94Primary 72, 77, 96Primary siteFailure 107primary site 78, 101, 103, 107, 131, 133, 156, 161, 166,170full initialization 170Master volumes 142–143Master volumes/CG, servers 169production activities 169production server 147Role changeover 142–143primary system 114, 117source volumes 169Primary <strong>XIV</strong> 74, 81, 122, 155primary <strong>XIV</strong>Master volume 147Mirror statuses 130, 145original direction 136Remote Mirroring menu 147Slave volumes 142–143provider 41, 46Qqueue depth 249, 251quiesce 47Index 281
RRDAC 227–228reactivation 111Recovery Point Objective (RPO) 73, 149Redbooks Web siteContact us xivRedHat 192, 231redirect on write 5, 22, 66redirect-on-write 47Remote Mirror 33, 71–72, 113–114activate 144remote mirror pair 198Remote Mirroring 8, 23, 71–73, 80, 125–126, 129, 132,159actions 86activate 155delete 165function 113implementation 113planning 111usage 82remote mirroring 116consistency groups 72, 112Fibre channel paths 113first step 81single unit 96synchronous 125<strong>XIV</strong> systems 86remote site 71–72, 78, 127, 133, 137, 166, 170, 177, 181secondary peers 103Slave volumes 138st<strong>and</strong>by server 137requestor 45, 47resize 113, 208, 214–215resize operation 66Resynchronization 102, 107, 136resynchronization 136, 169role 72, 76–77, 100change 78switching 78role reversal 166RPO 73, 153, 162RPO_Lagging 81, 161RPO_OK 81SSAN boot 68, 186SAN connectivit 113schedule 150, 162schedule interval 73Schedule Management 151schedule_create schedule 154, 163SCSI initiator 191SDDPCM 237Secondary 72, 77secondary site 131–135, 156, 166, 169–170mirror relation 137remote mirroring 134Role changeover 139–140secondary <strong>XIV</strong> 72–73, 81, 128, 136, 155, 161corresponding consistency group 155Mirror statuses 130, 145Slave volume 147service 45shadow copy 44persistent information 45single <strong>XIV</strong>footprint 253rack 253<strong>Storage</strong> Pool 92system 82, 85, 89Slave 72, 77Slave peer 74, 100, 132–133, 136, 151–152, 161slave peerconsistent data 74Slave Pool 127Slave role 73, 96, 126, 134–136, 167, 179–181Slave volume 76–79, 81, 127, 129, 132–133, 150, 152Changing role 100consistent state 77whole group 77snap_group 31, 37snap_group_duplicate 178Snapshotautomatic deletion 6, 8, 21creation 8, 31deletion priority 6, 11–12details 31duplicate 6, 9–10last_consistent 135last_replicated 172lock 35most_recent 172restore 37–38size 31snapshot 1, 5delete 6, 19duplicate 6, 9–10last consistent 136locked 6, 9naming convention 9snapshot group 28, 30snapshot volume 4–5, 7, 16, 46, 56snapshot_delete 20Snapshot/volume copy 109SNMP traps 112Source LUN 198, 208, 217source MDisk groupextent size 259Image Mode MDisks 261Source Target <strong>System</strong> 198, 207source updating 187–188, 201, 219source updating option 187SQL Server 45SqlServerWriter 46st<strong>and</strong>by 128state 77consistent 130initializing 129282 <strong>IBM</strong> <strong>XIV</strong> <strong>Storage</strong> <strong>System</strong>: <strong>Copy</strong> <strong>Services</strong> <strong>and</strong> <strong>Migration</strong>
<strong>Storage</strong> Pool 6, 10, 21additional allocations 21<strong>Storage</strong> poolconsistency group 94different CG 93existing volumes 94storage pool 93, 127, 130, 132, 155, 157, 275storage system 133, 170, 185–186, 188storageadmin 50SuSE 192SVC 243–245firmware version 244, 254, 260MDisk group 252, 259, 261mirror 245, 265quorum disk 253zone 245zoning 245SVC cluster 244–246svcinfo lsmdisk 251–253svctask 254–255, 257svctask chlicense 258switch role 134switch roles 103switch_role 77sync job 72–74, 150–151, 159, 161most_recent snapshot 172schedule 150Sync Type 127Synchronised 187synchronization 201, 209rate 90status 80Synchronized 130synchronized 204, 209, 218synchronous 71Synchronous Mirror 166synchronous mirroring 73syncrate 266Ttarget 86, 114–115, 187–189, 195Target <strong>System</strong> 127target volume 66, 69, 127–128, 137, 165target_config_sync_rates 90target_config_sync_rates. 102target_list 203, 210tdpexcc 58Test Data <strong>Migration</strong> 199–200, 204, 208the 107thick to thin migration 212thin provisioning 212Tivoli <strong>Storage</strong> Flash<strong>Copy</strong> Manager 41–43detailed information 63prerequesites 53wizard 52<strong>XIV</strong> VSS Provider 41–42Tivoli <strong>Storage</strong> Manager (TSM) 43, 58Tivoli <strong>Storage</strong> Manager for Advanced <strong>Copy</strong> <strong>Services</strong> 43TPC (Tivoli <strong>Storage</strong> Productivity Centre) 245transfer rate 209TSM Client Agent 59VVDisk 245, 250, 252progress percentage 265striping 250VDisk 5copy 0 267VDisk copy 260, 266VDisks 245, 252, 254virtualization license 258virtualization license limit 258, 273, 275VMware 68–69VMware ESX 278VMware File <strong>System</strong> (VMFS) 68vol_copy 68vol_lock 19volumeresize 113Volume <strong>Copy</strong> 65, 68OS image 68volume copy 1, 66, 68, 109volume mirrorcoupling 97–99, 104setup 151Volume Shadow <strong>Copy</strong> <strong>Services</strong> (VSS) 44VSS 41, 44provider 41, 46requestor 45service 45writer 45VSS architecture 45vssadmin 51Wwrite access 100writer 45, 47WWPN 192–193, 195, 203, 216, 245, 247XXCLI 10, 12–13, 90–91, 112–113, 116, 126, 128, 130,150, 154, 159XCLI comm<strong>and</strong> 72, 102, 117, 128, 154, 178, 245, 247,268XCLI example 122XCLI session 10, 12, 15, 128, 140, 143, 154<strong>XIV</strong> 1, 5, 41–42, 44, 71–73, 149–151, 243–245end disk controllers 243<strong>XIV</strong> 1 104, 108additional Master Volume 104available, deactivate mirrors 107Complete destruction 108complete destruction 108Deactivate mirror 107Map Master peers 108Master consistency group 104Master peer 109production data 110Index 283
emote mirroring peers 110remote targets 108Slave peer 108Slave volume 108volume copy 110<strong>XIV</strong> remote mirroring 108–109<strong>XIV</strong> system 107, 110<strong>XIV</strong> systems 110–111<strong>XIV</strong> 2 104, 107additional Slave volume 104consistency group 104Disaster Recovery testing 109DR servers 108other functions 109production applications 107production changes 107production workload 107–108Slave peer 108Slave volume 104, 109, 111Unmap Master peers 108<strong>XIV</strong> asynchronous mirroring 74, 83–84, 97–98, 149<strong>XIV</strong> Comm<strong>and</strong> Line Interface (XCLI) 202<strong>XIV</strong> GUI 76, 79, 126, 150, 244, 247–248Host section 273Pools section 273<strong>XIV</strong> host port 248–249, 251<strong>XIV</strong> mirroring 84, 86, 91–92, 98, 100, 102Advantages 112<strong>XIV</strong> remote mirroring 82–83, 85normal operation 107–109Planned deactivation 100user deactivation 111<strong>XIV</strong> <strong>Storage</strong><strong>System</strong> xi, 1, 5, 71, 113, 185–186, 243<strong>XIV</strong> <strong>Storage</strong> <strong>System</strong> 46–47, 65–67, 72, 93, 112primary IP address 50snapshot operations 52<strong>XIV</strong> subsystem 5–6<strong>XIV</strong> system 2, 73–75, 150, 152, 154available disk drives 92available physical disk drives 93mirroring connections 111planned outage 82same number 91single <strong>Storage</strong> Pool 96<strong>XIV</strong> mirroring target 86<strong>XIV</strong> Snapshot function 85<strong>XIV</strong> volume 68–69, 78, 92, 104, 149, 250–252<strong>XIV</strong> VSS Providerconfiguration 49<strong>XIV</strong> VSS provider 41, 47xiv_devlist 238<strong>XIV</strong>PCM 237Zzoning 190–192, 197, 216284 <strong>IBM</strong> <strong>XIV</strong> <strong>Storage</strong> <strong>System</strong>: <strong>Copy</strong> <strong>Services</strong> <strong>and</strong> <strong>Migration</strong>
<strong>IBM</strong> <strong>XIV</strong> <strong>Storage</strong> <strong>System</strong>: <strong>Copy</strong><strong>Services</strong> <strong>and</strong> <strong>Migration</strong><strong>IBM</strong> <strong>XIV</strong> <strong>Storage</strong> <strong>System</strong>: <strong>Copy</strong><strong>Services</strong> <strong>and</strong> <strong>Migration</strong><strong>IBM</strong> <strong>XIV</strong> <strong>Storage</strong> <strong>System</strong>: <strong>Copy</strong> <strong>Services</strong> <strong>and</strong> <strong>Migration</strong><strong>IBM</strong> <strong>XIV</strong> <strong>Storage</strong> <strong>System</strong>: <strong>Copy</strong> <strong>Services</strong> <strong>and</strong> <strong>Migration</strong>
<strong>IBM</strong> <strong>XIV</strong> <strong>Storage</strong> <strong>System</strong>: <strong>Copy</strong><strong>Services</strong> <strong>and</strong> <strong>Migration</strong><strong>IBM</strong> <strong>XIV</strong> <strong>Storage</strong> <strong>System</strong>: <strong>Copy</strong><strong>Services</strong> <strong>and</strong> <strong>Migration</strong>
Back cover®<strong>IBM</strong> <strong>XIV</strong> <strong>Storage</strong> <strong>System</strong>:<strong>Copy</strong> <strong>Services</strong> <strong>and</strong><strong>Migration</strong>®Learn copy <strong>and</strong>migration functions<strong>and</strong> explore practicalscenariosIntegrate Snapshotswith Tivoli Flash<strong>Copy</strong>ManagerUnderts<strong>and</strong>SVC-basedmigrationsThis <strong>IBM</strong> Redbooks publication provides a practical underst<strong>and</strong>ing ofthe <strong>XIV</strong> <strong>Storage</strong> <strong>System</strong> copy <strong>and</strong> migration functions. The <strong>XIV</strong> <strong>Storage</strong><strong>System</strong> has a rich set of copy functions suited for various dataprotection scenarios, which enables clients to enhance their businesscontinuance, data migration, <strong>and</strong> online backup solutions. Thesefunctions allow point-in-time copies, known as snapshots <strong>and</strong> fullvolume copies, <strong>and</strong> also include remote copy capabilities in eithersynchronous or asynchronous mode. These functions are included inthe <strong>XIV</strong> software, <strong>and</strong> all their features are available at no additionalcharge.The various copy functions are reviewed under separate chapters thatinclude detailed information about usage as well as practicalillustrations.This book also discusses how to integrate the snapshot function with<strong>IBM</strong> Tivoli Flash<strong>Copy</strong> manager, explains the <strong>XIV</strong> built-in migrationcapability, <strong>and</strong> presents migration alternatives based on the SanVolume Controller (SVC).INTERNATIONALTECHNICALSUPPORTORGANIZATIONBUILDING TECHNICALINFORMATION BASED ONPRACTICAL EXPERIENCE<strong>IBM</strong> Redbooks are developedby the <strong>IBM</strong> InternationalTechnical SupportOrganization. Experts from<strong>IBM</strong>, Customers <strong>and</strong> Partnersfrom around the world createtimely technical informationbased on realistic scenarios.Specific recommendationsare provided to help youimplement IT solutions moreeffectively in yourenvironment.For more information:ibm.com/redbooksSG24-7759-00 ISBN 0738434221