espejo retrovisor interior con cómpas y homelink - Cherod.com
espejo retrovisor interior con cómpas y homelink - Cherod.com
espejo retrovisor interior con cómpas y homelink - Cherod.com
- No tags were found...

You also want an ePaper? Increase the reach of your titles
YUMPU automatically turns print PDFs into web optimized ePapers that Google loves.
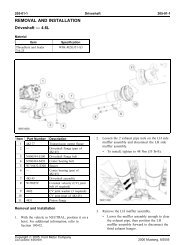
USEFKIT - MIRROR, REAR VIEW INSIDE WITHCOMPASS & HOMELINK ®NOTE: This accessory can be installedon any passenger car or light truck.JUEGO - ESPEJO RETROVISOR INTERIORCON CÓMPAS Y HOMELINK ®AVISO: Este accesorio puede estar instaladoen cualquier automóvil o camión ligero.NÉCESSAIRE - RÉTROVISEUR INTÉRIEURAVEC BOSSOLE ET HOMELINK ®A NOTER: Cet accessoire peut étre installe surtoute voiture de tourisme ou camionnette.Subject to alteration without noticeSous reserve de modificaciones techniquesReservadas modificaciones tecnicasPERSONAL INJURYLESIONES PERSONALESRISQUE DE BLESSUREVEHICLE DAMAGEDAÑO DE VEHíCULODOMMAGE AU VÉHICLULEINCORRECTINCORRECTOINCORRECTCORRECTCORRECTOCORRECTSEE MANUALVER MANUALVOIR LE MANUELA B C DEFTOOLS REQUIREDHERRAMIENTAS NECESARIASOUTILS NÉCESSAIRES8mm10mmFor parts and warrantyinformation, <strong>con</strong>tactGentex Corp. (616) 772-1800A fin de obtener informaciónsobre las piezas y la garantía,pongase en <strong>con</strong>tacto <strong>con</strong>Gentex Corp. (616)772-1800Pour toute demanded’information sur les píéceset la garantíe, <strong>con</strong>tacterGentex Corp. (616)772-18001 / 134L3Z-17700-AASK4L3J-17A694-AACOPYRIGHT FORD© March 9 ‘04550-0290 Rev. A
12 3A4 NOTE: Apply equal force downwardand against windshield during installationAuntil an audible click is heard.AVISO: Aplique igual fuerza hacia abajoy <strong>con</strong>tra el parabrisas durante lainstalación hasta que se escuche unclick claro y audible.A NOTER: En cours d’installation appuyerd’une manière égale vers le bas et<strong>con</strong>tre le pare-brise jusqu’a entendre unclic sonore.2 / 134L3Z-17700-AASK4L3J-17A694-AACOPYRIGHT FORD© March 9 ‘04550-0290 Rev. A
5NOTE: Ensure mirror is securelyattached to windshield button byadjusting mirror in a normalup/down and side-to-side fashion.AVISO: Asegúrese de que el <strong>espejo</strong>esté bien fijado al botón del parabrisasmediante el ajuste del <strong>espejo</strong> de unamanera normal de arriba hacia abajoy de lado a lado.A NOTER: S’assurer que le rétroviseursoit bien attaché sur son support enl’ajustant de haut en bas et latéralemente<strong>com</strong>me en <strong>con</strong>duite normale.A6 7BA83 / 134L3Z-17700-AASK4L3J-17A694-AACOPYRIGHT FORD© March 9 ‘04550-0290 Rev. A
910NOTE: Use appropriate sizewindshield wire cover suppliedwith kit.AVISO: Use el tamaño aproiadode cubierta de cable delparabrisas que se suministra<strong>con</strong> el juego.A NOTER: Utiliser le couvre filsur pare-brise, fourni avec cenécessaire, de taille approprié.11 12E+COPPERCOBRECUIVRE-+COPPERCOBRECUIVRESILVERPLATAARGENTBLACK WIRE WITH WHITE STRIPEALAMBRE NEGRO CON RAYA BLANCAFIL NOIR AVEC DES RAYURES BLANCHESBLACK WIREALAMBRE NEGROFIL NOIRAB13DBLACK WIRE WITH WHITE STRIPEALAMBRE NEGRO CON RAYA BLANCAFIL NOIR AVEC DES RAYURES BLANCHESBLACK WIREALAMBRE NEGROFIL NOIRNOTE: Use appropriate size female terminal according tovehicle application.AVISO: Use las terminales hembra apropiadas de acuerdoa la aplicación del vehículo.A NOTER: Utiliser une borne femelle appropriée pourl’utilisation du véhicule.4 / 134L3Z-17700-AASK4L3J-17A694-AACOPYRIGHT FORD© March 9 ‘04550-0290 Rev. A
14–GROUNDCONEXION A TIERRAMASSENOTE: Secure wire to a suitablechassis ground.AVISO: Asegure el cable a la<strong>con</strong>exión a tierra adecuada.A NOTER: Mettre le fil à unemasse carrosserie adéquate.1516NOTE: Select fuse with power only whenignition is on.AVISO: Elija el fusible que esté encendidosolamente cuando la ignición está funcionando.A NOTER: Choisir une fuse avec courantseulement lorsque I’ allumage est ouvert.NOTE: Use appropriate size fusetap according to vehicle application.AVISO: Use el tamañ apropiado demacho de fusible de acuerdo <strong>con</strong>la aplicación del vehículo.A NOTER: Selon le véhicule,utiliser un adapteursur fusible detaille approprié.17BLACK WIRE WITH WHITE STRIPEALAMBRE NEGRO CON RAYA BLANCAFIL NOIR AVEC DES RAYURES BLANCHES5 / 134L3Z-17700-AASK4L3J-17A694-AACOPYRIGHT FORD© March 9 ‘04550-0290 Rev. A
181920NOTE: Select fuse with all time power.AVISO: Elija el fusible <strong>con</strong> corriente<strong>con</strong>stante.A NOTER: Choisir le fusible avec courantpermanent.21 NOTE: Use appropriate size fuse22tap according to vehicle application.AVISO: Use el tamañ apropiado demacho de fusible de acuerdo <strong>con</strong>la aplicación del vehículo.A NOTER: Selon le véhicule,utiliser n adapteursur fusible detaille approprié.BLACK WIREALAMBRE NEGROFIL NOIR6 / 134L3Z-17700-AASK4L3J-17A694-AACOPYRIGHT FORD© March 9 ‘04550-0290 Rev. A
2324257 / 134L3Z-17700-AASK4L3J-17A694-AACOPYRIGHT FORD© March 9 ‘04550-0290 Rev. A
26NOTE: Determine the approximate<strong>com</strong>pass zone.AVISO: Determine la zona aproximadade brújula.A NOTER: Déterminer la zoned’utilisation approximative de laboussole.8 / 134L3Z-17700-AASK4L3J-17A694-AACOPYRIGHT FORD© March 9 ‘04550-0290 Rev. A
27NOTE: Determine the approximate<strong>com</strong>pass zone.AVISO: Determine la zona aproximadade brújula.A NOTER: Déterminer la zoned’utilisation approximative de laboussole.9 / 134L3Z-17700-AASK4L3J-17A694-AACOPYRIGHT FORD© March 9 ‘04550-0290 Rev. A
28NOTE: Determine the approximate<strong>com</strong>pass zone.AVISO: Determine la zona aproximadade brújula.A NOTER: Déterminer la zoned’utilisation approximative de laboussole.10 / 134L3Z-17700-AASK4L3J-17A694-AACOPYRIGHT FORD© March 9 ‘04550-0290 Rev. A
29NOTE: Determine the approximate<strong>com</strong>pass zone.AVISO: Determine la zona aproximadade brújula.A NOTER: Déterminer la zoned’utilisation approximative de laboussole.11 / 134L3Z-17700-AASK4L3J-17A694-AACOPYRIGHT FORD© March 9 ‘04550-0290 Rev. A
30NOTE: Depress “COMP” button until“8” appears and release. Then, depressbutton again until applicable <strong>com</strong>passzone number appears and release.Display should then return to “C”.31AVISO: Oprima el botón de “COMP”hasta que aparezca “8” y libérelo.Luego, oprima nuevamente el botónde “COMP” hasta que aparezca elnúmero de la zona de brújulacorrespondiente y libérelo. Lavisualización debrá regresar entoncesa “C”.A NOTER: Appuyer sur le bouton“COMP” jusqu’à ce que le numéro “8”apparaisse et relåcher. Ensuite, appuyerde nouveau sur le bouton “COMP” jusqu’àce que le numéro de zone d’utilisationadéquate apparaisse et relåacher. L’écrandoit alors réafficher “C”.32NOTE: Turn ignition key to OFF position.Push each HomeLink ® ( ) switchone at a time and verify that LED indicatorto the left of the center switch <strong>com</strong>es onwith a RED LED. Testing is now <strong>com</strong>plete.AVISO: Gire la Uave de encender a laposición “OFF.”Oprima cada interruptor “HomeLink” unoa la vez y verifique que el indicador “LED”a la izquierda del interruptor del centro seprenda <strong>con</strong> “RED LED”. La prueba está<strong>com</strong>pleta.REDLEDA NOTER: Tourner la el’e a` la positionOFF Pour enfoncer les chevilles, il fauttourner le bouton de blocage vers le haut.Pousser le bouton Homelink l’un apr`esl’autre et s’assurer que l’indicateur LED a`gauche du bouton du mìlieu indique LEDRED. La ve’rification est ainsi termin’ee.12 / 134L3Z-17700-AASK4L3J-17A694-AACOPYRIGHT FORD© March 9 ‘04550-0290 Rev. A