2009 Getting to Know Your Solstice - Cherod.com
2009 Getting to Know Your Solstice - Cherod.com
2009 Getting to Know Your Solstice - Cherod.com
- No tags were found...

You also want an ePaper? Increase the reach of your titles
YUMPU automatically turns print PDFs into web optimized ePapers that Google loves.
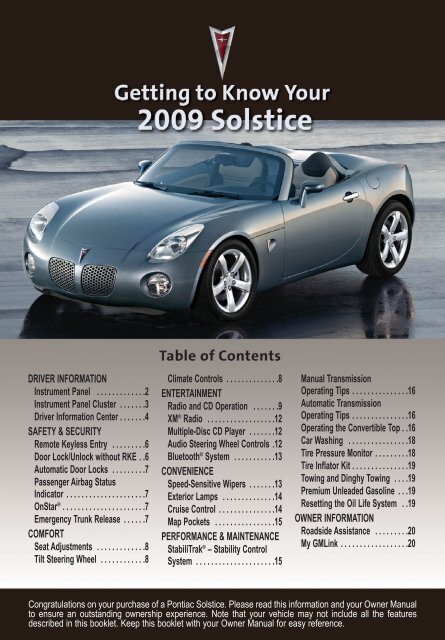
DRIVER INFORMATIONInstrument Panel . . . . . . . . . . . . .2Instrument Panel Cluster . . . . . . .3Driver Information Center . . . . . . .4SAFETY & SECURITYRemote Keyless Entry . . . . . . . . .6Door Lock/Unlock without RKE . .6Au<strong>to</strong>matic Door Locks . . . . . . . . .7Passenger Airbag StatusIndica<strong>to</strong>r . . . . . . . . . . . . . . . . . . . . .7OnStar ® . . . . . . . . . . . . . . . . . . . . . .7Emergency Trunk Release . . . . . .7COMFORTSeat Adjustments . . . . . . . . . . . . .8Tilt Steering Wheel . . . . . . . . . . . .8Climate Controls . . . . . . . . . . . . . .8ENTERTAINMENTRadio and CD Operation . . . . . . .9XM ® Radio . . . . . . . . . . . . . . . . . .12Multiple-Disc CD Player . . . . . . .12Audio Steering Wheel Controls .12Blue<strong>to</strong>oth ® System . . . . . . . . . . .13CONVENIENCESpeed-Sensitive Wipers . . . . . . .13Exterior Lamps . . . . . . . . . . . . . .14Cruise Control . . . . . . . . . . . . . . .14Map Pockets . . . . . . . . . . . . . . . .15PERFORMANCE & MAINTENANCEStabiliTrak ® – Stability ControlSystem . . . . . . . . . . . . . . . . . . . . .15Manual TransmissionOperating Tips . . . . . . . . . . . . . . .16Au<strong>to</strong>matic TransmissionOperating Tips . . . . . . . . . . . . . . .16Operating the Convertible Top . .16Car Washing . . . . . . . . . . . . . . . .18Tire Pressure Moni<strong>to</strong>r . . . . . . . . .18Tire Infla<strong>to</strong>r Kit . . . . . . . . . . . . . . .19Towing and Dinghy Towing . . . .19Premium Unleaded Gasoline . . .19Resetting the Oil Life System . .19OWNER INFORMATIONRoadside Assistance . . . . . . . . .20My GMLink . . . . . . . . . . . . . . . . . .20Congratulations on your purchase of a Pontiac <strong>Solstice</strong>. Please read this information and your Owner Manual<strong>to</strong> ensure an outstanding ownership experience. Note that your vehicle may not include all the featuresdescribed in this booklet. Keep this booklet with your Owner Manual for easy reference.
2<strong>Getting</strong> <strong>to</strong> <strong>Know</strong> <strong>Your</strong> <strong>Solstice</strong>DRIVER INFORMATIONInstrument PanelA B C D E F G H I J K B B AL M N O P Q R S T U V WThe main features of the instrumentpanel include:A. Side Window Air OutletsB. Air OutletsC. Turn Signal/Multifunction LeverD. Cruise Control But<strong>to</strong>ns (if equipped)E. Instrument ClusterF. Audio Steering Wheel Controls(if equipped)G. Instrument Panel Brightness ControlH. Passenger Airbag Status Indica<strong>to</strong>rI. Hazard Warning Flashers But<strong>to</strong>nJ. Fog Lamp But<strong>to</strong>n (if equipped)K. StabiliTrak But<strong>to</strong>nSee Section 3 of your Owner Manual.L. Hood Release LeverM. Driver Information Center Controls(if equipped)N. HornO. Windshield Wiper/Washer ControlsP. Climate ControlsQ. Accessory Power OutletR. Audio SystemS. Gearshift LeverT. Parking Brake LeverU. CupholderV. Trunk Release But<strong>to</strong>n (in Glove Box)W. Glove Box
3Instrument Panel ClusterA B C D E F G H I J K L<strong>Your</strong> vehicle’s instrument panel isequipped with this cluster or one verysimilar <strong>to</strong> it. The instrument panel clusterincludes these key features:A. SpeedometerB. Antilock Brake System Warning LightC. Trunk Ajar LightD. Low Fuel Warning LightE. Fuel GaugeF. Malfunction Indica<strong>to</strong>r Lamp(Check Engine Light)G. Airbag Readiness LightH. StabiliTrak Warning LightMI. Safety Belt Reminder LightJ. Low Coolant Warning LightK. Security LightL. Odometer/Driver Information CenterM. TachometerNote: The instrument panel cluster isdesigned <strong>to</strong> let you know about manyimportant aspects of your vehicle’soperation. It is important <strong>to</strong> read yourOwner Manual and be<strong>com</strong>e familiar withthe information being relayed <strong>to</strong> youby the lights, gauges and indica<strong>to</strong>rs,as well as what action can be taken <strong>to</strong>ensure safety and <strong>to</strong> prevent damage.See Section 3 of your Owner Manual.
4<strong>Getting</strong> <strong>to</strong> <strong>Know</strong> <strong>Your</strong> <strong>Solstice</strong>Driver Information Center(if equipped)<strong>Your</strong> vehicle’s Driver Information Center(DIC) provides vehicle information,vehicle warning messages and vehiclefeature personalization. The DIC messageswill be shown on your instrumentpanel cluster display.BATo operate the DIC, the ignition switchmust be on. The DIC is controlledthrough the following two but<strong>to</strong>ns locatedon the left side of the steering wheel:(Information): Press this but<strong>to</strong>n (A)<strong>to</strong> scroll through the vehicle informationmode displays.(Reset): Press this but<strong>to</strong>n (B) <strong>to</strong>reset some information mode options,select a personalization setting oracknowledge a warning message.Press both but<strong>to</strong>ns for several secondsand release <strong>to</strong> enter the personalizationmenu.Vehicle InformationPress the but<strong>to</strong>n <strong>to</strong> scroll throughthe following vehicle information:• Odometer• Trip A or Trip B• Fuel Range (until empty)• MPG AVG (average fuel economy)• MPG INST (instantaneous fueleconomy)• AV Speed (average vehicle speed)• Oil Life (remaining useful oil life)• Coolant (engine coolant temperature)• Tire Pressure (front and rear tirepressures)• Boost (if equipped) (indicates theamount of boost the turbochargedengine is receiving)Press and hold the but<strong>to</strong>n <strong>to</strong> resetthe information while it is displayed.Vehicle Feature PersonalizationA variety of your vehicle’s features canbe personalized <strong>to</strong> your preference. Topersonalize features:1. The vehicle must be s<strong>to</strong>pped <strong>to</strong>access the personalization menu.Press and hold both the andbut<strong>to</strong>ns for several seconds andrelease <strong>to</strong> enter the personalizationmenu.2. Press the but<strong>to</strong>n <strong>to</strong> scrollthrough the available personalizationfeatures.
53. Press the but<strong>to</strong>n <strong>to</strong> <strong>to</strong>gglebetween the available settings foreach feature.4. Press the but<strong>to</strong>n <strong>to</strong> record yourselection and move <strong>to</strong> the next feature.Personalization features include:• OIL LIFE RESET• UNITS• LOCK HORN (Horn chirp duringRemote Keyless Entry locking)• UNLOCK HORN (Horn chirp duringRemote Keyless Entry unlocking)• LIGHT FLASH (Exterior light flashduring Remote Keyless Entry lockingor unlocking)• DELAY LOCK (Delays locking thevehicle for five seconds after the lastdoor is closed)• AUTO UNLK (Au<strong>to</strong>matically unlocksthe vehicle doors)• UNLK (Determines when Au<strong>to</strong>Unlock will occur; au<strong>to</strong>matic transmissiononly)• EXT LIGHTS (Exterior perimeterlighting during Remote Keyless Entryunlock)• LANGUAGEWarnings and MessagesIf a problem is sensed in one of yourvehicle’s systems, a warning or messagewill appear in the DIC display (seeyour Owner Manual for a <strong>com</strong>plete list ofpossible warnings and messages).After a warning or message appears,press either the or but<strong>to</strong>n <strong>to</strong>clear the display screen for further use.Acknowledging the message only clearsthe display; it does not resolve theproblem.If your vehicle is equipped with OnStarand your Check Engine light or anyother warning message appears, youcan press the OnStar but<strong>to</strong>n and speak<strong>to</strong> an OnStar Advisor. In many vehicles,OnStar Advisors can access certaindiagnostic information and can tell youhow serious the problem is and whatyou should do about it.Note: <strong>Your</strong> vehicle’s warnings andmessages provide critical informationthat can prevent damage <strong>to</strong> your vehicle.Review your Owner Manual <strong>to</strong>be<strong>com</strong>e familiar with the informationdisplayed and the action required.See Section 3 of your Owner Manual.
6<strong>Getting</strong> <strong>to</strong> <strong>Know</strong> <strong>Your</strong> <strong>Solstice</strong>SAFETY & SECURITYRemote Keyless Entry(if equipped)The RemoteKeyless Entry(RKE) transmitterincludesthe followingfunctions:(Lock):Press this but<strong>to</strong>nwhen both doorsare closed <strong>to</strong> immediately lock them.The interior lamps will also turn off. Ifenabled through the Driver InformationCenter (DIC), the parking lamps willflash and/or the horn will chirp <strong>to</strong> indicatelocking has occurred.If the Lock but<strong>to</strong>n is pressed while anydoor is open and the Delayed Lock featureis enabled, the doors will not lock.Instead, a chime will sound. After bothdoors are closed, the doors will lock. Tocancel this delay, press the Lock but<strong>to</strong>na second time within five seconds.(Unlock): Press this but<strong>to</strong>n <strong>to</strong> unlockthe driver’s door. If the but<strong>to</strong>n is pressedagain within five seconds, all remainingdoors will unlock. The interior lamps willilluminate and remain on for 20 secondsor until the ignition is turned on. Ifenabled through the DIC, the parkinglamps will flash and the horn will chirp <strong>to</strong>indicate unlocking has occurred.(Trunk/Buttress Release): Pressthis but<strong>to</strong>n <strong>to</strong> release the trunk lid andconvertible <strong>to</strong>p buttress. You can openthe trunk with the transmitter when thevehicle is stationary.The trunk and buttress may also beunlatched using the Trunk Releasebut<strong>to</strong>n located in the glove box.(Vehicle Loca<strong>to</strong>r/Panic Alarm):The vehicle must be turned off <strong>to</strong> usethis feature.Press and hold the but<strong>to</strong>n forapproximately one second <strong>to</strong> locate yourvehicle. The horn will sound three timesand the parking lamps will flash threetimes.To sound the panic alarm, press andhold the but<strong>to</strong>n for three seconds. Thehorn will sound and the parking lampswill flash for 30 seconds. Press the but<strong>to</strong>nagain or turn the ignition key <strong>to</strong> anyposition <strong>to</strong> cancel the panic alarm.See Section 2 of your Owner Manual.Door Lock and Unlock Functionswithout the RKE Transmitter<strong>Your</strong> vehicle’s doors can also be locked/unlocked using the key.• To lock either door from the outside,turn the key clockwise.• To unlock either door from the outside,turn the key counterclockwise.See Section 2 of your Owner Manual.
7Au<strong>to</strong>matic Door Locks(if equipped)For your safety, all power door locks willau<strong>to</strong>matically lock when the shift lever ismoved out of Park with an au<strong>to</strong>matictransmission, or when the vehicle speedis greater than 5 mph (8 km/h) with amanual transmission.This feature cannot be disabled; however,if your vehicle has a Driver InformationCenter and an au<strong>to</strong>matic transmission,you can personalize the unlock features.See Section 2 of your Owner Manual.Passenger Airbag StatusIndica<strong>to</strong>r<strong>Your</strong> vehicle is equipped with aPassenger Sensing System located inthe passenger seat for the passenger’sfront airbag, and a passenger airbagstatus indica<strong>to</strong>r located on the instrumentpanel center stack.See Sections 1 and 3 of your Owner Manual.OnStar ® (if equipped)<strong>Your</strong> vehicle may feature the OnStarSafe & Sound Plan or the uplevel OnStarDirections & Connections Plan, with oneyear of OnStar service from the date youpurchased your new vehicle. OnStaroffers a variety of capabilities, suchas Remote Door Unlock, Au<strong>to</strong>maticNotification of Airbag Deployment, andHands-Free Calling. In addition, mostvehicles can get driving directions usingTurn-by-Turn Navigation. Press theOnStar but<strong>to</strong>n <strong>to</strong> ask an OnStar Advisorabout the service plan you have or <strong>to</strong>upgrade your plan.Note: Because the interior of a convertiblemay not be as quiet as a fixed roofvehicle, please note the following guidelineswhen using the OnStar speechrecognition function and when speaking<strong>to</strong> an OnStar Advisor:• Reduce background noise by raisingthe convertible <strong>to</strong>p or windows, or byslowing down or s<strong>to</strong>pping the vehicle.• Speak clearly and naturally, and louderif necessary, when using hands-freecalling.• Say each digit separately and continuouslywhen reciting phone numbers.For more information, refer <strong>to</strong>your OnStar Owner’s Guide, call1-888-4-ONSTAR (1-888-466-7827),or visit onstar.<strong>com</strong>.See Section 2 of your Owner Manual.Emergency Trunk ReleaseThe trunklid can beopenedfrom insidethe trunkby pullingon the emergency trunk release handlelocated on the driver’s side of the trunk.See Section 2 of your Owner Manual.
8<strong>Getting</strong> <strong>to</strong> <strong>Know</strong> <strong>Your</strong> <strong>Solstice</strong>COMFORTSeat AdjustmentsForward or Rearward AdjusterTo move the seats forward or rearward,lift and hold the lever under the front ofeach seat and manually slide the seat;then release the lever. Try <strong>to</strong> move theseat <strong>to</strong> ensure it is locked in place.ReclinerTo recline thefront seats,open the doorand rotate theknob on theoutboard sideof the seatuntil the seatbackis in thedesired position.Seatback LatchPull up thelatch on theoutboardside ofthe seatnear the<strong>to</strong>p of theseatback<strong>to</strong> foldthe seatforward. This provides access <strong>to</strong> theseatback map pocket.Driver Seat Height Adjuster(if equipped)The power driver seat height adjusterswitch is located on the outboard side ofthe driver’s seat. Adjust the seat positionbefore adjusting seat height. To raise orlower the seat, hold the switch up ordown.See Section 1 of your Owner Manual.Tilt Steering WheelTo adjust the steering wheel position:1. Pull down the lever located on the leftside of the steering column.2. Adjust the wheel <strong>to</strong> a <strong>com</strong>fortableposition. The wheel can be moved upor down.3. Push the lever all the way up <strong>to</strong> lockthe wheel in place.See Section 3 of your Owner Manual.Climate ControlsABCTemperature ControlTurn the temperature control knob (A) <strong>to</strong>raise or lower the temperature setting.(Air Conditioning) (if equipped):Press the temperature control knob <strong>to</strong>turn the air conditioning system on oroff. The indica<strong>to</strong>r light will flash threetimes and the air conditioning systemwill not function if the fan is turned off.
9Fan SpeedTurn the fan speed control knob (B) <strong>to</strong>increase or decrease fan speed.(Off): This position turns off thesystem.(Recirculation): Press the fanspeed control knob <strong>to</strong> turn the recirculationmode on or off. This mode keepsoutside air from entering the vehicle.Airflow ModesTurn the airflow control knob (C) <strong>to</strong> oneof the following five modes <strong>to</strong> changethe direction of the airflow:(Vent): This mode directs air <strong>to</strong> theinstrument panel outlets.(Bi-Level): This mode directs air <strong>to</strong>the instrument panel outlets and flooroutlets.(Floor): This mode directs most ofthe air <strong>to</strong> the floor outlets and some air <strong>to</strong>the side window outlets and windshield.(Defog): This mode directs air <strong>to</strong> thewindshield, side window outlets andfloor outlets.(Defrost): This mode directs most ofthe air <strong>to</strong> the windshield and some air <strong>to</strong>the side window outlets.(Rear Window Defogger): Pressthe airflow control knob <strong>to</strong> turn the rearwindow defogger on or off. The defoggerwill shut off au<strong>to</strong>matically after a setperiod of time. The defogger will remainactive, however, as long as the vehiclespeed is greater than 50 mph (80 km/h).Note: Do not use the rear windowdefogger when the convertible <strong>to</strong>p iss<strong>to</strong>red.See Section 3 of your Owner Manual.ENTERTAINMENTRadio and CD OperationWhile most of the features on your radiowill look familiar, the following are somethat may be new:(Power/Volume): Press this knob <strong>to</strong>turn the system on or off. Turn the knob<strong>to</strong> adjust the volume.(Information): Press this but<strong>to</strong>n <strong>to</strong><strong>to</strong>ggle the radio display between stationfrequency and time. If equipped, it willalso display additional text informationrelated <strong>to</strong> the current FM-RDS or XMstation, or MP3 song.(Tune): Turn this knob <strong>to</strong> select radiostations or, when a CD is playing, <strong>to</strong>select a track or MP3 file.Press the knob <strong>to</strong> display the <strong>to</strong>necontrol (bass/treble) or speaker control(balance/fade) setting. Press the pushbut<strong>to</strong>nunder the desired label on thedisplay. Turn the knob <strong>to</strong> adjust thesetting.FAV (Favorite): Press this but<strong>to</strong>n <strong>to</strong> gothrough up <strong>to</strong> six pages of any <strong>com</strong>bination(AM, FM, or XM, if equipped) ofpreset favorite radio stations. On eachpage, up <strong>to</strong> six stations are available byusing the six pushbut<strong>to</strong>ns below theradio display.
10<strong>Getting</strong> <strong>to</strong> <strong>Know</strong> <strong>Your</strong> <strong>Solstice</strong>BAND: Press this but<strong>to</strong>n <strong>to</strong> switch <strong>to</strong>AM, FM, or XM (if equipped). Whenplaying a CD or portable audio player,press this but<strong>to</strong>n <strong>to</strong> switch <strong>to</strong> the radio.(Seek/Scan): Press the right or leftarrow but<strong>to</strong>n <strong>to</strong> go <strong>to</strong> the next or previousradio station or, when a CD is playing,<strong>to</strong> the next track or MP3 file, or <strong>to</strong>the start of the current track or MP3 file.To enter the scan mode, press and holdeither arrow but<strong>to</strong>n for a few seconds (abeep will sound). Radio stations will bescanned. Press either arrow but<strong>to</strong>nagain <strong>to</strong> s<strong>to</strong>p scanning.(Reverse): Press and hold thisbut<strong>to</strong>n <strong>to</strong> reverse playback quickly withina track or MP3 file.(Forward): Press and hold thisbut<strong>to</strong>n <strong>to</strong> advance playback quickly withina track or MP3 file.CD/AUX: Press this but<strong>to</strong>n <strong>to</strong> play aCD instead of the radio. Press againand the system will au<strong>to</strong>matically searchfor an auxiliary input device, such as aportable audio player, connected <strong>to</strong> theauxiliary input located on the lower-rightside of the radio.EQ (Equalization): Press this but<strong>to</strong>n <strong>to</strong>select preset equalization settings.CAT (Category) (if equipped): Pressthis but<strong>to</strong>n <strong>to</strong> find XM stations within adesired category.Setting Favorite StationsBefore setting your favorite stations,shift your vehicle in<strong>to</strong> Park (au<strong>to</strong>matictransmission) or in<strong>to</strong> Neutral and set theparking brake (manual transmission).Note: Engaging in extended searchingfor specific audio stations or songs byusing but<strong>to</strong>ns and knobs — or givingextended attention <strong>to</strong> entertainment tasks— can lead you <strong>to</strong> look away from theroad frequently or longer than usual.Looking away from the road for prolongedperiods may cause you <strong>to</strong> missseeing things on the road that you need<strong>to</strong> see. Avoid engaging in extendedsearching for specific items while driving.You can set up <strong>to</strong> six pages of any<strong>com</strong>bination (AM, FM, or XM,if equipped) of favorite radio stations,with up <strong>to</strong> six stations on each page.To set up the number of favorite stationpages:1. Press the MENU but<strong>to</strong>n <strong>to</strong> display theradio setup menu.2. Press the pushbut<strong>to</strong>n located belowthe FAV 1–6 label on the radiodisplay.3. Select the desired number of favoritestation pages.4. Press the FAV but<strong>to</strong>n. You may nowbegin s<strong>to</strong>ring your favorite stations forthe chosen amount of numberedpages.To s<strong>to</strong>re favorite stations:1. Tune in the desired radio station.2. Press the FAV but<strong>to</strong>n <strong>to</strong> display thepage where the station is <strong>to</strong> bes<strong>to</strong>red.3. Press and hold one of the six pushbut<strong>to</strong>nsuntil a beep sounds <strong>to</strong> s<strong>to</strong>rethe station.4. Repeat the steps for each pushbut<strong>to</strong>non each page.
11Setting the Speed CompensatedVolumeWith Speed Compensated Volume(SCV), the radio au<strong>to</strong>matically adjuststhe volume <strong>to</strong> <strong>com</strong>pensate for roadnoise as vehicle speed changes.Press the MENU but<strong>to</strong>n <strong>to</strong> access theSCV settings.To set Speed Compensated Volume:1. Set the radio volume <strong>to</strong> the desiredlevel.2. Press the MENU but<strong>to</strong>n <strong>to</strong> display theradio setup menu.3. Press the pushbut<strong>to</strong>n below the au<strong>to</strong>volume label on the radio display.4. Press the pushbut<strong>to</strong>n under thedesired setting (Off, Low, Mediumor High) <strong>to</strong> select the level of<strong>com</strong>pensation.5. The <strong>com</strong>pensation will be se<strong>to</strong>nce the display times out after 10seconds.Setting the TimeTo set the time:1. Turn on the radio.2. Press the (Clock) but<strong>to</strong>n. Or,if equipped, press the MENU but<strong>to</strong>nuntil the clock option is displayed;and then press the pushbut<strong>to</strong>n locatedunder the clock option label. TheHR, MIN, MM, DD, YYYY labels willappear on the display.3. Press the pushbut<strong>to</strong>n under any ofthe labels <strong>to</strong> be changed.4. Press the pushbut<strong>to</strong>n again or theFWD but<strong>to</strong>n <strong>to</strong> increase the numbers.Press the REV but<strong>to</strong>n <strong>to</strong> decreasethe numbers. Rotating the (Tune)knob also will increase or decreasethe selected label.5. Press the Clock or MENU but<strong>to</strong>nagain <strong>to</strong> set the currently displayedtime and date.Portable Audio PlayerA portable audio player can be connected<strong>to</strong> the auxiliary input jack located onthe radio. Press the CD/AUX but<strong>to</strong>n <strong>to</strong>begin playing audio from the portableplayer over the vehicle speakers.MP3 Capability (if equipped)If your AM/FM stereo with CD has MP3playing capability, a CD-R or CD-RWcontaining MP3 audio files will playau<strong>to</strong>matically when inserted in<strong>to</strong> the CDplayer. An MP3 label will be displayed.Radio Data System (if equipped)When you tune <strong>to</strong> a Radio Data System(RDS) station, the station name and callletters will appear on the display insteadof the frequency. RDS stations may alsoprovide the time of day, a program typefor current programming and the nameof the program being broadcast.RDS features are available for use onlyon FM stations that broadcast RDSinformation. RDS relies on receivingspecific information from these stationsand will work only when the informationis available.See Section 3 of your Owner Manual.
12<strong>Getting</strong> <strong>to</strong> <strong>Know</strong> <strong>Your</strong> <strong>Solstice</strong>XM ® Radio (if equipped)XM Radio offers more than 170channels of digital-quality sound thatgoes wherever you go — coast <strong>to</strong> coast.After a free three-month trial period,activation and service subscriptionfees apply. Service is based in thecontinental United States and Canada.For more information, visit XM onlineat www.XMradio.<strong>com</strong> or call1-800-929-2100.See Section 3 of your Owner Manual.Multiple-Disc CD Player(if equipped)With the in-dash 6-Disc CD Player, notethat you cannot directly load a CD as insingle-play systems.To load a single CD:• Press and release the LOADbut<strong>to</strong>n. Wait for the display prompt <strong>to</strong>load the CD.To load multiple CDs:• Press and hold the LOAD but<strong>to</strong>nfor two seconds. Follow the displayprompts <strong>to</strong> load each CD.To play a specific CD:• Press the pushbut<strong>to</strong>n under the arrowlabel that corresponds <strong>to</strong> the loadedCD number on the display.Note: CDs with any affixed labels mayjam in the CD player. Label a CD usinga permanent marker. If more than oneCD is inserted in<strong>to</strong> the slot at a time,or if scratched or damaged CDs areplayed, the CD player could be damaged.When using the CD player, useonly CDs in good condition withoutlabels; load one CD at a time; and keepthe CD player and the loading slot freeof foreign materials, liquids or debris.To eject a CD:• To eject the CD that is currentlyplaying, press the EJECTbut<strong>to</strong>n once.• To eject all CDs, press and hold theEJECT but<strong>to</strong>n for two seconds.If a CD is not removed after severalseconds, it will be pulled back in<strong>to</strong> theplayer au<strong>to</strong>matically.See Section 3 of your Owner Manual.Audio Steering Wheel Controls(if equipped)The followingaudio controlsarelocated onthe steeringwheel:+ –(Volume):Press theplus or minus but<strong>to</strong>n <strong>to</strong> increase ordecrease the volume.
13(Next/Previous/End): Pressthe up or down arrow <strong>to</strong> go <strong>to</strong> the nex<strong>to</strong>r previous preset radio station or, whena CD is playing, <strong>to</strong> the next or previoustrack.Press and hold the up or down arrow forone second <strong>to</strong> advance <strong>to</strong> the next orprevious radio station in the selectedband or, when a CD is playing, <strong>to</strong> continuemoving <strong>to</strong> the next or previous trackon the CD.Press the (End) but<strong>to</strong>n <strong>to</strong> end orreject an OnStar or Blue<strong>to</strong>oth call.(Mute/Voice Recognition): Pressthis but<strong>to</strong>n <strong>to</strong> silence the system. Pressit again <strong>to</strong> turn on the sound.Press and hold the but<strong>to</strong>n for twoseconds <strong>to</strong> interact with the OnStar orBlue<strong>to</strong>oth system.See Section 3 of your Owner Manual.Blue<strong>to</strong>oth ® SystemThe in-vehicle Blue<strong>to</strong>oth system allowsusers with a Blue<strong>to</strong>oth-enabled cellphone <strong>to</strong> make and receive hands-freephone calls using the vehicle’s audiosystem, microphone and controls. TheBlue<strong>to</strong>oth-enabled cell phone must bepaired with the in-vehicle Blue<strong>to</strong>oth systembefore it can be used in the vehicle.Not all phones will support all functions.Visit www.pontiac.<strong>com</strong>/blue<strong>to</strong>othfor more information.See Section 3 of your Owner Manual.CONVENIENCESpeed-Sensitive WipersThe speed-sensitive wipers lever islocated <strong>to</strong> the right of the steeringcolumn. The headlamps and parkinglamps will turn on if the wipers are on formore than 15 seconds. The lever can bemoved <strong>to</strong> each of the following positions:(Mist): Move the lever down <strong>to</strong> thisposition <strong>to</strong> turn the wipers on for a singlewipe. Hold the lever at this position foradditional wipes.(Off): This position turns off thewindshield wipers.(Intermittent): Move the lever up <strong>to</strong>this position <strong>to</strong> have the wipers adjustwith vehicle speed. Wiper frequencywill increase as you drive faster anddecrease as you slow down. Rotate thespeed-sensitive adjustment band on thelever <strong>to</strong> increase or decrease the delaybetween wipes.(Low): Move the lever up <strong>to</strong> thisposition for steady, low-speed wipes.(High): Move the lever up <strong>to</strong> thisposition for rapid, high-speed wipes.(Windshield Washer): Push thebut<strong>to</strong>n on the end of the wipers lever <strong>to</strong>spray washer fluid on the windshield.See Section 3 of your Owner Manual.
14<strong>Getting</strong> <strong>to</strong> <strong>Know</strong> <strong>Your</strong> <strong>Solstice</strong>Exterior Lamps<strong>Your</strong> <strong>Solstice</strong> is equipped with an Au<strong>to</strong>maticHeadlamp System, which turnson the Daytime Running Lamps duringdaytime and the headlamps and otherexterior lamps at night or when necessary.The headlamps and parking lampsalso will turn on if the wipers are on formore than 15 seconds.Exterior Lamp Control SwitchThe exterior lamps can be operatedmanually using the control switch locatedon the lever <strong>to</strong> the left of the steeringcolumn. The switch can be rotated <strong>to</strong>each of the following positions:(Headlamps): This position turnson the headlamps, parking lamps andtaillamps.(Parking Lamps): This positionturns on the parking lamps and taillampsonly.AUTO (Au<strong>to</strong>matic Lamp Control): Thisposition au<strong>to</strong>matically turns on DaytimeRunning Lamps in the daytime, andheadlamps, parking lamps and taillampsat night or when necessary.(Off/On): When operating in theAUTO position, a momentary turn of thelamp control switch <strong>to</strong> the positionwill turn off the Au<strong>to</strong>matic HeadlampSystem.To activate the Au<strong>to</strong>matic HeadlampSystem, turn the switch <strong>to</strong> the positionagain. The Au<strong>to</strong>matic HeadlampSystem is always turned on when thevehicle is started.The Daytime Running Lamps will turn offwhen the lamp control switch is turned<strong>to</strong> the position if the vehicle is inPark or vehicle speed is less than 5 mph(8 km/h) after the vehicle is started.(Fog Lamps):Press this but<strong>to</strong>non the center ofthe instrumentpanel <strong>to</strong> turn thefog lamps onor off.See Section 3 of your Owner Manual.Cruise Control (if equipped)The following cruise control but<strong>to</strong>ns arelocated on the steering wheel:(On/Off): Press this but<strong>to</strong>n <strong>to</strong> turnthe cruise control system on or off.SET – (Set): Press this but<strong>to</strong>n <strong>to</strong> seta speed, or <strong>to</strong> decrease the set speedif the system is active. When the cruisecontrol speed is set, the DriverInformation Center will display theCruise Engaged message.
15RES + (Resume): Press this but<strong>to</strong>n <strong>to</strong>resume a set speed, or <strong>to</strong> increase theset speed if the system is active.See Section 3 of your Owner Manual.Map PocketsMap pockets are located on the frontseat cushions as well as the seatbacksof both seats. Lift the latch near the <strong>to</strong>pof the seatback <strong>to</strong> release the seat andfold it forward.There also is a netted s<strong>to</strong>rage areabehind the driver’s seat.See Section 1 of your Owner Manual.PERFORMANCE & MAINTENANCEStabiliTrak ® – Stability ControlSystem (if equipped)To limit wheelspin and help maintaindirectional control, you should alwaysleave the system on. If your vehiclebe<strong>com</strong>es stuck and rocking the vehicleis required, the system should beturned off.To turn off thetraction controlpart of the system,press the(StabiliTrak)but<strong>to</strong>n locatedon the center ofthe instrument panel.To turn off both the traction control andstability enhancement systems, pressand hold the but<strong>to</strong>n for five seconds.When either system is off, theStabiliTrak light on the instrument panelcluster will illuminate. Press the but<strong>to</strong>nagain <strong>to</strong> turn the system back on.Competitive Driving ModeThe Competitive Driving Mode is aperformance handling mode designed <strong>to</strong>be used only on a closed driving course.While operating in this mode, tractioncontrol is turned off and the amount ofintervention by the StabiliTrak system isreduced.To activate the Competitive DrivingMode, press the but<strong>to</strong>n twice withinfive seconds. Press the but<strong>to</strong>n again <strong>to</strong>return <strong>to</strong> normal StabiliTrak operation.See Section 4 of your Owner Manual.StabiliTrak is an advanced <strong>com</strong>putercontrolledvehicle stability and tractionenhancement system that assists withdirectional control of the vehicle in difficultdriving conditions. It turns on everytime you start your vehicle.
16<strong>Getting</strong> <strong>to</strong> <strong>Know</strong> <strong>Your</strong> <strong>Solstice</strong>Manual Transmission OperatingTips (if equipped)Starting the EngineTo start the engine, fully depress theclutch pedal before turning the key;otherwise, the engine will not start. Theshift lever also should be in Neutral andthe parking brake should be engaged.Reverse OperationWhen shifting in<strong>to</strong> Reverse, bring yourvehicle <strong>to</strong> a <strong>com</strong>plete s<strong>to</strong>p. Trying <strong>to</strong>engage Reverse with the vehicle movingcould damage the transmission. If youfind it difficult <strong>to</strong> shift in<strong>to</strong> Reverse,return the shift lever <strong>to</strong> Neutral andrelease the clutch pedal; then depressthe clutch pedal again and shift in<strong>to</strong>Reverse.Parking the VehicleWhen parking your vehicle, shift themanual transmission in<strong>to</strong> 1st or Reverseand set the parking brake. These are thebest positions for parking a manualtransmission-equipped vehicle.Rear Axle<strong>Your</strong> <strong>Solstice</strong> may be equipped with alimited slip rear differential. This optionaldifferential is designed <strong>to</strong> provide maximumpower and performance.The <strong>Solstice</strong> driveline is designed <strong>to</strong>transmit maximum engine <strong>to</strong>rque <strong>to</strong> therear wheels as efficiently as possible,which greatly enhances handling andacceleration capabilities.During an abrupt <strong>to</strong>rque transfer (e.g.,1st <strong>to</strong> 2nd gearshift at low enginespeeds, or abrupt de-clutching), youmay notice an audible feedback noisethat could be interpreted as clunking orrattling. This audible feedback noise isnormal and will not <strong>com</strong>promise thereliability of the clutch, transmission ordifferential.See Section 2 of your Owner Manual.Au<strong>to</strong>matic TransmissionOperating Tips (if equipped)The shift indica<strong>to</strong>r positions on theau<strong>to</strong>matic transmission are PRND4IL.Au<strong>to</strong>matic Overdrive (D) is the bestposition for normal driving. When drivingon hilly, winding roads and engine brakingis needed, use the Intermediate (I)position. The Low (L) position can beused when driving slowly on very steephills, or in snow or mud.See Section 2 of your Owner Manual.Operating the Convertible TopLowering the Convertible TopNote: Before lowering the convertible<strong>to</strong>p, make sure nothing is s<strong>to</strong>red in thetrunk on either side, or on <strong>to</strong>p, of thefuel tank. Do not lower or raise theconvertible <strong>to</strong>p while the vehicle isin motion.To lower the convertible <strong>to</strong>p:1. With an au<strong>to</strong>matic transmission inPark or a manual transmission in 1s<strong>to</strong>r Reverse and the parking brake set,turn off the ignition.
172. Open the trunk lid.3. Unlock the convertible <strong>to</strong>p front latch,located above the inside rearviewmirror, by pulling it down and turningcounterclockwise. Leave the latchopen and rotated <strong>to</strong> prevent damagewhen s<strong>to</strong>ring the <strong>to</strong>p.4. Pull rearward on the side edge ofthe convertible <strong>to</strong>p and pull it off thewindshield frame.5. Push the convertible <strong>to</strong>p down in<strong>to</strong>the trunk.6. Push evenly on the center of the <strong>to</strong>p<strong>to</strong> ensure that it is fully retracted andsecurely s<strong>to</strong>red.7. Close the trunk from the rear of thevehicle by pushing on the <strong>to</strong>p centerof the trunk lid.Raising the Convertible Top1. With an au<strong>to</strong>matic transmission inPark or a manual transmission in 1s<strong>to</strong>r Reverse and the parking brake set,lower the windows and then turn offthe ignition.2. Open the trunk lid.3. Pull the convertible <strong>to</strong>p forward byfirmly gripping the side edge andapplying a brisk upward and forwardmotion <strong>to</strong> get the <strong>to</strong>p in the full-upposition.Note: When raising the convertible <strong>to</strong>p,make certain that the orange pin oneach side of the <strong>to</strong>p is seated in<strong>to</strong> thehole inside the rubber molding <strong>to</strong> therear of the side window opening. Failure<strong>to</strong> seat the pins may result in wind andwater concerns.4. Pull the front edge of the convertible<strong>to</strong>p forward from the outside of thevehicle, or push the front edge of theconvertible <strong>to</strong>p forward from theinside of the vehicle.5. Turn the <strong>to</strong>p front latch handle clockwise<strong>to</strong> latch the convertible <strong>to</strong>p.6. Close the trunk from the rear of thevehicle by pushing on the <strong>to</strong>p centerof the trunk lid.7. At the rear edge of the convertible<strong>to</strong>p, press down on the buttresses <strong>to</strong>latch them in<strong>to</strong> the <strong>to</strong>p of the trunk.Note: A clear Mylar ® protective film hasbeen installed at the fac<strong>to</strong>ry on the trunklid surface under the convertible <strong>to</strong>p buttresses.This film is designed <strong>to</strong> helpprevent paint damage <strong>to</strong> the trunk lidover time. Do not remove this protectivefilm. It is intended <strong>to</strong> remain permanentlyaffixed <strong>to</strong> the trunk lid surface.
18<strong>Getting</strong> <strong>to</strong> <strong>Know</strong> <strong>Your</strong> <strong>Solstice</strong>Convertible Top CareTo properly care for the convertible <strong>to</strong>p,keep in mind these precautions:• High pressure car washes may causewater <strong>to</strong> enter the vehicle.• Do not lower the convertible <strong>to</strong>p ifthere are objects in the s<strong>to</strong>rage area.• Dry off the <strong>to</strong>p before lowering it.S<strong>to</strong>ring the <strong>to</strong>p when it is wet cancause stains and mildew.• Do not lower the <strong>to</strong>p in cold weather.• Do not operate the rear defoggerwhen the <strong>to</strong>p is s<strong>to</strong>red.• Always close the <strong>to</strong>p when leavingyour vehicle outdoors.See Section 2 of your Owner Manual.Car WashingThe convertible <strong>to</strong>p should be cleanedoften. However, high pressure car washesmay cause water <strong>to</strong> enter the vehicle.After washing and thoroughly rinsing thevehicle, let the <strong>to</strong>p dry in direct sunlight.A chamois or cloth may leave lint onthe <strong>to</strong>p.Cleaning the Chrome or AluminumWheelsKeep the wheels clean using mild soapand water and a soft, clean cloth. Strongsoaps and cleaners could damage thesurface of the wheels.The chrome or aluminum wheels mayalso be damaged if the vehicle is driventhrough an au<strong>to</strong>matic car wash that hassilicone carbide tire cleaning brushes.Note: Before entering an au<strong>to</strong>matic carwash, ensure that there is the necessaryamount of ground clearancebetween the vehicle and the car washguide rails.See Section 5 of your Owner Manual.Tire Pressure Moni<strong>to</strong>rThe Tire Pressure Moni<strong>to</strong>r alerts youwhen a significant reduction in pressureoccurs in one or more of your vehicle’stires by illuminating the (Low TirePressure) warning light on the instrumentpanel cluster. The low tire pressurewarning light will remain on until youcorrect the tire pressure. A CHECK TIREPRESSURE message may also appearon the DIC (if equipped).Correcting the Tire PressureWhen the low tire pressure warning lightilluminates, you must inflate the tire <strong>to</strong>the proper tire pressure (just as youmust refuel the vehicle when the lowfuel warning light illuminates). The Tireand Loading Information label shows thecorrect tire pressure for the tires whenthey’re cold. “Cold” means your vehiclehas been sitting for at least three hoursor driven no more than one mile.You can temporarily clear the DIC messageby acknowledging it with your DICcontrols. However, at the next vehiclestart-up, the DIC message will reappear ifthe tire pressure has not been corrected.During cooler conditions, the low tirepressure warning light may appear whenthe vehicle is first started and then turnoff as you start <strong>to</strong> drive. This could bean early indica<strong>to</strong>r that your tire pressuresare getting low and the tires need<strong>to</strong> be inflated <strong>to</strong> the proper pressure.
19Note: The Tire Pressure Moni<strong>to</strong>r canalert you about low tire pressure, but itdoesn’t replace normal monthly tiremaintenance.See Section 5 of your Owner Manual.Tire Infla<strong>to</strong>r KitPremium Unleaded GasolineUse premium unleaded gasoline with aposted octane rating of 91 or higher forbest engine performance. You may alsouse regular unleaded gasoline rated at87 octane or higher, but your vehicle’sperformance may be slightly reduced.Unleaded gasoline with an octane ratingbelow 87 is not re<strong>com</strong>mended.See Section 5 of your Owner Manual.Resetting the Oil Life System(if equipped)The tire infla<strong>to</strong>r kit is located at theback of the trunk on the driver’s side.It includes an air <strong>com</strong>pressor, a tiresealant canister, an accessory plug andan air pressure gauge. Refer <strong>to</strong> the tireinfla<strong>to</strong>r kit instructions for <strong>com</strong>pleteoperating information.See Section 5 of your Owner Manual.Towing and Dinghy Towing<strong>Your</strong> vehicle was not designed <strong>to</strong> <strong>to</strong>wa trailer.It also was not designed <strong>to</strong> be <strong>to</strong>wedbehind another vehicle with any of itswheels on the ground; therefore, dinghy<strong>to</strong>wing also is not re<strong>com</strong>mended.See Section 4 of your Owner Manual.The Oil Life System calculates engine oillife based on vehicle use and displays aCHANGE OIL SOON message in theDriver Information Center (DIC) whenit’s necessary <strong>to</strong> change your engine oiland filter. The Oil Life System should bereset <strong>to</strong> 100% only following an oilchange.To reset the Oil Life System:1. With the engine off, turn the ignition<strong>to</strong> Run.2. Press the (Information) and(Reset) but<strong>to</strong>ns on the DIC at thesame time <strong>to</strong> enter the personalizationmenu.3. Press the but<strong>to</strong>n until the DICdisplays OIL LIFE RESET.4. Press and hold the but<strong>to</strong>n for atleast one second.5. An ACKNOWLEDGED message willdisplay when the system has beenreset.See Section 5 of your Owner Manual.
20<strong>Getting</strong> <strong>to</strong> <strong>Know</strong> <strong>Your</strong> <strong>Solstice</strong>OWNER INFORMATIONRoadside Assistance1-800-ROADSIDE(1-800-762-3743)TTY Users: 1-888-889-2438As the owner of a new Pontiac vehicle,you are au<strong>to</strong>matically enrolled in thePontiac Roadside Assistance program.This value-added service is intended <strong>to</strong>provide you with peace of mind as youdrive in the city or travel the open road.Pontiac’s Roadside Assistance <strong>to</strong>ll-freenumber is staffed by a team of technicallytrained advisors who are available 24hours a day, 365 days a year, <strong>to</strong> provideminor repair information or make arrangements<strong>to</strong> <strong>to</strong>w your vehicle <strong>to</strong> the nearestPontiac dealer.Pontiac will provide the following servicesfor 5 years/100,000 miles at no expense<strong>to</strong> you:• Fuel delivery• Lockout service (identification required)• Tow <strong>to</strong> nearest dealership for warrantyservice• Flat tire assistance• Jump startsIn many instances, mechanical failures arecovered under Pontiac’s <strong>com</strong>prehensivewarranty. However, when other servicesare utilized, our advisors will explain anypayment obligations you might incur.For prompt and efficient assistance whencalling, please provide the following information<strong>to</strong> the advisor:• Location of the vehicle• Telephone number and your location• Vehicle model, year and color• Vehicle mileage• Vehicle Identification Number (VIN)• Vehicle license plate numberPontiac reserves the right <strong>to</strong> limit servicesor reimbursement <strong>to</strong> an owner or driverwhen, in Pontiac’s judgment, the claimsbe<strong>com</strong>e excessive in frequency or type ofoccurrence.Roadside Assistance and OnStar(if equipped)If you have a current OnStar subscription,press the OnStar but<strong>to</strong>n and the vehiclewill send your current GPS location <strong>to</strong> anOnStar Advisor who will speak <strong>to</strong> you,assess your problem, contact RoadsideAssistance and relay your exact location soyou will get the help you need.My GMLinkThe Pontiac Owner Center at My GMLinkis a <strong>com</strong>plimentary service for Pontiacowners, a one-s<strong>to</strong>p resource <strong>to</strong> enhanceyour Pontiac ownership experience.Exclusive member benefits include onlineservice reminders, vehicle maintenancetips, online owner manual, special privilegesand more. Sign up <strong>to</strong>day atwww.mygmlink.<strong>com</strong>.Certain restrictions, precautions and safety procedures apply <strong>to</strong> your vehicle. Please read your OwnerManual for <strong>com</strong>plete instructions. All information contained herein is based on information available at thetime of printing and is subject <strong>to</strong> change without notice. Copyright 2008 by GM Corp. All rights reserved.!15899512=A!15899512 A