- Page 1:
Oxygen XML Author plugin 13.2.0
- Page 4 and 5:
Table of Contents | 4Saving Documen
- Page 6 and 7:
Table of Contents | 6Templates.....
- Page 8 and 9:
Table of Contents | 8Defining a New
- Page 10 and 11:
Table of Contents | 10Custom Editor
- Page 12 and 13:
Introduction | 12Key Features and B
- Page 14 and 15:
Installation | 14Installation Requi
- Page 16 and 17:
Installation | 16The Oxygen XML Aut
- Page 18 and 19:
How Floating (Concurrent) Licenses
- Page 20 and 21:
sh licenseServer.sh myLicenseDir 54
- Page 22 and 23:
1. Start the Eclipse platform.2. Go
- Page 24 and 25:
External ProcessesThe amount of mem
- Page 26 and 27:
Getting Started | 26Getting HelpOnl
- Page 28 and 29:
The Editor PaneThe editor pane is w
- Page 30 and 31:
Getting Started | 30Figure 8: Error
- Page 32 and 33:
Getting Started | 32Figure 10: Data
- Page 34 and 35:
Editing Documents | 34Working with
- Page 36 and 37:
•Editing Documents | 36• Add fi
- Page 38 and 39:
Creating Documents Based on Templat
- Page 40 and 41:
Tip:Editing Documents | 40Server UR
- Page 42 and 43:
Editing Documents | 42The local-fil
- Page 44 and 45:
The New XML Project wizard is displ
- Page 46 and 47:
Editing Documents | 46• Use relat
- Page 48 and 49:
Editing Documents | 48• automatic
- Page 50 and 51:
Editing Documents | 50namespace is
- Page 52 and 53:
Editing Documents | 52Figure 25: Th
- Page 54 and 55:
• param-type - optional parameter
- Page 56 and 57:
A not namespace-valid documentEditi
- Page 58 and 59:
Editing Documents | 58Figure 29: Au
- Page 60 and 61:
Editing Documents | 60A second bene
- Page 62 and 63: 5. Select the type of the validated
- Page 64 and 65: You can use folding by clicking on
- Page 66 and 67: Large DocumentsLet's consider the c
- Page 68 and 69: Editing Documents | 68If you want t
- Page 70 and 71: xs:documentation/chapter/abstract/t
- Page 72 and 73: XML Refactoring ActionsThe followin
- Page 74 and 75: Editing Documents | 74example the c
- Page 77 and 78: Chapter5Authoring in the Visual Edi
- Page 79 and 80: Authoring in the Visual Editor | 79
- Page 81 and 82: Modification Follow-upWhen editing,
- Page 83 and 84: Authoring in the Visual Editor | 83
- Page 85 and 86: Authoring in the Visual Editor | 85
- Page 87 and 88: • The caret is positioned inside
- Page 89 and 90: • Refactoring - Contains a series
- Page 91 and 92: Code TemplatesYou can define short
- Page 93 and 94: Authoring in the Visual Editor | 93
- Page 95 and 96: Attention: Image hotspots are not s
- Page 97 and 98: ReviewAuthoring in the Visual Edito
- Page 99 and 100: Authoring in the Visual Editor | 99
- Page 101 and 102: Create Profiling AttributesNote: To
- Page 103 and 104: Authoring in the Visual Editor | 10
- Page 105: Authoring in the Visual Editor | 10
- Page 108 and 109: Author for DITA | 108Creating DITA
- Page 110 and 111: Author for DITA | 110• Edit Attri
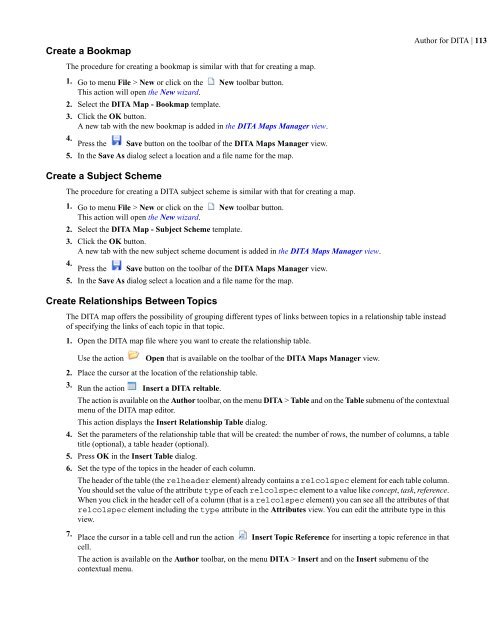
- Page 114 and 115: 8.Optionally for adding a new row t
- Page 116 and 117: A topic heading can be inserted bot
- Page 118 and 119: Author for DITA | 1183. Copy the ${
- Page 120 and 121: Configuring a DITA TransformationCr
- Page 122 and 123: Author for DITA | 122Figure 73: Edi
- Page 124 and 125: The Output TabIn the Output tab, yo
- Page 126 and 127: Set a Font for PDF Output Generated
- Page 128 and 129: Author for DITA | 128The CSS styles
- Page 130 and 131: Author for DITA | 130the id value o
- Page 132 and 133: Author for DITA | 132When editing a
- Page 134 and 135: Predefined Document Types | 134Docu
- Page 136 and 137: Predefined Document Types | 136•
- Page 138 and 139: Predefined Document Types | 138dire
- Page 140 and 141: Predefined Document Types | 140The
- Page 142 and 143: Predefined Document Types | 142the
- Page 144 and 145: TemplatesThere is a default templat
- Page 146 and 147: A new step will be inserted in eith
- Page 148 and 149: Predefined Document Types | 148Figu
- Page 150 and 151: Predefined Document Types | 150A dr
- Page 152 and 153: Predefined Document Types | 152•
- Page 154 and 155: Predefined Document Types | 154•
- Page 156 and 157: Predefined Document Types | 156•
- Page 158 and 159: Predefined Document Types | 158plug
- Page 160 and 161: If the dialog is closed with the Ca
- Page 162 and 163:
Author Developer Guide | 1622. Full
- Page 164 and 165:
Author Developer Guide | 164CSS Sty
- Page 166 and 167:
}Author Developer Guide | 166title
- Page 168 and 169:
Author Developer Guide | 168Note: T
- Page 170 and 171:
Author Developer Guide | 170Note: T
- Page 172 and 173:
Author Developer Guide | 1727. Clic
- Page 174 and 175:
Configuring the Main MenuDefined ac
- Page 176 and 177:
Author Developer Guide | 176Figure
- Page 178 and 179:
• param-type - optional parameter
- Page 180 and 181:
insertPositionOne of the three cons
- Page 182 and 183:
Here is the implementation of these
- Page 184 and 185:
Author Developer Guide | 184Figure
- Page 186 and 187:
"The operation failed due to the fo
- Page 188 and 189:
Author Developer Guide | 188Figure
- Page 190 and 191:
The image element has an attribute
- Page 192 and 193:
font-size: 2.0em;}* * * title{font-
- Page 194 and 195:
Important:The first argument is the
- Page 196 and 197:
Author Developer Guide | 196Organiz
- Page 198 and 199:
Author Developer Guide | 198You can
- Page 200 and 201:
Custom Editor VariablesAn editor va
- Page 202 and 203:
Author Developer Guide | 202Figure
- Page 204 and 205:
The table holds the following infor
- Page 206 and 207:
Author Developer Guide | 206attribu
- Page 208 and 209:
Author Developer Guide | 208The sty
- Page 210 and 211:
Author Developer Guide | 210Note: T
- Page 212 and 213:
Stack elementStack = context.getEle
- Page 214 and 215:
if(i > 0){try {Integer.parseInt(xpo
- Page 216 and 217:
Author Developer Guide | 216The met
- Page 218 and 219:
}if (node.getType() == AuthorNode.N
- Page 220 and 221:
When the above implementation is co
- Page 222 and 223:
Author Developer Guide | 222just pa
- Page 224 and 225:
In the listing below, the XML docum
- Page 226 and 227:
}String cs = attrValue.getValue();i
- Page 228 and 229:
Author Developer Guide | 228Note: T
- Page 230 and 231:
Author Developer Guide | 230URI of
- Page 232 and 233:
ExpressionE:lang(c)E + FE[foo]E[foo
- Page 234 and 235:
Name'display''empty-cells''float''f
- Page 236 and 237:
Name'vertical-align''visibility''wh
- Page 238 and 239:
lengthThe value must be interpreted
- Page 240 and 241:
Author Developer Guide | 240In orde
- Page 242 and 243:
Author Developer Guide | 242Oxygen
- Page 244 and 245:
Author Developer Guide | 244example
- Page 246 and 247:
The result of the functions below w
- Page 248 and 249:
The oxy_substring() FunctionThis fu
- Page 250 and 251:
Example Files Listings - The Simple
- Page 252 and 253:
Author Developer Guide | 252CSS Fil
- Page 254 and 255:
}margin-left:2em;Author Developer G
- Page 256 and 257:
XSL FilesAuthor Developer Guide | 2
- Page 258 and 259:
Author Developer Guide | 258• flo
- Page 260 and 261:
DeploymentThe Author Component Java
- Page 262 and 263:
The certificate details are display
- Page 264 and 265:
Author Developer Guide | 264If you
- Page 266 and 267:
Author Developer Guide | 2663. Many
- Page 269:
Chapter10The DITA Topics Document T
- Page 273:
Chapter12The DocBook 5 Document Typ
- Page 277:
Chapter14The TEI P5 Document TypeTh
- Page 281 and 282:
Chapter16Grid EditorTopics:In the g
- Page 283 and 284:
The following actions are available
- Page 285 and 286:
Grid Editor | 285Figure 119: Copyin
- Page 287 and 288:
Chapter17Transforming DocumentsTopi
- Page 289 and 290:
Transforming Documents | 289• XSL
- Page 291 and 292:
Transforming Documents | 291If you
- Page 293 and 294:
Transforming Documents | 293• Ign
- Page 295 and 296:
Transforming Documents | 295• Pro
- Page 297 and 298:
The following actions are available
- Page 299 and 300:
Transforming Documents | 299Figure
- Page 301 and 302:
Transforming Documents | 301XSLT Pr
- Page 303 and 304:
Transforming Documents | 303XSL-FO
- Page 305 and 306:
For Mac OS X and Linux create a fil
- Page 307 and 308:
Transforming Documents | 307• ${f
- Page 309 and 310:
Chapter18Querying DocumentsTopics:
- Page 311 and 312:
Querying Documents | 311Figure 134:
- Page 313 and 314:
XPath Utilization with DocBook DTDT
- Page 315 and 316:
Querying Documents | 315The upper p
- Page 317 and 318:
XQJ TransformersThis section descri
- Page 319:
• Strip whitespaces - Can have on
- Page 322 and 323:
Working with Archives | 322Browsing
- Page 324 and 325:
Working with Archives | 324Figure 1
- Page 327 and 328:
Chapter20Working with DatabasesTopi
- Page 329 and 330:
• db2jcc_license_cisuz.jar• db2
- Page 331 and 332:
The dialog for configuring a data s
- Page 333 and 334:
Working with Databases | 333Figure
- Page 335 and 336:
How to Configure a JDBC-ODBC Connec
- Page 337 and 338:
Working with Databases | 337Figure
- Page 339 and 340:
Working with Databases | 339Figure
- Page 341 and 342:
Actions Available at Connection Lev
- Page 343 and 344:
Working with Databases | 343Figure
- Page 345 and 346:
3. Drag the table or a column of th
- Page 347 and 348:
1. Go to menu Preferences > Data So
- Page 349 and 350:
6. Click the OK button to finish th
- Page 351 and 352:
Working with Databases | 351Note: T
- Page 353 and 354:
• Delete - Deletes the current co
- Page 355 and 356:
Working with Databases | 355Figure
- Page 357 and 358:
Working with Databases | 357• Ref
- Page 359 and 360:
Working with Databases | 359• Cle
- Page 361 and 362:
How to Configure a WebDAV Connectio
- Page 363 and 364:
Chapter21Content Management System
- Page 365 and 366:
How to Configure a Documentum (CMS)
- Page 367 and 368:
• Format - The document content t
- Page 369:
Content Management System (CMS) Int
- Page 372 and 373:
Digital Signatures | 372OverviewDig
- Page 374 and 375:
• Inclusive with comments - If se
- Page 377 and 378:
Chapter23Text Editor Specific Actio
- Page 379 and 380:
Text Editor Specific Actions | 379S
- Page 381 and 382:
• French (Switzerland)• German
- Page 383 and 384:
Chapter24Configuring the Applicatio
- Page 385 and 386:
Configuring the Application | 385
- Page 387 and 388:
Configuring the Application | 387
- Page 389 and 390:
Configuring the Application | 389Th
- Page 391 and 392:
The rest of the document preserves
- Page 393 and 394:
Configuring the Application | 393If
- Page 395 and 396:
Configuring the Application | 395No
- Page 397 and 398:
Configuring the Application | 397
- Page 399 and 400:
Elements / Attributes by PrefixThe
- Page 401 and 402:
Configuring the Application | 401
- Page 403 and 404:
Configuring the Application | 403
- Page 405 and 406:
Configuring the Application | 405Fo
- Page 407 and 408:
Configuring the Application | 407Fi
- Page 409 and 410:
XSLTProcThe XSLTProc preferences pa
- Page 411 and 412:
Configuring the Application | 411di
- Page 413 and 414:
• ${pd} - The project directory.
- Page 415 and 416:
Configuring the Application | 415Fi
- Page 417 and 418:
Configuring the Application | 417Fi
- Page 419 and 420:
Configuring the Application | 419
- Page 421 and 422:
Configuring the Application | 421pr
- Page 423 and 424:
Configuring the Application | 423
- Page 425:
Configuring the Application | 425
- Page 428 and 429:
Common Problems | 428Syntax Highlig
- Page 431:
Chapter26TermsActive cellBlockInlin
- Page 434 and 435:
Configure the application (continue
- Page 436 and 437:
Native XML databases (NXD) (continu
- Page 438:
Index | 438


