Benchtop Peristaltic Dispenser Peristaltische Schlauchpumpe
Benchtop Peristaltic Dispenser Peristaltische Schlauchpumpe
Benchtop Peristaltic Dispenser Peristaltische Schlauchpumpe
- No tags were found...

You also want an ePaper? Increase the reach of your titles
YUMPU automatically turns print PDFs into web optimized ePapers that Google loves.
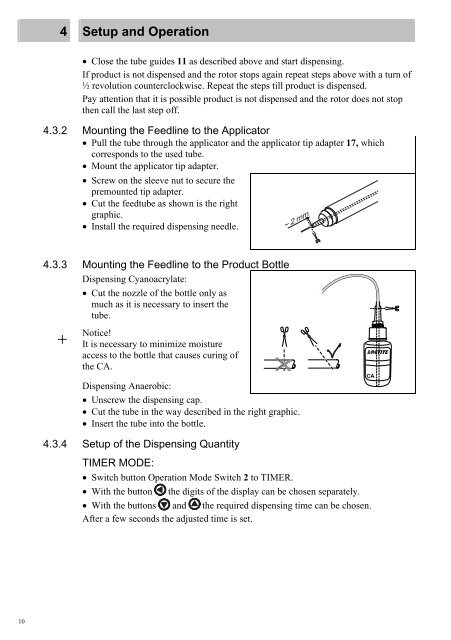
4 Setup and Operation• Close the tube guides 11 as described above and start dispensing.If product is not dispensed and the rotor stops again repeat steps above with a turn of½ revolution counterclockwise. Repeat the steps till product is dispensed.Pay attention that it is possible product is not dispensed and the rotor does not stopthen call the last step off.4.3.2 Mounting the Feedline to the Applicator• Pull the tube through the applicator and the applicator tip adapter 17, whichcorresponds to the used tube.• Mount the applicator tip adapter.• Screw on the sleeve nut to secure thepremounted tip adapter.• Cut the feedtube as shown is the rightgraphic.• Install the required dispensing needle.~ 2 mm4.3.3 Mounting the Feedline to the Product BottleDispensing Cyanoacrylate:• Cut the nozzle of the bottle only asmuch as it is necessary to insert thetube.+Notice!It is necessary to minimize moistureaccess to the bottle that causes curing ofthe CA.Dispensing Anaerobic:• Unscrew the dispensing cap.• Cut the tube in the way described in the right graphic.• Insert the tube into the bottle.CA4.3.4 Setup of the Dispensing QuantityTIMER MODE:• Switch button Operation Mode Switch 2 to TIMER.• With the button the digits of the display can be chosen separately.• With the buttons and the required dispensing time can be chosen.After a few seconds the adjusted time is set.10