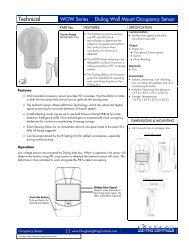
Relay Panels for HID Relays Nema 4 Panels Technical Data
NEMA 4 Panels - Douglas Lighting Control
NEMA 4 Panels - Douglas Lighting Control
- No tags were found...

You also want an ePaper? Increase the reach of your titles
YUMPU automatically turns print PDFs into web optimized ePapers that Google loves.
<strong>Relay</strong> <strong>Panels</strong> <strong>for</strong> <strong>HID</strong> <strong>Relay</strong>s<br />
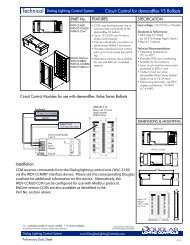
PART No.<br />
N4 <strong>Panels</strong><br />
N4X <strong>Panels</strong><br />
<strong>Nema</strong> 4 <strong>Panels</strong><br />
DESCRIPTION<br />
<br />
Douglas N4 and N4X series relay<br />
panels are a versatile line of panels<br />
used <strong>for</strong> WR 6161 and WR-6172 relays.<br />
<br />
Standard sizes range from 12 to 72 relays.<br />
(Note: 6172 = 2 relay spaces).<br />
<br />
A panel consists of the enclosure (tub),<br />
the interior and the cover. Enclosures<br />
are installed in the rough-in stage and<br />
interiors are installed and connected<br />
after wires are pulled.<br />
<br />
Interior has snap brackets <strong>for</strong> mounting<br />
relays and DIN rail in the center <strong>for</strong><br />
mounting control components.<br />
<br />
Cover and enclosure can be coated<br />
steel (NEMA 4 Standard) or stainless<br />
steel (NEMA 4X Standard).<br />
<strong>Technical</strong> <strong>Data</strong><br />
SPECIFICATION<br />
<br />
N4 enclosures and covers, which meet<br />
NEMA 4 Standard, are made of steel<br />
coated with ANSI/ASA 61 Grey.<br />
Coating is heat fused polyester epoxy<br />
finish applied on all surfaces.<br />
N4X enclosures and covers are made<br />
of corrosion-free stainless steel to meet<br />
NEMA 4X Standard.<br />
<br />
Interior insert is made from aluminum,<br />
steel and plastic parts.<br />
Certifications<br />
<br />
UL listed, CSA approved<br />
<br />
EEMAC/NEMA 4 Standard<br />
Options<br />
<br />
Voltage dividers to divide line voltage<br />
compartment <strong>for</strong> different line voltages.<br />
<strong>Nema</strong>4 Panel Numbering System<br />
Enclosure<br />
Interior<br />
N4 C<br />
xx<br />
N4X W M<br />
Capacity<br />
Barrier Layout <strong>Relay</strong> Code<br />
Compartment: C <strong>HID</strong> relays: M<br />
Wireway: W<br />
Box Code<br />
Grey Painted Finish: N4<br />
Stainless Steel Finish: N4x<br />
Compartment Style<br />
Barrier Layout<br />
CAPACITY<br />
PART No.<br />
SIZE<br />
(H x W x D)<br />
4"<br />
4"<br />
12 24<br />
WE1 - C12M WE2 - C24M<br />
20 x 14 x 5 33 x 14 x 5<br />
Symbols<br />
Low voltage area<br />
Line voltage area<br />
4½"<br />
3"<br />
<strong>HID</strong> relay<br />
Trans<strong>for</strong>mer<br />
4½"<br />
3"<br />
4½"<br />
3"<br />
4½"<br />
3"<br />
Wireway Style<br />
Barrier Layout<br />
6"<br />
6" 6"<br />
7"<br />
CAPACITY<br />
PART No.<br />
SIZE<br />
(H x W x D)<br />
24<br />
PWE3 - W24M<br />
27 x 20 x 5<br />
36 48 72<br />
PWE4 - W36M PWE6 - W48M PWE8 - W72M<br />
33 x 20 x 5 39 x 20 x 5<br />
54 x 20 x 5<br />
Components 1.9<br />
A-1.9,10 -<strong>Relay</strong>s&<strong>Panels</strong>, NEMA4<br />
www.DouglasLightingControls.com
<strong>Relay</strong> <strong>Panels</strong> <strong>for</strong> <strong>HID</strong> <strong>Relay</strong>s<br />
<strong>Nema</strong> 4 <strong>Panels</strong><br />
<strong>Technical</strong> <strong>Data</strong><br />
<strong>Nema</strong> 4 <strong>Panels</strong>: Exploded View<br />
Hinged Cover<br />
Insulating rubber gasket<br />
on inside surface.<br />
Enclosure<br />
Mount enclosure<br />
on wall.<br />
INSTALLATION & ASSEMBLY<br />
N4 and N4X series relay panels <strong>for</strong> Douglas <strong>HID</strong> relays<br />
are supplied with a separate interior. All of the<br />
components and barriers are mounted to the interior.<br />
Douglas N4 and N4X panels are primarily intended <strong>for</strong><br />
projects where the interior is factory pre-assembled. To<br />
install the relay panel the following sequence is<br />
recommended:<br />
1) Mount the empty enclosure onto the wall and pull<br />
wires. It is recommended that all (or most) of the<br />
wires be pulled prior to installing the interior. This will<br />
prevent component damage from the wire pulling<br />
operation.<br />
2) <strong>Relay</strong> line voltage terminals are sized <strong>for</strong> a maximum<br />
of 12AWG wire.<br />
For low voltage wiring, 18AWG solid is<br />
recommended.<br />
3) Once the wires have been pulled, install the interior<br />
and bolt it into place. Make line connections to relays<br />
according to the panel schedule provided. If there is<br />
no schedule, identify circuits on blank schedule.<br />
4) To test circuit, turn circuit breaker off, use manual<br />
lever to turn relay on and then turn on the circuit<br />
breaker. This will help prevent relay contact welding<br />
due to dead shorts.<br />
5) Verify that the schedule matches the lights operated<br />
by the relay.<br />
6) Once the line circuits are connected and verified,<br />
connect low voltage switch wiring to relays or<br />
devices.<br />
<strong>Relay</strong> Interior<br />
<strong>Relay</strong>s mount to <strong>HID</strong> snap rails.<br />
Barriers are located to provide the<br />
line / low voltage division.<br />
Trans<strong>for</strong>mers mount to 1/2" knock<br />
outs located in the barrier.<br />
Control components are mounted<br />
to DIN rail in center of interior.<br />
Pre-assembled <strong>Nema</strong> 4 panels will<br />
have panel schedules completed<br />
according to in<strong>for</strong>mation provided<br />
and all low voltage control<br />
connections pre-wired.<br />
Components 1.10<br />
A-1.9,10 -<strong>Relay</strong>s&<strong>Panels</strong>, NEMA4<br />
www.DouglasLightingControls.com