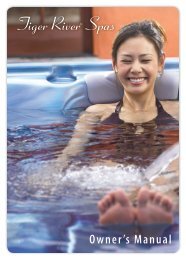
owner’s manual
owner's manual - Bullfrog Spas
owner's manual - Bullfrog Spas

Create successful ePaper yourself
Turn your PDF publications into a flip-book with our unique Google optimized e-Paper software.
Using a gentle circular motion, scrub the cover,<br />
careful to not let any of the cover dry before<br />
rinsing with water.<br />
Step 4: Rinse the cover thoroughly and dry with a<br />
clean cloth.<br />
Step 5: Use saddle soap (never a petroleum-based<br />
product) to condition the cover per the<br />
manufacturer’s instructions.<br />
Step 6: Wipe and rinse any dirt from the bottom<br />
of the cover.<br />
Step 7: Replace the cover and secure the locks.<br />
NOTE: To remove tree sap, use lighter fluid (the<br />
type used in cigarette lighters). Use sparingly.<br />
Immediately, apply saddle soap to the area.<br />
Miscellaneous Care<br />
Cleaning and Protecting the Headrests<br />
Regularly, clean all headrests with mild soap,<br />
water, and a clean cloth. Monthly, use a nonpetroleum-based<br />
product such as 303 Aerospace<br />
Protectant manufactured by 303 Products, Inc.<br />
This will maintain water resistance and luster of<br />
the product.<br />
NOTE: Headrest discoloration is caused by<br />
improper water chemistry and is not covered under<br />
the Bullfrog warranties.<br />
Vacuum the Spa<br />
Debris from wind, trees, and users will<br />
occasionally accumulate on the bottom of the<br />
spa. The filtration system will remove the smaller<br />
debris; however, debris that is too large or heavy<br />
will have to be removed by a spa vacuum. If you<br />
do not have a spa vacuum, contact your<br />
authorized Bullfrog Spa dealer.<br />
Pillow Care<br />
1. Don’t sit on them or slide over them into the<br />
spa or they<br />
will tear.<br />
2. IMPORTANT: Remove the pillows when<br />
shocking the spa or when sanitizer levels are<br />
high. Leave cover open for at least 30 minutes<br />
after shocking to ensure pillows are not affected.<br />
3. Clean the pillow with rubbing alcohol and use<br />
a conditioner, such as Armor All ® monthly.<br />
Freeze Prevention<br />
In regions where low temperatures fall below 5 F<br />
(-15 C), it is recommended that a 2” (5.08cm)<br />
insulation board or blanket be secured to the<br />
backside of the spa equipment compartment<br />
door.<br />
IMPORTANT: When daytime outside<br />
temperatures reach 60 F (15.6 C), the equipment<br />
compartment insulation must be removed to<br />
prevent overheating of the equipment.<br />
Low-Use or No-Use Periods<br />
During certain times of the year, you may not use<br />
the spa on a frequent basis. For these low-use or<br />
no-use periods, consider the following:<br />
No Use for Two to Six Weeks<br />
If the spa will not be used for at least two weeks,<br />
lower the temperature to the lowest setting of<br />
80°F (26°C) or place in Sleep Mode. Lowering<br />
the temperature will cut the cost of operation,<br />
however; you will need to adjust the temperature<br />
setting approximately 4 hours before use in order<br />
to heat the spa to 100°F (38°C).<br />
IMPORTANT: During all low- and no-use<br />
periods, be sure to maintain the spa water as per<br />
the instructions in the Water Chemistry section.<br />
IMPORTANT: For all no-use periods, and on a<br />
weekly basis, be sure to have someone visually<br />
check that the spa is functioning correctly and to<br />
also maintain the spa water as per the<br />
instructions under the Water Chemistry section.<br />
Not doing so may lead to corrosion, staining,<br />
and/or scaling to the spa and its equipment.<br />
During periods of freezing temperatures, a spa<br />
that has malfunctioned may be subject to<br />
damaged plumbing or equipment as a result of ice<br />
buildup within the spa. If the spa cannot be<br />
checked and maintained on a weekly basis, then<br />
consider winterization.<br />
24