MarthaStewartLivingOctober2015
You also want an ePaper? Increase the reach of your titles
YUMPU automatically turns print PDFs into web optimized ePapers that Google loves.
124<br />
HOW-TO HANDBOOK<br />
How-tos<br />
HOW-TO<br />
Unearthed Jack-o’-Lanterns PAGE 97<br />
HOW-TO<br />
Flock of Crows PAGE 96<br />
A<br />
B<br />
For the pumpkins, download<br />
our root-design templates<br />
(at marthastewart<br />
.com/root-face). Scale them<br />
to fit; print. Then etch the<br />
designs on the pumpkins,<br />
following the basic instructions<br />
on page 28.<br />
Supplies<br />
Tar paper<br />
White pencil or china<br />
marker<br />
Heavy-duty scissors<br />
Fiber-wrapped wire<br />
Hot-glue gun<br />
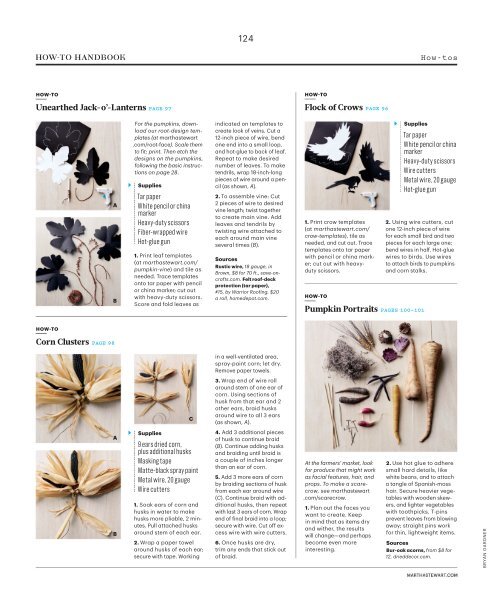
1. Print leaf templates<br />
(at marthastewart.com/<br />
pumpkin-vine) and tile as<br />
needed. Trace templates<br />
onto tar paper with pencil<br />
or china marker; cut out<br />
with heavy-duty scissors.<br />
Score and fold leaves as<br />
indicated on templates to<br />
create look of veins. Cut a<br />
12-inch piece of wire, bend<br />
one end into a small loop,<br />
and hot-glue to back of leaf.<br />
Repeat to make desired<br />
number of leaves. To make<br />
tendrils, wrap 18-inch-long<br />
pieces of wire around a pencil<br />
(as shown, A).<br />
2. To assemble vine: Cut<br />
2 pieces of wire to desired<br />
vine length; twist together<br />
to create main vine. Add<br />
leaves and tendrils by<br />
twisting wire attached to<br />
each around main vine<br />
several times (B).<br />
Sources<br />
Rustic wire, 18 gauge, in<br />
Brown, $8 for 70 ft., save-oncrafts.com.<br />
Felt roof-deck<br />
protection (tar paper),<br />
#15, by Warrior Roofing, $20<br />
a roll, homedepot.com.<br />
1. Print crow templates<br />
(at marthastewart.com/<br />
crow-templates), tile as<br />
needed, and cut out. Trace<br />
templates onto tar paper<br />
with pencil or china marker;<br />
cut out with heavyduty<br />
scissors.<br />
HOW-TO<br />
Supplies<br />
Pumpkin Portraits PAGES 100–101<br />
Tar paper<br />
White pencil or china<br />
marker<br />
Heavy-duty scissors<br />
Wire cutters<br />
Metal wire, 20 gauge<br />
Hot-glue gun<br />
2. Using wire cutters, cut<br />
one 12-inch piece of wire<br />
for each small bird and two<br />
pieces for each large one;<br />
bend wires in half. Hot-glue<br />
wires to birds. Use wires<br />
to attach birds to pumpkins<br />
and corn stalks.<br />
HOW-TO<br />
Corn Clusters PAGE 98<br />
in a well-ventilated area,<br />
spray-paint corn; let dry.<br />
Remove paper towels.<br />
C<br />
3. Wrap end of wire roll<br />
around stem of one ear of<br />
corn. Using sections of<br />
husk from that ear and 2<br />
other ears, braid husks<br />
around wire to all 3 ears<br />
(as shown, A).<br />
A<br />
B<br />
Supplies<br />
9 ears dried corn,<br />
plus additional husks<br />
Masking tape<br />
Matte-black spray paint<br />
Metal wire, 20 gauge<br />
Wire cutters<br />
1. Soak ears of corn and<br />
husks in water to make<br />
husks more pliable, 2 minutes.<br />
Pull attached husks<br />
around stem of each ear.<br />
2. Wrap a paper towel<br />
around husks of each ear;<br />
secure with tape. Working<br />
4. Add 3 additional pieces<br />
of husk to continue braid<br />
(B). Continue adding husks<br />
and braiding until braid is<br />
a couple of inches longer<br />
than an ear of corn.<br />
5. Add 3 more ears of corn<br />
by braiding sections of husk<br />
from each ear around wire<br />
(C). Continue braid with additional<br />
husks, then repeat<br />
with last 3 ears of corn. Wrap<br />
end of final braid into a loop;<br />
secure with wire. Cut off excess<br />
wire with wire cutters.<br />
6. Once husks are dry,<br />
trim any ends that stick out<br />
of braid.<br />
At the farmers’ market, look<br />
for produce that might work<br />
as facial features, hair, and<br />
props. To make a scarecrow,<br />
see marthastewart<br />
.com/scarecrow.<br />
1. Plan out the faces you<br />
want to create. Keep<br />
in mind that as items dry<br />
and wither, the results<br />
will change—and perhaps<br />
become even more<br />
interesting.<br />
2. Use hot glue to adhere<br />
small hard details, like<br />
white beans, and to attach<br />
a tangle of Spanish-moss<br />
hair. Secure heavier vegetables<br />
with wooden skewers,<br />
and lighter vegetables<br />
with toothpicks. T-pins<br />
prevent leaves from blowing<br />
away; straight pins work<br />
for thin, lightweight items.<br />
Sources<br />
Bur-oak acorns, from $8 for<br />
12, drieddecor.com.<br />
BRYAN GARDNER


