
You also want an ePaper? Increase the reach of your titles
YUMPU automatically turns print PDFs into web optimized ePapers that Google loves.
ELINEFL<br />
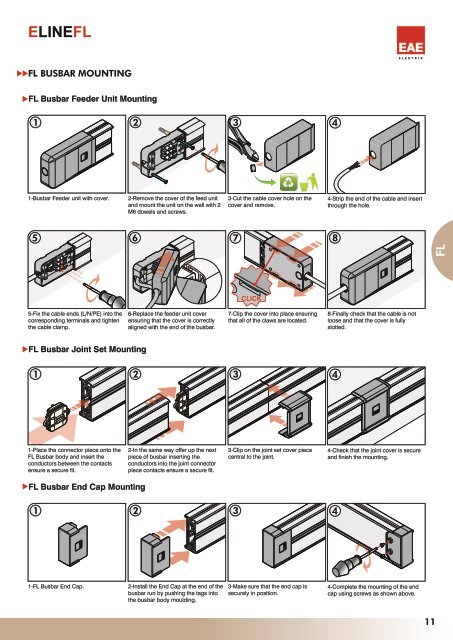
FL BUSBAR MOUNTING<br />
FL Busbar Feeder Unit Mounting<br />
1<br />
2<br />
3<br />
4<br />
1-Busbar Feeder unit with cover.<br />
2-Remove the cover of the feed unit<br />
and mount the unit on the wall with 2<br />
M6 dowels and screws.<br />
3-Cut the cable cover hole on the<br />
cover and remove.<br />
4-Strip the end of the cable and insert<br />
through the hole.<br />
5<br />
6 7<br />
8<br />
FL<br />
CLICK<br />
5-Fix the cable ends (L/N/PE) into the<br />
corresponding terminals and tighten<br />
the cable clamp.<br />
6-Replace the feeder unit cover<br />
ensuring that the cover is correctly<br />
aligned with the end of the busbar.<br />
7-Clip the cover into place ensuring<br />
that all of the claws are located.<br />
8-Finally check that the cable is not<br />
loose and that the cover is fully<br />
slotted.<br />
FL Busbar Joint Set Mounting<br />
1 2<br />
3<br />
4<br />
1-Place the connector piece onto the<br />
FL Busbar body and insert the<br />
conductors between the contacts<br />
ensure a secure fit.<br />
2-In the same way offer up the next<br />
piece of busbar inserting the<br />
conductors into the joint connector<br />
piece contacts ensure a secure fit.<br />
3-Clip on the joint set cover piece<br />
central to the joint.<br />
4-Check that the joint cover is secure<br />
and finish the mounting.<br />
FL Busbar End Cap Mounting<br />
1 2<br />
3<br />
4<br />
1-FL Busbar End Cap.<br />
2-Install the End Cap at the end of the<br />
busbar run by pushing the tags into<br />
the busbar body moulding.<br />
3-Make sure that the end cap is<br />
securely in position.<br />
4-Complete the mounting of the end<br />
cap using screws as shown above.<br />
11