
Create successful ePaper yourself
Turn your PDF publications into a flip-book with our unique Google optimized e-Paper software.
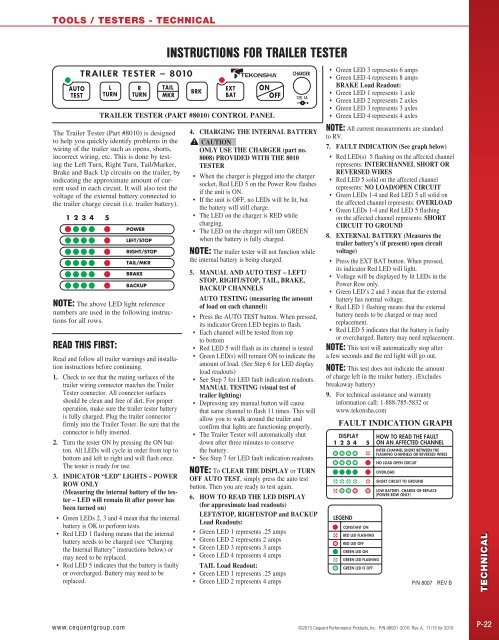
TOOLS / TESTERS - TECHNICAL<br />
INSTRUCTIONS FOR TRAILER TESTER<br />
TRAILER TESTER (PART #8010) CONTROL PANEL<br />
• Green LED 3 represents 6 amps<br />
• Green LED 4 represents 8 amps<br />
BRAKE Load Readout:<br />
• Green LED 1 represents 1 axle<br />
• Green LED 2 represents 2 axles<br />
• Green LED 3 represents 3 axles<br />
• Green LED 4 represents 4 axles<br />
The Trailer Tester (Part #8010) is designed<br />
to help you quickly identify problems in the<br />
wiring of the trailer such as opens, shorts,<br />
incorrect wiring, etc. This is done by testing<br />
the Left Turn, Right Turn, Tail/Marker,<br />
Brake and Back Up circuits on the trailer, by<br />
indicating the approximate amount of current<br />
used in each circuit. It will also test the<br />
voltage of the external battery connected to<br />
the trailer charge circuit (i.e. trailer battery).<br />
NOTE: The above LED light reference<br />
numbers are used in the following instructions<br />
for all rows.<br />
READ THIS FIRST:<br />
Read and follow all trailer warnings and installation<br />
instructions before continuing.<br />
1. Check to see that the mating surfaces of the<br />
trailer wiring connector matches the Trailer<br />
Tester connector. All connector surfaces<br />
should be clean and free of dirt. For proper<br />
operation, make sure the trailer tester battery<br />
is fully charged. Plug the trailer connector<br />
firmly into the Trailer Tester. Be sure that the<br />
connector is fully inserted.<br />
2. Turn the tester ON by pressing the ON button.<br />
All LEDs will cycle in order from top to<br />
bottom and left to right and will flash once.<br />
The tester is ready for use.<br />
3. INDICATOR “LED” LIGHTS – POWER<br />
ROW ONLY<br />
(Measuring the internal battery of the tester<br />
– LED will remain lit after power has<br />
been turned on)<br />
• Green LEDs 2, 3 and 4 mean that the internal<br />
battery is OK to perform tests.<br />
• Red LED 1 flashing means that the internal<br />
battery needs to be charged (see “Charging<br />
the Internal Battery” instructions below) or<br />
may need to be replaced.<br />
• Red LED 5 indicates that the battery is faulty<br />
or overcharged. Battery may need to be<br />
replaced.<br />
4. CHARGING THE INTERNAL BATTERY<br />
CAUTION<br />
ONLY USE THE CHARGER (part no.<br />
8008) PROVIDED WITH THE 8010<br />
TESTER<br />
• When the charger is plugged into the charger<br />
socket, Red LED 5 on the Power Row flashes<br />
if the unit is ON.<br />
• If the unit is OFF, no LEDs will be lit, but<br />
the battery will still charge.<br />
• The LED on the charger is RED while<br />
charging.<br />
• The LED on the charger will turn GREEN<br />
when the battery is fully charged.<br />
NOTE: The trailer tester will not function while<br />
the internal battery is being charged.<br />
5. MANUAL AND AUTO TEST – LEFT/<br />
STOP, RIGHT/STOP, TAIL, BRAKE,<br />
BACKUP CHANNELS<br />
AUTO TESTING (measuring the amount<br />
of load on each channel):<br />
• Press the AUTO TEST button. When pressed,<br />
its indicator Green LED begins to flash.<br />
• Each channel will be tested from top<br />
to bottom<br />
• Red LED 5 will flash as its channel is tested<br />
• Green LED(s) will remain ON to indicate the<br />
amount of load. (See Step 6 for LED display<br />
load readouts)<br />
• See Step 7 for LED fault indication readouts.<br />
MANUAL TESTING (visual test of<br />
trailer lighting)<br />
• Depressing any manual button will cause<br />
that same channel to flash 11 times. This will<br />
allow you to walk around the trailer and<br />
confirm that lights are functioning properly.<br />
• The Trailer Tester will automatically shut<br />
down after three minutes to conserve<br />
the battery.<br />
• See Step 7 for LED fault indication readouts.<br />
NOTE: To CLEAR THE DISPLAY or TURN<br />
OFF AUTO TEST, simply press the auto test<br />
button. Then you are ready to test again.<br />
6. HOW TO READ THE LED DISPLAY<br />
(for approximate load readouts)<br />
LEFT/STOP, RIGHT/STOP and BACKUP<br />
Load Readouts:<br />
• Green LED 1 represents .25 amps<br />
• Green LED 2 represents 2 amps<br />
• Green LED 3 represents 3 amps<br />
• Green LED 4 represents 4 amps<br />
TAIL Load Readout:<br />
• Green LED 1 represents .25 amps<br />
• Green LED 2 represents 4 amps<br />
NOTE: All current measurements are standard<br />
to RV.<br />
7. FAULT INDICATION (See graph below)<br />
• Red LED(s) 5 flashing on the affected channel<br />
represents: INTERCHANNEL SHORT OR<br />
REVERSED WIRES<br />
• Red LED 5 solid on the affected channel<br />
represents: NO LOAD/OPEN CIRCUIT<br />
• Green LEDs 1-4 and Red LED 5 all solid on<br />
the affected channel represents: OVERLOAD<br />
• Green LEDs 1-4 and Red LED 5 flashing<br />
on the affected channel represents: SHORT<br />
CIRCUIT TO GROUND<br />
8. EXTERNAL BATTERY (Measures the<br />
trailer battery’s (if present) open circuit<br />
voltage)<br />
• Press the EXT BAT button. When pressed,<br />
its indicator Red LED will light.<br />
• Voltage will be displayed by lit LEDs in the<br />
Power Row only.<br />
• Green LED’s 2 and 3 mean that the external<br />
battery has normal voltage.<br />
• Red LED 1 flashing means that the external<br />
battery needs to be charged or may need<br />
replacement.<br />
• Red LED 5 indicates that the battery is faulty<br />
or overcharged. Battery may need replacement.<br />
NOTE: This test will automatically stop after<br />
a few seconds and the red light will go out.<br />
NOTE: This test does not indicate the amount<br />
of charge left in the trailer battery. (Excludes<br />
breakaway battery)<br />
9. For technical assistance and warranty<br />
information call: 1-888-785-5832 or<br />
www.tekonsha.com<br />
FAULT INDICATION GRAPH<br />
P/N 8007 REV B<br />
TECHNICAL<br />
www.cequentgroup.com ©2015 <strong>Cequent</strong> Performance Products, Inc. P/N 98931-<strong>2016</strong> Rev. A. 11/15 for <strong>2016</strong><br />
P-22