
Create successful ePaper yourself
Turn your PDF publications into a flip-book with our unique Google optimized e-Paper software.
Handling the <strong>Plummer</strong> <strong>Blocks</strong> and Bearings<br />
9.3 Installation of the bearing and associated<br />
components<br />
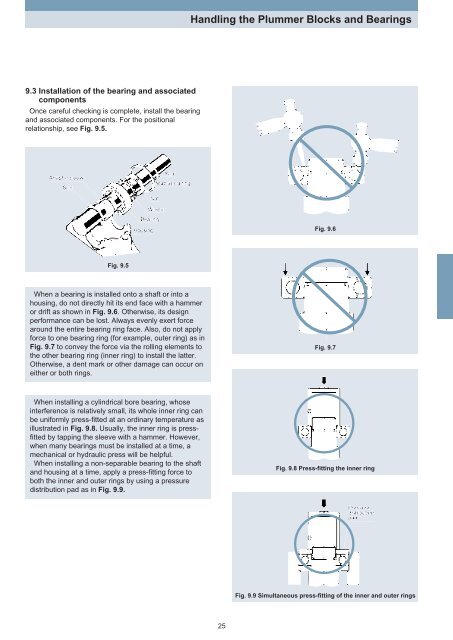
Once careful checking is complete, install the bearing<br />
and associated components. For the positional<br />
relationship, see Fig. 9.5.<br />
Fig. 9.6<br />
Fig. 9.5<br />
When a bearing is installed onto a shaft or into a<br />
housing, do not directly hit its end face with a hammer<br />
or drift as shown in Fig. 9.6. Otherwise, its design<br />
performance can be lost. Always evenly exert force<br />
around the entire bearing ring face. Also, do not apply<br />
force to one bearing ring (for example, outer ring) as in<br />
Fig. 9.7 to convey the force via the rolling elements to<br />
the other bearing ring (inner ring) to install the latter.<br />
Otherwise, a dent mark or other damage can occur on<br />
either or both rings.<br />
Fig. 9.7<br />
When installing a cylindrical bore bearing, whose<br />
interference is relatively small, its whole inner ring can<br />
be uniformly press-fitted at an ordinary temperature as<br />
illustrated in Fig. 9.8. Usually, the inner ring is pressfitted<br />
by tapping the sleeve with a hammer. However,<br />
when many bearings must be installed at a time, a<br />
mechanical or hydraulic press will be helpful.<br />
When installing a non-separable bearing to the shaft<br />
and housing at a time, apply a press-fitting force to<br />
both the inner and outer rings by using a pressure<br />
distribution pad as in Fig. 9.9.<br />
Fig. 9.8 Press-fitting the inner ring<br />
Fig. 9.9 Simultaneous press-fitting of the inner and outer rings<br />
25