
Create successful ePaper yourself
Turn your PDF publications into a flip-book with our unique Google optimized e-Paper software.
Handling the <strong>Plummer</strong> <strong>Blocks</strong> and Bearings<br />
9.6 Maintenance and inspection<br />
To be able to use a bearing to its design life and avoid<br />
any accident, check the following points at regular<br />
intervals.<br />
(1) Running sound on bearing<br />
(2) Temperature on bearing or plummer block<br />
(3) Vibration on shaft<br />
(4) Leaking grease or worn oil seal<br />
(5) Loose tightening and mounting bolts<br />
(6) Trouble-free operation of the lubrication system, and<br />
loosening or leakage with piping<br />
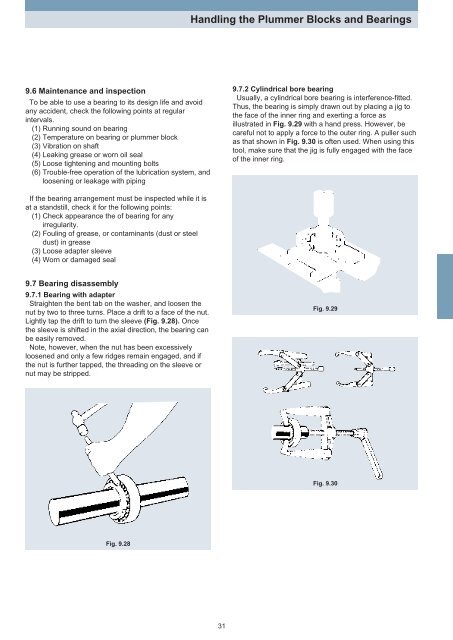
9.7.2 Cylindrical bore bearing<br />
Usually, a cylindrical bore bearing is interference-fitted.<br />
Thus, the bearing is simply drawn out by placing a jig to<br />
the face of the inner ring and exerting a force as<br />
illustrated in Fig. 9.29 with a hand press. However, be<br />
careful not to apply a force to the outer ring. A puller such<br />
as that shown in Fig. 9.30 is often used. When using this<br />
tool, make sure that the jig is fully engaged with the face<br />
of the inner ring.<br />
If the bearing arrangement must be inspected while it is<br />
at a standstill, check it for the following points:<br />
(1) Check appearance the of bearing for any<br />
irregularity.<br />
(2) Fouling of grease, or contaminants (dust or steel<br />
dust) in grease<br />
(3) Loose adapter sleeve<br />
(4) Worn or damaged seal<br />
9.7 Bearing disassembly<br />
9.7.1 Bearing with adapter<br />
Straighten the bent tab on the washer, and loosen the<br />
nut by two to three turns. Place a drift to a face of the nut.<br />
Lightly tap the drift to turn the sleeve (Fig. 9.28). Once<br />
the sleeve is shifted in the axial direction, the bearing can<br />
be easily removed.<br />
Note, however, when the nut has been excessively<br />
loosened and only a few ridges remain engaged, and if<br />
the nut is further tapped, the threading on the sleeve or<br />
nut may be stripped.<br />
Fig. 9.29<br />
Fig. 9.30<br />
Fig. 9.28<br />
31