
Create successful ePaper yourself
Turn your PDF publications into a flip-book with our unique Google optimized e-Paper software.
Handling the <strong>Plummer</strong> <strong>Blocks</strong> and Bearings<br />
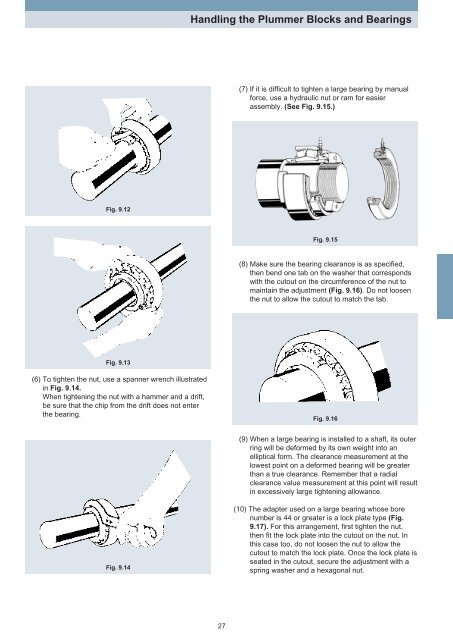
(7) If it is difficult to tighten a large bearing by manual<br />
force, use a hydraulic nut or ram for easier<br />
assembly. (See Fig. 9.15.)<br />
Fig. 9.12<br />
Fig. 9.15<br />
(8) Make sure the bearing clearance is as specified,<br />
then bend one tab on the washer that corresponds<br />
with the cutout on the circumference of the nut to<br />
maintain the adjustment (Fig. 9.16). Do not loosen<br />
the nut to allow the cutout to match the tab.<br />
Fig. 9.13<br />
(6) To tighten the nut, use a spanner wrench illustrated<br />
in Fig. 9.14.<br />
When tightening the nut with a hammer and a drift,<br />
be sure that the chip from the drift does not enter<br />
the bearing.<br />
Fig. 9.16<br />
(9) When a large bearing is installed to a shaft, its outer<br />
ring will be deformed by its own weight into an<br />
elliptical form. The clearance measurement at the<br />
lowest point on a deformed bearing will be greater<br />
than a true clearance. Remember that a radial<br />
clearance value measurement at this point will result<br />
in excessively large tightening allowance.<br />
Fig. 9.14<br />
(10) The adapter used on a large bearing whose bore<br />
number is 44 or greater is a lock plate type (Fig.<br />
9.17). For this arrangement, first tighten the nut,<br />
then fit the lock plate into the cutout on the nut. In<br />
this case too, do not loosen the nut to allow the<br />
cutout to match the lock plate. Once the lock plate is<br />
seated in the cutout, secure the adjustment with a<br />
spring washer and a hexagonal nut.<br />
27