MOLAD laser and light Master - OpticsPlanet.com
MOLAD laser and light Master - OpticsPlanet.com
MOLAD laser and light Master - OpticsPlanet.com

Create successful ePaper yourself
Turn your PDF publications into a flip-book with our unique Google optimized e-Paper software.
Figure 20 Figure 21 27<br />
29<br />
In the event the <strong>MOLAD</strong> unit fails to operate or appears to operate at low power,<br />
please check the following:<br />
1. Fails to operate.<br />
A. Replace the batteries (see instructions, pp. 24-25).<br />
B. Use night vision goggles to confirm that the unit is not operating in the IR<br />
Mode.<br />
C. Check the battery installation to make sure the positive (+) terminal is<br />
facing toward the flash<strong>light</strong> head. See Figure 18, p. 25.<br />
2. Laser or Tactical <strong>light</strong> is weak or dim.<br />
A. Check the front cap of the <strong>laser</strong> <strong>and</strong> tactical <strong>light</strong> to make sure that they<br />
are not covered with dirt or powder. See Figure 15, p. 22.<br />
B. Replace the batteries (see instructions, pp. 24-25).<br />
Troubleshooting the <strong>MOLAD</strong><br />
Laser Devices, Inc. (LDI) offers a one-year limited warranty (excluding batteries<br />
<strong>and</strong> <strong>light</strong> bulbs) from the date of the original purchase against failure due to<br />
defect in design, parts <strong>and</strong> workmanship. This warranty is void if the product<br />
serial number has been removed or in the event that the product has been<br />
misused, modified or abused. LDI will replace defective products at its discretion.<br />
To the maximum extent permitted by law, LDI disclaims all other warranties<br />
whether expressed or implied, including but not limited to, implied warranties of<br />
merchantability <strong>and</strong> fitness for a particular purpose. In no event shall LDI or its<br />
suppliers, distributors, dealers or agents be liable for any damages whatsoever<br />
(including without limitation damages for personal injury, wrongful death or<br />
pecuniary loss) arising out of the use or the inability to use any LDI manufactured<br />
product. This limited warranty gives the purchaser specific legal rights, which<br />
may vary from state to state or jurisdiction to jurisdiction. 31<br />
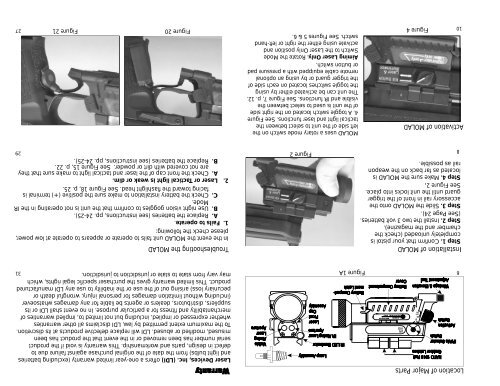
<strong>MOLAD</strong> uses a rotary mode switch on the<br />
left side of the unit to select between the<br />
tactical <strong>light</strong> <strong>and</strong> <strong>laser</strong> functions. See Figure<br />
4. A toggle switch located on the right side<br />
of the unit is used to select between the<br />
visible <strong>and</strong> IR functions. See Figure 7, p. 12.<br />
The unit can be activated either by using<br />
the toggle switches located on each side of<br />
the trigger guard or by using an optional<br />
remote cable equipped with a pressure pad<br />
or button switch.<br />
Aiming Laser Only. Rotate the Mode<br />
Switch to the Laser Only position <strong>and</strong><br />
activate using either the right or left-h<strong>and</strong><br />
switch. See Figures 5 & 6.<br />
Figure 2<br />
Figure 1A<br />
Figure 4<br />
10<br />
Activation of <strong>MOLAD</strong><br />
Installation of <strong>MOLAD</strong><br />
Step 1. Confirm that your pistol is<br />
<strong>com</strong>pletely unloaded (check the<br />
chamber <strong>and</strong> the magazine).<br />
Step 2. Install the two 3 volt batteries.<br />
(See Page 24).<br />
Step 3. Slide the <strong>MOLAD</strong> onto the<br />
accessory rail in front of the trigger<br />
guard until the unit locks into place.<br />
See Figure 2.<br />
Step 4. Make sure the <strong>MOLAD</strong> is<br />
located as far back on the weapon<br />
rail as possible.<br />
DEVICES, DEVICES, INC.<br />
MADE IN THE USA<br />
LASER LASER<br />
I/R<br />
VIS<br />
OFF<br />
ON<br />
Location of Major Parts<br />
8<br />
6