MOLAD laser and light Master - OpticsPlanet.com
MOLAD laser and light Master - OpticsPlanet.com
MOLAD laser and light Master - OpticsPlanet.com

Create successful ePaper yourself
Turn your PDF publications into a flip-book with our unique Google optimized e-Paper software.
21<br />
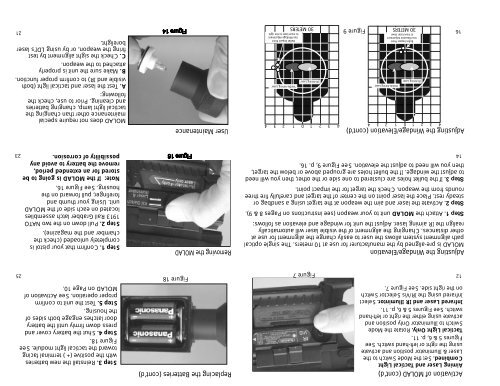
<strong>MOLAD</strong> does not require special<br />
maintenance other than changing the<br />
tactical <strong>light</strong> lamp, changing batteries<br />
<strong>and</strong> cleaning. Prior to use, check the<br />
following:<br />
A. Test the <strong>laser</strong> <strong>and</strong> tactical <strong>light</strong> (both<br />
visible <strong>and</strong> IR) to confirm proper function.<br />
B. Make sure the unit is properly<br />
attached to the weapon.<br />
C. Check the sight alignment by test<br />
firing the weapon, or by using LDI’s <strong>laser</strong><br />
bore<strong>light</strong>.<br />
23<br />
25<br />
Note: If the <strong>MOLAD</strong> is going to be<br />
stored for an extended period,<br />
remove the battery to avoid any<br />
possibility of corrosion.<br />
Step 2. Pull down on the two NATO<br />
1913 Rail Grabber latch assemblies<br />
located on each side of the <strong>MOLAD</strong><br />
unit. Using your thumb <strong>and</strong><br />
forefinger, pull forward on the<br />
housing. See Figure 16.<br />
Step 1. Confirm that your pistol is<br />
<strong>com</strong>pletely unloaded (check the<br />
chamber <strong>and</strong> the magazine).<br />
Step 3. Reinstall the new batteries<br />
with the positive (+) terminal facing<br />
toward the tactical <strong>light</strong> module. See<br />
Figure 18.<br />
Step 4. Shut the battery cover <strong>and</strong><br />
press down firmly until the battery<br />
door latches engage both sides of<br />
the housing.<br />
Step 5. Test the unit to confirm<br />
proper operation. See Activation of<br />
<strong>MOLAD</strong> on Page 10.<br />
User Maintenance<br />
Removing the <strong>MOLAD</strong><br />
Figure 18<br />
Replacing the Batteries (cont’d)<br />
Bullet Impact Point<br />
Use Windage Adjustment<br />
to move <strong>laser</strong> to the right<br />
Visible Aiming Laser<br />
1 2 3 4<br />
30 METERS<br />
IR Aiming Laser<br />
3 2 1 0<br />
4<br />
Figure 9<br />
Visible Aiming Laser<br />
1 2 3 4<br />
30 METERS<br />
Bullet Impact Point<br />
Use Elevation Adjustment<br />
to move <strong>laser</strong> down<br />
IR Aiming Laser<br />
3 2 1 0<br />
Adjusting the Windage/Elevation (cont'd)<br />
Step 3. If the bullet holes are clustered to one side or the other, then you will need<br />
to adjust the windage. If the bullet holes are grouped above or below the target,<br />
then you will need to adjust the elevation. See Figure 9, p. 16.<br />
Step 2. Activate the <strong>laser</strong> <strong>and</strong> aim the weapon at the target using a s<strong>and</strong>bag or<br />
steady rest. Place the <strong>laser</strong> point on the center of the target <strong>and</strong> carefully fire three<br />
rounds from the weapon. Check the target for the impact point.<br />
Step 1. Attach the <strong>MOLAD</strong> unit to your weapon (see instructions on Pages 8 & 9).<br />
Adjusting the Windage/Elevation<br />
<strong>MOLAD</strong> is pre-aligned by the manufacturer for use at 10 meters. The single optical<br />
path alignment system allows the user to easily change the alignment for use at<br />
other distances. Changing the alignment of the visible <strong>laser</strong> will automatically<br />
realign the IR aiming <strong>laser</strong>. Adjust the unit for windage <strong>and</strong> elevation as follows:<br />
Figure 7<br />
4<br />
16<br />
14<br />
12<br />
Activation of <strong>MOLAD</strong> (cont’d)<br />
Aiming Laser <strong>and</strong> Tactical Light<br />
Combined. Set the Mode Switch to the<br />
Laser & Illuminator position <strong>and</strong> activate<br />
using the right or left-h<strong>and</strong> switch. See<br />
Figures 5 & 6, p. 11.<br />
Tactical Light Only. Rotate the Mode<br />
Switch to Illuminator Only position <strong>and</strong><br />
activate using either the right or left-h<strong>and</strong><br />
switch. See Figures 5 & 6, p. 11.<br />
Infrared Laser <strong>and</strong> IR Illumintor. Select<br />
Infrared using the IR/Vis Selector Switch<br />
on the right side. See Figure 7.