Devonshire April May 17
Devonshire magazine: Events, History, wildlife of Devon
Devonshire magazine: Events, History, wildlife of Devon

You also want an ePaper? Increase the reach of your titles
YUMPU automatically turns print PDFs into web optimized ePapers that Google loves.
improving your<br />
PHOTOGRAPHY<br />
with Nigel Jones<br />
Challenging Light<br />
There are times when the scene is fantastic, but your camera isnʼt able to cope with<br />
the lighting conditions. Are you aware of your options in these situations?<br />
As the person that carries out the<br />
bulk of the photography for this<br />
magazine, you can imagine Iʼve had<br />
to develop effective strategies for<br />
ensuring images taken on site are<br />
usable when theyʼre downloaded<br />
back in the office onto my mac.<br />
Iʼm assuming that youʼre using a<br />
camera with a viewfinder - digital<br />
or optical (weʼll discuss this in a<br />
later issue). If you donʼt, then it<br />
becomes very difficult when youʼre<br />
out and about taking shots, to<br />
ensure youʼre capturing the right<br />
quality exposures. Using just the<br />
lcd display on the back of your<br />
camera wonʼt be effective because<br />
youʼll find viewing the exposure<br />
and focussing extremely difficult<br />
and ultimately hit and miss.<br />
processed and unrealistic. A way<br />
round this is to set your camera to<br />
take 3 varying exposures in highburst<br />
speed mode (ideally on a<br />
tripod, using a remote trigger to<br />
avoid camera shake), and then<br />
you can blend and process them<br />
on the computer using HDR software<br />
such Hdrsoft, Photomatix,<br />
Photoshop, etc.<br />
supports RAW). RAW images are<br />
the result of exactly what your<br />
camera sees when you take the<br />
shot, no in-camera processing is<br />
applied. The beauty of this format is<br />
they allow deep control over shadows<br />
and highlights, the amount<br />
of control you get over the image<br />
is quite staggering. You may be<br />
aware of this route, and have put<br />
for the sky and clouds by using<br />
compensation exposure. I tend to<br />
generally use my camera in aperture<br />
priority mode. This is where<br />
you set the aperture manually, and<br />
the camera works out the exposure<br />
based on its light metering system.<br />
Then I dial in exposure compensation<br />
so that none of the white and<br />
grey tones are lost in the clouds.<br />
One of the problems with digital<br />
cameras that cause the scenario<br />
(1) on the right, is that whilst the<br />
dynamic range of the human eye<br />
and a higher end digital camera is<br />
pretty similar (10-14 f-stops), our<br />
eyes have a virtual range exceeding<br />
24 f-stops. This is because our eyes<br />
work in a manner more akin to a<br />
video recorder, where our eyes<br />
dynamically adjust as the subject<br />
of our view changes, and also our<br />
brain does a lot of processing to<br />
combine all these different exposures<br />
- the net effect being our<br />
much greater perceived dynamic<br />
range.<br />
Getting back to the problem in<br />
hand, high contrast lighting, there<br />
are some effective strategies you<br />
can adopt in order to arrive at the<br />
final outcome of a decent photo.<br />
1) HDR (High Dynamic Range)<br />
your camera may have the ability<br />
to generate HDR images, these<br />
essentially are where the camera<br />
takes 3 (or more) very rapid shots<br />
at varying exposures and then<br />
merges them inside your camera<br />
using its processing capabilities.<br />
This can (depending on the camera)<br />
be quite effective, but photos<br />
can sometimes appear overly<br />
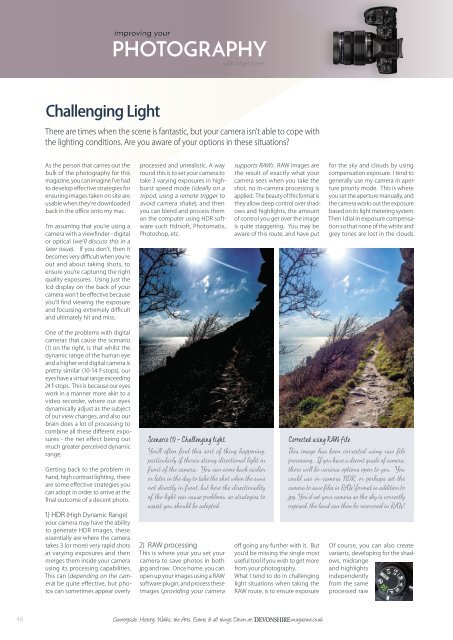
Scenario (1) - Chall enging light<br />
You’ll often find this sort of thing happening,<br />
particularly if there’s strong directional light in<br />
front of the camera. You can come back earlier<br />
or later in the day to take the shot when the sun’s<br />
not directly in front, but here the directionality<br />
of the light can cause problems, so strategies to<br />
assist you should be adopted.<br />
2) RAW processing<br />
This is where your you set your<br />
camera to save photos in both<br />
.jpg and raw. Once home, you can<br />
open up your images using a RAW<br />
software plugin, and process these<br />
images (providing your camera<br />
off going any further with it. But<br />
youʼd be missing the single most<br />
useful tool if you wish to get more<br />
from your photography.<br />
What I tend to do in challenging<br />
light situations when taking the<br />
RAW route, is to ensure exposure<br />
Corrected using RAW file<br />
This image has been corrected using raw file<br />
processing. If you have a decent grade of camera,<br />
there will be various options open to you. You<br />
could use in-camera HDR, or perhaps set the<br />
camera to save files in RAW format in addition to<br />
jpg. You’d set your camera so the sky is correctly<br />
exposed, the land can then be recovered in RAW.<br />
Of course, you can also create<br />
variants, developing for the shadows,<br />
midrange<br />
and highlights<br />
independently<br />
from the same<br />
processed raw<br />
48<br />
Countryside, History, Walks, the Arts, Events & all things Devon at: DEVONSHIRE magazine.co.uk