April 2018

Create successful ePaper yourself
Turn your PDF publications into a flip-book with our unique Google optimized e-Paper software.
Dormer Windows<br />
GET YOUR DORMER DETAILS RIGHT<br />
The Technical Team at Marley Eternit explain how to get the key details for valleys and side<br />
abutments correct and ensure your dormer window installation is right first time.<br />
Dormer windows are becoming increasingly<br />
popular as a way of increasing usable<br />
space in the loft, as well as to create<br />
more visually interesting roof designs. There are<br />
many different types of dormer, ranging from the<br />
most common gable fronted, through to hip<br />
dormers and the more specialist eyebrow dormer.<br />
For roofing contractors, each dormer will require<br />
its own particular detailing, depending on roofing<br />
material, location and how it is framed. However,<br />
most dormers will include common roof details<br />
such as valleys, side abutments, eaves, ridges or<br />
cloak verges.<br />
Here, we focus specifically on design details for<br />
valleys and side abutments, using clay plain tiles<br />
as an example.<br />
Valleys<br />
Most dormers create valleys on either side; this<br />
means a higher volume of water runs through<br />
them as they are collecting the rainwater from the<br />
two roof slopes. Therefore flashing and<br />
weathering is very important.<br />
The following design steps should be followed:<br />
1 - The width of an open valley trough should be<br />
determined in accordance with BS 5534, which<br />
takes into account the volume of rainwater at<br />
specified flow rates draining from plan areas and<br />
roof pitches.<br />
2 - When designing the valley construction, it is<br />
important to set the timber boards for valley<br />
linings and troughs on noggings between the<br />
rafters, so that the face is flush with the top of<br />
the adjacent rafters.<br />
3 - The width of the boards needs to be wider than<br />
the determined valley width, to accommodate the<br />
ends of the slating or tiling battens and any tilting<br />
fillets used for metal valley linings.<br />
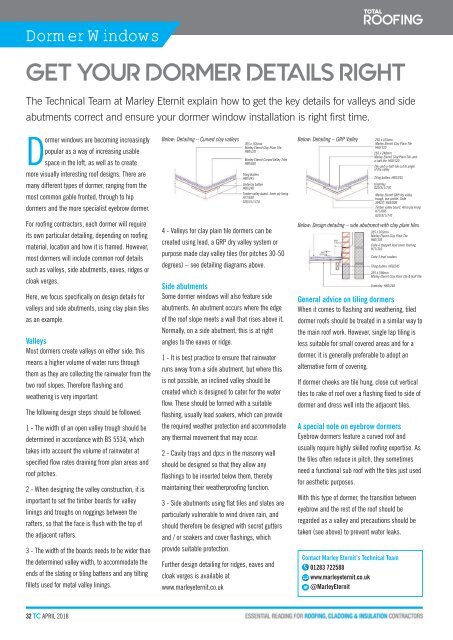
Below: Detailing – Curved clay valleys<br />
265 x 165mm<br />
Marley Eternit Clay Plain Tile<br />
H60/120<br />
Marley Eternit Curved Valley Tiles<br />
H60/630<br />
Tiling Batten<br />
H60/245<br />
Underlay batten<br />
H60/240<br />
Timber valley board, 4mm ply lining<br />
H71/630<br />
G20/311/770<br />
4 - Valleys for clay plain tile dormers can be<br />
created using lead, a GRP dry valley system or<br />
purpose made clay valley tiles (for pitches 30-50<br />
degrees) – see detailing diagrams above.<br />
Side abutments<br />
Some dormer windows will also feature side<br />
abutments. An abutment occurs where the edge<br />
of the roof slope meets a wall that rises above it.<br />
Normally, on a side abutment, this is at right<br />
angles to the eaves or ridge.<br />
1 - It is best practice to ensure that rainwater<br />
runs away from a side abutment, but where this<br />
is not possible, an inclined valley should be<br />
created which is designed to cater for the water<br />
flow. These should be formed with a suitable<br />
flashing, usually lead soakers, which can provide<br />
the required weather protection and accommodate<br />
any thermal movement that may occur.<br />
2 - Cavity trays and dpcs in the masonry wall<br />
should be designed so that they allow any<br />
flashings to be inserted below them, thereby<br />
maintaining their weatherproofing function.<br />
3 - Side abutments using flat tiles and slates are<br />
particularly vulnerable to wind driven rain, and<br />
should therefore be designed with secret gutters<br />
and / or soakers and cover flashings, which<br />
provide suitable protection.<br />
Further design detailing for ridges, eaves and<br />
cloak verges is available at<br />
www.marleyeternit.co.uk<br />
Below: Detailing – GRP Valley<br />
265 x 165mm<br />
Marley Eternit Clay Plain Tile<br />
H60/120<br />
265 x 248mm<br />
Marley Eternit Clay Plain Tile-anda-half<br />
tile. H60/120<br />
Tile-and-a-half-tile cut to angle<br />
of the valley<br />
Tiling batten. H60/245<br />
Underlay<br />
G20/311/770<br />
Marley Eternit GRP dry valley<br />
trough, low profile. Code<br />
30422). H65/606<br />
Timber valley board, 4mm ply lining<br />
H71/606<br />
G20/311/770<br />
Below: Design detailing – side abutment with clay plain tiles<br />
265 x 165mm<br />
Marley Eternit Clay Plain Tile<br />
H60/120<br />
Code 4 stepped lead cover flashing<br />
H71/310<br />
Code 3 lead soakers<br />
Tiling batten. H60/245<br />
265 x 248mm<br />
Marley Eternit Clay Plain Tile & Half Tile<br />
Underlay. H60/240<br />
General advice on tiling dormers<br />
When it comes to flashing and weathering, tiled<br />
dormer roofs should be treated in a similar way to<br />
the main roof work. However, single lap tiling is<br />
less suitable for small covered areas and for a<br />
dormer, it is generally preferable to adopt an<br />
alternative form of covering.<br />
If dormer cheeks are tile hung, close cut vertical<br />
tiles to rake of roof over a flashing fixed to side of<br />
dormer and dress well into the adjacent tiles.<br />
A special note on eyebrow dormers<br />
Eyebrow dormers feature a curved roof and<br />
usually require highly skilled roofing expertise. As<br />
the tiles often reduce in pitch, they sometimes<br />
need a functional sub roof with the tiles just used<br />
for aesthetic purposes.<br />
With this type of dormer, the transition between<br />
eyebrow and the rest of the roof should be<br />
regarded as a valley and precautions should be<br />
taken (see above) to prevent water leaks.<br />
Contact Marley Eternit’s Technical Team<br />
01283 722588<br />
www.marleyeternit.co.uk<br />
@MarleyEternit<br />
32 TC APRIL <strong>2018</strong>