NEO-2 User Manual - Mesa Labs
NEO-2 User Manual - Mesa Labs
NEO-2 User Manual - Mesa Labs

You also want an ePaper? Increase the reach of your titles
YUMPU automatically turns print PDFs into web optimized ePapers that Google loves.
Contents<br />
Product Overview 1<br />
Applications for Use 2<br />
Principles of Operation 2<br />
Cautions and Storage 3<br />
Cautions 3<br />
Storage 3<br />
Taking Measurements 4<br />
Instrument Calibration 5<br />
Calibrating Conductivity 5<br />
Calibrating Temperature 6<br />
Calibrating Pressure 6<br />
Calibrating the pH Function 7<br />
Calibrating Display Contrast 7<br />
Customizing the Security Passcode 8<br />
Resetting to Default Calibration Values 8<br />
Care & Maintenance 9<br />
Replacing the Battery 9<br />
Specifications 10<br />
Replacing the pH Probe 9<br />
Cleaning and Disinfecting 9<br />
Replacement Parts 11<br />
Solutions 12<br />
Care and Calibration Stations 12<br />
Limited Warranty 13<br />
Service and Support 14<br />
Information in this document is subject to change without notice. No part of this document may be reproduced or transmitted in any form or<br />
by any means, electronic or mechanical, for any purpose, without the express permission of <strong>Mesa</strong> Laboratories, Inc.
Product Overview<br />
LCD<br />
Mode<br />
switch<br />
<strong>NEO</strong>-2 Meter <strong>User</strong>’s Guide 1<br />
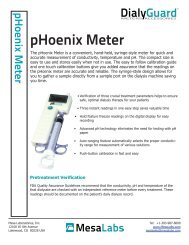
The <strong>NEO</strong>-2 Meter is a precision test instrument that measures conductivity, temperature, pressure,<br />
and pH of liquids. The measurement system is composed of a base unit, a<br />
conductivity/temperature cell, pressure sensor and a pH probe (optional accessory). The base unit<br />
contains electronic circuitry, a differential pressure transducer, mode switch, liquid crystal display<br />
(LCD), and a 9-volt battery. The conductivity/temperature cell and pH probe connect to the base<br />
unit with cables. Positive and negative pressure ports are located on the side of the base unit.<br />
Conductivity/Temperature Cell<br />
Negative (-)<br />
pressure port<br />
(BLUE)<br />
pH Probe In-line pH adapter<br />
pH probe<br />
connector<br />
Conductivity/<br />
temperature<br />
cell connector
<strong>NEO</strong>-2 Meter <strong>User</strong>’s Guide 2<br />
Applications for Use<br />
The <strong>NEO</strong>-2 Meter may be used by hemodialysis personnel to test conductivity, temperature,<br />
pressure, and pH of the dialysate solution used with hemodialysis delivery systems. The <strong>NEO</strong>-2<br />
Meter may also be used to test the pH and conductivity of acid and sodium bicarbonate dialysate<br />
concentrates and water used in hemodialysis applications.<br />
Principles of Operation<br />
Conductivity and temperature measurements are taken as solution flows through the<br />
conductivity/temperature cell. Differential pressure measurements are taken using an in-line<br />
adapter that uses plastic tubing to connect to the positive and negative pressure ports. pH<br />
measurements may be taken using an in-line adapter attached to the dialysate line or by directly<br />
inserting the pH probe into solution. Each measurement may be taken independently of another or<br />
simultaneously.<br />
Measurements are shown on the display. The user may view the desired parameter by rotating the<br />
mode switch. The scroll feature displays readings sequentially without user interaction. <strong>User</strong><br />
prompts guide the user through the calibration process.<br />
A liquid may be tested using one of the following methods:<br />
In-line Setup for Hemodialysis Delivery Systems<br />
(Conductivity/temperature, pressure, and/or pH)<br />
Sampling Dip<br />
(Conductivity/ (pH)<br />
temperature)
Cautions and Storage<br />
<strong>NEO</strong>-2 Meter <strong>User</strong>’s Guide 3<br />
Cautions<br />
Verify accurate function of your test instrument before taking measurements or whenever<br />
inaccurate readings are suspected.<br />
When calibrating your instrument, use a standard that is traceable to the National Institute of<br />
Standards and Technology (NIST) or an equivalent standards organization.<br />
For conductivity calibration, use sodium chloride (NaCl) standard solution. The <strong>NEO</strong>-2 Meter is<br />
temperature-compensated for sodium chloride (NaCl) solution. Using other solutions, such as<br />
potassium chloride (KCl) may result in inaccurate calibration.<br />
Do not use the <strong>NEO</strong>-2 Meter in place of the hemodialysis delivery system’s primary sensors,<br />
controls, and/or monitors.<br />
DO NOT use the <strong>NEO</strong>-2 Meter to test the hemodialysis delivery system while a patient is being<br />
dialyzed.<br />
DO NOT submerge your instrument in liquids. DO NOT allow liquids to enter the enclosure or<br />
the measurement cell connectors.<br />
Always use clean, dry transducer protectors on the pressure ports to prevent liquids from entering<br />
the instrument and damaging the pressure transducer.<br />
Do not use abrasive cleaning agents and/or full strength bleach or acid to clean the base unit or<br />
cells as this will cause damage.<br />
Federal law restricts the use of this device to sale by or on the order of a physician.<br />
Storage<br />
Conductivity/temperature cell: Rinse the cell interior thoroughly with reverse osmosis (RO)<br />
water before storing.<br />
pH Probe: Rinse thoroughly with RO water and store with 4.00 pH buffer solution in In-Line<br />
Fitting. Cap both ends with the caps provided.<br />
Store your instrument away from extreme temperatures.<br />
Keep the original packaging in the event the instrument must be returned for service.
Taking Measurements<br />
Sampling<br />
(Conductivity/temperature)<br />
<strong>NEO</strong>-2 Meter <strong>User</strong>’s Guide 4<br />
Instrument modes: conductivity, temperature, pressure, pH, and calibration are capitalized and<br />
enclosed in [BRACKETS].<br />
Display symbols and user prompts are capitalized and enclosed in “QUOTATIONS.”<br />
Click means to press and release the mode switch once.<br />
CAUTION: Verify calibration of your instrument before each use. See “Instrument Calibration” if<br />
calibration is needed.<br />
DO NOT use the <strong>NEO</strong>-2 Meter to test the hemodialysis delivery system while a patient is being<br />
dialyzed.<br />
1) Connect the desired cell and/or adapters to the instrument. Choose one of the following<br />
methods:<br />
Dip<br />
(pH)<br />
In-line Setup for Hemodialysis Delivery Systems<br />
(Conductivity/temperature, pressure, and/or pH)<br />
2) Click the mode switch twice to turn the meter on. It will turn on in the mode last used. Select<br />
the desired parameter by rotating the mode switch in either direction. Take readings when the<br />
readings stabilize.<br />
3) To manually turn the meter off, press and hold the mode switch for 3 seconds. Otherwise, it<br />
will turn off automatically after 30 minutes to preserve battery life.<br />
To activate the scroll feature: While the meter is on, click the mode switch. “SCROLL” will<br />
appear in the upper right corner of the display and the meter will begin scrolling through each<br />
mode in this order: conductivity, temperature, pressure, pH. The meter will automatically skip<br />
[CONDUCTIVITY] and [TEMPERATURE] if the cell is not connected. To deactivate the<br />
scroll feature, press or rotate the mode switch.<br />
4) Rinse the cell interior, pH probe, and adapters thoroughly with reverse osmosis (RO) water<br />
after use. See “Cautions and Storage” for storage instructions.
Instrument Calibration<br />
<strong>NEO</strong>-2 Meter <strong>User</strong>’s Guide 5<br />
Verify accurate calibration of the conductivity, temperature, pressure, and pH functions before use<br />
or whenever inaccurate readings are suspected.<br />
To enter [CALIBRATION] mode, turn the meter on and rotate the mode switch until the display<br />
reads “CLICK TO ENTER CALIBRATION MODE”. Click the mode switch.<br />
Enter security passcode by rotating the mode switch in either direction. Click the mode switch.<br />
(NOTE: Default security passcode is 10. To change the security passcode, refer to “Customizing<br />
the Security Passcode” located in this section.)<br />
Select one of the following by rotating the mode switch in either direction: “CONDUCTIVITY”,<br />
“TEMPERATURE”, “ZERO PRESSURE”, “POS/NEG PRESSURE”, “7.0 PH”,<br />
“4.0 AND 10.0 PH”, “DISPLAY CONTRAST”. “CAL” will appear in the upper right corner of<br />
the display.<br />
To exit [CALIBRATION] mode and save your changes, press and hold the mode switch for 3<br />
seconds.<br />
Calibrating Conductivity<br />
Each range must be calibrated separately. Use the appropriate solution for each range as shown in<br />
the table below.<br />
Recommended Standard Solution Values (mS/cm)<br />
RANGE .020 to 1.999 2.00 to 19.99 20.0 to 199.9<br />
SOLUTION VALUE 1 14.0 100<br />
CAUTION: Use only sodium chloride (NaCl) standard solution. The <strong>NEO</strong>-2 Meter’s<br />
conductivity function is temperature-compensated for NaCl solution. Other solutions, such as<br />
potassium chloride (KCl), may result in inaccurate calibration.<br />
You will need:<br />
� Conductivity standard solution<br />
� Cell Cleaning Syringe with Female Hansen ® -Female Luer Adapter attached<br />
� Clean, dry container such as a glass beaker (approx. 100 ml) or<br />
� Sample tray (P/N 303110001 – available from MESA LABS)<br />
1) Connect the cell cleaning syringe to either<br />
conductivity/temperature cell Hansen ® connector.<br />
2) Enter calibration mode and select “CONDUCTIVITY”. A value<br />
will appear with “CAL” in the upper right corner of the display.<br />
3) Rinse the container with the standard solution you will be using to<br />
eliminate contaminants. Discard the rinse solution. Pour at least<br />
50 ml of fresh solution into the rinsed container.<br />
4) Insert the unattached Hansen ® connector into the solution as<br />
shown and draw solution through the cell. While solution is<br />
flowing and when the reading stabilizes, adjust the reading until it<br />
matches the standard solution value.<br />
5) Repeat step 4 to confirm that the displayed reading matches the<br />
solution value.<br />
Cell should be connected<br />
to the meter!
6) Repeat steps 3 – 5 for each conductivity range.<br />
7) To save your changes, press and hold the mode switch for 3 seconds.<br />
<strong>NEO</strong>-2 Meter <strong>User</strong>’s Guide 6<br />
Calibrating Temperature<br />
You will need:<br />
� NIST-traceable Thermometer with 0.1º C resolution; accuracy ± 0.05 º C or better.<br />
� Cell Cleaning Syringe<br />
� Temperature-controlled, circulating solution bath<br />
1) Submerge the thermometer into the solution bath at approximately<br />
25º C and allow reading to stabilize.<br />
2) Connect the cell cleaning syringe to either<br />
conductivity/temperature cell Hansen ® connector.<br />
3) Enter calibration mode and select “TEMPERATURE”. A value<br />
will appear with “CAL” in the upper right corner of the display.<br />
4) Insert the unattached Hansen ® connector into the solution as<br />
shown and draw solution through the cell. While solution is<br />
flowing and when the reading stabilizes, adjust the reading until it<br />
matches the thermometer reading.<br />
5) Repeat step 4 to confirm that the displayed reading matches the<br />
thermometer reading.<br />
6) To save your changes, press and hold the mode switch for 3 seconds.<br />
Calibrating Pressure<br />
You will first zero pressure, then calibrate positive/negative pressure as described.<br />
You will need:<br />
� Mercury manometer or other pressure standard with 1 mmHg resolution;<br />
accuracy ± 2 mmHg or better.<br />
� In-line pressure adapter<br />
� Pressure source<br />
Cell should be connected<br />
to the meter!<br />
1) Enter calibration mode and select “ZERO PRESSURE”. A value will appear with “CAL” in<br />
the upper right corner of the display.<br />
2) Open both pressure ports to atmosphere. Rotate the mode switch in either direction to<br />
automatically adjust to “0”. Click the mode switch.<br />
3) Rotate the mode switch and select “POS/NEG PRESSURE” A value will appear with “CAL”<br />
in the upper right corner of the display.<br />
4) Using the in-line pressure adapter, connect<br />
the positive pressure port, the pressure<br />
standard, and the pressure source as shown.<br />
5) Create pressure to +800 mmHg and clamp<br />
the pressure source line. Adjust the reading<br />
until it matches that of the pressure<br />
standard. Remove the clamp to release the<br />
pressure.<br />
6) Connect the in-line pressure adapter to the<br />
negative pressure port and repeat step 5.<br />
Note that the <strong>NEO</strong>-2 will display negative<br />
pressure.<br />
7) To save your changes, press and hold the mode switch for 3 seconds.<br />
Setup for Pressure Calibration
Calibrating the pH Function<br />
pH must be calibrated at three values: 4.0, 7.0, and 10.0.<br />
You will need:<br />
� 7.0, 4.0 and 10.0 pH buffer solutions<br />
� Container such as a glass beaker (approx. 100 ml) or<br />
� Sample tray (P/N 303110001 – available from MESA LABS<br />
<strong>NEO</strong>-2 Meter <strong>User</strong>’s Guide 7<br />
For maximum efficiency, prepare three containers with 7.0, 4.0 and 10.0 pH buffer solutions as<br />
outlined below before beginning.<br />
Rinse the pH probe with RO water between calibrations with the different pH buffer solutions.<br />
1) Unscrew the pH probe from the In-Line fitting.<br />
2) Rinse a clean, dry container with 7.0 pH buffer solution. Discard the rinse solution. Pour at<br />
least 50 ml of fresh solution into the rinsed container.<br />
3) Enter calibration mode and select “7.0 PH”. A value will appear with “CAL” in the upper right<br />
corner of the display.<br />
4) Insert the pH probe into the solution and stir in a circular<br />
motion to thoroughly hydrate the sensing and reference<br />
electrodes. When the reading stabilizes, rotate the mode<br />
switch in either direction to automatically adjust to “7.0”.<br />
Click the mode switch.<br />
5) Select “4.0 AND 10.0 PH”. A value will be shown with<br />
“CAL” in the upper right corner of the display.<br />
6) Rinse a clean, dry container with 4.0 pH buffer solution.<br />
Discard the rinse solution. Pour at least 50 ml of fresh<br />
solution into the rinsed container.<br />
7) Insert the pH probe into the solution and stir in a circular<br />
motion to thoroughly hydrate the sensing and reference<br />
electrodes. When the reading stabilizes, rotate the mode switch in either direction to<br />
automatically adjust to “4.0”. Click the mode switch.<br />
8) Repeat steps 5 – 6 with 10.0 pH buffer solution.<br />
9) To save your changes, press and hold the mode switch for 3 seconds.<br />
Calibrating Display Contrast<br />
Alter the contrast of the display to allow for easier viewing.<br />
1) Enter calibration mode and select “DISPLAY CONTRAST”. A random set of two-digit<br />
values will appear with “CAL” in the upper right corner of the display.<br />
2) Rotate the mode switch clockwise to lighten the display and counterclockwise to darken the<br />
display.<br />
3) To save your changes, press and hold the mode switch for 3 seconds.<br />
Setup for pH Calibration
Customizing the Security Passcode<br />
<strong>NEO</strong>-2 Meter <strong>User</strong>’s Guide 8<br />
Change the security passcode to prevent unauthorized calibration. Be sure to write down your<br />
security passcode in a secure place for future reference.<br />
You will need:<br />
� Standard or Phillips ® screwdriver<br />
1) Turn the meter on and rotate the mode switch until the display reads “CLICK TO ENTER<br />
CALIBRATION MODE”. Click the mode switch.<br />
2) Loosen all four enclosure screws and carefully remove the front cover.<br />
3) Press and hold the white pushbutton located on the back of the circuit board attached to the<br />
front cover.<br />
4) Rotate the mode switch in either direction until desired security passcode is displayed.<br />
Release the pushbutton. The default security passcode “10” will be displayed.<br />
5) Rotate the mode switch until the new customized security passcode is displayed. Click the<br />
mode switch to enter [CALIBRATION] mode. Press and hold the mode switch for 3 seconds<br />
to exit [CALIBRATION] mode and save the new passcode settings.<br />
6) Replace the cover. Take care to align the edges of the front and back covers to ensure proper<br />
sealing.<br />
7) Tighten the housing screws. DO NOT overtighten—this may damage the enclosure.<br />
Resetting to Default Calibration Values<br />
Resetting to default calibration values will initialize ALL pH and pressure calibration, display<br />
contrast, and security passcode settings.<br />
You will need:<br />
� Standard or Phillips ® screwdriver<br />
1) Turn the meter on and rotate the mode switch to the [PRESSURE] mode.<br />
2) Loosen all four enclosure screws and carefully remove the front cover.<br />
3) Press and hold the white pushbutton located on the back of the circuit board attached to the<br />
front cover until two short beeps are heard. Release the pushbutton immediately upon hearing<br />
the two short beeps.<br />
4) Replace the cover. Take care to align the edges of the front and back covers to ensure proper<br />
sealing.<br />
5) Tighten the housing screws. DO NOT overtighten—this may damage the enclosure.
Care & Maintenance<br />
<strong>NEO</strong>-2 Meter <strong>User</strong>’s Guide 9<br />
Replacement pH probes, accessories, and standard solutions are available from MESA LABS or<br />
your local distributor.<br />
Replacing the Battery<br />
When the low battery indicator appears in the upper left hand corner of the display, replace the<br />
battery as soon as possible. The instrument will continue to function normally until the battery<br />
voltage drops below a critical limit. At that time, the low battery indicator will be shown on an<br />
otherwise blank display and the instrument will turn off after 2 seconds. Instrument functions are<br />
inoperable when the low battery indicator is the only symbol displayed!<br />
To replace the battery:<br />
You will need:<br />
� Standard or Phillips ® screwdriver<br />
1) Loosen all four enclosure screws and remove the front cover.<br />
2) Remove the battery and replace it with a fresh 9-volt battery, observing the proper polarity.<br />
3) Replace the cover. Take care to align the edges of the front and back covers to ensure proper<br />
sealing.<br />
4) Tighten the housing screws. DO NOT overtighten—this may damage the enclosure.<br />
Replacing the pH Probe<br />
If the pH probe is stored properly, it will provide several years of trouble-free service. When the<br />
stabilization time becomes long, it is time to replace it. Refer to the “Replacement Parts” section.<br />
Cleaning and Disinfecting<br />
Base Unit<br />
Wipe the exterior of the instrument with a soft, damp cloth.<br />
CAUTION: DO NOT submerge your instrument in liquids. DO NOT allow liquids to enter the<br />
enclosure or the measurement cell connectors. Do not use abrasive cleaning agents and/or full<br />
strength bleach or acid to clean the base unit, conductivity/temperature cell, or pH probe as this<br />
will cause damage.<br />
Conductivity/Temperature Cell<br />
When cared for properly, the conductivity/temperature cell has an indefinite lifespan.<br />
Periodic cleaning with a mild bleach solution (1%) or mild acid (such as <strong>NEO</strong>-CARE or vinegar)<br />
will minimize hard deposits and bacteria from forming on the conductivity/temperature cell<br />
sensors. Deposits on the cell sensors may cause inaccurate readings.<br />
To disinfect, draw a mild bleach solution (comprised of 1 part household bleach and 99 parts RO<br />
water) or <strong>NEO</strong>-CARE Cell Cleaning Solution through the cell using the Cell Cleaning Syringe.<br />
Allow it remain in the cell for at least 10 minutes. Rinse thoroughly with RO water.<br />
pH Probe<br />
Wipe with a mild soap solution. Rinse thoroughly with RO water. Store with 4.0 pH buffer<br />
solution in the In-Line Fitting capped on both ends to extend the life of the pH reference electrode.<br />
In-line Adapters: Soak in a mild bleach solution for 10 minutes. Rinse thoroughly with water.
Specifications 1<br />
CONDUCTIVITY *<br />
TEMPERATURE<br />
PRESSURE<br />
Technical Specifications<br />
<strong>NEO</strong>-2 Meter <strong>User</strong>’s Guide 10<br />
RANGE RESOLUTION ACCURACY<br />
100.0 to 199.9 mS<br />
20.0 to 99.9 mS<br />
2.00 to 19.99 mS<br />
1.0 mS<br />
0.1 mS<br />
0.01mS<br />
± 8% of reading<br />
± 2.0 mS<br />
± 0.1 mS<br />
.020 to 1.999 mS<br />
0.001 mS<br />
± 0.01 mS<br />
10.0 o to 90.0 o C 0.1º C 10.0 o to 40.0 o C: ±0.2 o C<br />
41.0 o to 90.0 o C: ±1.0 o C<br />
Gauge:<br />
-700 to +1000 mmHg<br />
Differential:<br />
-1000 to +1500 mmHg<br />
1 mmHg<br />
1 mmHg<br />
± 5 mmHg<br />
± 1% of reading<br />
pH 1.0 to 12.0 pH units 0.1 pH unit ± 0.1 pH unit<br />
*Temperature-compensation: 15° to 45°C.<br />
Physical Specifications<br />
DIMENSIONS WEIGHT POWER BATTERY TYPE<br />
H 4.85” x W 4.1” x D 3.4”<br />
12.3 x 10.4 x 8.6 cm<br />
1 Specifications are subject to change without notice.<br />
1.16 lbs./525 g Battery 9V Alkaline
Replacement Parts<br />
The following replacement parts are available from MESA LABS or your local distributor.<br />
Replacement Parts<br />
<strong>NEO</strong>-2 Meter <strong>User</strong>’s Guide 11<br />
Description Quantity Part Number<br />
In-Line Adapter 2 91.0027<br />
Pressure Adapter 1 91.0031<br />
Conductivity/Temperature Cell 1 11.9006<br />
Luer Fittings Kit 5 of each<br />
fitting<br />
91.0011<br />
Cell Cleaning Kit 1 02.0029<br />
<strong>NEO</strong>-2 Pressure Port Replacement Kit 1 91.0003-1 (red)<br />
91.0003-2 (blue)<br />
<strong>NEO</strong>-2 Meter <strong>User</strong>’s Guide 1 11.9050<br />
Sample tray 1 303110001
Solutions<br />
<strong>NEO</strong>-2 Meter <strong>User</strong>’s Guide 12<br />
MESA LABS standard solutions are certified traceable to<br />
NIST Standard Reference Materials and are sealed with<br />
tamper-evident packaging.<br />
TO ORDER, CALL 1-800-992-6372<br />
Outside the USA, Contact your local distributor<br />
Description Value Size Order No.<br />
Conductivity Standard Solution<br />
mS/cm at 25°C,<br />
Shelf life: 12 months<br />
1 mS 16 oz./475 ml 02.0037<br />
14.0 mS<br />
16 oz./475 ml 02.0014<br />
32 oz./950 ml 02.0027<br />
Discard 30 days after opening. 100 mS 16 oz./475 ml 02.0036<br />
pH Buffer Reference Standard Solution<br />
± 0.01 at 25°C<br />
Shelf life: 18 months<br />
4.00 pH (color-coded red) 16 oz./475 ml 02.0032<br />
7.00 pH (color-coded green)<br />
16 oz./475 ml 02.0030<br />
32 oz./950 ml 02.0031<br />
Discard 90 days after opening. 10.00 pH (color-coded blue) 16 oz./475 ml 02.0034<br />
<strong>NEO</strong>-CARE Cell Cleaning Solution<br />
Gently, yet effectively, removes hard deposits and bacterial filming from cell<br />
sensors for greater accuracy and extended instrument life. Non-toxic.<br />
Ensure Standard Solution Accuracy<br />
� Keep solutions tightly capped to avoid evaporation.<br />
� Take measurements immediately after pouring — evaporation will cause errors.<br />
� Never, EVER pour used solution back into the bottle.<br />
16 oz./475 ml 02.0013<br />
32 oz./950 ml 02.0028<br />
1 gallon 02.0003<br />
� Discard solution the appropriate number of days after opening the bottle or after the expiration date.<br />
MESA LABS Care and Calibration Stations provide a fast, convenient means for rinsing, disinfecting, verifying,<br />
and calibrating your <strong>NEO</strong>-2 and other meters. One-way check valves prevent evaporation and contamination of<br />
your standard solutions while minimizing waste. Used solution is expelled through the check valve to a sink or<br />
waste container via a drainage tube. Contact MESA LABS or your local distributor for further details.<br />
4-Bottle TRI-STATION pictured at left.<br />
Single Rinse Station pictured at right.
Service and Support<br />
<strong>NEO</strong>-2 Meter <strong>User</strong>’s Guide 14<br />
MESA LABS offers full repair and calibration services at its corporate headquarters and<br />
authorized service depot locations throughout the world.<br />
DO NOT attempt to repair or modify the instrument, as this will void the warranty. Any service<br />
required other than battery replacement or calibration must be referred to MESA LABS, an<br />
authorized distributor, or service depot.<br />
Please contact <strong>Mesa</strong> Laboratories, Inc. for further information.<br />
Write to <strong>Mesa</strong> Laboratories, Inc.<br />
12100 W. 6 th Avenue<br />
Lakewood, Colorado, USA 80228<br />
Telephone 1-800-992-6372 - Toll-free USA/Canada<br />
1-303-987-8000<br />
Fax 1-303-987-8989<br />
Hours 8:00 am - 5:00 pm, MT, Monday-Friday<br />
E-mail medservice@mesalabs.com<br />
Website www.mesalabs.com