Web_Designer_UK__May_2018
You also want an ePaper? Increase the reach of your titles
YUMPU automatically turns print PDFs into web optimized ePapers that Google loves.
Tutorials<br />
Design isometric typography<br />
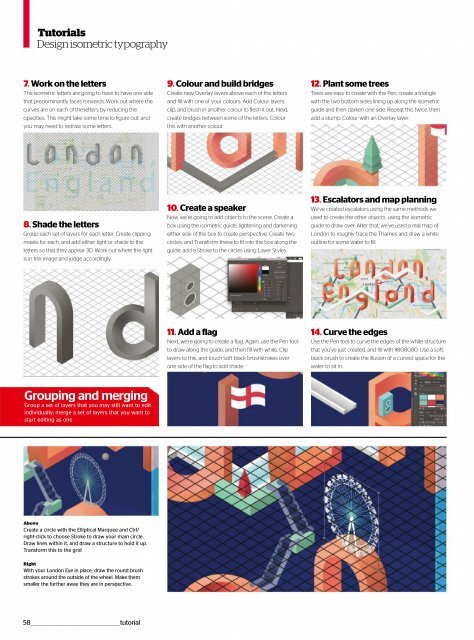
7. Work on the letters<br />
The isometric letters are going to have to have one side<br />
that predominantly faces forwards. Work out where the<br />
curves are on each of the letters by reducing the<br />
opacities. This might take some time to figure out, and<br />
you may need to redraw some letters.<br />
9. Colour and build bridges<br />
Create new Overlay layers above each of the letters<br />
and fill with one of your colours. Add Colour layers,<br />
clip, and brush in another colour to flesh it out. Next,<br />
create bridges between some of the letters. Colour<br />
this with another colour.<br />
12. Plant some trees<br />
Trees are easy to create with the Pen; create a triangle<br />
with the two bottom sides lining up along the isometric<br />
guide and then darken one side. Repeat this twice, then<br />
add a stump. Colour with an Overlay layer.<br />
8. Shade the letters<br />
Group each set of layers for each letter. Create clipping<br />
masks for each, and add either light or shade to the<br />
letters so that they appear 3D. Work out where the light<br />
is in the image and judge accordingly.<br />
10. Create a speaker<br />
Now, we’re going to add objects to the scene. Create a<br />
box using the isometric guide, lightening and darkening<br />
either side of the box to create perspective. Create two<br />
circles, and Transform these to fit into the box along the<br />
guide; add a Stroke to the circles using Layer Styles.<br />
13. Escalators and map planning<br />
We’ve created escalators using the same methods we<br />
used to create the other objects, using the isometric<br />
guide to draw over. After that, we’ve used a real map of<br />
London to roughly trace the Thames and draw a white<br />
outline for some water to fill.<br />
11. Add a flag<br />
Next, we’re going to create a flag. Again, use the Pen tool<br />
to draw along the guide, and then fill with white. Clip<br />
layers to this, and touch soft black brushstrokes over<br />
one side of the flag to add shade.<br />
14. Curve the edges<br />
Use the Pen tool to curve the edges of the white structure<br />
that you’ve just created, and fill with #808080. Use a soft,<br />
black brush to create the illusion of a curved space for the<br />
water to sit in.<br />
Grouping and merging<br />
Group a set of layers that you may still want to edit<br />
individually; merge a set of layers that you want to<br />
start editing as one<br />
Above<br />
Create a circle with the Elliptical Marquee and Ctrl/<br />
right-click to choose Stroke to draw your main circle.<br />
Draw lines within it, and draw a structure to hold it up.<br />
Transform this to the grid<br />
Right<br />
With your London Eye in place, draw the round brush<br />
strokes around the outside of the wheel. Make them<br />
smaller the further away they are in perspective.<br />
58 __________________________________________________tutorial


