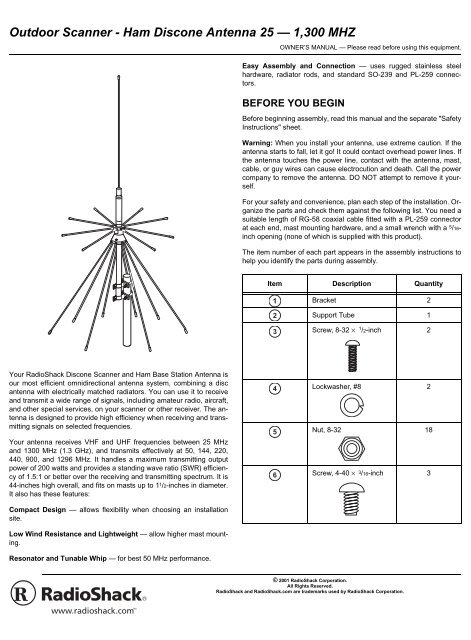
Outdoor Scanner - Ham Discone Antenna 25 ... - Radio Shack
Outdoor Scanner - Ham Discone Antenna 25 ... - Radio Shack
Outdoor Scanner - Ham Discone Antenna 25 ... - Radio Shack

You also want an ePaper? Increase the reach of your titles
YUMPU automatically turns print PDFs into web optimized ePapers that Google loves.
<strong>Outdoor</strong> <strong>Scanner</strong> - <strong>Ham</strong> <strong>Discone</strong> <strong>Antenna</strong> <strong>25</strong> — 1,300 MHZ<br />
Your <strong>Radio</strong><strong>Shack</strong> <strong>Discone</strong> <strong>Scanner</strong> and <strong>Ham</strong> Base Station <strong>Antenna</strong> is<br />
our most efficient omnidirectional antenna system, combining a disc<br />
antenna with electrically matched radiators. You can use it to receive<br />
and transmit a wide range of signals, including amateur radio, aircraft,<br />
and other special services, on your scanner or other receiver. The antenna<br />
is designed to provide high efficiency when receiving and transmitting<br />
signals on selected frequencies.<br />
Your antenna receives VHF and UHF frequencies between <strong>25</strong> MHz<br />
and 1300 MHz (1.3 GHz), and transmits effectively at 50, 144, 220,<br />
440, 900, and 1296 MHz. It handles a maximum transmitting output<br />
power of 200 watts and provides a standing wave ratio (SWR) efficiency<br />
of 1.5:1 or better over the receiving and transmitting spectrum. It is<br />
44-inches high overall, and fits on masts up to 1 1/2-inches in diameter.<br />
It also has these features:<br />
Compact Design — allows flexibility when choosing an installation<br />
site.<br />
Low Wind Resistance and Lightweight — allow higher mast mounting.<br />
Resonator and Tunable Whip — for best 50 MHz performance.<br />
OWNER’S MANUAL — Please read before using this equipment.<br />
Easy Assembly and Connection — uses rugged stainless steel<br />
hardware, radiator rods, and standard SO-239 and PL-<strong>25</strong>9 connectors.<br />
BEFORE YOU BEGIN<br />
Before beginning assembly, read this manual and the separate "Safety<br />
Instructions" sheet.<br />
Warning: When you install your antenna, use extreme caution. If the<br />
antenna starts to fall, let it go! It could contact overhead power lines. If<br />
the antenna touches the power line, contact with the antenna, mast,<br />
cable, or guy wires can cause electrocution and death. Call the power<br />
company to remove the antenna. DO NOT attempt to remove it yourself.<br />
For your safety and convenience, plan each step of the installation. Organize<br />
the parts and check them against the following list. You need a<br />
suitable length of RG-58 coaxial cable fitted with a PL-<strong>25</strong>9 connector<br />
at each end, mast mounting hardware, and a small wrench with a 5/16inch<br />
opening (none of which is supplied with this product).<br />
The item number of each part appears in the assembly instructions to<br />
help you identify the parts during assembly.<br />
Item Description Quantity<br />
Bracket 2<br />
Support Tube 1<br />
Screw, 8-32 × 1 /2-inch 2<br />
Lockwasher, #8 2<br />
Nut, 8-32 18<br />
Screw, 4-40 × 3/16-inch 3<br />
© 2001 <strong>Radio</strong><strong>Shack</strong> Corporation.<br />
All Rights Reserved.<br />
<strong>Radio</strong><strong>Shack</strong> and <strong>Radio</strong><strong>Shack</strong>.com are trademarks used by <strong>Radio</strong><strong>Shack</strong> Corporation.
Item Description Quantity<br />
Lockwasher, #4 3<br />
Apex Assembly 1<br />
Rod, Disk Element 8<br />
Rod, Cone Assembly 8<br />
Coil Assembly 1<br />
Whip Assembly 1<br />
Allen Wrench 1<br />
U-bolt 2<br />
Split Lockwasher, 1/ 4-inch 4<br />
Nut, 1 /4-20 4<br />
Danger Label 1<br />
ASSEMBLING THE ANTENNA<br />
Follow these instructions to assemble your antenna.<br />
1. Install two brackets (1) on the support tube (2) using one 8-32 × 1/2inch<br />
screw (3), one #8 lockwasher (4), and one 8-32 nut (5) for each<br />
bracket. Do not fully tighten the hardware yet.<br />
Position one bracket at the midpoint of the tube. Position the other<br />
bracket at the bottom of the tube.<br />
2<br />
2. Slide the RG-58 coaxial cable through the support tube. Connect<br />
the PL-<strong>25</strong>9 connector to the SO-239 terminal on the apex assembly<br />
(8).<br />
3. Install the apex assembly (8), into the end of the support tube (2)<br />
and secure it with three 4-40 × 3/16 screws (6) and lockwashers (7).<br />
Cable<br />
4. Screw one 8-32 nut (5) onto the threaded end of each of the eight<br />
disc element rods (9).<br />
5. Screw each disc element rod (9) into the holes around the upper<br />
disc of the apex assembly (8), and hand tighten each rod. Rotate each<br />
8-32 nut (5) until it fits snugly against the disc. Then use a 5 /16-inch<br />
wrench to tighten each nut against the disc surface to secure each rod.<br />
6. Screw one 8-32 nut (5) onto the threaded end of each of the eight<br />
cone assembly rods (10).<br />
7. Screw each cone assembly rod into the base of the cone section of<br />
the apex assembly (8), and hand tighten each rod. Next, use a wrench<br />
to tighten each nut against the cone surface to secure each rod.<br />
8. Screw the coil assembly (11) to the top of the apex assembly (8),<br />
and hand tighten. Insert the whip assembly (12) into the top of the coil
assembly. To secure the whip assembly, use the allen wrench (13) to<br />
tighten the set screw.<br />
9. Place the mounting brackets (1) against the chosen section of the<br />
antenna mast, and secure each bracket with a U-bolt (14), two 1/4 -inch<br />
split lockwashers (15), and two 1/4-20 hex nuts (16). When each bracket<br />
is in the correct position, tighten the nuts fully.<br />
10. Use the appropriate mast mounting hardware (not supplied) to secure<br />
the coaxial cable to the antenna mast, leaving some slack in the<br />
cable. Mount the mast section to your chosen mast support system following<br />
the instructions that accompany the support system.<br />
11. Route the remainder of the RG-58 cable to the receiver or transmitter.<br />
A self-adhering Danger Label (17) is supplied. As a safety warning, affix<br />
this label at eye level on the mast holding the antenna.<br />
TUNING THE ANTENNA<br />
Set Screw<br />
To ensure your antenna works with a minimum standing wave ratio<br />
(SWR) on all channels in the 6-meter amateur radio band, we allowed<br />
extra whip length for proper tuning.<br />
3<br />
To properly tune your antenna, you need an SWR meter. <strong>Radio</strong><strong>Shack</strong><br />
stores sell many scanner and amateur radio accessories, including<br />
SWR meters.<br />
1. Connect the SWR meter between the transceiver and the antenna<br />
cable, as described in the meter’s instructions.<br />
2. Measure the SWR on the lowest and highest channels.<br />
3. If the SWR reading on the lowest channel is higher than that specified<br />
in the meter’s instructions, lengthen the antenna by loosening the<br />
set screw and pulling the whip out of the coil about 1/8-inch. If the SWR<br />
reading on the highest channel is higher than that specified in the<br />
meter’s instructions, remove the whip from the coil and cut 1/8-inch<br />
from its lower end. You can cut the whip with a hacksaw or large wire<br />
cutters. You can also use a file to make a small groove around the<br />
whip and then break off the piece.<br />
4. Measure the SWR again and repeat the adjustment, if necessary.<br />
Cut off only 1/8-inch at a time, checking the SWR each time.<br />
FREQUENCY CURVES<br />
70 CM - VSWR VS. FREQUENCY<br />
6 METER - VSWR VS. FREQUENCY<br />
VSWR VS> FREQUENCY
Limited Ninety-Day Warranty<br />
This product is warranted by <strong>Radio</strong><strong>Shack</strong> against manufacturing defects in material and workmanship under normal<br />
use for ninety (90) days from the date of purchase from <strong>Radio</strong><strong>Shack</strong> company-owned stores and authorized<br />
<strong>Radio</strong><strong>Shack</strong> franchisees and dealers. EXCEPT AS PROVIDED HEREIN, <strong>Radio</strong><strong>Shack</strong> MAKES NO EXPRESS<br />
WARRANTIES AND ANY IMPLIED WARRANTIES, INCLUDING THOSE OF MERCHANTABILITY AND FIT-<br />
NESS FOR A PARTICULAR PURPOSE, ARE LIMITED IN DURATION TO THE DURATION OF THE WRITTEN<br />
LIMITED WARRANTIES CONTAINED HEREIN. EXCEPT AS PROVIDED HEREIN, <strong>Radio</strong><strong>Shack</strong> SHALL HAVE<br />
NO LIABILITY OR RESPONSIBILITY TO CUSTOMER OR ANY OTHER PERSON OR ENTITY WITH RE-<br />
SPECT TO ANY LIABILITY, LOSS OR DAMAGE CAUSED DIRECTLY OR INDIRECTLY BY USE OR PERFOR-<br />
MANCE OF THE PRODUCT OR ARISING OUT OF ANY BREACH OF THIS WARRANTY, INCLUDING, BUT<br />
NOT LIMITED TO, ANY DAMAGES RESULTING FROM INCONVENIENCE, LOSS OF TIME, DATA, PROP-<br />
ERTY, REVENUE, OR PROFIT OR ANY INDIRECT, SPECIAL, INCIDENTAL, OR CONSEQUENTIAL DAM-<br />
AGES, EVEN IF <strong>Radio</strong><strong>Shack</strong> HAS BEEN ADVISED OF THE POSSIBILITY OF SUCH DAMAGES.<br />
Some states do not allow limitations on how long an implied warranty lasts or the exclusion or limitation of incidental<br />
or consequential damages, so the above limitations or exclusions may not apply to you.<br />
In the event of a product defect during the warranty period, take the product and the <strong>Radio</strong><strong>Shack</strong> sales receipt as<br />
proof of purchase date to any <strong>Radio</strong><strong>Shack</strong> store. <strong>Radio</strong><strong>Shack</strong> will, at its option, unless otherwise provided by law:<br />
(a) correct the defect by product repair without charge for parts and labor; (b) replace the product with one of the<br />
same or similar design; or (c) refund the purchase price. All replaced parts and products, and products on which<br />
a refund is made, become the property of <strong>Radio</strong><strong>Shack</strong>. New or reconditioned parts and products may be used in<br />
the performance of warranty service. Repaired or replaced parts and products are warranted for the remainder of<br />
the original warranty period. You will be charged for repair or replacement of the product made after the expiration<br />
of the warranty period.<br />
This warranty does not cover: (a) damage or failure caused by or attributable to acts of God, abuse, accident,<br />
misuse, improper or abnormal usage, failure to follow instructions, improper installation or maintenance, alteration,<br />
lightning or other incidence of excess voltage or current; (b) any repairs other than those provided by a <strong>Radio</strong><strong>Shack</strong><br />
Authorized Service Facility; (c) consumables such as fuses or batteries; (d) cosmetic damage; (e)<br />
transportation, shipping or insurance costs; or (f) costs of product removal, installation, set-up service adjustment<br />
or reinstallation.<br />
This warranty gives you specific legal rights, and you may also have other rights which vary from state to state.<br />
<strong>Radio</strong><strong>Shack</strong> Customer Relations, 200 Taylor Street, 6th Floor, Fort Worth, TX 76102<br />
We Service What We Sell 12/99<br />
05/2001<br />
20-043 Printed in USA