Yellow. The Klingspor customer magazine - Edition 2|2020
The new Klingspor customer magazine!
The new Klingspor customer magazine!
- No tags were found...

Create successful ePaper yourself
Turn your PDF publications into a flip-book with our unique Google optimized e-Paper software.
8<br />
GRIT SIZE SEQUENCE<br />
<strong>Yellow</strong>. <strong>The</strong> <strong>Klingspor</strong> Customer Magazine <strong>2|2020</strong><br />
Grinding tips for<br />
professionals<br />
Part 8:<br />
Grit size<br />
sequence<br />
For more info, visit<br />
www.klingspor.de<br />
What is the correct grit size sequence to follow when sanding wood with a<br />
random orbital sander? Our expert, Marcin Grzesiak, explains how to sand wood<br />
with exceptional fineness and precision.<br />
Following the correct grit size<br />
sequence ensures that scratches<br />
resulting from sanding with a coarser<br />
grit are removed reliably. This is of<br />
particular importance when you sand<br />
against the grain, as the resulting<br />
scratches are difficult to remove if the<br />
jumps in grit size are too large. <strong>The</strong> correct<br />
sequence will save you any nasty surprises<br />
during staining. <strong>The</strong> problem during the<br />
sanding process: skipping too many steps<br />
in the grit sequence may keep a fine grit<br />
from removing scratches that may have<br />
been caused by a coarser grit.<br />
<strong>The</strong>refore, the dependable removal of<br />
scratches from the wood surface requires<br />
that you never skip more than one grit size<br />
in the grit sequence.<br />
A good example of the correct practice<br />
could be accomplished by preparing a<br />
wooden surface with the grit sequence<br />
P80, P120, and P180.<br />
If you follow a P80 grit directly with a<br />
P180 grit, you may still be able to produce<br />
a flat and beautiful surface. You will just<br />
have to invest more time and effort.<br />
However, you cannot be certain of a<br />
particular result until the stain has been<br />
applied on the surface. If the scratches are<br />
still visible following this application, the<br />
workpiece will need to be sanded and<br />
stained again. ■<br />
Advice from the expert<br />
If you wish to ensure that all scratches are<br />
removed, you should refrain from skipping more<br />
than one grit size in your work steps.<br />
<strong>The</strong> test parameters we apply<br />
Type of wood:<br />
Pine<br />
Machine used:<br />
DeWalt random orbital sander<br />
Product diameter:<br />
150 mm<br />
Abrasives used:<br />
PS33K self-fastening discs<br />
Hole pattern: GLS 3<br />
Grit sequence:<br />
P80, P120, P180<br />
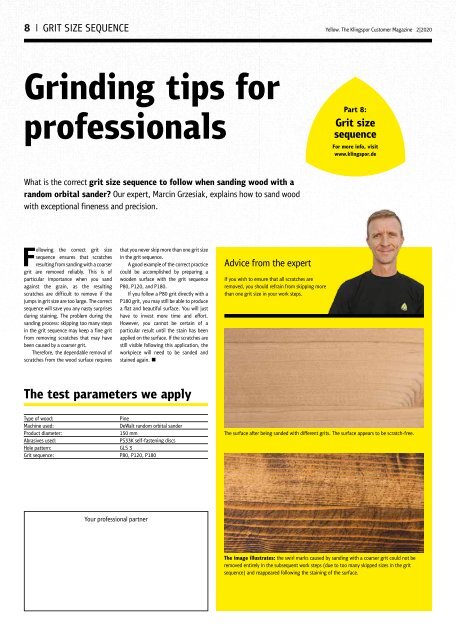
<strong>The</strong> surface after being sanded with different grits. <strong>The</strong> surface appears to be scratch-free.<br />
Your professional partner<br />
<strong>The</strong> image illustrates: the swirl marks caused by sanding with a coarser grit could not be<br />
removed entirely in the subsequent work steps (due to too many skipped sizes in the grit<br />
sequence) and reappeared following the staining of the surface.