Revel Ultima Studio™ Loudspeaker
Revel Ultima Studio™ Loudspeaker
Revel Ultima Studio™ Loudspeaker

You also want an ePaper? Increase the reach of your titles
YUMPU automatically turns print PDFs into web optimized ePapers that Google loves.
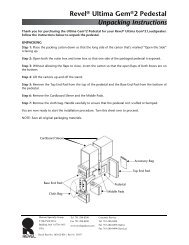
Figure 14. Installing a new<br />
REVEL ULTIMA STUDIO<br />
side panel.<br />
PANEL REPLACEMENT<br />
Although your new REVEL ULTIMA STUDIO loudspeakers are<br />
preassembled at the factory, you can replace existing side panels<br />
with new ones as follows:<br />
1. Lay a REVEL ULTIMA STUDIO on one side, on a soft surface<br />
such as carpeting, or a thick rug.<br />
2. Use the enclosed hex wrench to untighten the exposed side<br />
panel bolts and remove. Remove the panel and grille.<br />
3. Install a new side panel, as shown in Figure 14. Start all six bolts<br />
(with trim rings) by hand and tighten them with the hex<br />
wrench. Be careful not to overtighten.<br />
Bolt<br />
Trim<br />
Ring<br />
4. Lay the REVEL ULTIMA STUDIO on its other side, onto a<br />
soft surface. Use the enclosed hex wrench to untighten the side<br />
panel bolts and remove. Remove the panel.<br />
5. Install the loudspeaker grille, as shown in Figure 15 (on the<br />
next page). Insert the grille tips into panel cups.<br />
Continued on the next page...<br />
REVEL ULTIMA STUDIO<br />
Owner’s Manual<br />
19