Operating instructions Urban Milk Shuttle Calf milk ... - Demsa Genetik
Operating instructions Urban Milk Shuttle Calf milk ... - Demsa Genetik
Operating instructions Urban Milk Shuttle Calf milk ... - Demsa Genetik

Create successful ePaper yourself
Turn your PDF publications into a flip-book with our unique Google optimized e-Paper software.
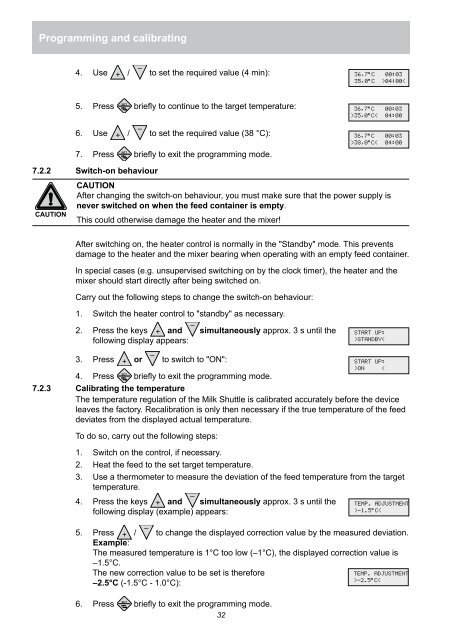
Programming and calibrating<br />
4. Use + /<br />
5. Press<br />
SET<br />
6. Use + /<br />
7. Press<br />
7.2.2 Switch-on behaviour<br />
CAUTION<br />
SET<br />
–<br />
to set the required value (4 min):<br />
briefly to continue to the target temperature:<br />
–<br />
to set the required value (38 °C):<br />
briefly to exit the programming mode.<br />
CAUTION<br />
After changing the switch-on behaviour, you must make sure that the power supply is<br />
never switched on when the feed container is empty.<br />
This could otherwise damage the heater and the mixer!<br />
After switching on, the heater control is normally in the "Standby" mode. This prevents<br />
damage to the heater and the mixer bearing when operating with an empty feed container.<br />
In special cases (e.g. unsupervised switching on by the clock timer), the heater and the<br />
mixer should start directly after being switched on.<br />
Carry out the following steps to change the switch-on behaviour:<br />
1. Switch the heater control to "standby" as necessary.<br />
2. Press the keys + and<br />
following display appears:<br />
3. Press + or<br />
4. Press<br />
SET<br />
–<br />
–<br />
to switch to "ON":<br />
simultaneously approx. 3 s until the<br />
briefly to exit the programming mode.<br />
7.2.3 Calibrating the temperature<br />
The temperature regulation of the <strong>Milk</strong> <strong>Shuttle</strong> is calibrated accurately before the device<br />
leaves the factory. Recalibration is only then necessary if the true temperature of the feed<br />
deviates from the displayed actual temperature.<br />
To do so, carry out the following steps:<br />
1. Switch on the control, if necessary.<br />
2. Heat the feed to the set target temperature.<br />
3. Use a thermometer to measure the deviation of the feed temperature from the target<br />
temperature.<br />
–<br />
4. Press the keys + and simultaneously approx. 3 s until the<br />
following display (example) appears:<br />
5. Press + /<br />
–<br />
to change the displayed correction value by the measured deviation.<br />
Example:<br />
The measured temperature is 1°C too low (–1°C), the displayed correction value is<br />
–1.5°C.<br />
The new correction value to be set is therefore<br />
–2.5°C (-1.5°C - 1.0°C):<br />
6. Press<br />
SET<br />
briefly to exit the programming mode.<br />
32<br />
36,7°C 00:03<br />
35,0°C >04:00<<br />
36,7°C 00:03<br />
>35,0°C< 04:00<br />
36,7°C 00:03<br />
>38,0°C< 04:00<br />
START UP:<br />
>STANDBY<<br />
START UP:<br />
>ON <<br />
TEMP. ADJUSTMENT<br />
>-1.5°C<<br />
TEMP. ADJUSTMENT<br />
>-2.5°C