Antle Knife: Making a Sami-Style Knife Handle and Sheath
This book’s detailed step-by-step instructions concern 1) selecting and preparing the material for the knife’s handle and sheath (e.g., the antler, the leather, the wood and the bark), then 2) using the material to build a classic and authentic antler knife the Scandinavian way. Most of the comprehensive and valuable instructions in this book, whose author lives in northern Sweden, concern the intricacies of working with antler, a subject in which the author has over 50 years of experience. The instructions will help you to avoid mistakes and to learn important procedures, tricks and tips so you can develop your own style. Although the author uses reindeer antler for this knife, he explains you could also use moose or caribou antler. The author says, “I hope this book will lower the reader’s learning threshold for working with antler, easing the knifemaker into this amazing hobby, and inspire readers to use their imagination and do something new”. Hardcover, 112 pages, 208 color photos and drawings, 10-in. x 7-in x .5-in.
This book’s detailed step-by-step instructions concern 1) selecting and preparing the material for the knife’s handle and sheath (e.g., the antler, the leather, the wood and the bark), then 2) using the material to build a classic and authentic antler knife the Scandinavian way. Most of the comprehensive and valuable instructions in this book, whose author lives in northern Sweden, concern the intricacies of working with antler, a subject in which the author has over 50 years of experience. The instructions will help you to avoid mistakes and to learn important procedures, tricks and tips so you can develop your own style.
Although the author uses reindeer antler for this knife, he explains you could also use moose or caribou antler.
The author says, “I hope this book will lower the reader’s learning threshold for working with antler, easing the knifemaker into this amazing hobby, and inspire readers to use their imagination and do something new”.
Hardcover, 112 pages, 208 color photos and drawings, 10-in. x 7-in x .5-in.
You also want an ePaper? Increase the reach of your titles
YUMPU automatically turns print PDFs into web optimized ePapers that Google loves.
Procedure<br />
The h<strong>and</strong>le must be completed before the sheath. It will be your guide for<br />
determining the correct size <strong>and</strong> appearance of your sheath. While the h<strong>and</strong>le<br />
is best made first, the bottom part of the sheath which is made entirely of antler<br />
must be roughly planned out in advance. By doing this you will know what the<br />
best sections of antler will be to use in the h<strong>and</strong>le (i.e., if you are using the same<br />
antler for both the sheath <strong>and</strong> the h<strong>and</strong>le).<br />
The <strong>Knife</strong> <strong>H<strong>and</strong>le</strong><br />
TIP: Never put antler directly between the jaws of a vise. This could leave<br />
marks or crack the antler. Use leather shims.<br />
Leather is an excellent shim material to use between the jaws of the vise <strong>and</strong> the<br />
antler. It will not only prevent indentation marks, but it also provides friction for<br />
gripping the antler. There is also a rubber-faced magnetic shim that works well.<br />
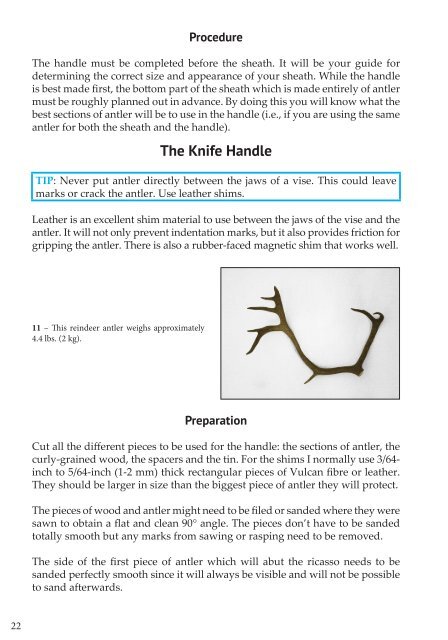
11 – This reindeer antler weighs approximately<br />
4.4 lbs. (2 kg).<br />
Preparation<br />
Cut all the different pieces to be used for the h<strong>and</strong>le: the sections of antler, the<br />
curly-grained wood, the spacers <strong>and</strong> the tin. For the shims I normally use 3/64-<br />
inch to 5/64-inch (1-2 mm) thick rectangular pieces of Vulcan fibre or leather.<br />
They should be larger in size than the biggest piece of antler they will protect.<br />
The pieces of wood <strong>and</strong> antler might need to be filed or s<strong>and</strong>ed where they were<br />
sawn to obtain a flat <strong>and</strong> clean 90° angle. The pieces don’t have to be s<strong>and</strong>ed<br />
totally smooth but any marks from sawing or rasping need to be removed.<br />
The side of the first piece of antler which will abut the ricasso needs to be<br />
s<strong>and</strong>ed perfectly smooth since it will always be visible <strong>and</strong> will not be possible<br />
to s<strong>and</strong> afterwards.<br />
22


