Antle Knife: Making a Sami-Style Knife Handle and Sheath
This book’s detailed step-by-step instructions concern 1) selecting and preparing the material for the knife’s handle and sheath (e.g., the antler, the leather, the wood and the bark), then 2) using the material to build a classic and authentic antler knife the Scandinavian way. Most of the comprehensive and valuable instructions in this book, whose author lives in northern Sweden, concern the intricacies of working with antler, a subject in which the author has over 50 years of experience. The instructions will help you to avoid mistakes and to learn important procedures, tricks and tips so you can develop your own style. Although the author uses reindeer antler for this knife, he explains you could also use moose or caribou antler. The author says, “I hope this book will lower the reader’s learning threshold for working with antler, easing the knifemaker into this amazing hobby, and inspire readers to use their imagination and do something new”. Hardcover, 112 pages, 208 color photos and drawings, 10-in. x 7-in x .5-in.
This book’s detailed step-by-step instructions concern 1) selecting and preparing the material for the knife’s handle and sheath (e.g., the antler, the leather, the wood and the bark), then 2) using the material to build a classic and authentic antler knife the Scandinavian way. Most of the comprehensive and valuable instructions in this book, whose author lives in northern Sweden, concern the intricacies of working with antler, a subject in which the author has over 50 years of experience. The instructions will help you to avoid mistakes and to learn important procedures, tricks and tips so you can develop your own style.
Although the author uses reindeer antler for this knife, he explains you could also use moose or caribou antler.
The author says, “I hope this book will lower the reader’s learning threshold for working with antler, easing the knifemaker into this amazing hobby, and inspire readers to use their imagination and do something new”.
Hardcover, 112 pages, 208 color photos and drawings, 10-in. x 7-in x .5-in.
You also want an ePaper? Increase the reach of your titles
YUMPU automatically turns print PDFs into web optimized ePapers that Google loves.
days. The disadvantage with this procedure is that in the future, when the<br />
knife is exposed to rain <strong>and</strong> then dries, without using a plastic bag it might be<br />
hard to remove the knife from your sheath.<br />
Finishing the Leather Surface<br />
When the leather has dried, it can be coated with regular wax.<br />
The Belt Loop<br />
Cut a strip from a thin piece of soft leather. The width of the strip you make<br />
will depend on the thickness of the leather you have. Normally you would cut<br />
a strip about 5/8-inch (15 mm) wide if the leather has a maximum thickness of<br />
1/16-inch (1.5 mm). It should be about 16-inches (40 cm) long.<br />
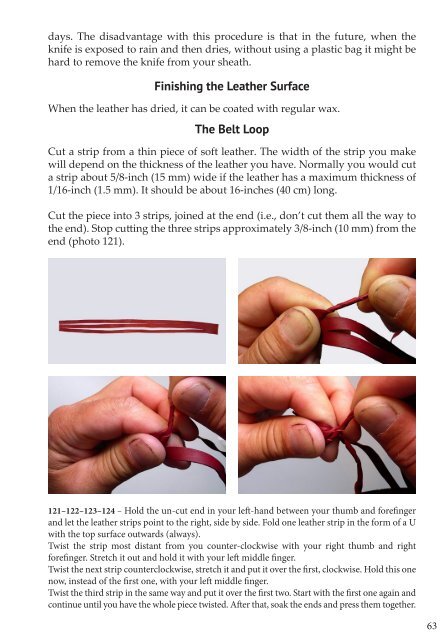
Cut the piece into 3 strips, joined at the end (i.e., don’t cut them all the way to<br />
the end). Stop cutting the three strips approximately 3/8-inch (10 mm) from the<br />
end (photo 121).<br />
121–122–123–124 – Hold the un-cut end in your left-h<strong>and</strong> between your thumb <strong>and</strong> forefinger<br />
<strong>and</strong> let the leather strips point to the right, side by side. Fold one leather strip in the form of a U<br />
with the top surface outwards (always).<br />
Twist the strip most distant from you counter-clockwise with your right thumb <strong>and</strong> right<br />
forefinger. Stretch it out <strong>and</strong> hold it with your left middle finger.<br />
Twist the next strip counterclockwise, stretch it <strong>and</strong> put it over the first, clockwise. Hold this one<br />
now, instead of the first one, with your left middle finger.<br />
Twist the third strip in the same way <strong>and</strong> put it over the first two. Start with the first one again <strong>and</strong><br />
continue until you have the whole piece twisted. After that, soak the ends <strong>and</strong> press them together.<br />
63


