Antle Knife: Making a Sami-Style Knife Handle and Sheath
This book’s detailed step-by-step instructions concern 1) selecting and preparing the material for the knife’s handle and sheath (e.g., the antler, the leather, the wood and the bark), then 2) using the material to build a classic and authentic antler knife the Scandinavian way. Most of the comprehensive and valuable instructions in this book, whose author lives in northern Sweden, concern the intricacies of working with antler, a subject in which the author has over 50 years of experience. The instructions will help you to avoid mistakes and to learn important procedures, tricks and tips so you can develop your own style. Although the author uses reindeer antler for this knife, he explains you could also use moose or caribou antler. The author says, “I hope this book will lower the reader’s learning threshold for working with antler, easing the knifemaker into this amazing hobby, and inspire readers to use their imagination and do something new”. Hardcover, 112 pages, 208 color photos and drawings, 10-in. x 7-in x .5-in.
This book’s detailed step-by-step instructions concern 1) selecting and preparing the material for the knife’s handle and sheath (e.g., the antler, the leather, the wood and the bark), then 2) using the material to build a classic and authentic antler knife the Scandinavian way. Most of the comprehensive and valuable instructions in this book, whose author lives in northern Sweden, concern the intricacies of working with antler, a subject in which the author has over 50 years of experience. The instructions will help you to avoid mistakes and to learn important procedures, tricks and tips so you can develop your own style.
Although the author uses reindeer antler for this knife, he explains you could also use moose or caribou antler.
The author says, “I hope this book will lower the reader’s learning threshold for working with antler, easing the knifemaker into this amazing hobby, and inspire readers to use their imagination and do something new”.
Hardcover, 112 pages, 208 color photos and drawings, 10-in. x 7-in x .5-in.

Create successful ePaper yourself
Turn your PDF publications into a flip-book with our unique Google optimized e-Paper software.
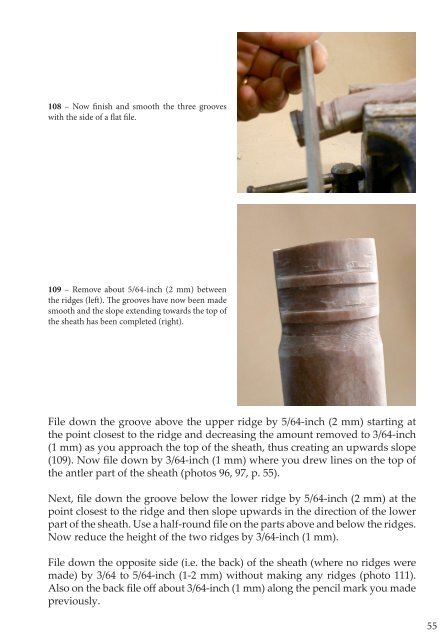
108 – Now finish <strong>and</strong> smooth the three grooves<br />
with the side of a flat file.<br />
109 – Remove about 5/64-inch (2 mm) between<br />
the ridges (left). The grooves have now been made<br />
smooth <strong>and</strong> the slope extending towards the top of<br />
the sheath has been completed (right).<br />
File down the groove above the upper ridge by 5/64-inch (2 mm) starting at<br />
the point closest to the ridge <strong>and</strong> decreasing the amount removed to 3/64-inch<br />
(1 mm) as you approach the top of the sheath, thus creating an upwards slope<br />
(109). Now file down by 3/64-inch (1 mm) where you drew lines on the top of<br />
the antler part of the sheath (photos 96, 97, p. 55).<br />
Next, file down the groove below the lower ridge by 5/64-inch (2 mm) at the<br />
point closest to the ridge <strong>and</strong> then slope upwards in the direction of the lower<br />
part of the sheath. Use a half-round file on the parts above <strong>and</strong> below the ridges.<br />
Now reduce the height of the two ridges by 3/64-inch (1 mm).<br />
File down the opposite side (i.e. the back) of the sheath (where no ridges were<br />
made) by 3/64 to 5/64-inch (1-2 mm) without making any ridges (photo 111).<br />
Also on the back file off about 3/64-inch (1 mm) along the pencil mark you made<br />
previously.<br />
55