

Repair Parts and Maintenance Guide | Sloan - Sloan Valve Company
Repair Parts and Maintenance Guide | Sloan - Sloan Valve Company
Repair Parts and Maintenance Guide | Sloan - Sloan Valve Company

You also want an ePaper? Increase the reach of your titles
YUMPU automatically turns print PDFs into web optimized ePapers that Google loves.
Sink Systems<br />
TROUBLESHOOTING GUIDE<br />
1. No water flows when sensor is activated<br />
Ensure that main power supply is turned “ON.” Check receptacle,<br />
transformer, solenoid, leads <strong>and</strong> connections.<br />
INDICATOR: If Sensor LED does not blink:<br />
A. Control module circuit board is faulty; replace.<br />
B. Sensor is faulty; replace sensor module.<br />
INDICATOR: If Sensor LED blinks when user is sensed:<br />
A. Supply Stop(s) may be closed; open Supply Stop(s).<br />
B. Debris may be in Solenoid filter; remove, clean <strong>and</strong> reinstall.<br />
2. Very low flow or slow dribble<br />
A. Supply Stop(s) may be closed; open Supply Stop(s).<br />
B. Debris is in solenoid, won’t close properly; remove operator <strong>and</strong> clean.<br />
Reassemble in the same manner.<br />
C. Debris may be in Solenoid filter; remove, clean <strong>and</strong> reinstall.<br />
D. Debris is in spray head; remove, clean <strong>and</strong> reinstall.<br />
3. Continues to run (even after power to faucet has been<br />
disconnected)<br />
A. Solenoid valve is installed backwards; install correctly.<br />
B. Debris is in solenoid, won’t close properly; remove operator <strong>and</strong> clean.<br />
Reassemble in the same manner.<br />
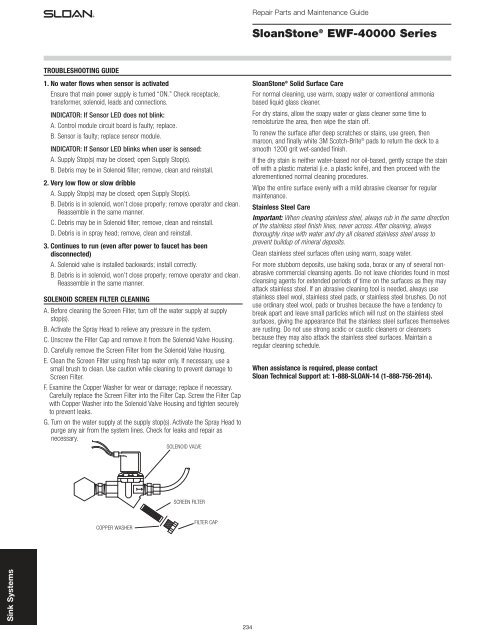
SOLENOID SCREEN FILTER CLEANING<br />
A. Before cleaning the Screen Filter, turn off the water supply at supply<br />
stop(s).<br />
B. Activate the Spray Head to relieve any pressure in the system.<br />
C. Unscrew the Filter Cap <strong>and</strong> remove it from the Solenoid <strong>Valve</strong> Housing.<br />
D. Carefully remove the Screen Filter from the Solenoid <strong>Valve</strong> Housing.<br />
E. Clean the Screen Filter using fresh tap water only. If necessary, use a<br />
small brush to clean. Use caution while cleaning to prevent damage to<br />
Screen Filter.<br />
F. Examine the Copper Washer for wear or damage; replace if necessary.<br />
Carefully replace the Screen Filter into the Filter Cap. Screw the Filter Cap<br />
with Copper Washer into the Solenoid <strong>Valve</strong> Housing <strong>and</strong> tighten securely<br />
to prevent leaks.<br />
G. Turn on the water supply at the supply stop(s). Activate the Spray Head to<br />
purge any air from the system lines. Check for leaks <strong>and</strong> repair as<br />
necessary.<br />
SOLENOID VALVE<br />
COPPER WASHER<br />
SCREEN FILTER<br />
FILTER CAP<br />
234<br />
<strong>Repair</strong> <strong>Parts</strong> <strong>and</strong> <strong>Maintenance</strong> <strong>Guide</strong><br />
<strong>Sloan</strong>Stone ® EWF-40000 Series<br />
<strong>Sloan</strong>Stone ® Solid Surface Care<br />
For normal cleaning, use warm, soapy water or conventional ammonia<br />
based liquid glass cleaner.<br />
For dry stains, allow the soapy water or glass cleaner some time to<br />
remoisturize the area, then wipe the stain off.<br />
To renew the surface after deep scratches or stains, use green, then<br />
maroon, <strong>and</strong> finally white 3M Scotch-Brite ® pads to return the deck to a<br />
smooth 1200 grit wet-s<strong>and</strong>ed finish.<br />
If the dry stain is neither water-based nor oil-based, gently scrape the stain<br />
off with a plastic material (i.e. a plastic knife), <strong>and</strong> then proceed with the<br />
aforementioned normal cleaning procedures.<br />
Wipe the entire surface evenly with a mild abrasive cleanser for regular<br />
maintenance.<br />
Stainless Steel Care<br />
Important: When cleaning stainless steel, always rub in the same direction<br />
of the stainless steel finish lines, never across. After cleaning, always<br />
thoroughly rinse with water <strong>and</strong> dry all cleaned stainless steel areas to<br />
prevent buildup of mineral deposits.<br />
Clean stainless steel surfaces often using warm, soapy water.<br />
For more stubborn deposits, use baking soda, borax or any of several nonabrasive<br />
commercial cleansing agents. Do not leave chlorides found in most<br />
cleansing agents for extended periods of time on the surfaces as they may<br />
attack stainless steel. If an abrasive cleaning tool is needed, always use<br />
stainless steel wool, stainless steel pads, or stainless steel brushes. Do not<br />
use ordinary steel wool, pads or brushes because the have a tendency to<br />
break apart <strong>and</strong> leave small particles which will rust on the stainless steel<br />
surfaces, giving the appearance that the stainless steel surfaces themselves<br />
are rusting. Do not use strong acidic or caustic cleaners or cleansers<br />
because they may also attack the stainless steel surfaces. Maintain a<br />
regular cleaning schedule.<br />
When assistance is required, please contact<br />
<strong>Sloan</strong> Technical Support at: 1-888-SLOAN-14 (1-888-756-2614).


