Repair Parts and Maintenance Guide | Sloan - Sloan Valve Company
Repair Parts and Maintenance Guide | Sloan - Sloan Valve Company
Repair Parts and Maintenance Guide | Sloan - Sloan Valve Company
Create successful ePaper yourself
Turn your PDF publications into a flip-book with our unique Google optimized e-Paper software.
Manual<br />
Flushometers<br />
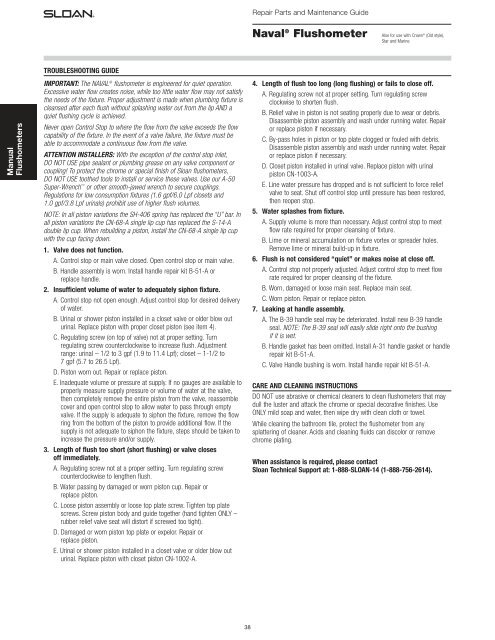
TROUBLESHOOTING GUIDE<br />
IMPORTANT: The NAVAL ® flushometer is engineered for quiet operation.<br />
Excessive water flow creates noise, while too little water flow may not satisfy<br />
the needs of the fixture. Proper adjustment is made when plumbing fixture is<br />
cleansed after each flush without splashing water out from the lip AND a<br />
quiet flushing cycle is achieved.<br />
Never open Control Stop to where the flow from the valve exceeds the flow<br />
capability of the fixture. In the event of a valve failure, the fixture must be<br />
able to accommodate a continuous flow from the valve.<br />
ATTENTION INSTALLERS: With the exception of the control stop inlet,<br />
DO NOT USE pipe sealant or plumbing grease on any valve component or<br />
coupling! To protect the chrome or special finish of <strong>Sloan</strong> flushometers,<br />
DO NOT USE toothed tools to install or service these valves. Use our A-50<br />
Super-Wrench or other smooth-jawed wrench to secure couplings.<br />
Regulations for low consumption fixtures (1.6 gpf/6.0 Lpf closets <strong>and</strong><br />
1.0 gpf/3.8 Lpf urinals) prohibit use of higher flush volumes.<br />
NOTE: In all piston variations the SH-406 spring has replaced the “U” bar. In<br />
all piston variations the CN-68-A single lip cup has replaced the S-14-A<br />
double lip cup. When rebuilding a piston, install the CN-68-A single lip cup<br />
with the cup facing down.<br />
1. <strong>Valve</strong> does not function.<br />
A. Control stop or main valve closed. Open control stop or main valve.<br />
B. H<strong>and</strong>le assembly is worn. Install h<strong>and</strong>le repair kit B-51-A or<br />
replace h<strong>and</strong>le.<br />
2. Insufficient volume of water to adequately siphon fixture.<br />
A. Control stop not open enough. Adjust control stop for desired delivery<br />
of water.<br />
B. Urinal or shower piston installed in a closet valve or older blow out<br />
urinal. Replace piston with proper closet piston (see item 4).<br />
C. Regulating screw (on top of valve) not at proper setting. Turn<br />
regulating screw counterclockwise to increase flush. Adjustment<br />
range: urinal – 1/2 to 3 gpf (1.9 to 11.4 Lpf); closet – 1-1/2 to<br />
7 gpf (5.7 to 26.5 Lpf).<br />
D. Piston worn out. <strong>Repair</strong> or replace piston.<br />
E. Inadequate volume or pressure at supply. If no gauges are available to<br />
properly measure supply pressure or volume of water at the valve,<br />
then completely remove the entire piston from the valve, reassemble<br />
cover <strong>and</strong> open control stop to allow water to pass through empty<br />
valve. If the supply is adequate to siphon the fixture, remove the flow<br />
ring from the bottom of the piston to provide additional flow. If the<br />
supply is not adequate to siphon the fixture, steps should be taken to<br />
increase the pressure <strong>and</strong>/or supply.<br />
3. Length of flush too short (short flushing) or valve closes<br />
off immediately.<br />
A. Regulating screw not at a proper setting. Turn regulating screw<br />
counterclockwise to lengthen flush.<br />
B. Water passing by damaged or worn piston cup. <strong>Repair</strong> or<br />
replace piston.<br />
C. Loose piston assembly or loose top plate screw. Tighten top plate<br />
screws. Screw piston body <strong>and</strong> guide together (h<strong>and</strong> tighten ONLY –<br />
rubber relief valve seat will distort if screwed too tight).<br />
D. Damaged or worn piston top plate or expelor. <strong>Repair</strong> or<br />
replace piston.<br />
E. Urinal or shower piston installed in a closet valve or older blow out<br />
urinal. Replace piston with closet piston CN-1002-A.<br />
38<br />
<strong>Repair</strong> <strong>Parts</strong> <strong>and</strong> <strong>Maintenance</strong> <strong>Guide</strong><br />
Naval ® Flushometer<br />
Also for use with Crown ® (Old style),<br />
Star <strong>and</strong> Marine<br />
4. Length of flush too long (long flushing) or fails to close off.<br />
A. Regulating screw not at proper setting. Turn regulating screw<br />
clockwise to shorten flush.<br />
B. Relief valve in piston is not seating properly due to wear or debris.<br />
Disassemble piston assembly <strong>and</strong> wash under running water. <strong>Repair</strong><br />
or replace piston if necessary.<br />
C. By-pass holes in piston or top plate clogged or fouled with debris.<br />
Disassemble piston assembly <strong>and</strong> wash under running water. <strong>Repair</strong><br />
or replace piston if necessary.<br />
D. Closet piston installed in urinal valve. Replace piston with urinal<br />
piston CN-1003-A.<br />
E. Line water pressure has dropped <strong>and</strong> is not sufficient to force relief<br />
valve to seat. Shut off control stop until pressure has been restored,<br />
then reopen stop.<br />
5. Water splashes from fixture.<br />
A. Supply volume is more than necessary. Adjust control stop to meet<br />
flow rate required for proper cleansing of fixture.<br />
B. Lime or mineral accumulation on fixture vortex or spreader holes.<br />
Remove lime or mineral build-up in fixture.<br />
6. Flush is not considered “quiet” or makes noise at close off.<br />
A. Control stop not properly adjusted. Adjust control stop to meet flow<br />
rate required for proper cleansing of the fixture.<br />
B. Worn, damaged or loose main seat. Replace main seat.<br />
C. Worn piston. <strong>Repair</strong> or replace piston.<br />
7. Leaking at h<strong>and</strong>le assembly.<br />
A. The B-39 h<strong>and</strong>le seal may be deteriorated. Install new B-39 h<strong>and</strong>le<br />
seal. NOTE: The B-39 seal will easily slide right onto the bushing<br />
if it is wet.<br />
B. H<strong>and</strong>le gasket has been omitted. Install A-31 h<strong>and</strong>le gasket or h<strong>and</strong>le<br />
repair kit B-51-A.<br />
C. <strong>Valve</strong> H<strong>and</strong>le bushing is worn. Install h<strong>and</strong>le repair kit B-51-A.<br />
CARE AND CLEANING INSTRUCTIONS<br />
DO NOT use abrasive or chemical cleaners to clean flushometers that may<br />
dull the luster <strong>and</strong> attack the chrome or special decorative finishes. Use<br />
ONLY mild soap <strong>and</strong> water, then wipe dry with clean cloth or towel.<br />
While cleaning the bathroom tile, protect the flushometer from any<br />
splattering of cleaner. Acids <strong>and</strong> cleaning fluids can discolor or remove<br />
chrome plating.<br />
When assistance is required, please contact<br />
<strong>Sloan</strong> Technical Support at: 1-888-SLOAN-14 (1-888-756-2614).


