NegaFix Ai Guide (PDF)
NegaFix Ai Guide (PDF)
NegaFix Ai Guide (PDF)

You also want an ePaper? Increase the reach of your titles
YUMPU automatically turns print PDFs into web optimized ePapers that Google loves.
Negative<br />
<strong>NegaFix</strong><br />
.<br />
* The slider “Auto-tolerance” is only<br />
available with the scanner depending<br />
versions of SilverFast<strong>Ai</strong> and<br />
SilverFastSE.<br />
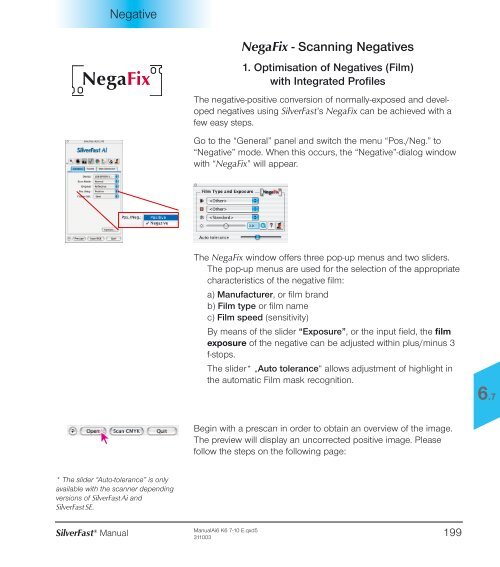
<strong>NegaFix</strong> - Scanning Negatives<br />
1. Optimisation of Negatives (Film)<br />
with Integrated Profiles<br />
The negative-positive conversion of normally-exposed and developed<br />
negatives using SilverFast’s <strong>NegaFix</strong> can be achieved with a<br />
few easy steps.<br />
Go to the “General” panel and switch the menu “Pos./Neg.” to<br />
“Negative” mode. When this occurs, the “Negative”-dialog window<br />
with “<strong>NegaFix</strong>” will appear.<br />
The <strong>NegaFix</strong> window offers three pop-up menus and two sliders.<br />
The pop-up menus are used for the selection of the appropriate<br />
characteristics of the negative film:<br />
a) Manufacturer, or film brand<br />
b) Film type or film name<br />
c) Film speed (sensitivity)<br />
By means of the slider “Exposure”, or the input field, the film<br />
exposure of the negative can be adjusted within plus/minus 3<br />
f-stops.<br />
The slider* „Auto tolerance“ allows adjustment of highlight in<br />
the automatic Film mask recognition.<br />
Begin with a prescan in order to obtain an overview of the image.<br />
The preview will display an uncorrected positive image. Please<br />
follow the steps on the following page:<br />
SilverFast ® Manual<strong>Ai</strong>6 K6 7-10 E.qxd5<br />
Manual 199<br />
311003<br />
6.7
6.7<br />
,.<br />
Negative<br />
,.<br />
.<br />
1. Image Frame Selection<br />
Ensure the selection marquee is<br />
inside the image and does not<br />
touch the perimeter of the film<br />
material. The image on the right<br />
has been automatically optimised<br />
with the integrated “Standard<br />
Profile”.<br />
2. Select Film Manufacturer<br />
Select manufacturer or negative<br />
film brand: e.g. Agfa.<br />
3. Select Film Type<br />
Select the film type: e.g. HDC<br />
4. Select Film Speed<br />
With the pop-up menu, select the<br />
film speed (ASA/ISO-value) of<br />
the actual film. All chosen<br />
settings will be instantly updated<br />
in the preview window.<br />
5. Auto tolerance<br />
In case the image still lacks<br />
neutrality, this slider can be used<br />
to adjust the tollerance of the<br />
mask-recognition (in the highlights)<br />
6. Correct Film Exposure<br />
Normally, a correction of film exposure is not necessary. If the<br />
image appears too bright or too dark, use the slider to simulate<br />
a film exposure of ± 3 f-stops. You will see the correction in<br />
real-time on the preview.<br />
7. Apply Auto-Adjust<br />
Now the process of negative-positive conversion is complete.<br />
To fully optimise your image, press the SilverFast auto-adjust<br />
button from the tool bar as usual and/or apply other SilverFast<br />
tools as desired.<br />
200 SilverFast ® Manual
Negative<br />
2. Example Optimisation of a Negative<br />
This example is shows the optimisation of an “Agfa, HDC 200 plus”<br />
Negative:<br />
First, switch the mode from Positive to<br />
Negative and start a prescan. The prescan<br />
window will show an image converted to<br />
positive.<br />
Change the scan frame so that it is only<br />
covering the actual image pixels and does<br />
not touch the perforation holes of the film.<br />
Film manufacturer: “Agfa”<br />
This pop-up allows selection of the<br />
manufacturer of the Negative film. The<br />
selection effect will update the preview<br />
window in real-time.<br />
Filmtype: “HDC plus”<br />
Select the specific film type in this popup.<br />
Every film preset will distinctively<br />
change the frame in the preview window.<br />
Film speed: “200 ASA”<br />
In this pop-up, you can select the film<br />
speed (ASA/ISO-value) of the film being<br />
used. The selection will again update<br />
the preview window.<br />
Exposure correction: “+1 f-stops”<br />
Finally, with this slider, you can correct<br />
the film exposure within +1 f-stop.<br />
SilverFast ® Manual 201<br />
6.7
6.7<br />
Negative<br />
.<br />
NOTE!<br />
The IT8-calibration only applies to the<br />
“positiv”-scan mode (slides and<br />
photographs). Calibration is automatically<br />
disabled in "negative"- mode.<br />
This completes the process of converting a<br />
negative to a positve.<br />
In order to get optimum results, you only<br />
need to click the SilverFast auto-adjust<br />
button.<br />
The auto-adjust will set the correct highlight-shadow<br />
values as well as the overall<br />
brightness for the active scan frame.<br />
In case the results are not as desired, try other film presets<br />
(manufacturer), film speeds, sometimes even with a profile of<br />
another manufacturer to get better results.<br />
Swtiching to expert mode is only necessary if the above<br />
suggestions aren’t suitable.<br />
You can now continue with the normal SilverFast tools for further<br />
optimisation until you start the final scan:<br />
e.g. naming the image, scaling, USM, descreening, selective<br />
colour correction, … and finally scan in CMYK or RGB.<br />
202 SilverFast ® Manual
Negative<br />
* Attention!<br />
the expert dialog will only be available<br />
in SilverFast<strong>Ai</strong>, SilverFastHDR,<br />
SilverFastDC, etc.<br />
SilverFastSE-Versions will not have the<br />
<strong>NegaFix</strong> Expert-Dialog<br />
3. The Expert-Dialog*<br />
When should the Expert-Dialog be used?<br />
In any case you should first use the normal procedure to convert a<br />
negative to positive as outlined in chapter 2.<br />
When these steps do not yield the desired results, open<br />
the “Expert-Dialog”. This could for, instance, be the case when<br />
profiles for a specific film are missing, or when the existing<br />
profiles do not convert the negative correctly.<br />
“Expert”-Dialog Overview<br />
The Expert-Dialog comes up when you click the “Expert”-button<br />
and consists of two major panels:<br />
a) the dialog “Expansion” to monitor and control the dynamic<br />
range and expansion of the negative<br />
b) the dialog “Curves” to characterize the profiles and eliminate<br />
colour casts.<br />
SilverFast ® Manual 203<br />
6.7
6.7<br />
Negative<br />
Workflow of Expert-Mode<br />
A short description of how to optimise a negative with the<br />
expert-dialog:<br />
1. Standard menu: Select a film profile<br />
Even when none of the profiles will yield a good result, the best<br />
possible should be selected. If the deviation is too strong it<br />
would be better to switch to “Other”, or “Standard”.<br />
Refer to the procedure for selecting profiles on pages 5,<br />
section 1 to 5.<br />
2. Expansion-Menu<br />
Using the slider “Auto-Tolerance” will adjust the strength of the<br />
auto-masking process.<br />
The effect can be monitored in the histogram and preview<br />
window. The slider at the position utmost left indicates minimal<br />
effects<br />
3. Curves-Menu: Adjustment of curves<br />
Change to “Edit”-mode (click on pencil). Drag the curves so<br />
that the image in the preview window will look as desired.<br />
Single curves can be selected by clicking the colour patches<br />
(red, green, blue for single curves) above the curves dialog (to<br />
select all curves, click grey patch). All curves are selected by<br />
default.<br />
Single curve points can be moved with the mouse.<br />
For a more precise adjustment, it is possible to<br />
zoom into the curves („plus“ magnifier; pressed<br />
„Alt“ key<br />
„Minus“ magnifier)<br />
In the zoomed mode, the visible area may be<br />
moved with the pressed „Shift“ key.<br />
204 SilverFast ® Manual
Negative<br />
.<br />
4. Curves-Menu: Set Neutral Grey<br />
Sometimes image areas that should be<br />
neutral have a colour cast. This can be<br />
easily neutralized or even changed into<br />
another colour:<br />
With the curves in edit mode, click onto the<br />
colour cast area in the preview. This point in<br />
the gradation curves is marked by vertical<br />
lines and marked in the HS and L dialogue<br />
display below by a single point or a line<br />
respectively.<br />
Drag this point in the HS dialogue vertically<br />
down to the horizontal grey axis.<br />
The preview window will reflect the change<br />
immediately.<br />
If you do not want this point purely neutral,<br />
you can drag the point into any other area<br />
of the colour space. It is now up to you:<br />
which tint you will give to your grey: colder<br />
and more blue, warmer and more red, or …<br />
5. Curves-Menu: Save the newly created profile<br />
Click on “Save as”- button and give the newly created profile a<br />
new name.<br />
Custom profiles will appended in the pop-up “ASA/ISO”.<br />
SilverFast ® Manual 205<br />
6.7
6.7<br />
Negative<br />
.<br />
The “Expansion” Menu in Detail<br />
The upper portion of the expert-dialog, the “Expansion” menu,<br />
monitors the orange mask histogram and how <strong>NegaFix</strong> will optimise<br />
the orange mask. The histogram will also allow optimisation<br />
of the orange mask manually.<br />
Automatic Mask<br />
The upper half shows the negative histogram, and how the mask<br />
automatic has set the highlight and shadow points.<br />
The automatic mask is continiously active, indicated<br />
by the check mark, left of the button “Auto”.<br />
Clicking the button “Auto” will activate the automatic mask manually.<br />
<strong>NegaFix</strong> will analyize the negative again, remove the orange<br />
mask, and show the resultant histogram and preview image.<br />
Note:<br />
This icon indicates a warning when the automatic mask is<br />
inactive. It will appear in the upper area of the NegFix control<br />
window. It will also appear after clicking the button “Reset”.<br />
The orange mask removal will be indicated (or controlled) through<br />
the position of the vertical delimiters left and right of the single<br />
histograms . The orange automatic mask will move the delimters to<br />
the initial pixels in the single histograms channels.<br />
206 SilverFast ® Manual
Negative<br />
The numbers beside the delimiters will indicate the corresponding<br />
tonal value. The delimters can also be used as sliders and actively<br />
control the orange mask removal process.<br />
The strength of the orange automatic<br />
mask can be controlled with the slider “Auto-Tolerance”<br />
Moving the slider to the far right will have the greatest effect.<br />
Any change can be monitored in the <strong>NegaFix</strong> dialog window and<br />
also immediately updated in the large SilverFast preview. This way<br />
you will always be in full control over the results of your corrections.<br />
Additional Buttons in the Dialog Window:<br />
Clicking the “Reset”-button will reset all settings and will<br />
also switch the orange automatic mask off. After a Reset the<br />
warning icon (auto-mask off) will appear as a reminder.<br />
This button will switch the appearance of histograms for<br />
monitoring between RGB (“tonal values “ 0 to 255) and CMY<br />
(“percentage values” 0 to 100).<br />
The button will only switch the appearance and will have no<br />
influence on image quality or any other changes.<br />
The pop-up menu “Save”<br />
allows saving of custom highlight/shadow points for<br />
the orange mask process or loading<br />
of previously saved orange mask H-S<br />
points.<br />
SilverFast ® Manual 207<br />
6.7
6.7<br />
Negative<br />
L S<br />
H<br />
view<br />
Original<br />
View after<br />
clicking the zoom<br />
3 times.<br />
Setting Orange Mask Highlight Shadow points<br />
The lower part of the “Expansion” dialog monitors the position of<br />
the orange mask highlight-shadow points within the 3-dimensional<br />
HSL-colour space.<br />
Both, highlights and shadows will normally have a visible colour<br />
cast. The auto-mask will recognize and remove this cast.<br />
The position will be displayed within the square colour space and<br />
within the vertical luminance field.<br />
The vertical fields indicate Luminance (“L”). The colour square will<br />
show the colour hue (angle) horizontally and the Saturation (“S”)<br />
vertically.<br />
The markings (short bars within the vertical fields, small points<br />
within the colour square) indicate the exact position of the highlight-shadow<br />
points in the colour space.<br />
The bars, as well as the points, are colour cast correction controls<br />
and must be moved with the mouse. Any change will be displayed<br />
within the NegFix dialog window and immediately updated in the<br />
SilverFast preview window.<br />
With the integrated zoom function, you can freely<br />
zoom into and out of the colour space.<br />
This will enable very subtle corrections of the neutrality of the<br />
orange mask highlight-shadow points.<br />
208 SilverFast ® Manual
Negative<br />
The “Curves” Dialog<br />
The second window of the Expert-Dialog, the “Curves” panel,<br />
monitors the RGB-curves of the active film profile: All-Curves<br />
(black), as well as the single curves Red, Green and Blue.<br />
This dialog allows modification of an existing Film profile directly<br />
and allows it to be saved as a new profile. The colour character of<br />
the negative profile can be changed and colour casts can be<br />
removed as well.<br />
Changing the Film Gradation Curves<br />
The “Edit” button activates the curves dialog. A black overlay<br />
curve, defined by a succession of black curves points will<br />
appear. The sequence of points represents the character of the<br />
original film manufacturer profile.<br />
For a more precise adjustment it is again<br />
possible to zoom into the curve („Plus“<br />
magnifier; and with the „Alt“ key pressed the<br />
„Minus“ magnifier). Within the zoomed<br />
mode, the visible area can be moved by<br />
pressing the „Shift“ key and moving the<br />
mouse.<br />
Single points on the curves may be touched<br />
and relocated with the mouse. For a more<br />
precise adjustment, it is possible to zoom<br />
into the curves („plus“ magnifier; pressed<br />
„Alt“ key „Minus“ magnifier). In the zoomed<br />
mode, the visible area may be moved with<br />
the pressed „Shift“ key.<br />
Selecting any of the RGB-selectors above the curves will<br />
activate any of the Red, Green or Blue curves accordingly.<br />
Clicking the Grey selector will active all curves .<br />
The button “Smoothen” allows to smoothening of an active<br />
curve which might be slightly rough. This function can be used<br />
repeatedly: Additional clicks will invoke further smoothening<br />
operations. Several clicks will increase the effect.<br />
SilverFast ® Manual 209<br />
6.7
6.7<br />
Negative<br />
Neutralizing Colour Casts<br />
First click the edit button to activate the curve dialog.<br />
Move the cursor into the image preview window and click onto the<br />
area you want to neutralize. While moving the cursor, you can<br />
monitor the colour values (CMY recommended) in the floating<br />
densitometer.<br />
Clicking onto the image will bring up a new dialog below the<br />
<strong>NegaFix</strong> curve dialog window. The image point you have clicked<br />
onto will be monitored as a small point in the HSL-colour space,<br />
and the tonal values will be indicated as vertical lines in the film<br />
gradation window.<br />
Again the markings in the HSL-dialog represent controls which can<br />
easily be moved with the mouse.<br />
For more subtle control, zoom buttons can be clicked to zoom in<br />
and out of the colour space.<br />
All changes of all controls will immediately be displayed in the<br />
SilverFast preview window.<br />
Neutralizing a colour cast is achieved by dragging a point in the<br />
HSL-dialog down to the neutral grey axis.<br />
After releasing the mouse the preview window will be updated.<br />
210 SilverFast ® Manual
Negative<br />
Producing a Colour Cast Deliberately<br />
Naturally any point within the HSL colour space can be moved to<br />
any other colour. This will produce a colour cast..<br />
With many images, pure neutrality will look unnatural,<br />
Think about pictures of a sunset.<br />
A warm reddish colour cast is<br />
surely desired versus a cold neutral<br />
rendering<br />
Image with<br />
neutral grey<br />
Image with<br />
yellowish grey<br />
Saving Changes as a New Profile<br />
Once all changes are done and the preview window shows the<br />
desired results, the updated settings can be saved as a new profile:<br />
Clicking the “Save”-button will save all parameters in the current<br />
profile. Of course the previous Profile will be overwritten.<br />
It is safer to use the option “Save as”. Here you can give the profile<br />
a new name.<br />
New profiles will be saved under the “ASA/ISO”-pop-up menu list<br />
and can be reused at any time.<br />
SilverFast ® Manual 211<br />
6.7
6.7<br />
Negative<br />
.<br />
✕<br />
Overview SilverFast<br />
4. Reference Card SilverFast<strong>NegaFix</strong><br />
<strong>NegaFix</strong> can be activated from the “General” panel by selecting the<br />
“Negative” pop-up.<br />
<strong>NegaFix</strong>-Dialog in SilverFast<strong>Ai</strong><br />
under Macintosh<br />
Overview SilverFastSE<br />
<strong>NegaFix</strong>-Dialog in SilverFast<strong>Ai</strong><br />
under Windows<br />
The extended functinality of the “Expert-Dialog” is only available in<br />
the full versions of SilverFast<strong>Ai</strong>, SilverFastHDR, SilverFastDC.<br />
In SilverFastSE-Versions, the expert dialog is not available. All film<br />
parameter selections can be fully applied.<br />
<strong>NegaFix</strong>-Dialog in SilverFastSE<br />
under Macintosh<br />
<strong>NegaFix</strong>-Dialog in SilverFastSE<br />
under Windows<br />
212 SilverFast ® Manual<br />
.
Negative<br />
<strong>NegaFix</strong>-Dialog<br />
Standard-Dialog editing of Negative<br />
film contains these controls:<br />
Pop-up to select film manufacturer<br />
Pop-up to select film-type<br />
Pop-up to select film speed<br />
Slider for film exposure<br />
control<br />
Button to open / close<br />
expert-dialog*<br />
Button to open help-file<br />
Warning to indicate<br />
auto-mask*<br />
* Note:<br />
Only available in full version of<br />
SilverFast <strong>Ai</strong>, not available in “SE”-<br />
Version!<br />
SilverFast<strong>NegaFix</strong> Components<br />
The standard dialog can be extended by clicking onto the “Expert”button*.<br />
In extended mode, you can switch between the panels<br />
“Expansion” and “Curves”:<br />
Expert-Dialog* “Expansion”<br />
Single control elements:<br />
Switching between<br />
CMY- or RGBmonitoring<br />
in the<br />
Histogram<br />
Maskautomatic-button<br />
Reset-button<br />
. .<br />
Save menu<br />
Auto tolerance<br />
Slider for<br />
mask-automation<br />
Expert-Dialog* “Curves”<br />
Single control elements:<br />
Edit-Mode on/off<br />
Smoothen Curves<br />
Reset-Button<br />
Save Button<br />
Save-as-Button<br />
Select single Colour<br />
channels (RGB)<br />
SilverFast ® Manual 213<br />
6.7
6.7<br />
Negative<br />
214 SilverFast ® Manual