

Product Catalog 2023 - Steel & Fence Supply
View our 2023 product catalog to discover the products currently on offer from Steel & Fence Supply. Call or visit us today to place your order. Conveniently located in San Jose, California, at the intersection of Highways 101 and 880. (408) 573-3779
View our 2023 product catalog to discover the products currently on offer from Steel & Fence Supply. Call or visit us today to place your order. Conveniently located in San Jose, California, at the intersection of Highways 101 and 880. (408) 573-3779

You also want an ePaper? Increase the reach of your titles
YUMPU automatically turns print PDFs into web optimized ePapers that Google loves.
CHAIN-LINK F ENCE & GATE<br />
Installation Instructions<br />
7<br />
5<br />
INSTALLING TOP RAILS<br />
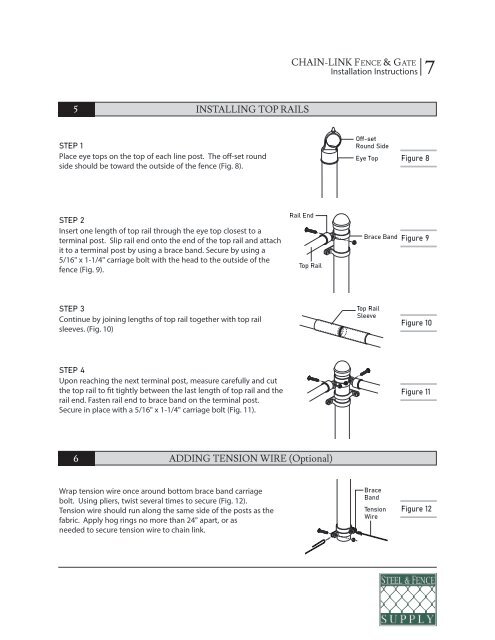
STEP 1<br />
Place eye tops on the top of each line post. The off-set round<br />
side should be toward the outside of the fence (Fig. 8).<br />
Off-set<br />
Round Side<br />
Eye Top<br />
Figure 8<br />
STEP 2<br />
Insert one length of top rail through the eye top closest to a<br />
terminal post. Slip rail end onto the end of the top rail and attach<br />
it to a terminal post by using a brace band. Secure by using a<br />
5/16" x 1-1/4" carriage bolt with the head to the outside of the<br />
fence (Fig. 9).<br />
Rail End<br />
Top Rail<br />
Brace Band<br />
Figure 9<br />
STEP 3<br />
Continue by joining lengths of top rail together with top rail<br />
sleeves. (Fig. 10)<br />
Top Rail<br />
Sleeve<br />
Figure 10<br />
STEP 4<br />
Upon reaching the next terminal post, measure carefully and cut<br />
the top rail to fit tightly between the last length of top rail and the<br />
rail end. Fasten rail end to brace band on the terminal post.<br />
Secure in place with a 5/16" x 1-1/4" carriage bolt (Fig. 11).<br />
Figure 11<br />
6<br />
ADDING TENSION WIRE (Optional)<br />
Wrap tension wire once around bottom brace band carriage<br />
bolt. Using pliers, twist several times to secure (Fig. 12).<br />
Tension wire should run along the same side of the posts as the<br />
fabric. Apply hog rings no more than 24" apart, or as<br />
needed to secure tension wire to chain link.<br />
Brace<br />
Band<br />
Tension<br />
Wire<br />
Figure 12