

Product Catalog 2023 - Steel & Fence Supply
View our 2023 product catalog to discover the products currently on offer from Steel & Fence Supply. Call or visit us today to place your order. Conveniently located in San Jose, California, at the intersection of Highways 101 and 880. (408) 573-3779
View our 2023 product catalog to discover the products currently on offer from Steel & Fence Supply. Call or visit us today to place your order. Conveniently located in San Jose, California, at the intersection of Highways 101 and 880. (408) 573-3779

You also want an ePaper? Increase the reach of your titles
YUMPU automatically turns print PDFs into web optimized ePapers that Google loves.
CHAIN-LINK F ENCE & GATE<br />
Installation Instructions<br />
8<br />
7<br />
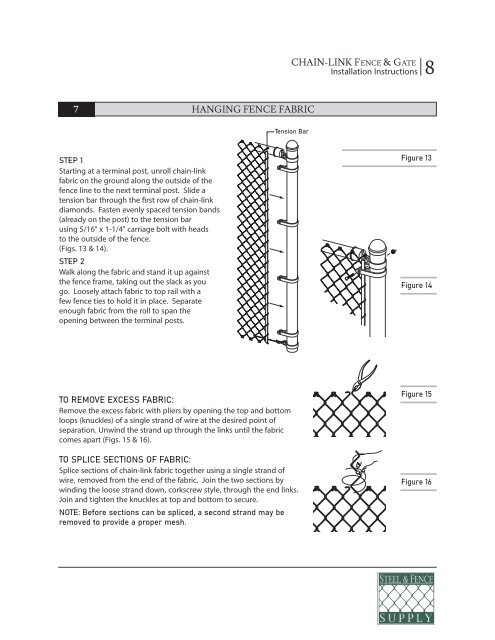
HANGING FENCE FABRIC<br />
Tension Bar<br />
STEP 1<br />
Starting at a terminal post, unroll chain-link<br />
fabric on the ground along the outside of the<br />
fence line to the next terminal post. Slide a<br />
tension bar through the first row of chain-link<br />
diamonds. Fasten evenly spaced tension bands<br />
(already on the post) to the tension bar<br />
using 5/16" x 1-1/4" carriage bolt with heads<br />
to the outside of the fence.<br />
(Figs. 13 & 14).<br />
STEP 2<br />
Walk along the fabric and stand it up against<br />
the fence frame, taking out the slack as you<br />
go. Loosely attach fabric to top rail with a<br />
few fence ties to hold it in place. Separate<br />
enough fabric from the roll to span the<br />
opening between the terminal posts.<br />
Figure 13<br />
Figure 14<br />
TO REMOVE EXCESS FABRIC:<br />
Remove the excess fabric with pliers by opening the top and bottom<br />
loops (knuckles) of a single strand of wire at the desired point of<br />
separation. Unwind the strand up through the links until the fabric<br />
comes apart (Figs. 15 & 16).<br />
TO SPLICE SECTIONS OF FABRIC:<br />
Splice sections of chain-link fabric together using a single strand of<br />
wire, removed from the end of the fabric. Join the two sections by<br />
winding the loose strand down, corkscrew style, through the end links.<br />
Join and tighten the knuckles at top and bottom to secure.<br />
NOTE: Before sections can be spliced, a second strand may be<br />
removed to provide a proper mesh.<br />
Figure 15<br />
Figure 16