

Product Catalog 2023 - Steel & Fence Supply
View our 2023 product catalog to discover the products currently on offer from Steel & Fence Supply. Call or visit us today to place your order. Conveniently located in San Jose, California, at the intersection of Highways 101 and 880. (408) 573-3779
View our 2023 product catalog to discover the products currently on offer from Steel & Fence Supply. Call or visit us today to place your order. Conveniently located in San Jose, California, at the intersection of Highways 101 and 880. (408) 573-3779

You also want an ePaper? Increase the reach of your titles
YUMPU automatically turns print PDFs into web optimized ePapers that Google loves.
CHAIN-LINK FENCE & GATE<br />
Installation Instructions<br />
9<br />
8<br />
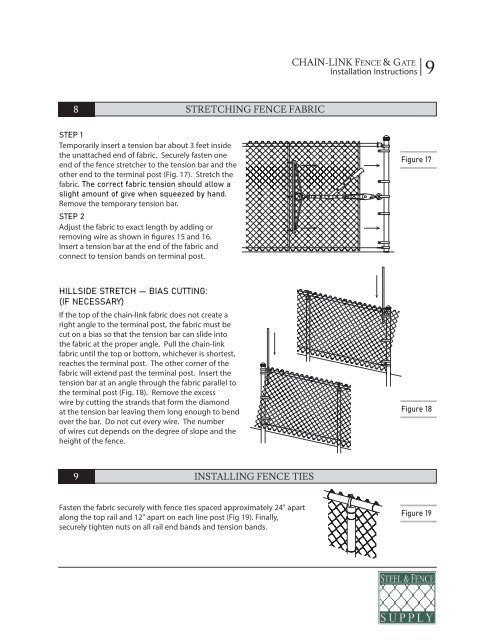
STRETCHING FENCE FABRIC<br />
STEP 1<br />
Temporarily insert a tension bar about 3 feet inside<br />
the unattached end of fabric. Securely fasten one<br />
end of the fence stretcher to the tension bar and the<br />
other end to the terminal post (Fig. 17). Stretch the<br />
fabric. The correct fabric tension should allow a<br />
slight amount of give when squeezed by hand.<br />
Remove the temporary tension bar.<br />
STEP 2<br />
Adjust the fabric to exact length by adding or<br />
removing wire as shown in figures 15 and 16.<br />
Insert a tension bar at the end of the fabric and<br />
connect to tension bands on terminal post.<br />
Figure 17<br />
HILLSIDE STRETCH — BIAS CUTTING:<br />
(IF NECESSARY)<br />
If the top of the chain-link fabric does not create a<br />
right angle to the terminal post, the fabric must be<br />
cut on a bias so that the tension bar can slide into<br />
the fabric at the proper angle. Pull the chain-link<br />
fabric until the top or bottom, whichever is shortest,<br />
reaches the terminal post. The other corner of the<br />
fabric will extend past the terminal post. Insert the<br />
tension bar at an angle through the fabric parallel to<br />
the terminal post (Fig. 18). Remove the excess<br />
wire by cutting the strands that form the diamond<br />
at the tension bar leaving them long enough to bend<br />
over the bar. Do not cut every wire. The number<br />
of wires cut depends on the degree of slope and the<br />
height of the fence.<br />
Figure 18<br />
9<br />
INSTALLING FENCE TIES<br />
Fasten the fabric securely with fence ties spaced approximately 24" apart<br />
along the top rail and 12" apart on each line post (Fig 19). Finally,<br />
securely tighten nuts on all rail end bands and tension bands.<br />
Figure 19