

Product Catalog 2023 - Steel & Fence Supply
View our 2023 product catalog to discover the products currently on offer from Steel & Fence Supply. Call or visit us today to place your order. Conveniently located in San Jose, California, at the intersection of Highways 101 and 880. (408) 573-3779
View our 2023 product catalog to discover the products currently on offer from Steel & Fence Supply. Call or visit us today to place your order. Conveniently located in San Jose, California, at the intersection of Highways 101 and 880. (408) 573-3779

You also want an ePaper? Increase the reach of your titles
YUMPU automatically turns print PDFs into web optimized ePapers that Google loves.
CHAIN-LINK F ENCE & GATE<br />
Installation Instructions<br />
5<br />
2<br />
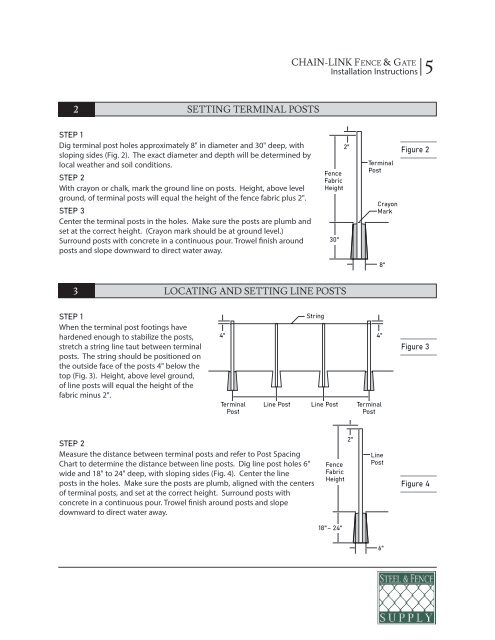
SETTING TERMINAL POSTS<br />
STEP 1<br />
Dig terminal post holes approximately 8" in diameter and 30" deep, with<br />
sloping sides (Fig. 2). The exact diameter and depth will be determined by<br />
local weather and soil conditions.<br />
STEP 2<br />
With crayon or chalk, mark the ground line on posts. Height, above level<br />
ground, of terminal posts will equal the height of the fence fabric plus 2".<br />
STEP 3<br />
Center the terminal posts in the holes. Make sure the posts are plumb and<br />
set at the correct height. (Crayon mark should be at ground level.)<br />
Surround posts with concrete in a continuous pour. Trowel finish around<br />
posts and slope downward to direct water away.<br />
<strong>Fence</strong><br />
Fabric<br />
Height<br />
30"<br />
2"<br />
Terminal<br />
Post<br />
Crayon<br />
Mark<br />
Figure 2<br />
8"<br />
3<br />
LOCATING AND SETTING LINE POSTS<br />
STEP 1<br />
When the terminal post footings have<br />
hardened enough to stabilize the posts,<br />
stretch a string line taut between terminal<br />
posts. The string should be positioned on<br />
the outside face of the posts 4" below the<br />
top (Fig. 3). Height, above level ground,<br />
of line posts will equal the height of the<br />
fabric minus 2".<br />
4"<br />
Terminal<br />
Post<br />
Line Post<br />
String<br />
Line Post<br />
4"<br />
Terminal<br />
Post<br />
Figure 3<br />
STEP 2<br />
Measure the distance between terminal posts and refer to Post Spacing<br />
Chart to determine the distance between line posts. Dig line post holes 6"<br />
wide and 18" to 24" deep, with sloping sides (Fig. 4). Center the line<br />
posts in the holes. Make sure the posts are plumb, aligned with the centers<br />
of terminal posts, and set at the correct height. Surround posts with<br />
concrete in a continuous pour. Trowel finish around posts and slope<br />
downward to direct water away.<br />
<strong>Fence</strong><br />
Fabric<br />
Height<br />
2"<br />
Line<br />
Post<br />
Figure 4<br />
18"– 24"<br />
6"