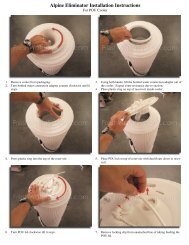
Watts Premier RO Pure RO-4 Manual - Fresh Water Systems
Watts Premier RO Pure RO-4 Manual - Fresh Water Systems
Watts Premier RO Pure RO-4 Manual - Fresh Water Systems

You also want an ePaper? Increase the reach of your titles
YUMPU automatically turns print PDFs into web optimized ePapers that Google loves.
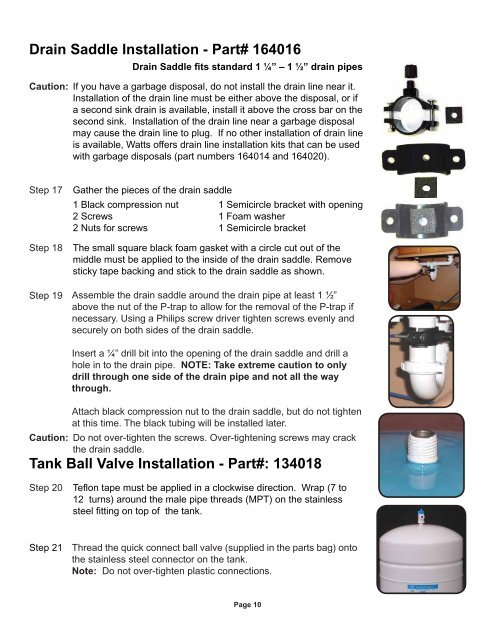
Drain Saddle Installation - Part# 164016<br />
Drain Saddle fi ts standard 1 ¼” – 1 ½” drain pipes<br />
Caution: If you have a garbage disposal, do not install the drain line near it.<br />
Installation of the drain line must be either above the disposal, or if<br />
a second sink drain is available, install it above the cross bar on the<br />
second sink. Installation of the drain line near a garbage disposal<br />
may cause the drain line to plug. If no other installation of drain line<br />
is available, <strong>Watts</strong> offers drain line installation kits that can be used<br />
with garbage disposals (part numbers 164014 and 164020).<br />
Step 17<br />
Step 18<br />
Step 19<br />
Step 20<br />
Step 21<br />
Gather the pieces of the drain saddle<br />
1 Black compression nut 1 Semicircle bracket with opening<br />
2 Screws 1 Foam washer<br />
2 Nuts for screws 1 Semicircle bracket<br />
The small square black foam gasket with a circle cut out of the<br />
middle must be applied to the inside of the drain saddle. Remove<br />
sticky tape backing and stick to the drain saddle as shown.<br />
Assemble the drain saddle around the drain pipe at least 1 ½”<br />
above the nut of the P-trap to allow for the removal of the P-trap if<br />
necessary. Using a Philips screw driver tighten screws evenly and<br />
securely on both sides of the drain saddle.<br />
Insert a ¼” drill bit into the opening of the drain saddle and drill a<br />
hole in to the drain pipe. NOTE: Take extreme caution to only<br />
drill through one side of the drain pipe and not all the way<br />
through.<br />
Attach black compression nut to the drain saddle, but do not tighten<br />
at this time. The black tubing will be installed later.<br />
Caution: Do not over-tighten the screws. Over-tightening screws may crack<br />
the drain saddle.<br />
Tank Ball Valve Installation - Part#: 134018<br />
Tefl on tape must be applied in a clockwise direction. Wrap (7 to<br />
12 turns) around the male pipe threads (MPT) on the stainless<br />
steel fi tting on top of the tank.<br />
Thread the quick connect ball valve (supplied in the parts bag) onto<br />
the stainless steel connector on the tank.<br />
Note: Do not over-tighten plastic connections.<br />
Page 10