Watts Premier RO Pure RO-4 Manual - Fresh Water Systems
Watts Premier RO Pure RO-4 Manual - Fresh Water Systems
Watts Premier RO Pure RO-4 Manual - Fresh Water Systems

You also want an ePaper? Increase the reach of your titles
YUMPU automatically turns print PDFs into web optimized ePapers that Google loves.
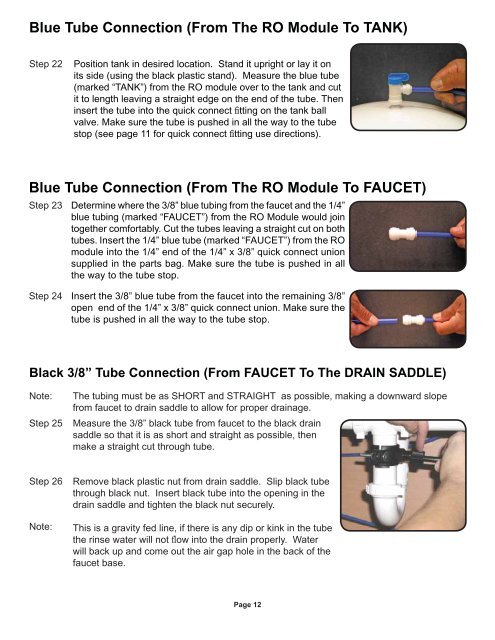
Blue Tube Connection (From The <strong>RO</strong> Module To TANK)<br />
Step 22<br />
Position tank in desired location. Stand it upright or lay it on<br />
its side (using the black plastic stand). Measure the blue tube<br />
(marked “TANK”) from the <strong>RO</strong> module over to the tank and cut<br />
it to length leaving a straight edge on the end of the tube. Then<br />
insert the tube into the quick connect fi tting on the tank ball<br />
valve. Make sure the tube is pushed in all the way to the tube<br />
stop (see page 11 for quick connect fi tting use directions).<br />
Blue Tube Connection (From The <strong>RO</strong> Module To FAUCET)<br />
Step 23 Determine where the 3/8” blue tubing from the faucet and the 1/4”<br />
blue tubing (marked “FAUCET”) from the <strong>RO</strong> Module would join<br />
together comfortably. Cut the tubes leaving a straight cut on both<br />
tubes. Insert the 1/4” blue tube (marked “FAUCET”) from the <strong>RO</strong><br />
module into the 1/4” end of the 1/4” x 3/8” quick connect union<br />
supplied in the parts bag. Make sure the tube is pushed in all<br />
the way to the tube stop.<br />
Step 24 Insert the 3/8” blue tube from the faucet into the remaining 3/8”<br />
open end of the 1/4” x 3/8” quick connect union. Make sure the<br />
tube is pushed in all the way to the tube stop.<br />
Black 3/8” Tube Connection (From FAUCET To The DRAIN SADDLE)<br />
Note:<br />
Step 25<br />
Step 26<br />
Note:<br />
The tubing must be as SHORT and STRAIGHT as possible, making a downward slope<br />
from faucet to drain saddle to allow for proper drainage.<br />
Measure the 3/8” black tube from faucet to the black drain<br />
saddle so that it is as short and straight as possible, then<br />
make a straight cut through tube.<br />
Remove black plastic nut from drain saddle. Slip black tube<br />
through black nut. Insert black tube into the opening in the<br />
drain saddle and tighten the black nut securely.<br />
This is a gravity fed line, if there is any dip or kink in the tube<br />
the rinse water will not fl ow into the drain properly. <strong>Water</strong><br />
will back up and come out the air gap hole in the back of the<br />
faucet base.<br />
Page 12