Watts Premier RO Pure RO-4 Manual - Fresh Water Systems
Watts Premier RO Pure RO-4 Manual - Fresh Water Systems
Watts Premier RO Pure RO-4 Manual - Fresh Water Systems

You also want an ePaper? Increase the reach of your titles
YUMPU automatically turns print PDFs into web optimized ePapers that Google loves.
WATTS <strong>Premier</strong> Chrome Monitored & Non-Monitored<br />
(Top Mount) Faucet Installation<br />
Minimum Maximum<br />
Mounting Hole Size 1.00” 1.25”<br />
Torque on Toggle Bolt 5lb.in. (max)<br />
Step 6<br />
Step 7<br />
Step 8<br />
Step 9<br />
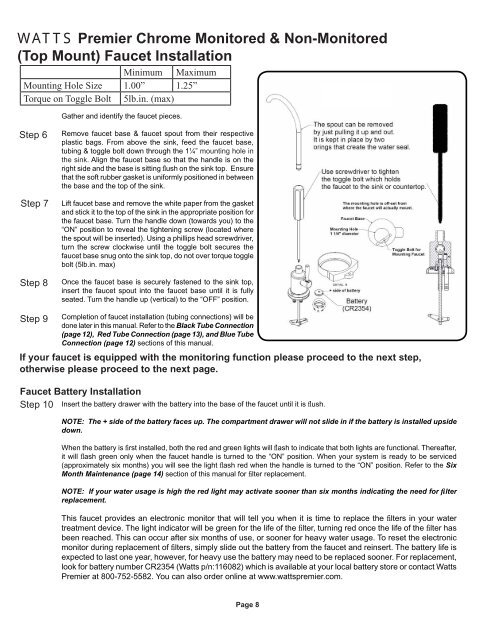
Gather and identify the faucet pieces.<br />
Remove faucet base & faucet spout from their respective<br />
plastic bags. From above the sink, feed the faucet base,<br />
tubing & toggle bolt down through the 1¼” mounting hole in<br />
the sink. Align the faucet base so that the handle is on the<br />
right side and the base is sitting fl ush on the sink top. Ensure<br />
that the soft rubber gasket is uniformly positioned in between<br />
the base and the top of the sink.<br />
Lift faucet base and remove the white paper from the gasket<br />
and stick it to the top of the sink in the appropriate position for<br />
the faucet base. Turn the handle down (towards you) to the<br />
“ON” position to reveal the tightening screw (located where<br />
the spout will be inserted). Using a phillips head screwdriver,<br />
turn the screw clockwise until the toggle bolt secures the<br />
faucet base snug onto the sink top, do not over torque toggle<br />
bolt (5lb.in. max)<br />
Once the faucet base is securely fastened to the sink top,<br />
insert the faucet spout into the faucet base until it is fully<br />
seated. Turn the handle up (vertical) to the “OFF” position.<br />
Completion of faucet installation (tubing connections) will be<br />
done later in this manual. Refer to the Black Tube Connection<br />
(page 12), Red Tube Connection (page 13), and Blue Tube<br />
Connection (page 12) sections of this manual.<br />
If your faucet is equipped with the monitoring function please proceed to the next step,<br />
otherwise please proceed to the next page.<br />
Faucet Battery Installation<br />
Step 10<br />
Insert the battery drawer with the battery into the base of the faucet until it is fl ush.<br />
NOTE: The + side of the battery faces up. The compartment drawer will not slide in if the battery is installed upside<br />
down.<br />
When the battery is fi rst installed, both the red and green lights will fl ash to indicate that both lights are functional. Thereafter,<br />
it will fl ash green only when the faucet handle is turned to the “ON” position. When your system is ready to be serviced<br />
(approximately six months) you will see the light fl ash red when the handle is turned to the “ON” position. Refer to the Six<br />
Month Maintenance (page 14) section of this manual for fi lter replacement.<br />
NOTE: If your water usage is high the red light may activate sooner than six months indicating the need for fi lter<br />
replacement.<br />
This faucet provides an electronic monitor that will tell you when it is time to replace the fi lters in your water<br />
treatment device. The light indicator will be green for the life of the fi lter, turning red once the life of the fi lter has<br />
been reached. This can occur after six months of use, or sooner for heavy water usage. To reset the electronic<br />
monitor during replacement of fi lters, simply slide out the battery from the faucet and reinsert. The battery life is<br />
expected to last one year, however, for heavy use the battery may need to be replaced sooner. For replacement,<br />
look for battery number CR2354 (<strong>Watts</strong> p/n:116082) which is available at your local battery store or contact <strong>Watts</strong><br />
<strong>Premier</strong> at 800-752-5582. You can also order online at www.wattspremier.com.<br />
Page 8