

Pearl Redbox RBM 20 Module Owner's Manual v
Pearl Redbox RBM 20 Module Owner's Manual v
Pearl Redbox RBM 20 Module Owner's Manual v

You also want an ePaper? Increase the reach of your titles
YUMPU automatically turns print PDFs into web optimized ePapers that Google loves.
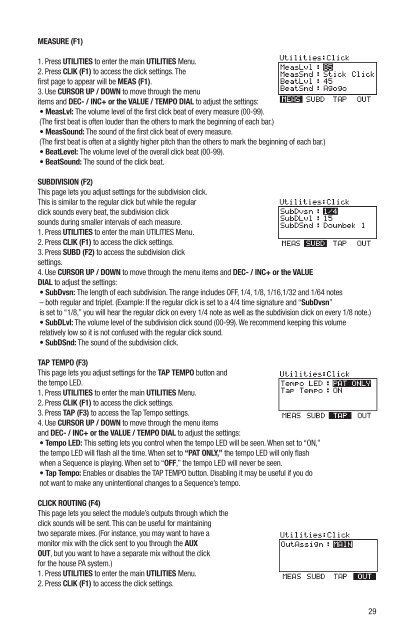
MEASURE (F1)<br />
1. Press UTILITIES to enter the main UTILITIES Menu.<br />
2. Press CLIK (F1) to access the click settings. The<br />
first page to appear will be MEAS (F1).<br />
3. Use CURSOR UP / DOWN to move through the menu<br />
items and DEC- / INC+ or the VALUE / TEMPO DIAL to adjust the settings:<br />
• MeasLvl: The volume level of the first click beat of every measure (00-99).<br />
(The first beat is often louder than the others to mark the beginning of each bar.)<br />
• MeasSound: The sound of the first click beat of every measure.<br />
(The first beat is often at a slightly higher pitch than the others to mark the beginning of each bar.)<br />
• BeatLevel: The volume level of the overall click beat (00-99).<br />
• BeatSound: The sound of the click beat.<br />
SUBDIVISION (F2)<br />
This page lets you adjust settings for the subdivision click.<br />
This is similar to the regular click but while the regular<br />
click sounds every beat, the subdivision click<br />
sounds during smaller intervals of each measure.<br />
1. Press UTILITIES to enter the main UTILITIES Menu.<br />
2. Press CLIK (F1) to access the click settings.<br />
3. Press SUBD (F2) to access the subdivision click<br />
settings.<br />
4. Use CURSOR UP / DOWN to move through the menu items and DEC- / INC+ or the VALUE<br />
DIAL to adjust the settings:<br />
• SubDvsn: The length of each subdivision. The range includes OFF, 1/4, 1/8, 1/16,1/32 and 1/64 notes<br />
– both regular and triplet. (Example: If the regular click is set to a 4/4 time signature and “SubDvsn”<br />
is set to “1/8,” you will hear the regular click on every 1/4 note as well as the subdivision click on every 1/8 note.)<br />
• SubDLvl: The volume level of the subdivision click sound (00-99). We recommend keeping this volume<br />
relatively low so it is not confused with the regular click sound.<br />
• SubDSnd: The sound of the subdivision click.<br />
TAP TEMPO (F3)<br />
This page lets you adjust settings for the TAP TEMPO button and<br />
the tempo LED.<br />
1. Press UTILITIES to enter the main UTILITIES Menu.<br />
2. Press CLIK (F1) to access the click settings.<br />
3. Press TAP (F3) to access the Tap Tempo settings.<br />
4. Use CURSOR UP / DOWN to move through the menu items<br />
and DEC- / INC+ or the VALUE / TEMPO DIAL to adjust the settings:<br />
• Tempo LED: This setting lets you control when the tempo LED will be seen. When set to “ON,”<br />
the tempo LED will flash all the time. When set to “PAT ONLY,” the tempo LED will only flash<br />
when a Sequence is playing. When set to “OFF,” the tempo LED will never be seen.<br />
• Tap Tempo: Enables or disables the TAP TEMPO button. Disabling it may be useful if you do<br />
not want to make any unintentional changes to a Sequence’s tempo.<br />
CLICK ROUTING (F4)<br />
This page lets you select the module’s outputs through which the<br />
click sounds will be sent. This can be useful for maintaining<br />
two separate mixes. (For instance, you may want to have a<br />
monitor mix with the click sent to you through the AUX<br />
OUT, but you want to have a separate mix without the click<br />
for the house PA system.)<br />
1. Press UTILITIES to enter the main UTILITIES Menu.<br />
2. Press CLIK (F1) to access the click settings.<br />
29