

Pearl Redbox RBM 20 Module Owner's Manual v
Pearl Redbox RBM 20 Module Owner's Manual v
Pearl Redbox RBM 20 Module Owner's Manual v

You also want an ePaper? Increase the reach of your titles
YUMPU automatically turns print PDFs into web optimized ePapers that Google loves.
UTILITIES<br />
The UTILITIES Menu lets you control global settings such as the output<br />
routing and trigger sensitivity as well as click, MIDI, and<br />
tempo settings. You can also transmit SysEx data in this menu as<br />
well as re-initialize the <strong>RBM</strong>-<strong>20</strong> (i.e., return it to its factory settings).<br />
To access the UTILITIES Menu, press the module’s UTILITIES<br />
Button and navigate the menus or adjust the settings<br />
accordingly. For more information, see the UTILITIES MENU chapter.<br />
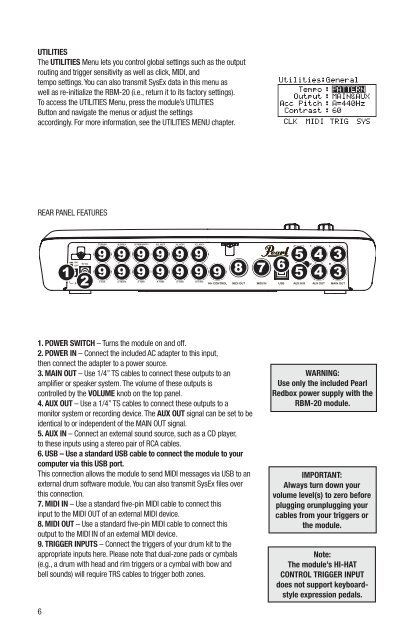
REAR PANEL FEATURES<br />
1 2<br />
1. POWER SWITCH – Turns the module on and off.<br />
2. POWER IN – Connect the included AC adapter to this input,<br />
then connect the adapter to a power source.<br />
3. MAIN OUT – Use 1/4” TS cables to connect these outputs to an<br />
amplifier or speaker system. The volume of these outputs is<br />
controlled by the VOLUME knob on the top panel.<br />
4. AUX OUT – Use a 1/4” TS cables to connect these outputs to a<br />
monitor system or recording device. The AUX OUT signal can be set to be<br />
identical to or independent of the MAIN OUT signal.<br />
5. AUX IN – Connect an external sound source, such as a CD player,<br />
to these inputs using a stereo pair of RCA cables.<br />
6. USB – Use a standard USB cable to connect the module to your<br />
computer via this USB port.<br />
This connection allows the module to send MIDI messages via USB to an<br />
external drum software module. You can also transmit SysEx files over<br />
this connection.<br />
7. MIDI IN – Use a standard five-pin MIDI cable to connect this<br />
input to the MIDI OUT of an external MIDI device.<br />
8. MIDI OUT – Use a standard five-pin MIDI cable to connect this<br />
output to the MIDI IN of an external MIDI device.<br />
9. TRIGGER INPUTS – Connect the triggers of your drum kit to the<br />
appropriate inputs here. Please note that dual-zone pads or cymbals<br />
(e.g., a drum with head and rim triggers or a cymbal with bow and<br />
bell sounds) will require TRS cables to trigger both zones.<br />
6<br />
9<br />
9<br />
9<br />
9<br />
9<br />
9<br />
9<br />
9<br />
9<br />
9<br />
9<br />
9<br />
9<br />
8<br />
7 6<br />
5<br />
5<br />
4<br />
4<br />
3<br />
3<br />
WARNING:<br />
Use only the included <strong>Pearl</strong><br />
<strong>Redbox</strong> power supply with the<br />
<strong>RBM</strong>-<strong>20</strong> module.<br />
IMPORTANT:<br />
Always turn down your<br />
volume level(s) to zero before<br />
plugging orunplugging your<br />
cables from your triggers or<br />
the module.<br />
Note:<br />
The module’s HI-HAT<br />
CONTROL TRIGGER INPUT<br />
does not support keyboardstyle<br />
expression pedals.