
You also want an ePaper? Increase the reach of your titles
YUMPU automatically turns print PDFs into web optimized ePapers that Google loves.
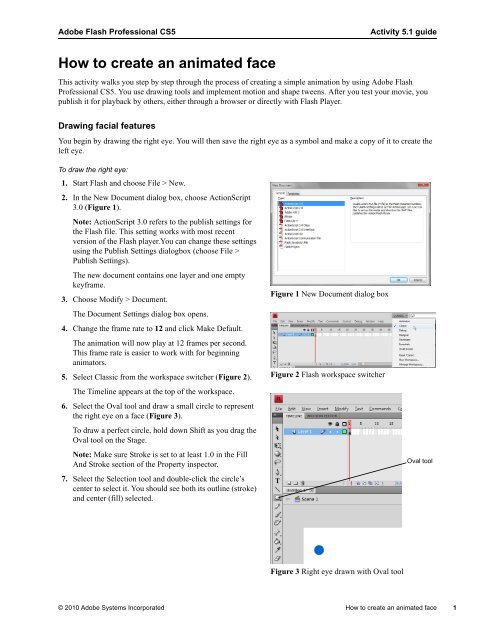
Adobe Flash Professional CS5 Activity 5.1 guide<br />
<strong>How</strong> <strong>to</strong> <strong>create</strong> <strong>an</strong> <strong>an</strong>imated <strong>face</strong><br />
This activity walks you step by step through the process of creating a simple <strong>an</strong>imation by using Adobe Flash<br />
Professional CS5. You use drawing <strong>to</strong>ols <strong>an</strong>d implement motion <strong>an</strong>d shape tweens. After you test your movie, you<br />
publish it for playback by others, either through a browser or directly with Flash Player.<br />
Drawing facial features<br />
You begin by drawing the right eye. You will then save the right eye as a symbol <strong>an</strong>d make a copy of it <strong>to</strong> <strong>create</strong> the<br />
left eye.<br />
To draw the right eye:<br />
1. Start Flash <strong>an</strong>d choose File > New.<br />
2. In the New Document dialog box, choose ActionScript<br />
3.0 (Figure 1).<br />
Note: ActionScript 3.0 refers <strong>to</strong> the publish settings for<br />
the Flash file. This setting works with most recent<br />
version of the Flash player.You c<strong>an</strong> ch<strong>an</strong>ge these settings<br />
using the Publish Settings dialogbox (choose File ><br />
Publish Settings).<br />
The new document contains one layer <strong>an</strong>d one empty<br />
keyframe.<br />
3. Choose Modify > Document.<br />
The Document Settings dialog box opens.<br />
4. Ch<strong>an</strong>ge the frame rate <strong>to</strong> 12 <strong>an</strong>d click Make Default.<br />
The <strong>an</strong>imation will now play at 12 frames per second.<br />
This frame rate is easier <strong>to</strong> work with for beginning<br />
<strong>an</strong>ima<strong>to</strong>rs.<br />
5. Select Classic from the workspace switcher (Figure 2).<br />
The Timeline appears at the <strong>to</strong>p of the workspace.<br />
6. Select the Oval <strong>to</strong>ol <strong>an</strong>d draw a small circle <strong>to</strong> represent<br />
the right eye on a <strong>face</strong> (Figure 3).<br />
To draw a perfect circle, hold down Shift as you drag the<br />
Oval <strong>to</strong>ol on the Stage.<br />
Note: Make sure Stroke is set <strong>to</strong> at least 1.0 in the Fill<br />
And Stroke section of the Property inspec<strong>to</strong>r.<br />
7. Select the Selection <strong>to</strong>ol <strong>an</strong>d double-click the circle’s<br />
center <strong>to</strong> select it. You should see both its outline (stroke)<br />
<strong>an</strong>d center (fill) selected.<br />
Figure 1 New Document dialog box<br />
Figure 2 Flash workspace switcher<br />
Figure 3 Right eye drawn with Oval <strong>to</strong>ol<br />
Oval <strong>to</strong>ol<br />
© 2010 Adobe Systems Incorporated <strong>How</strong> <strong>to</strong> <strong>create</strong> <strong>an</strong> <strong>an</strong>imated <strong>face</strong> 1
Activity 5.1 guide Adobe Flash Professional CS5<br />
8. To ch<strong>an</strong>ge the outline color of the eye, click the Stroke<br />
Color box in the Property inspec<strong>to</strong>r <strong>an</strong>d select a new<br />
color (Figure 4). To ch<strong>an</strong>ge the fill color, use the Fill<br />
Color box.<br />
9. On the Timeline, double-click the layer name, Layer 1<br />
(Figure 5).<br />
This selects the layer name so you c<strong>an</strong> rename it.<br />
10. Rename the layer Right Eye <strong>an</strong>d press Enter (Windows)<br />
or Return (Mac OS) (Figure 6).<br />
Figure 4 Image Property inspec<strong>to</strong>r<br />
Figure 5 Layer name selected<br />
Figure 6 New layer name<br />
Stroke color<br />
Fill color<br />
2 <strong>How</strong> <strong>to</strong> <strong>create</strong> <strong>an</strong> <strong>an</strong>imated <strong>face</strong> © 2010 Adobe Systems Incorporated
Adobe Flash Professional CS5 Activity 5.1 guide<br />
Converting the eye <strong>to</strong> a symbol<br />
Instead of creating two eyes separately, you will convert the right eye from a shape <strong>to</strong> a graphic symbol. This adds<br />
the eye <strong>to</strong> the library so you c<strong>an</strong> use it over <strong>an</strong>d over. This will also reduce the size of your finished movie because the<br />
symbol is only s<strong>to</strong>red once.<br />
To save the eye graphic as a symbol:<br />
1. Continue from the previous steps.<br />
2. On the Right Eye layer, click frame 1 <strong>to</strong> select it<br />
(Figure 7).<br />
This au<strong>to</strong>matically selects the contents of frame 1.<br />
Note: If the right eye is not completely selected,<br />
double-click the eye on the Stage with the Selection<br />
<strong>to</strong>ol <strong>to</strong> select it.<br />
3. Select Modify > Convert To Symbol.<br />
The Convert To Symbol dialog box opens (Figure 8).<br />
4. In the dialog box, name the symbol eye, select Graphic<br />
as the behavior, <strong>an</strong>d click OK.<br />
The eye on the Stage is now just <strong>an</strong> inst<strong>an</strong>ce (copy) of<br />
the master eye symbol, which is s<strong>to</strong>red in the library.<br />
The eye now has a single blue selection border<br />
(Figure 9) <strong>an</strong>d c<strong>an</strong> be selected with a single click.<br />
5. Select Window > Library <strong>to</strong> see that your symbol has<br />
been added <strong>to</strong> the Library p<strong>an</strong>el (Figure 10).<br />
Note: You must select the eye symbol in the library <strong>to</strong><br />
see the graphic in the preview window.<br />
You c<strong>an</strong> now reuse the eye symbol as m<strong>an</strong>y times as<br />
you w<strong>an</strong>t without redrawing it.<br />
Figure 7 Frame 1 selected<br />
Figure 8 Convert To Symbol dialog box<br />
Figure 9 Graphic symbol selected<br />
Figure 10 Symbol in Library p<strong>an</strong>el<br />
© 2010 Adobe Systems Incorporated <strong>How</strong> <strong>to</strong> <strong>create</strong> <strong>an</strong> <strong>an</strong>imated <strong>face</strong> 3
Activity 5.1 guide Adobe Flash Professional CS5<br />
To reuse the eye symbol <strong>to</strong> <strong>create</strong> the left eye:<br />
1. Continue from the previous steps.<br />
2. Click the New Layer but<strong>to</strong>n in the lower left corner of the<br />
Timeline <strong>to</strong> insert a new layer (Figure 11).<br />
3. Double-click the layer name <strong>an</strong>d ch<strong>an</strong>ge the name <strong>to</strong> Left<br />
Eye.<br />
4. On the Left Eye layer, select frame 1.<br />
5. Select the eye symbol in the Library p<strong>an</strong>el <strong>an</strong>d drag the<br />
symbol on<strong>to</strong> the Stage.<br />
You now have a second inst<strong>an</strong>ce of the eye on the Stage.<br />
Using inst<strong>an</strong>ces from the library keeps the file size of<br />
your movie smaller th<strong>an</strong> copying <strong>an</strong>d pasting. Smaller<br />
movies load faster in a browser.<br />
To draw the nose:<br />
1. Continue from the previous steps.<br />
2. Insert a new layer <strong>an</strong>d name it Nose.<br />
3. Select frame 1 on the Nose layer.<br />
4. Select the Line <strong>to</strong>ol <strong>an</strong>d draw two lines that form <strong>an</strong> <strong>an</strong>gle<br />
<strong>to</strong> represent a nose (Figure 12).<br />
5. To adjust the <strong>an</strong>gle after you’ve drawn it, use the<br />
Subselection <strong>to</strong>ol (white arrow) <strong>to</strong> drag the corner or one<br />
end of the line. (You might try dragging one end of a line<br />
with the Arrow <strong>to</strong>ol <strong>to</strong> see the difference between the two<br />
<strong>to</strong>ols.)<br />
New Layer but<strong>to</strong>n<br />
Figure 11 New Layer but<strong>to</strong>n<br />
Figure 12 Draw nose<br />
4 <strong>How</strong> <strong>to</strong> <strong>create</strong> <strong>an</strong> <strong>an</strong>imated <strong>face</strong> © 2010 Adobe Systems Incorporated
Adobe Flash Professional CS5 Activity 5.1 guide<br />
Adding frames <strong>to</strong> make a three-second movie<br />
A Flash movie typically plays 12 frames per second. To keep the nose on the Stage for 3 seconds, for example, you<br />
need <strong>to</strong> insert 36 additional frames on the Nose layer after frame 1, the current frame. (Starting at frame 1, it will take<br />
the movie 3 seconds <strong>to</strong> reach frame 37, because 1 + 36 = 37.)<br />
To add frames:<br />
1. Continue from the previous steps.<br />
2. Select frame 37 on the Nose layer <strong>an</strong>d select Insert ><br />
Timeline > Frame.<br />
Flash inserts frames through frame 37 (Figure 13).<br />
Observe that the playhead (the red rect<strong>an</strong>gle at the <strong>to</strong>p of<br />
the Timeline) is on frame 37 <strong>an</strong>d that the nose is visible<br />
but the eyes have disappeared. At the bot<strong>to</strong>m of the<br />
Timeline, you c<strong>an</strong> see that this movie is currently 37<br />
frames, is set <strong>to</strong> play at 12 frames per second, <strong>an</strong>d will<br />
play for 3 seconds.<br />
Note: The keyboard shortcut for inserting a frame is F5.<br />
3. Drag the playhead <strong>to</strong> various frames.<br />
The nose remains visible in frames 1 through 37, but the<br />
eyes appear only in frame 1.<br />
4. To see your movie, drag the playhead <strong>to</strong> frame 1 <strong>an</strong>d then<br />
select Control > Play.<br />
At this point, not much is happening beyond frame 1.<br />
Drawing the mouth<br />
Figure 13 Frame inserted in Timeline<br />
To draw the mouth, you first draw a line <strong>an</strong>d then bend the line by using the Selection <strong>to</strong>ol.<br />
To draw the mouth:<br />
1. Continue from the previous steps.<br />
2. Insert a new layer <strong>an</strong>d name it Mouth.<br />
3. Select frame 1 of the Mouth layer.<br />
4. Draw a mouth in frame 1.<br />
• Use the Line <strong>to</strong>ol <strong>to</strong> draw a straight line (Figure 14).<br />
• Select the Selection <strong>to</strong>ol <strong>an</strong>d click on the Stage away<br />
from the line <strong>to</strong> deselect it.<br />
• Move the pointer <strong>to</strong>ward the middle of the line.<br />
When a curve appears next <strong>to</strong> the pointer, drag the<br />
middle of the line downward <strong>to</strong> <strong>create</strong> a smile<br />
(Figure 15).<br />
• When you release the mouse but<strong>to</strong>n, only the smile<br />
remains (Figure 16).<br />
Figure 14 Mouth as straight line<br />
Figure 15 Drag line with Arrow <strong>to</strong>ol<br />
Figure 16 Mouth complete<br />
© 2010 Adobe Systems Incorporated <strong>How</strong> <strong>to</strong> <strong>create</strong> <strong>an</strong> <strong>an</strong>imated <strong>face</strong> 5
Activity 5.1 guide Adobe Flash Professional CS5<br />
Animating the facial features<br />
To <strong>an</strong>imate the facial features, you will use tweens. With tweens, you cause objects <strong>to</strong> ch<strong>an</strong>ge over time by using the<br />
Timeline.<br />
Animating the eyes<br />
To use motion tweens <strong>to</strong> <strong>an</strong>imate the eyes:<br />
1. Continue from the previous steps.<br />
2. On the Right Eye layer, select frame 37 <strong>an</strong>d select Insert<br />
> Timeline > Frame (Figure 17).<br />
3. With the Right Eye layer selected, choose Insert ><br />
Motion Tween.<br />
4. Select frame 37 on the Right Eye layer <strong>an</strong>d drag the right<br />
eye a short dist<strong>an</strong>ce.<br />
A motion path appears on the Stage showing the path<br />
from the position in the first frame of the tween sp<strong>an</strong> <strong>to</strong><br />
the new position (Figure 18). Because you explicitly<br />
defined the X <strong>an</strong>d Y properties of the object, property<br />
keyframes are added for X <strong>an</strong>d Y in the frame containing<br />
the playhead. Property keyframes appear as small<br />
diamonds in the tween sp<strong>an</strong> on the timeline.<br />
5. Position the playhead on frame 1 <strong>an</strong>d select Control ><br />
Play <strong>to</strong> play your movie <strong>an</strong>d see the effect of the motion<br />
tween.<br />
The right eye gradually moves from its original position<br />
in frame 1 <strong>to</strong> the new position in frame 37. Notice that<br />
only the right eye moves.<br />
Note: If you w<strong>an</strong>t <strong>to</strong> ch<strong>an</strong>ge the motion, move only the<br />
symbol in keyframe 37.<br />
6. Choose frame 37 on the Left Eye layer <strong>an</strong>d select Insert ><br />
Timeline > Frame.<br />
7. With the Right Eye layer selected, choose Insert ><br />
Motion Tween. In frame 37 move the left eye the same<br />
dist<strong>an</strong>ce as the right eye.<br />
Figure 17 Tween sp<strong>an</strong> in the Timeline p<strong>an</strong>el<br />
Figure 18 Tweened object with a motion path<br />
6 <strong>How</strong> <strong>to</strong> <strong>create</strong> <strong>an</strong> <strong>an</strong>imated <strong>face</strong> © 2010 Adobe Systems Incorporated
Adobe Flash Professional CS5 Activity 5.1 guide<br />
Animating the mouth<br />
Because you <strong>create</strong>d the mouth by using one of the drawing <strong>to</strong>ols (the Line <strong>to</strong>ol) <strong>an</strong>d have not converted the mouth <strong>to</strong><br />
a symbol, it is still a shape. You c<strong>an</strong> use a shape tween <strong>to</strong> <strong>an</strong>imate the mouth.<br />
To use a shape tween <strong>to</strong> <strong>an</strong>imate the mouth:<br />
1. Continue from the previous steps.<br />
2. Select frame 37 on the Mouth layer <strong>an</strong>d insert a<br />
keyframe.<br />
3. With the Selection <strong>to</strong>ol, click on the Stage away from the<br />
mouth line <strong>to</strong> deselect it. Then drag the mouth line in<strong>to</strong> a<br />
bigger smile.<br />
4. To <strong>create</strong> a shape tween between the first <strong>an</strong>d last frames<br />
on the Mouth layer, click a frame between frames 1 <strong>an</strong>d<br />
37, <strong>an</strong>d select Insert > Shape Tween.<br />
The frames containing the shape tween are now light<br />
green <strong>an</strong>d contain a solid arrow running from the start<br />
frame <strong>to</strong> the end frame (Figure 19).<br />
5. Select File > Save.<br />
6. Select Control > Test Movie > In Flash Professional <strong>to</strong><br />
see it play.<br />
Selecting Control > Test Movie exports a .swf file <strong>an</strong>d<br />
plays it in a preview window. When the movie reaches<br />
the last frame, it loops back <strong>to</strong> frame 1 <strong>an</strong>d plays again.<br />
7. Select File > Close <strong>to</strong> close the preview window.<br />
Create <strong>an</strong>y additional <strong>an</strong>imated facial features as you choose.<br />
Figure 19 Shape Tween on the Mouth layer<br />
© 2010 Adobe Systems Incorporated <strong>How</strong> <strong>to</strong> <strong>create</strong> <strong>an</strong> <strong>an</strong>imated <strong>face</strong> 7
Activity 5.1 guide Adobe Flash Professional CS5<br />
Publishing your movie<br />
When you’re ready <strong>to</strong> deliver your movie <strong>to</strong> <strong>an</strong> audience, you c<strong>an</strong> publish the Flash document (FLA file) for<br />
playback. The Publish comm<strong>an</strong>d <strong>create</strong>s a Flash SWF file (playable with Flash Player) <strong>an</strong>d <strong>an</strong> HTML document that<br />
inserts your Flash movie in a browser window. For viewers who do not have Flash Player installed, you c<strong>an</strong> choose <strong>to</strong><br />
publish the FLA file in alternative file formats—GIF, JPEG, PNG, or QuickTime—with the HTML needed <strong>to</strong> display<br />
them in a browser window.<br />
When you publish HTML with your movie, Flash also <strong>create</strong>s a file called AC_OETags.js. This JavaScript file lets<br />
your SWF file play au<strong>to</strong>matically in certain browsers (called active content-compli<strong>an</strong>t browsers) that would<br />
otherwise require a site visi<strong>to</strong>r <strong>to</strong> click <strong>to</strong> play your movie. To avoid this problem, upload AC_OETags.js <strong>to</strong> your site<br />
in the same location as the HTML file that hosts the movie. For more about this issue, visit www.adobe.com/go/<br />
activecontent.<br />
To publish your movie:<br />
1. Select File > Publish Settings <strong>to</strong> open the Publish<br />
Settings dialog box (Figure 20).<br />
2. Use the Formats tab <strong>to</strong> determine which file formats <strong>to</strong><br />
output when you publish.<br />
Figure 20 Publish Settings dialog box<br />
8 <strong>How</strong> <strong>to</strong> <strong>create</strong> <strong>an</strong> <strong>an</strong>imated <strong>face</strong> © 2010 Adobe Systems Incorporated
Adobe Flash Professional CS5 Activity 5.1 guide<br />
3. Use the Flash tab <strong>to</strong> determine which Flash Player you<br />
are publishing <strong>to</strong> (Figure 21). If you think your audience<br />
might not have the latest player, you might w<strong>an</strong>t <strong>to</strong> select<br />
<strong>an</strong> older player from the Player menu.<br />
4. Select Generate Size Report under Adv<strong>an</strong>ced <strong>to</strong> see a<br />
detailed report of size for each asset in your movie.<br />
5. Select Protect From Import <strong>to</strong> prevent <strong>an</strong>yone from<br />
importing your SWF file in<strong>to</strong> Flash <strong>an</strong>d converting it<br />
back <strong>to</strong> a FLA file.<br />
6. Select Compress Movie under SWF Settings <strong>to</strong> reduce<br />
the file size of the exported movie.<br />
7. Use the HTML tab <strong>to</strong> control settings for the HTML file<br />
(Figure 22).<br />
8. Deselect the Loop option if you w<strong>an</strong>t your movie <strong>to</strong> play<br />
through only one time <strong>an</strong>d s<strong>to</strong>p.<br />
9. To publish your movie, click the Publish but<strong>to</strong>n. To save<br />
your settings without publishing, click OK.<br />
Figure 21 Flash tab of Publish Settings dialog box<br />
Figure 22 HTML tab of Publish Settings dialog<br />
box<br />
© 2010 Adobe Systems Incorporated <strong>How</strong> <strong>to</strong> <strong>create</strong> <strong>an</strong> <strong>an</strong>imated <strong>face</strong> 9