
Create successful ePaper yourself
Turn your PDF publications into a flip-book with our unique Google optimized e-Paper software.
<strong>SteppIR</strong> <strong>Antennas</strong> - BigIR 13<br />
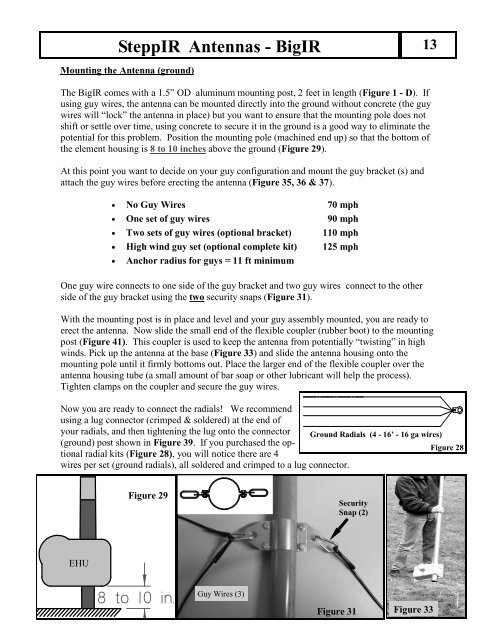
Mounting the Antenna (ground)<br />
The BigIR comes with a 1.5” OD aluminum mounting post, 2 feet in length (Figure 1 - D). If<br />
using guy wires, the antenna can be mounted directly into the ground without concrete (the guy<br />
wires will “lock” the antenna in place) but you want to ensure that the mounting pole does not<br />
shift or settle over time, using concrete to secure it in the ground is a good way to eliminate the<br />
potential for this problem. Position the mounting pole (machined end up) so that the bottom of<br />
the element housing is 8 to 10 inches above the ground (Figure 29).<br />
At this point you want to decide on your guy configuration and mount the guy bracket (s) and<br />
attach the guy wires before erecting the antenna (Figure 35, 36 & 37).<br />
• No Guy Wires 70 mph<br />
• One set of guy wires 90 mph<br />
• Two sets of guy wires (optional bracket) 110 mph<br />
• High wind guy set (optional complete kit) 125 mph<br />
• Anchor radius for guys = 11 ft minimum<br />
One guy wire connects to one side of the guy bracket and two guy wires connect to the other<br />
side of the guy bracket using the two security snaps (Figure 31).<br />
With the mounting post is in place and level and your guy assembly mounted, you are ready to<br />
erect the antenna. Now slide the small end of the flexible coupler (rubber boot) to the mounting<br />
post (Figure 41). This coupler is used to keep the antenna from potentially “twisting” in high<br />
winds. Pick up the antenna at the base (Figure 33) and slide the antenna housing onto the<br />
mounting pole until it firmly bottoms out. Place the larger end of the flexible coupler over the<br />
antenna housing tube (a small amount of bar soap or other lubricant will help the process).<br />
Tighten clamps on the coupler and secure the guy wires.<br />
Now you are ready to connect the radials! We recommend<br />
using a lug connector (crimped & soldered) at the end of<br />
your radials, and then tightening the lug onto the connector Ground Radials (4 - 16’ - 16 ga wires)<br />
(ground) post shown in Figure 39. If you purchased the op-<br />
Figure 28<br />
tional radial kits (Figure 28), you will notice there are 4<br />
wires per set (ground radials), all soldered and crimped to a lug connector.<br />
EHU<br />
Figure 29<br />
8 to 10 in.<br />
Guy Wires (3)<br />
Security<br />
Snap (2)<br />
Figure 31<br />
Figure 33