Bullard Clean Air Boxes (CAB) Series Panel Mount User Manual ...
Bullard Clean Air Boxes (CAB) Series Panel Mount User Manual ...
Bullard Clean Air Boxes (CAB) Series Panel Mount User Manual ...

You also want an ePaper? Increase the reach of your titles
YUMPU automatically turns print PDFs into web optimized ePapers that Google loves.
Monitor Specifications / Set Up and Operation<br />
2<br />
Respirator Capacity<br />
The <strong>Bullard</strong> <strong>Clean</strong> <strong>Air</strong> Box is supplied with up to 8 quick-disconnect fittings. The actual<br />
number of respirators that may be connected to the <strong>CAB</strong> is dependent on the inlet<br />
pressure to the <strong>Bullard</strong> air filtration system and the air flow and pressure requirements<br />
of the respirator being worn. <strong>Air</strong> supply pressure ranges and approved hose lengths for<br />
a respirator can be found in the manufacturer’s <strong>User</strong> Instructions for the respirator.<br />
<strong>Air</strong> Monitoring<br />
The air flows through the CO monitor and a small amount (~0.5 lpm) is diverted<br />
through a preset internal regulator and flow restrictor, delivering a continuous flow<br />
of sample air to the sensor chamber. The monitor will analyze the air and display the<br />
CO concentration in parts-per-million (ppm). The Green LED located on the face of the<br />
monitor will illuminate during normal operation when the CO level is below the CO alarm<br />
point (10 ppm US and 5 ppm International). If the CO level rises above the alarm set<br />
point, the Red (alarm) LED on the face of the monitor will illuminate and an audible alarm<br />
will sound.<br />
Function Modes<br />
The knob on the front of the COM10 or COM5 monitor sets the functions for the CO<br />
monitor and can be switched to RUN, TEST and CAL.<br />
RUN mode is the operation/detection mode. The monitor must be in the RUN mode<br />
to monitor the supplied breathing air. Supplied air must be turned on and flowing to<br />
the instrument while in this mode. When the supplied air is off or interrupted while the<br />
monitor is in the RUN mode, the low flow alarm will sound and LF will be displayed on the<br />
monitor until the supplied air is turned on.<br />
TEST mode allows for bump testing of the sensor or for silencing of the low flow alarm<br />
when supplied air is shut off. To perform a bump test, place the monitor in the TEST<br />
mode and flow the calibration gas into the center of the knob. The reading on the monitor<br />
should be 10 +/- 1 if applying CO gas. The reading on the monitor should be zero or 1 if<br />
applying the zero gas. In the test mode, the supplied air will not be monitored and there<br />
is no need to turn the supplied air off when entering this mode. Unit must be zeroed after<br />
bump test is performed.<br />
CAL mode is the calibration and zero calibration mode. When the monitor is switched<br />
to the CAL mode, the supplied air will not be flowing to the sensor and there is no need<br />
to shut off the supplied air. When in the CAL mode, (AC) AutoCal ® will be displayed.<br />
Pressing the On/Off button while in this mode will change the display to (AO) AutoZero.<br />
For calibration and zeroing instruction, see the Calibration section.<br />
F1 (fault) is indicated on the display when the cam valve is not positioned securely in<br />
one of these three modes.<br />
Error Codes<br />
rC indicates that the system requires a recalibration.<br />
lb indicates a low battery.<br />
Monitor Specs<br />
Operating Temperature .............................................................-4ºF to 120ºF (-20ºC to 48.89ºC)<br />
Humidity Range ...................................................................................................................0 – 100%<br />
Sample Flow Rate ..................................................................................................................0.85 cfh<br />
Display .................................................................................................................................2 digit LCD<br />
Sensor Type ............................................................................Electrochemical; Carbon Monoxide<br />
Range ..................................................................................................................................0 – 99 ppm<br />
Calibration ..................................... <strong>Manual</strong> CO and Zero - Auto Cal ® ; No manual adjustments<br />
Alarm Setting....................................................................................10 ppm (5 ppm International)<br />
<strong>CAB</strong> <strong>Clean</strong> <strong>Air</strong> Box Set Up and Operation<br />
WARNINg<br />
Always operate the <strong>CAB</strong> <strong>Clean</strong> <strong>Air</strong> Box in the upright position. Failure to comply may<br />
result in one or all of the following:<br />
Auto drains will not function properly. This may result in the contamination of the<br />
CO monitor and cause water to be passed through the air supply hose and into the<br />
worker’s respirator.<br />
Auto drains may become clogged. See user instructions for information on cleaning<br />
or replacing auto drains.<br />
Filters may accumulate moisture and/or contaminants. See user instructions for<br />
information on replacing filter.<br />
Set Up and Operation<br />
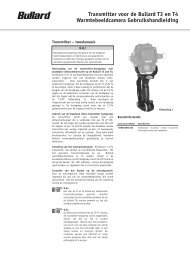
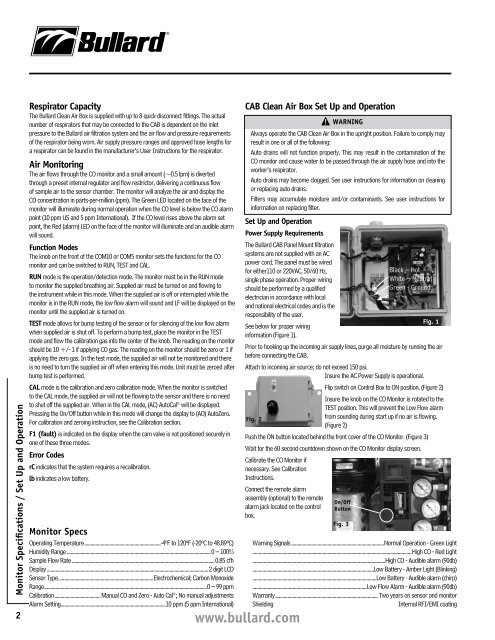
Power Supply Requirements<br />
The <strong>Bullard</strong> <strong>CAB</strong> <strong>Panel</strong> <strong>Mount</strong> filtration<br />
systems are not supplied with an AC<br />
power cord. The panel must be wired<br />
for either110 or 220VAC, 50/60 Hz,<br />
Black – Hot<br />
single phase operation. Proper wiring<br />
White – Neutral<br />
should be performed by a qualified<br />
Green - Ground<br />
electrician in accordance with local<br />
and national electrical codes and is the<br />
responsibility of the user.<br />
Fig. 1<br />
See below for proper wiring<br />
information (Figure 1).<br />
Prior to hooking up the incoming air supply lines, purge all moisture by running the air<br />
before connecting the <strong>CAB</strong>.<br />
Attach to incoming air source; do not exceed 150 psi.<br />
Insure the AC Power Supply is operational.<br />
Flip switch on Control Box to ON position. (Figure 2)<br />
Insure the knob on the CO Monitor is rotated to the<br />
TEST position. This will prevent the Low Flow alarm<br />
Fig. 2<br />
from sounding during start up if no air is flowing.<br />
(Figure 2)<br />
Push the ON button located behind the front cover of the CO Monitor. (Figure 3)<br />
Wait for the 60 second countdown shown on the CO Monitor display screen.<br />
Calibrate the CO Monitor if<br />
necessary. See Calibration<br />
Instructions.<br />
Connect the remote alarm<br />
assembly (optional) to the remote<br />
On/Off<br />
alarm jack located on the control Button<br />
box.<br />
Fig. 3<br />
www.bullard.com<br />
Warning Signals .......................................................................... Normal Operation - Green Light<br />
...............................................................................................................................High CO - Red Light<br />
..........................................................................................................High CO - Audible alarm (90db)<br />
.................................................................................................Low Battery - Amber Light (Blinking)<br />
...................................................................................................Low Battery - Audible alarm (chirp)<br />
...........................................................................................Low Flow Alarm - Audible alarm (90db)<br />
Warranty .................................................................................. Two years on sensor and monitor<br />
Shielding Internal RFI/EMI coating