Bullard Clean Air Boxes (CAB) Series Panel Mount User Manual ...
Bullard Clean Air Boxes (CAB) Series Panel Mount User Manual ...
Bullard Clean Air Boxes (CAB) Series Panel Mount User Manual ...

Create successful ePaper yourself
Turn your PDF publications into a flip-book with our unique Google optimized e-Paper software.
System Maintenance / Battery and Sensor Replacement<br />
4<br />
Calibration<br />
Monitor calibration should be performed monthly or whenever the reading may be<br />
questionable. A calibration schedule should be maintained for future reference. To obtain<br />
an accurate calibration, we recommend the use of <strong>Bullard</strong> calibration kits.<br />
Part Number:<br />
<strong>CAB</strong>CK Calibration kit for CO monitor, 10 ppm CO, zero air, regulator and case -<br />
34 liter size<br />
<strong>CAB</strong>CK17L Calibration kit for CO monitor, 10ppm CO, zero air and regulator -<br />
17 liter size<br />
<strong>CAB</strong>RS New CO sensor<br />
NOTE<br />
To assure sensor accuracy, calibration of the monitor is required. If you cannot<br />
obtain an accurate calibration, sensor replacement may be necessary. Contact<br />
<strong>Bullard</strong> Customer Service Department for ordering information.<br />
Battery Replacement<br />
CO Monitor Battery Replacement: A 9-volt battery is installed under the front panel cover<br />
to provide power to the CO monitor. This monitor may also run solely on DC power if the<br />
clean air box is not attached to an AC power supply.<br />
To replace the 9-volt battery, remove the panel cover from the front of the CO monitor.<br />
Lift it off from either the left or right side. If a 9-volt battery is being used to power the<br />
monitor and the battery power becomes too low, the monitor will indicate low battery<br />
(LB) on the display to indicate it is time to change the battery. (Figure 4)<br />
Fig. 4<br />
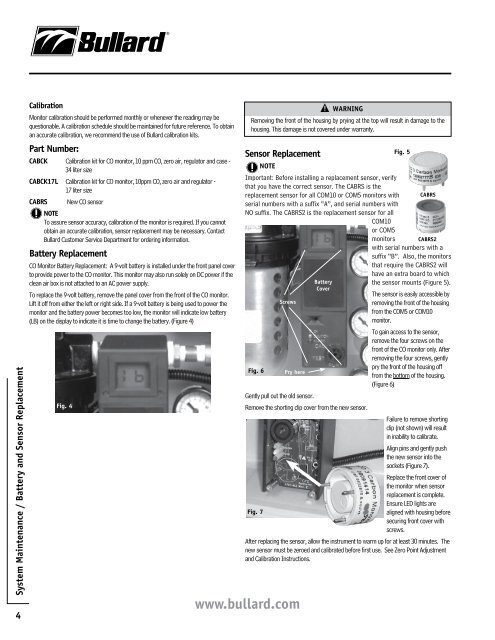
Sensor Replacement<br />
NOTE<br />
Important: Before installing a replacement sensor, verify<br />
that you have the correct sensor. The <strong>CAB</strong>RS is the<br />
replacement sensor for all COM10 or COM5 monitors with<br />
serial numbers with a suffix “A”, and serial numbers with<br />
NO suffix. The <strong>CAB</strong>RS2 is the replacement sensor for all<br />
COM10<br />
or COM5<br />
monitors<br />
www.bullard.com<br />
WARNINg<br />
Removing the front of the housing by prying at the top will result in damage to the<br />
housing. This damage is not covered under warranty.<br />
Fig. 6<br />
Screws<br />
Pry here<br />
Battery<br />
Cover<br />
Fig. 5<br />
<strong>CAB</strong>RS<br />
<strong>CAB</strong>RS2<br />
with serial numbers with a<br />
suffix “B”. Also, the monitors<br />
that require the <strong>CAB</strong>RS2 will<br />
have an extra board to which<br />
the sensor mounts (Figure 5).<br />
The sensor is easily accessible by<br />
removing the front of the housing<br />
from the COM5 or COM10<br />
monitor.<br />
To gain access to the sensor,<br />
remove the four screws on the<br />
front of the CO monitor only. After<br />
removing the four screws, gently<br />
pry the front of the housing off<br />
from the bottom of the housing.<br />
(Figure 6)<br />
Gently pull out the old sensor.<br />
Remove the shorting clip cover from the new sensor.<br />
Failure to remove shorting<br />
clip (not shown) will result<br />
in inability to calibrate.<br />
Align pins and gently push<br />
the new sensor into the<br />
sockets (Figure 7).<br />
Replace the front cover of<br />
the monitor when sensor<br />
replacement is complete.<br />
Ensure LED lights are<br />
Fig. 7<br />
aligned with housing before<br />
securing front cover with<br />
screws.<br />
After replacing the sensor, allow the instrument to warm up for at least 30 minutes. The<br />
new sensor must be zeroed and calibrated before first use. See Zero Point Adjustment<br />
and Calibration Instructions.