Bullard Clean Air Boxes (CAB) Series Panel Mount User Manual ...
Bullard Clean Air Boxes (CAB) Series Panel Mount User Manual ...
Bullard Clean Air Boxes (CAB) Series Panel Mount User Manual ...
You also want an ePaper? Increase the reach of your titles
YUMPU automatically turns print PDFs into web optimized ePapers that Google loves.
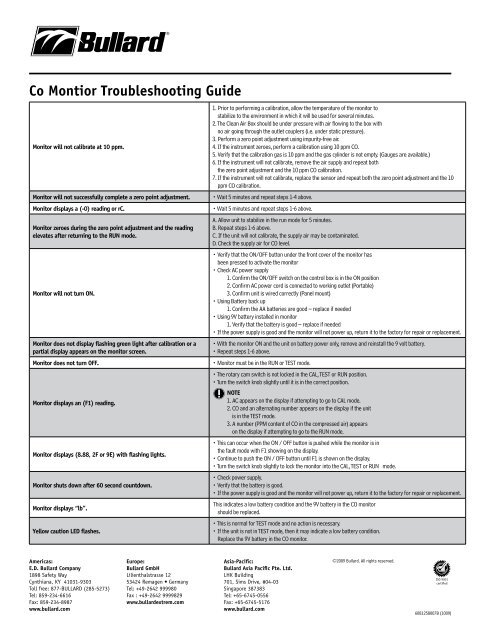
Co Montior Troubleshooting guide<br />
Monitor will not calibrate at 10 ppm.<br />
Monitor will not successfully complete a zero point adjustment. • Wait 5 minutes and repeat steps 1-4 above.<br />
Monitor displays a (-0) reading or rC. • Wait 5 minutes and repeat steps 1-6 above.<br />
Monitor zeroes during the zero point adjustment and the reading<br />
elevates after returning to the RUN mode.<br />
Monitor will not turn ON.<br />
Monitor does not display flashing green light after calibration or a<br />
partial display appears on the monitor screen.<br />
Americas:<br />
E.D. <strong>Bullard</strong> Company<br />
1898 Safety Way<br />
Cynthiana, KY 41031-9303<br />
Toll free: 877-BULLARD (285-5273)<br />
Tel: 859-234-6616<br />
Fax: 859-234-8987<br />
www.bullard.com<br />
Europe:<br />
<strong>Bullard</strong> gmbH<br />
Lilienthalstrasse 12<br />
53424 Remagen • Germany<br />
Tel: +49-2642 999980<br />
Fax : +49-2642 9999829<br />
www.bullardextrem.com<br />
1. Prior to performing a calibration, allow the temperature of the monitor to<br />
stabilize to the environment in which it will be used for several minutes.<br />
2. The <strong>Clean</strong> <strong>Air</strong> Box should be under pressure with air flowing to the box with<br />
no air going through the outlet couplers (i.e. under static pressure).<br />
3. Perform a zero point adjustment using impurity-free air.<br />
4. If the instrument zeroes, perform a calibration using 10 ppm CO.<br />
5. Verify that the calibration gas is 10 ppm and the gas cylinder is not empty. (Gauges are available.)<br />
6. If the instrument will not calibrate, remove the air supply and repeat both<br />
the zero point adjustment and the 10 ppm CO calibration.<br />
7. If the instrument will not calibrate, replace the sensor and repeat both the zero point adjustment and the 10<br />
ppm CO calibration.<br />
A. Allow unit to stabilize in the run mode for 5 minutes.<br />
B. Repeat steps 1-6 above.<br />
C. If the unit will not calibrate, the supply air may be contaminated.<br />
D. Check the supply air for CO level.<br />
• Verify that the ON/OFF button under the front cover of the monitor has<br />
been pressed to activate the monitor<br />
• Check AC power supply<br />
1. Confirm the ON/OFF switch on the control box is in the ON position<br />
2. Confirm AC power cord is connected to working outlet (Portable)<br />
3. Confirm unit is wired correctly (<strong>Panel</strong> mount)<br />
• Using Battery back up<br />
1. Confirm the AA batteries are good – replace if needed<br />
• Using 9V battery installed in monitor<br />
1. Verify that the battery is good – replace if needed<br />
• If the power supply is good and the monitor will not power up, return it to the factory for repair or replacement.<br />
• With the monitor ON and the unit on battery power only, remove and reinstall the 9 volt battery.<br />
• Repeat steps 1-6 above.<br />
Monitor does not turn OFF. • Monitor must be in the RUN or TEST mode.<br />
• The rotary cam switch is not locked in the CAL, TEST or RUN position.<br />
• Turn the switch knob slightly until it is in the correct position.<br />
NOTE<br />
Monitor displays an (F1) reading.<br />
1. AC appears on the display if attempting to go to CAL mode.<br />
2. CO and an alternating number appears on the display if the unit<br />
is in the TEST mode.<br />
3. A number (PPM content of CO in the compressed air) appears<br />
on the display if attempting to go to the RUN mode.<br />
• This can occur when the ON / OFF button is pushed while the monitor is in<br />
the fault mode with F1 showing on the display.<br />
Monitor displays (8.88, 2F or 9E) with flashing lights.<br />
• Continue to push the ON / OFF button until F1 is shown on the display.<br />
• Turn the switch knob slightly to lock the monitor into the CAL, TEST or RUN mode.<br />
• Check power supply.<br />
Monitor shuts down after 60 second countdown.<br />
• Verify that the battery is good.<br />
• If the power supply is good and the monitor will not power up, return it to the factory for repair or replacement.<br />
This indicates a low battery condition and the 9V battery in the CO monitor<br />
Monitor displays “lb”.<br />
should be replaced.<br />
• This is normal for TEST mode and no action is necessary.<br />
Yellow caution LED flashes.<br />
• If the unit is not in TEST mode, then it may indicate a low battery condition.<br />
Replace the 9V battery in the CO monitor.<br />
Asia-Pacific:<br />
<strong>Bullard</strong> Asia Pacific Pte. Ltd.<br />
LHK Building<br />
701, Sims Drive, #04-03<br />
Singapore 387383<br />
Tel: +65-6745-0556<br />
Fax: +65-6745-5176<br />
www.bullard.com<br />
©2009 <strong>Bullard</strong>. All rights reserved.<br />
ISO 9001<br />
certified<br />
6081258007B (1009)


