HELCOM Map and Data Service User Manual
HELCOM Map and Data Service User Manual
HELCOM Map and Data Service User Manual

You also want an ePaper? Increase the reach of your titles
YUMPU automatically turns print PDFs into web optimized ePapers that Google loves.
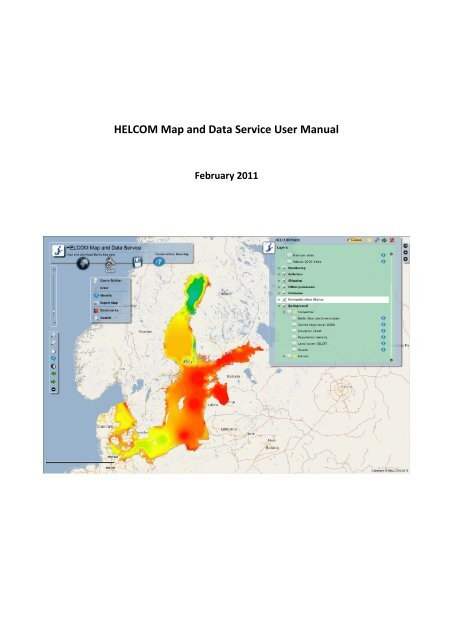
<strong>HELCOM</strong> <strong>Map</strong> <strong>and</strong> <strong>Data</strong> <strong>Service</strong> <strong>User</strong> <strong>Manual</strong><br />
February 2011
Table of contents<br />
Table of contents…………………………………………………………………………...2<br />
1. General……………………………………………………………………………….………….3<br />
2. Basic map functions…………………………………………………………………..……3<br />
2.1 Selecting visible map layers…………………………………………………………….3<br />
2.2 Viewing legend……………………………………………………………………………....4<br />
2.3 Viewing metadata of the layer………………………………………………………..5<br />
2.4 Zooming <strong>and</strong> moving the map…………………………………………………………6<br />
2.5 Identify tool (view attributes)………………………………………………………….6<br />
3. <strong>Data</strong> delivery functions……………………………………………………………………7<br />
3.1 Downloading maps………………………………………………………………………….7<br />
3.2 Web map service (WMS) ………………………………………………………………..8<br />
4. <strong>Map</strong> tools………………………………………………………………………………………..8<br />
4.1 Query builder tool……………………………………………………………………………8<br />
4.2 Draw tool……………………………………………………………………………………….10<br />
4.3 Identify tool………………………………………………………………………..………….10<br />
4.4 Export map tool……………………………………………………………………………..11<br />
4.5 Bookmarks tool…………………………………………………………………………..….11<br />
4.6 Search tool…………………………………………………………………………..…………11<br />
2
1. General<br />
This manual has been written for the users of the <strong>HELCOM</strong> <strong>Map</strong> <strong>and</strong> <strong>Data</strong> service. The most<br />
important objective of this manual is to explain how to use the map service. This manual<br />
contains all the needed information to visualize, download, search <strong>and</strong> query datasets in the<br />
map service.<br />
In case of any questions or feedback, please contact joni.kaitaranta@helcom.fi.<br />
2. Basic map functions<br />
2.1 Selecting visible map layers<br />
There are numerous layers in the map service. The layers are grouped under thematic folders<br />
(Ecological features etc.) in a window on the right h<strong>and</strong> side of the start page (Figure 1). The<br />
folders can be opened with a single click. Layers can be selected to be visualized on the map by<br />
ticking the box next to the layer name (Figure 2).<br />
Figure 1. <strong>Map</strong> service front page.<br />
3
Figure 2. Selecting visible layers (Currently visualized: Benthic marine l<strong>and</strong>scapes from BALANCE project).<br />
NOTE: If some of the thematic folders do not open, press the refresh button of your browser<br />
to reload the map page <strong>and</strong> try again.<br />
2.2 Viewing legend<br />
The legend of the selected layers can be seen by clicking the “Legend” text on the upper right<br />
h<strong>and</strong> side of the page (Figure 3a). When legend view is enabled the user can switch back to<br />
layer selection view by clicking the folder icon (Figure 3b) on the upper right h<strong>and</strong> side of the<br />
page. Transparency of each thematic folder can be adjusted by clicking transparency button<br />
(wheels image) on the upper right corner. The legend/layers window can be hidden or<br />
uncovered with arrow symbols on the right h<strong>and</strong> side of the window.<br />
Figure 3a. <strong>Map</strong> legend view for the selected layer(s). Figure 3b. Layer selection view.<br />
NOTE: If legend figures are not loaded properly (blank images), it is recommended to press the<br />
refresh button of your browser to reload the map page <strong>and</strong> try again.<br />
4
2.3 Viewing metadata of the layer<br />
The metadata information for each layer can be opened from the button on the right h<strong>and</strong><br />
side of each layer (Figure 4). This opens a popup window with documented metadata<br />
information of the layer (Figure 5). Metadata file can also be downloaded by downloading the<br />
map layer (see 4.1 Downloading maps).<br />
NOTE: Currently metadata is best viewed with Internet Explorer 8. When using Firefox,<br />
installing add-on IE Tab V2 (https://addons.mozilla.org/en-US/firefox/addon/ie-tab-2-ff-<br />
36/) <strong>and</strong> viewing the page with IE Tab displays the metadata correctly.<br />
Figure 4. Metadata information button.<br />
Figure 5. Metadata information window.<br />
5
2.4 Zooming <strong>and</strong> moving the map<br />
Zooming <strong>and</strong> moving the map can be done with buttons located in the navigation toolbar on<br />
the left h<strong>and</strong> side of the page (Figure 6). Zooming can also be done by scrolling mouse wheel<br />
or moving by keyboard arrow buttons.<br />
Figure 6. Navigation toolbar functions.<br />
2.5 Identify tool (view attributes)<br />
With the identify tool in the navigation toolbar (see Figure 6) it is possible to view attribute<br />
information of each map object by clicking the object (Figure 7).<br />
Figure 7. <strong>Map</strong> page showing attribute values of the selected map object.<br />
6
3. <strong>Data</strong> delivery functions<br />
Most of the datasets in the map service can be downloaded by the user. The simplest way to<br />
get access to the data is to download map files using the download tool. There is also<br />
possibility to connect to the <strong>HELCOM</strong> GIS Server via Web <strong>Map</strong> <strong>Service</strong> (WMS) interface.<br />
3.1 Downloading maps<br />
The map files can be downloaded by selecting “ESRI Shapefiles” under the <strong>Data</strong> Delivery menu<br />
(Figure 8). This opens the download window (Figure 9) where the user can select the layer <strong>and</strong><br />
start the download. Downloading is possible for one layer at a time. <strong>Map</strong> layer will be<br />
delivered as a packed zip file with metadata file included.<br />
Figure 8. Downloading maps functionality in the data delivery menu.<br />
Figure 9. Selecting the layer in the download window.<br />
7
3.2 Web <strong>Map</strong> <strong>Service</strong>s (WMS)<br />
Instructions on how to establish WMS connection <strong>HELCOM</strong> server can be obtained by clicking<br />
“Web map services” in the <strong>Data</strong> Delivery menu (Figure 10). This opens a window with detailed<br />
instructions <strong>and</strong> video on how to establish the connection with ArcGIS or GAIA software.<br />
Figure10. Web map service instructions under data delivery menu.<br />
4. <strong>Map</strong> Tools<br />
There are some basic GIS functionalities available in the <strong>HELCOM</strong> <strong>Map</strong> <strong>and</strong> <strong>Data</strong> <strong>Service</strong> under<br />
the Tools menu (Figure 11). The user can build simple queries <strong>and</strong> perform searches. Also<br />
there is possibility to draw objects on the map <strong>and</strong> save the result in picture format.<br />
Figure 11. Tools menu content.<br />
4.1 Query builder tool<br />
Selecting the query builder tool opens the query builder window (Figure 12). First the user<br />
needs to choose the thematic map service for query, for example “Ecological feature”. After<br />
map service selection the user can either<br />
I) make an attribute query by selecting “Attribute filter” sheet<br />
II) make a spatial query by selecting “Spatial filter” sheet<br />
8
Figure 12. Query builder window.<br />
Making an attribute filter query requires that the target map layer is selected in the attribute<br />
filter sheet (Figure 13). After the target layer selection, the selection of queried attributes<br />
(columns) can be done. When the field is selected, unique values of the field is displayed in the<br />
“Values” menu. With the operator buttons it is possible to form a simple SQL query to filter out<br />
the desired result. The SQL query clause is formed in the “filter” field <strong>and</strong> can be executed by<br />
pressing the “Search” button. Selected features are then visualized in the map <strong>and</strong> table of<br />
selected attributes can be viewed by clicking the table image on upper right pane of the Query<br />
builder window. In the example case (Figure 13) there have been selected observations from<br />
Sweden by an SQL filter clause (COUNTRY = ‘Sweden’) from map layer “TBT in sediment”.<br />
Figure 13. Example of attribute query.<br />
Making spatial filter query requires that the target map layer is selected in the attribute filter<br />
sheet (Figure 13). After that the user can click the spatial filter sheet to appear (Figure 14). The<br />
spatial filter can be used to select features intersecting, overlapping or within a certain search<br />
area. The selection criterion is defined with “Select features with” menu. Optional buffer size<br />
can be applied to certain range in “Optional buffer” window. After the selection the user can<br />
draw on the map with one of the following tools: point, polyline or polygon. Double clicking<br />
ends the drawing task <strong>and</strong> by pressing the search button the features of the selected layer are<br />
selected based on the defined spatial definition <strong>and</strong> drawn object.<br />
9
Figure 14. Example of spatial search by polygon area.<br />
4.2 Draw tool<br />
Selecting the draw tool opens the draw tool window (Figure 15). It is possible to add text <strong>and</strong><br />
draw points, lines or polygons on the map. The graphics information can be saved <strong>and</strong> loaded<br />
again to be viewed in the <strong>HELCOM</strong> <strong>Map</strong> <strong>and</strong> <strong>Data</strong> <strong>Service</strong>. Screen image can be saved by Export<br />
map tool (See 4.4 Export map tool).<br />
Figure 15. Example of the drawing tool.<br />
4.3 Identify tool<br />
The identify feature can be used also from the Tools menu. This opens the Identify tool<br />
window where attributes of the selected map features are displayed (Figure 16).<br />
10
Figure 16. Identify tool window.<br />
4.4 Export map tool<br />
<strong>Map</strong> view can be saved as a screenshot by selecting the “Export map” function from the tools<br />
menu (Figure 17). Recommended format for map figures is png.<br />
Figure 17. Export map tool window.<br />
4.5 Bookmarks tool<br />
<strong>Map</strong> locations can be saved as bookmarks by the bookmarks tool (Figure 18). The user can<br />
navigate to the bookmark location by clicking the bookmark in the bookmark window. Adding<br />
current map view to bookmark can be done by “Add bookmark” button.<br />
Figure 18. Bookmarks tool window.<br />
4.6 Search tool<br />
Layer features can be searched with the Search tool (Figure 19). After the layer is selected in<br />
the “Search layer”- menu, the search can be done by text search or by spatial search. Search<br />
mode is selected in the upper pane of the window. After the search is done, the result<br />
11
attribute table can be viewed by selecting “Detailed results” <strong>and</strong> saved as comma separated<br />
value table by “Export to CSV” button.<br />
Figure 19. Search tool window <strong>and</strong> search results.<br />
12