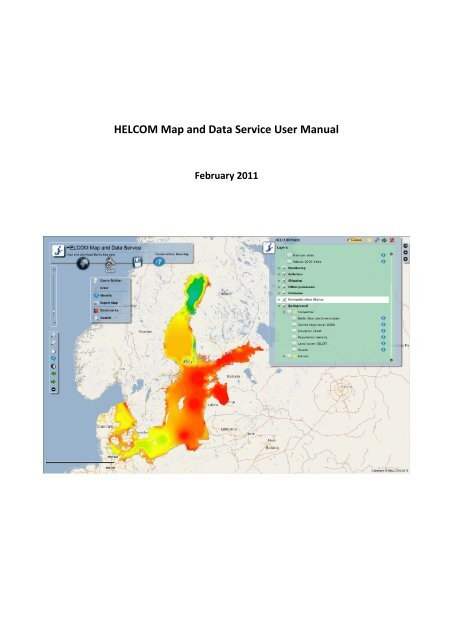
HELCOM Map and Data Service User Manual
HELCOM Map and Data Service User Manual
HELCOM Map and Data Service User Manual

Create successful ePaper yourself
Turn your PDF publications into a flip-book with our unique Google optimized e-Paper software.
<strong>HELCOM</strong> <strong>Map</strong> <strong>and</strong> <strong>Data</strong> <strong>Service</strong> <strong>User</strong> <strong>Manual</strong><br />
February 2011
Table of contents<br />
Table of contents…………………………………………………………………………...2<br />
1. General……………………………………………………………………………….………….3<br />
2. Basic map functions…………………………………………………………………..……3<br />
2.1 Selecting visible map layers…………………………………………………………….3<br />
2.2 Viewing legend……………………………………………………………………………....4<br />
2.3 Viewing metadata of the layer………………………………………………………..5<br />
2.4 Zooming <strong>and</strong> moving the map…………………………………………………………6<br />
2.5 Identify tool (view attributes)………………………………………………………….6<br />
3. <strong>Data</strong> delivery functions……………………………………………………………………7<br />
3.1 Downloading maps………………………………………………………………………….7<br />
3.2 Web map service (WMS) ………………………………………………………………..8<br />
4. <strong>Map</strong> tools………………………………………………………………………………………..8<br />
4.1 Query builder tool……………………………………………………………………………8<br />
4.2 Draw tool……………………………………………………………………………………….10<br />
4.3 Identify tool………………………………………………………………………..………….10<br />
4.4 Export map tool……………………………………………………………………………..11<br />
4.5 Bookmarks tool…………………………………………………………………………..….11<br />
4.6 Search tool…………………………………………………………………………..…………11<br />
2
1. General<br />
This manual has been written for the users of the <strong>HELCOM</strong> <strong>Map</strong> <strong>and</strong> <strong>Data</strong> service. The most<br />
important objective of this manual is to explain how to use the map service. This manual<br />
contains all the needed information to visualize, download, search <strong>and</strong> query datasets in the<br />
map service.<br />
In case of any questions or feedback, please contact joni.kaitaranta@helcom.fi.<br />
2. Basic map functions<br />
2.1 Selecting visible map layers<br />
There are numerous layers in the map service. The layers are grouped under thematic folders<br />
(Ecological features etc.) in a window on the right h<strong>and</strong> side of the start page (Figure 1). The<br />
folders can be opened with a single click. Layers can be selected to be visualized on the map by<br />
ticking the box next to the layer name (Figure 2).<br />
Figure 1. <strong>Map</strong> service front page.<br />
3
Figure 2. Selecting visible layers (Currently visualized: Benthic marine l<strong>and</strong>scapes from BALANCE project).<br />
NOTE: If some of the thematic folders do not open, press the refresh button of your browser<br />
to reload the map page <strong>and</strong> try again.<br />
2.2 Viewing legend<br />
The legend of the selected layers can be seen by clicking the “Legend” text on the upper right<br />
h<strong>and</strong> side of the page (Figure 3a). When legend view is enabled the user can switch back to<br />
layer selection view by clicking the folder icon (Figure 3b) on the upper right h<strong>and</strong> side of the<br />
page. Transparency of each thematic folder can be adjusted by clicking transparency button<br />
(wheels image) on the upper right corner. The legend/layers window can be hidden or<br />
uncovered with arrow symbols on the right h<strong>and</strong> side of the window.<br />
Figure 3a. <strong>Map</strong> legend view for the selected layer(s). Figure 3b. Layer selection view.<br />
NOTE: If legend figures are not loaded properly (blank images), it is recommended to press the<br />
refresh button of your browser to reload the map page <strong>and</strong> try again.<br />
4
2.3 Viewing metadata of the layer<br />
The metadata information for each layer can be opened from the button on the right h<strong>and</strong><br />
side of each layer (Figure 4). This opens a popup window with documented metadata<br />
information of the layer (Figure 5). Metadata file can also be downloaded by downloading the<br />
map layer (see 4.1 Downloading maps).<br />
NOTE: Currently metadata is best viewed with Internet Explorer 8. When using Firefox,<br />
installing add-on IE Tab V2 (https://addons.mozilla.org/en-US/firefox/addon/ie-tab-2-ff-<br />
36/) <strong>and</strong> viewing the page with IE Tab displays the metadata correctly.<br />
Figure 4. Metadata information button.<br />
Figure 5. Metadata information window.<br />
5
2.4 Zooming <strong>and</strong> moving the map<br />
Zooming <strong>and</strong> moving the map can be done with buttons located in the navigation toolbar on<br />
the left h<strong>and</strong> side of the page (Figure 6). Zooming can also be done by scrolling mouse wheel<br />
or moving by keyboard arrow buttons.<br />
Figure 6. Navigation toolbar functions.<br />
2.5 Identify tool (view attributes)<br />
With the identify tool in the navigation toolbar (see Figure 6) it is possible to view attribute<br />
information of each map object by clicking the object (Figure 7).<br />
Figure 7. <strong>Map</strong> page showing attribute values of the selected map object.<br />
6
3. <strong>Data</strong> delivery functions<br />
Most of the datasets in the map service can be downloaded by the user. The simplest way to<br />
get access to the data is to download map files using the download tool. There is also<br />
possibility to connect to the <strong>HELCOM</strong> GIS Server via Web <strong>Map</strong> <strong>Service</strong> (WMS) interface.<br />
3.1 Downloading maps<br />
The map files can be downloaded by selecting “ESRI Shapefiles” under the <strong>Data</strong> Delivery menu<br />
(Figure 8). This opens the download window (Figure 9) where the user can select the layer <strong>and</strong><br />
start the download. Downloading is possible for one layer at a time. <strong>Map</strong> layer will be<br />
delivered as a packed zip file with metadata file included.<br />
Figure 8. Downloading maps functionality in the data delivery menu.<br />
Figure 9. Selecting the layer in the download window.<br />
7
3.2 Web <strong>Map</strong> <strong>Service</strong>s (WMS)<br />
Instructions on how to establish WMS connection <strong>HELCOM</strong> server can be obtained by clicking<br />
“Web map services” in the <strong>Data</strong> Delivery menu (Figure 10). This opens a window with detailed<br />
instructions <strong>and</strong> video on how to establish the connection with ArcGIS or GAIA software.<br />
Figure10. Web map service instructions under data delivery menu.<br />
4. <strong>Map</strong> Tools<br />
There are some basic GIS functionalities available in the <strong>HELCOM</strong> <strong>Map</strong> <strong>and</strong> <strong>Data</strong> <strong>Service</strong> under<br />
the Tools menu (Figure 11). The user can build simple queries <strong>and</strong> perform searches. Also<br />
there is possibility to draw objects on the map <strong>and</strong> save the result in picture format.<br />
Figure 11. Tools menu content.<br />
4.1 Query builder tool<br />
Selecting the query builder tool opens the query builder window (Figure 12). First the user<br />
needs to choose the thematic map service for query, for example “Ecological feature”. After<br />
map service selection the user can either<br />
I) make an attribute query by selecting “Attribute filter” sheet<br />
II) make a spatial query by selecting “Spatial filter” sheet<br />
8
Figure 12. Query builder window.<br />
Making an attribute filter query requires that the target map layer is selected in the attribute<br />
filter sheet (Figure 13). After the target layer selection, the selection of queried attributes<br />
(columns) can be done. When the field is selected, unique values of the field is displayed in the<br />
“Values” menu. With the operator buttons it is possible to form a simple SQL query to filter out<br />
the desired result. The SQL query clause is formed in the “filter” field <strong>and</strong> can be executed by<br />
pressing the “Search” button. Selected features are then visualized in the map <strong>and</strong> table of<br />
selected attributes can be viewed by clicking the table image on upper right pane of the Query<br />
builder window. In the example case (Figure 13) there have been selected observations from<br />
Sweden by an SQL filter clause (COUNTRY = ‘Sweden’) from map layer “TBT in sediment”.<br />
Figure 13. Example of attribute query.<br />
Making spatial filter query requires that the target map layer is selected in the attribute filter<br />
sheet (Figure 13). After that the user can click the spatial filter sheet to appear (Figure 14). The<br />
spatial filter can be used to select features intersecting, overlapping or within a certain search<br />
area. The selection criterion is defined with “Select features with” menu. Optional buffer size<br />
can be applied to certain range in “Optional buffer” window. After the selection the user can<br />
draw on the map with one of the following tools: point, polyline or polygon. Double clicking<br />
ends the drawing task <strong>and</strong> by pressing the search button the features of the selected layer are<br />
selected based on the defined spatial definition <strong>and</strong> drawn object.<br />
9
Figure 14. Example of spatial search by polygon area.<br />
4.2 Draw tool<br />
Selecting the draw tool opens the draw tool window (Figure 15). It is possible to add text <strong>and</strong><br />
draw points, lines or polygons on the map. The graphics information can be saved <strong>and</strong> loaded<br />
again to be viewed in the <strong>HELCOM</strong> <strong>Map</strong> <strong>and</strong> <strong>Data</strong> <strong>Service</strong>. Screen image can be saved by Export<br />
map tool (See 4.4 Export map tool).<br />
Figure 15. Example of the drawing tool.<br />
4.3 Identify tool<br />
The identify feature can be used also from the Tools menu. This opens the Identify tool<br />
window where attributes of the selected map features are displayed (Figure 16).<br />
10
Figure 16. Identify tool window.<br />
4.4 Export map tool<br />
<strong>Map</strong> view can be saved as a screenshot by selecting the “Export map” function from the tools<br />
menu (Figure 17). Recommended format for map figures is png.<br />
Figure 17. Export map tool window.<br />
4.5 Bookmarks tool<br />
<strong>Map</strong> locations can be saved as bookmarks by the bookmarks tool (Figure 18). The user can<br />
navigate to the bookmark location by clicking the bookmark in the bookmark window. Adding<br />
current map view to bookmark can be done by “Add bookmark” button.<br />
Figure 18. Bookmarks tool window.<br />
4.6 Search tool<br />
Layer features can be searched with the Search tool (Figure 19). After the layer is selected in<br />
the “Search layer”- menu, the search can be done by text search or by spatial search. Search<br />
mode is selected in the upper pane of the window. After the search is done, the result<br />
11
attribute table can be viewed by selecting “Detailed results” <strong>and</strong> saved as comma separated<br />
value table by “Export to CSV” button.<br />
Figure 19. Search tool window <strong>and</strong> search results.<br />
12