SERVICE MANUAL REF-MR-255J-A,NZ - BDT
SERVICE MANUAL REF-MR-255J-A,NZ - BDT
SERVICE MANUAL REF-MR-255J-A,NZ - BDT

You also want an ePaper? Increase the reach of your titles
YUMPU automatically turns print PDFs into web optimized ePapers that Google loves.
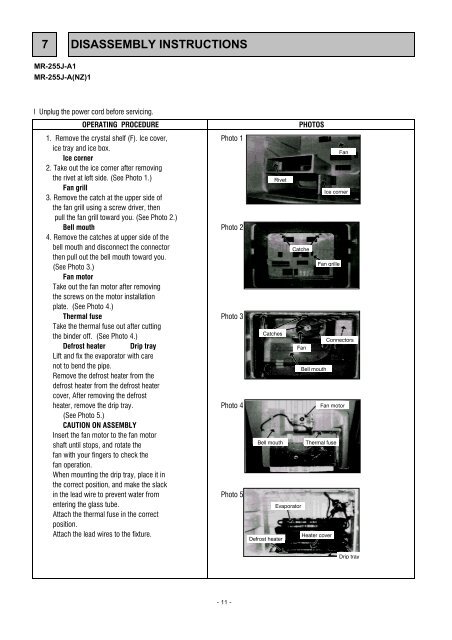
7 DISASSEMBLY INSTRUCTIONS<br />
<strong>MR</strong>-<strong>255J</strong>-A1<br />
<strong>MR</strong>-<strong>255J</strong>-A(<strong>NZ</strong>)1<br />
l Unplug the power cord before servicing.<br />
OPERATING PROCEDURE PHOTOS<br />
1. Remove the crystal shelf (F). Ice cover,<br />
ice tray and ice box.<br />
Ice corner<br />
2. Take out the ice corner after removing<br />
Photo 1<br />
the rivet at left side. (See Photo 1.)<br />
Fan grill<br />
3. Remove the catch at the upper side of<br />
the fan grill using a screw driver, then<br />
pull the fan grill toward you. (See Photo 2.)<br />
Rivet<br />
Bell mouth<br />
4. Remove the catches at upper side of the<br />
Photo 2<br />
bell mouth and disconnect the connector<br />
then pull out the bell mouth toward you.<br />
(See Photo 3.)<br />
Fan motor<br />
Take out the fan motor after removing<br />
the screws on the motor installation<br />
plate. (See Photo 4.)<br />
Catche<br />
Thermal fuse<br />
Take the thermal fuse out after cutting<br />
Photo 3<br />
the binder off. (See Photo 4.)<br />
Catches<br />
Defrost heater Drip tray<br />
Fan<br />
Lift and fix the evaporator with care<br />
not to bend the pipe.<br />
Remove the defrost heater from the<br />
defrost heater from the defrost heater<br />
cover, After removing the defrost<br />
heater, remove the drip tray.<br />
(See Photo 5.)<br />
CAUTION ON ASSEMBLY<br />
Insert the fan motor to the fan motor<br />
Photo 4<br />
shaft until stops, and rotate the<br />
fan with your fingers to check the<br />
fan operation.<br />
When mounting the drip tray, place it in<br />
the correct position, and make the slack<br />
Bell mouth<br />
in the lead wire to prevent water from Photo 5<br />
entering the glass tube.<br />
Attach the thermal fuse in the correct<br />
position.<br />
Attach the lead wires to the fixture.<br />
Evaporator<br />
- 11 -<br />
Defrost heater<br />
Bell mouth<br />
Fan<br />
Ice corner<br />
Fan grille<br />
Connectors<br />
Fan motor<br />
Thermal fuse<br />
Heater cover<br />
Drip tray