HANGING & GLAZING TImber DOOrS - Wickes
HANGING & GLAZING TImber DOOrS - Wickes
HANGING & GLAZING TImber DOOrS - Wickes

Create successful ePaper yourself
Turn your PDF publications into a flip-book with our unique Google optimized e-Paper software.
<strong>HANGING</strong> & <strong>GLAZING</strong><br />
<strong>TImber</strong> <strong>DOOrS</strong><br />
Whether you have collected<br />
this leaflet along with a new<br />
<strong>Wickes</strong> door, or have picked<br />
it up in your store prior to<br />
choosing a door, it is hoped<br />
that the information which<br />
follows will be helpful to you.<br />
KEEP INFORMED<br />
• Look for other Good Idea<br />
Leaflets that could help you<br />
with your current project.<br />
• Check that your Good Idea<br />
Leaflets are kept up to date.<br />
Leaflets are regularly changed<br />
to reflect product changes so<br />
keep an eye on issue dates.<br />
• If you would like to be put on<br />
our mailing list for the <strong>Wickes</strong><br />
Catalogue call<br />
0845 274 1000<br />
• Visit our website<br />
wickes.co.uk<br />
The overall purpose of<br />
the leaflet is to give you<br />
guidance on the selection<br />
of a door, hanging it, fitting<br />
door furniture, glazing where<br />
necessary, and treating it so<br />
that it gives years of service.<br />
<strong>Wickes</strong> have been selling doors for over 35 years and have steadily built a reputation for quality<br />
and value amongst both the Trade and public. We now sell over 1 million Doors a year, which<br />
makes us one of the biggest suppliers in the UK. Our scale means we can offer products with the<br />
quality of a specialist supplier but at prices everyone can afford.<br />
Choosing a Door<br />
We always aim to stock the most popular styles and sizes in our stores across the country, so you<br />
should find the one to suit your home. Glazed doors can allow light into darker parts of the house<br />
whilst heavier panelled doors will help cut down the transmission of sound and heat from room to<br />
room. Pick up a Doors Brochure or go Online at www.wickes.co.uk for the full range.<br />
When deciding on a new door, whether it is internal or external, always buy one that fits in with<br />
the style of your property i.e. modern, traditional, town, country etc. As a rule of thumb, clean,<br />
simple lines suit a more modern style, whilst an older or traditional house needs a more classic<br />
style, usually with some embellishment.<br />
Timber is a great choice for both external and internal doors. It has a character and feel that is<br />
only found with a natural product but choose with care and match the type of door to the use it will<br />
have. Timber doors should be hung as soon as possible after buying or delivery. If you can’t, then<br />
they should be stored flat in a cool, dry area.<br />
Never store timber near new concrete, plaster and other sources moisture and do not exposed<br />
to direct sunlight or heat. Leaning them against a wall for extended periods could cause them to<br />
distort.<br />
NOTE: The protective packaging should not be removed until you are ready to treat and fit the<br />
door.<br />
Sizes<br />
ISSUe 07/09<br />
36<br />
PLEASE NOTE that the<br />
correct treatment and<br />
weatherproofing of exterior<br />
doors is critical and failure<br />
to follow instructions in this<br />
leaflet and elsewhere will<br />
lead to guarantees being<br />
invalidated.<br />
This does not affect your statutory rights.<br />
The most popular size of interior door is a 1981 x 762mm (78 x 30”) size and we stock this in<br />
every style. We also stock up to four further sizes, dependent on the style. All interior doors are<br />
35mm thick, apart from Fire doors, which are 44mm.<br />
The most popular exterior (front door) door size is 1981 x 838mm (78 x 33”).<br />
We stock this size in all styles as well as 762mm (30”) and 813mm (32”) sizes in the most popular<br />
styles.<br />
All timber doors can be trimmed to size, how much will depend on the door but typically this will<br />
be about 10mm in total.
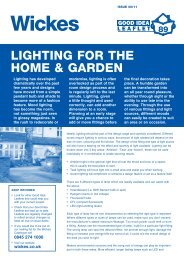
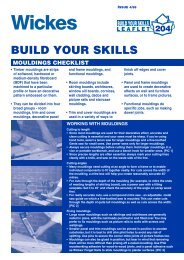
FIG. 1<br />
FIG. 2<br />
FIG. 3<br />
<strong>HANGING</strong> A DOOR<br />
2mm CLEARANCE<br />
JAMB<br />
BEVELLED EDGE<br />
1 2<br />
OPENING<br />
HEIGHT<br />
LESS 4mm<br />
The basic techniques for hanging a door are<br />
the same for interior and exterior types, the only<br />
major difference being that an interior door is<br />
generally cut heightwise in order to open freely<br />
over carpeting or other floor coverings<br />
whereas an exterior door is cut to fit between<br />
the head (top) and sill (bottom) of the frame.<br />
An interior door frame does not have a sill.<br />
For the purpose of this leaflet the fitting of an<br />
exterior door is described in most detail.<br />
The first job to be done is to have a good<br />
look at the existing frame. With an exterior<br />
replacement particularly, there is no point<br />
in fitting a new hardwood door into an old,<br />
perhaps rotting, frame with a well worn sill.<br />
Nor will an attractive natural hardwood door<br />
look good in an old painted softwood frame.<br />
MEASURE BOTH<br />
SIDES<br />
DOORSTOP DOORSTOP<br />
2mm CLEARANCE<br />
DOOR<br />
SET SQUARE<br />
IN CORNER TO<br />
CHECK ANGLE<br />
JAMB<br />
BEVELLED EDGE<br />
Fitting a new hardwood frame is, therefore,<br />
advisable and matching pre-treated hardwood<br />
frames are available from <strong>Wickes</strong> for their 6’<br />
6” x 2’ 6”, 6’ 6” x 2’ 9” and 6’ 8” x 2’ 8” exterior<br />
doors, fitting into brickwork openings of 6’<br />
10” x 2’ 10”, 6’ 10” x 3’ 1” and 7’ 0” x 3’ 0”<br />
respectively with a little clearance all round.<br />
When these frames are used and<br />
correctly installed, the doors will often prove<br />
to be a perfect fit with no cutting to size<br />
required but timber tolerances may lead to<br />
some shaving being necessary for a perfect fit.<br />
Installation of a new frame is described later.<br />
To find out which door size you require when<br />
using an existing frame, simply measure<br />
the opening rebate in the frame, both height<br />
and width, or the size of the present door.<br />
Purchase a new door of suitable size bearing<br />
in mind that the new door may initially be<br />
slightly oversize. External doors can be<br />
reduced in height and width. This must be<br />
taken off equally ie a maximum of 13mm off<br />
each edge. Refer to manufactures instructions<br />
Flush doors can be reduced less than<br />
veneered timber doors. On flush doors you<br />
should not remove more than 5mm from any<br />
side. If you remove more than these amounts<br />
you will seriously weaken the structure of the<br />
door leading to warping or twisting. Under<br />
these circumstances your guarantee will be<br />
invalid. Always check door labels for details on<br />
trimming.<br />
You’ll also need to purchase new hinges<br />
and other door furniture, if required. Brass,<br />
Chrome, Stainless Steel or Brushed Steel<br />
furniture is recommended on all exterior<br />
doors and interior hardwood ones.<br />
When you have all the materials on site,<br />
the old door can be removed. This must be<br />
done with care to avoid damaging the frame<br />
especially around the hinge housings. Open<br />
the door at 90° to the frame and put wedges<br />
under it to support it.<br />
Slightly loosen all the screws holding the<br />
hinges to the frame jambs. The slots in the old<br />
screws may well have been filled with paint<br />
over the years and this must be removed to<br />
enable the screwdriver to get a good grip. If<br />
the screws have rusted they may be difficult<br />
to loosen. If this is a problem, fit the tip of the<br />
screwdriver into the screw slot, then strike the<br />
end of the driver sharply with a mallet whilst<br />
exerting turning pressure first clockwise then<br />
anti-clockwise, on the screw. FIG. 1.<br />
This will often break the grip of the rust and the<br />
screw can be extracted. Remove the screws<br />
holding the bottom hinge first, then all but one<br />
of the top set. Only remove this last one when<br />
sure you can support the door adequately.<br />
Taking care not to damage the timber around<br />
the hinge housing remove the door and put<br />
aside. It will have to be temporarily replaced<br />
later. If it was a good fit in the frame it can be<br />
used as a template for the new door if this has<br />
to be cut. This is particularly valuable if the<br />
frame is badly out-of-square and the new door<br />
has to be unusually shaped to fit. Offer the<br />
new door into, or at least against, the opening<br />
to check the fit. If you are lucky it will slot into<br />
the opening perfectly with a clearance of about<br />
2mm all round.<br />
It is, however, more than likely that some size<br />
adjustments will have to be made and the<br />
height should be dealt with first. Check that<br />
the frame is square and then measure the<br />
height at each side. FIG. 2. Deduct 4mm from<br />
each measurement. Mark the resulting size on<br />
the door, measuring from the top since excess<br />
timber should be removed from the bottom rail.<br />
NOTE: On flush doors only, an equal amount<br />
should be taken from the top and bottom, not<br />
all from the bottom. Note that exterior carved<br />
doors with glazed panels are always fitted so<br />
that the glass is installed from the inside of the<br />
house. When measuring prior to cutting ensure<br />
that the door is the right way round. This is<br />
particularly important when the door is longer<br />
on one edge than the other.
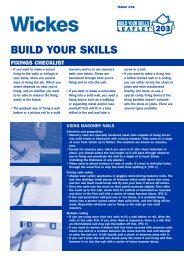
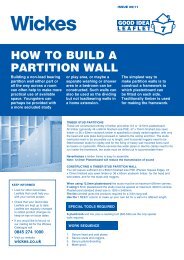
FIG. 4<br />
FIG. 5<br />
FIG. 6<br />
DOORSTOP<br />
MEASUREMENT FROM<br />
INSIDE OF DOORSTOP<br />
TO EDGE OF HINGE<br />
HINGE FLAP<br />
THICKNESS MARKED<br />
HINGE FLAP AGAINST STILE.<br />
MARK TOP AND BOTTOM<br />
2mm WEDGE<br />
UNDER DOOR<br />
When the excess has been removed reposition<br />
the door with the hinge stile (the vertical<br />
section of the door frame which will be fitted<br />
with the hinges) tightly up against the hinge<br />
jamb (the vertical part of the frame on the side<br />
where the hinges will be). Note that with flush<br />
doors there will sometimes be a stamped mark<br />
on one edge, or the top of the door, indicating<br />
the position of the built-in lock block. The edge<br />
opposite this mark is the hinge stile. With an<br />
assistant holding the door in place from the<br />
inside, mark a line using a soft pencil down<br />
the outside face of the door where it touches<br />
against the locking jamb.<br />
Remove the door again and measure from<br />
the hinge stile to the mark on the locking stile.<br />
Deduct 4mm from this measurement. This will<br />
give you the correct finished width of the door.<br />
Now, cutting equally from each edge, remove<br />
JAMB<br />
MARK AROUND HINGE<br />
FLAP WITH SOFT PENCIL<br />
STILE<br />
JAMB<br />
SAME MEASUREMENT AS IN FIG. 5<br />
HINGE LOCATION AS MARKED IN FIG. 4<br />
the excess timber with a plane.<br />
When planing a flush door on the stamped<br />
lock block edge, always make a note on the<br />
face of the door perhaps using adhesive tape<br />
to indicate the position of the lock block before<br />
planing off the stamped mark.<br />
Repeatedly reposition the door in the frame<br />
to ensure that you do not plane off too much<br />
timber. When the door fits with a clearance of<br />
2mm at each side all the way down, the cutting<br />
is almost finished.<br />
The plane should be used finally to create a<br />
slight bevel on the stile edges towards the door<br />
stop. FIG. 3. Before bevelling, check again<br />
that the door is the correct way round. Finally,<br />
sand the cut edges and corners of the door to<br />
remove sharp edges. Use a medium/fine grade<br />
of glasspaper for this.<br />
Cutting the hinge housings is the next job. For<br />
hardwood exterior doors and glazed interior<br />
doors, you will need to use three 100mm brass<br />
hinges. These should be fitted 230mm from the<br />
top and bottom of the door and in the centre<br />
but if the existing hinge housings on the frame<br />
are to be used again, then measuring is not<br />
required. Simply check that the new hinge<br />
screw holes are correctly aligned with the old<br />
holes.<br />
Fit the hinges to the frame jamb using just one<br />
screw in each hinge. It may be necessary to<br />
slightly recut the housings to accommodate the<br />
hinges. Open the hinges and insert the door<br />
into the opening. Wedge it in place so that it is<br />
raised 2mm above the sill and 2mm below the<br />
head of the frame. Close the hinges against<br />
the face of the door and mark their positions.<br />
FIG. 4.<br />
Remove the door. Measure the distance from<br />
the doorstop to the nearest edge of each<br />
hinge. FIG. 5.<br />
Transfer this measurement to the door<br />
working from the face which will be against the<br />
doorstop, and mark in line with the intended<br />
hinge positions.<br />
Remove the hinges from the jamb and position<br />
on the door stile again in line with the marks<br />
made earlier. Draw around the hinge arm.<br />
Also, mark the hinge thickness on the face of<br />
the door. FIG. 6.<br />
Cut out the housing using a sharp bevelled<br />
edge chisel following the sequence as in<br />
FIG. 7.<br />
Fit the hinges using one screw only in each.<br />
Pilot holes should be made for the screws<br />
to prevent them splitting the timber. Using<br />
wedges to support the door, hang it in place<br />
with again just one screw holding each hinge in<br />
the jamb housing. Check that the door closes<br />
correctly with clearance all round. If necessary,<br />
adjust the depth of the hinge recesses until a<br />
perfect fit is achieved. You must now remove<br />
the door and temporarily refit the old one.<br />
An inward opening exterior door should at<br />
this stage have a rebate cut along the front<br />
bottom edge as shown in FIG. 9 in order to<br />
accommodate the sill weatherstripping and<br />
create a good seal. The rebate would be on<br />
the opposite side for an outward opening door.<br />
A weatherbar should also be fitted to the outside<br />
face of the door to throw rainwater off. Run a<br />
length of masking tape across the door with the<br />
bottom edge where the top of the weatherbar<br />
will be. Run a bead of All Purpose Silicone<br />
sealant along the edge of the weatherbar then<br />
screw it in place and smooth off to a concave<br />
finish. Remove the masking tape immediately.<br />
See FIG. 9.<br />
A new hardwood door must then be treated<br />
with at least one coat of <strong>Wickes</strong> High<br />
Performance Woodstain on all cut surfaces<br />
paying special attention to the top and<br />
bottom edges. Lock and hinge housings<br />
should also be basecoated as should any<br />
glazing rebates and holes for letterplates.
FIG. 7<br />
FIG. 8<br />
FIG. 9<br />
SILL<br />
No timber should be left untreated.<br />
When this has dried the entire door should<br />
be given three coats of <strong>Wickes</strong> High<br />
Performance Woodstain. It is very much<br />
easier to apply these treatments to the door<br />
before it is finally hung and it ensures that<br />
it is well protected before having to face the<br />
weather.<br />
Failure to treat any exterior door before<br />
it is hung will lead to the absorption of<br />
moisture which will cause the door to swell<br />
and perhaps even become distorted. Never<br />
forget the top and bottom edges.<br />
The sooner it is treated the better and the<br />
treatment should be the same on both sides<br />
of the door. If you use a microporous finish<br />
on the outside, you must do the same on the<br />
inside.<br />
When the <strong>Wickes</strong> High Performance<br />
Woodstain has dried the door can be hung<br />
again with all hinge screws being driven in.<br />
1 2 3<br />
NOTE POSITION OF CHISEL BEVELLED EDGE<br />
GLASS<br />
CENTRALISED IN<br />
OPENING PRESSED<br />
AGAINST MASTIC<br />
3mm SETTING<br />
BLOCKS – MATCHSTICKS OR<br />
TIMBER WEDGES<br />
MASKING<br />
TAPE<br />
CONCAVE<br />
FINISH TO<br />
SEALANT<br />
WEATHERBAR<br />
A WEATHERSTRIP<br />
An alternative treatment would be with <strong>Wickes</strong><br />
Quick Drying Woodstains which are available<br />
in a range of colours, but, again, every single<br />
surface of the door must be treated.<br />
LOCKS & LATCHES<br />
Once the door is hung locks or latches and<br />
the other furniture can be fitted. For security<br />
reasons it is recommended that a front door<br />
should be fitted with (a) a cylinder rim lock,<br />
(b) a 5-lever mortice deadlock to BS 3621 for<br />
use when the house is unoccupied and (c) a<br />
security chain or door viewer.<br />
A back door should have a mortice sashlock<br />
to BS 3621 fitted along with two security rack<br />
bolts.<br />
No locks should be cut into doors in line<br />
with any centre or off centre horizontal mid<br />
rail since this will weaken the joint possibly<br />
causing separation of the joint and a<br />
breakdown in the surface protection. Such<br />
action will invalidate your guarantee.<br />
If an outward opening door has been fitted,<br />
with the vulnerable hinge pivots accessible<br />
to an intruder, a pair of <strong>Wickes</strong> hinge bolts<br />
should be fitted to prevent the intruder lifting<br />
the door out of the frame after removing the<br />
hinge pins. All locks are supplied with full fitting<br />
instructions.<br />
<strong>GLAZING</strong> DOORS<br />
If necessary, the glazing of doors is carried out<br />
only when the door has been hung. This is to<br />
make the door lighter to handle and reduces<br />
the risk of the glass being damaged.<br />
The use of putty for the glazing of decorative<br />
doors especially those which are not to be<br />
painted is not recommended. It can be difficult<br />
to obtain a putty which matches the colour of<br />
the door and many people find it difficult to use<br />
putty and obtain a neat finish.<br />
A timber glazing bead used with our gun<br />
applied all purpose silicone sealant is a far<br />
better way of achieving a professional finish<br />
to your glazing work and <strong>Wickes</strong> supply a<br />
matching glazing bead for their doors.<br />
Like the hardwood doors, this glazing bead is<br />
pre-treated with a basecoat. It is available in<br />
2.4m lengths. Some doors are supplied with<br />
pre-cut beads. Whilst waiting to hang the door<br />
you should cut the glazing beads to size with<br />
mitred ends for each glass opening. Once cut,<br />
the bead ends should be treated with two coats<br />
of <strong>Wickes</strong> High Performance Woodstain and<br />
then all faces treated with a finishing coat of<br />
your choice.<br />
To fit the glass, apply a bed of the sealant to<br />
the rebate upstand. The bed should be about<br />
4mm thick all round. Press the glass into<br />
position, centrally in the opening against the<br />
sealant, compressing this to about 3mm thick.<br />
In order to ensure that the glass does not<br />
slide to the bottom of the glass opening it is<br />
recommended that small wooden wedges<br />
about 3mm thick and 4mm wide are used as<br />
setting blocks on which the bottom edge of the<br />
glass rests. Matchsticks can be used or small<br />
scraps of timber. Do not use any metal items to<br />
act as setting blocks. FIG. 8.<br />
The use of these blocks is essential when<br />
fitting <strong>Wickes</strong> clear bevelled edge glass to<br />
ensure that the bevelling remains equally<br />
aligned around each pane.<br />
Apply more sealant to the face of the glass<br />
around the perimeter, again about 4mm<br />
thick, then fit the pre-cut glazing bead. This<br />
should be pushed firmly against the sealant to<br />
compress it. Pin the bead in place with 25mm<br />
panel pins. Do not pin within 50mm of the end<br />
of each piece of bead since this could cause it<br />
to split. Punch the nail heads below the timber<br />
surface. In-fill the resulting hollows with a<br />
matching filler or sealant.<br />
The excess sealant squeezed out on either<br />
side of the glass must now be removed to<br />
leave a neat slightly concave surface. This is<br />
particularly important on the outside to ensure<br />
that rainwater runs off easily. FIG. 10.<br />
After glazing has been completed the door<br />
should be lightly sanded and given a further<br />
coat of your chosen topcoat on both sides.<br />
FITTING A NEW EXTERIOR DOOR FRAME<br />
As mentioned earlier it will often be necessary<br />
to fit a new door frame as well as a new door.<br />
This is a relatively straightforward process and<br />
begins with measuring the existing brickwork<br />
opening dimensions to check that one of<br />
<strong>Wickes</strong> hardwood frames, complete with a<br />
sill, will fit. The necessary brickwork opening<br />
dimensions were given earlier but it should be<br />
stressed that those dimensions do give about<br />
9mm clearance, so that the frame can be set<br />
squarely.
FIG. 10<br />
<strong>GLAZING</strong><br />
BEAD<br />
Remove the old door and discard it. The old<br />
frame was probably installed in one piece<br />
when the house was built and will have to be<br />
cut out in sections.<br />
Start by sawing through both side jambs at an<br />
angle. Insert the end of a crowbar or similar<br />
lever behind the cut jambs and lever them<br />
away from the brickwork and separate them<br />
from the head and the sill.<br />
Cut through the head and sill in similar fashion<br />
and remove them. You may find that the head<br />
extends into the brickwork at each end and<br />
the sections will have to be pulled out. The<br />
resulting holes cannot be used again and<br />
should be filled with a cement mortar mix.<br />
Remove all the old nails left in the brickwork<br />
and clean up the opening, chopping away any<br />
mortar fillets.<br />
Check that there is a damp proof course fitted<br />
directly below the level of the old sill. If this<br />
is damaged it must be replaced. If no damp<br />
proof course is in place, fit one.<br />
Assemble the new frame knocking the mortise<br />
and tenon joints firmly home. Use a waterproof<br />
FIG. 11<br />
DPC LEVEL<br />
GLASS<br />
CONCAVE<br />
FINISH TO<br />
SEALANT<br />
WEDGES UNDER SILL<br />
wood adhesive on the joints and screw them<br />
together. Only cut the sill if it is too long to fit<br />
into the space left by the old one.<br />
Note that <strong>Wickes</strong> Hardwood frames can be<br />
used for inward or outward opening doors,<br />
simply by locating the jambs the correct<br />
way round on the sill. Exterior doors<br />
should open inwards.<br />
Insert the assembled frame into the opening.<br />
Fit wedges under the sill to push it up against<br />
the lintel. Use a spirit level to get the sill<br />
perfectly horizontal. Use more wedges to get<br />
the jambs upright. Use a spirit level repeatedly<br />
to check the vertical alignment.<br />
Measure the frame diagonals to ensure that the<br />
frame is perfectly square. FIG. 11. Only when<br />
they measure exactly the same can you be sure<br />
that it is square and some adjustment of the<br />
wedges may be necessary to achieve this.<br />
Secure the frame to the brick opening<br />
using our 8 x 80mm frame fixers. Drill holes<br />
directly through the frame and into the wall.<br />
Countersink the holes in the frame. Tap in the<br />
fixers and drive home the screws taking care<br />
not to distort the frame by driving them in too<br />
hard.<br />
Avoid siting any fixings where the door hinges<br />
are to be situated but do have at least one<br />
fixing just above or below the intended position<br />
of the lock keep for extra security.<br />
Hang the door before covering the screw<br />
heads with a matching wood filler and before<br />
making good around the frame. This will<br />
enable minor frame positioning adjustments to<br />
be made if required.<br />
Use a cement mortar mix to fill in the space<br />
under the sill and an exterior sealant around the<br />
jambs and the head.
•<br />
•<br />
•<br />
•<br />
•<br />
•<br />
•<br />
•<br />
•<br />
Constructed using a solid wood core and an extra-thick (3mm), premium-quality, real oak veneer<br />
24mm double-glazed sealed units with toughened (to BS6206 Class A) and weather-tested (to BS6375 Part 1) safety glass<br />
High security locks and extra locking drop bolts are included<br />
Double-sealed weather seals keep the worst of the British weather outside<br />
Reversible left or right opening doors<br />
Thermally insulated and fully compliant with Part L of the Building Regulations<br />
FSC certified to ensure long-term timber supplies whilst protecting the environment<br />
A unique top-hung roller system means door is less likely to jam or stick. Patented set adjusters make adjusting to the correct positioning a simple task<br />
Majority of components are factory pre-drilled for ease of assembly<br />
WICKES FOLDING PATIO DOORS<br />
<strong>Wickes</strong> Folding Patio Doors can transform your<br />
home and increase its value. The doors are<br />
constructed using the very best quality materials.<br />
Each door is built with a solid wood core and an<br />
extra-thick, premium-quality, real oak veneer.<br />
They’re also double-glazed with toughened,<br />
weather-tested safety glass.<br />
Why choose a <strong>Wickes</strong> Folding Patio Door?<br />
SIZES: 6, 8, 10, 12, 14 & 16ft approximately.<br />
Metric sizes and pictures are available at: www.<br />
wickes.co.uk<br />
NOTE: Fitting and instillation instructions are<br />
also available as a pdf. at: www.wickes.co.uk.<br />
This will allow you or your builder to be ready for<br />
delivery, saving you time and money.<br />
WEATHER PROTECTION: The doors and<br />
frames have premium grade weather seals,<br />
with every door and frame double sealed,<br />
front and back, to prevent draughts and water<br />
ingress. The bottom of the frame has a unique<br />
timber and aluminium combination cill design,<br />
incorporating an aluminium sub-cill for optimum<br />
drainage. With the timber cill incorporated, the<br />
door-sets have been weather tested to BS6375<br />
Part 1.<br />
STRENGTH & SAFETY: The doors and frames<br />
are made from engineered timber, including a<br />
laminated hardwood core, which provides added<br />
stability and reduces twisting, bowing, warping<br />
and splitting.<br />
The doors comply with Building Regulations<br />
(Part L) and have a thermal rating 1.9 W/m2K.<br />
This helps to keep your home warmer in the<br />
winter and cooler in the summer, and also helps<br />
lower the carbon emissions from your property.<br />
The door-sets feature 24mm thick Pilkington K<br />
Low E Glass Double Glazed Units, tempered to<br />
the latest standards - BS EN 12600 and BS EN<br />
12150.<br />
“Tempered” means that the glass is up to five<br />
times stronger than standard glass and, for<br />
safety, if smashed, it exhibits similar properties<br />
to a car windscreen, breaking into small pieces.<br />
8FT FOLDING PATIO DOORS - 187479<br />
SECURITY: Each access door has a highsecurity,<br />
3-point locking system, which is<br />
engaged by lifting the handle and locked with a<br />
turn of the key in the Euro cylinder.<br />
The door-sets incorporate internal drop bolts in<br />
between each folding ‘leaf’, which slide up and<br />
down into the timber of the frame. The bottom<br />
bolt always locks for increased security.<br />
TROUBLE-FREE INSTALLATION:Each doorset<br />
includes a comprehensive, step-by-step<br />
instruction booklet.<br />
The majority of components are pre-machined<br />
for ease of assembly - the only machining<br />
required is to fit the door handles. All holes are<br />
either pre-drilled or clearly marked where the<br />
folding/sliding door hardware fits. The doors<br />
themselves are fully machined and pre-sized to<br />
the required specification.<br />
Whilst every care has been taken to ensure that the product design, descriptions, specifications and techniques of construction are accurate at the date of printing. <strong>Wickes</strong><br />
products will inevitably change from time to time and the customer is advised to check that the design, descriptions, specifications and techniques of constructing any of the<br />
products described in this leaflet are still valid at the time of purchase or placing an order.<br />
© <strong>Wickes</strong> Building Supplies Limited 2009<br />
All rights reserved. No part of this publication may be produced or transmitted in any form or by any means electronic, mechanical, photocopying, recording or otherwise or<br />
stored in any retrieval system of any nature without the written permission of the copyright holder and the publisher.
![To-Order Kitchens [PDF] - Wickes](https://img.yumpu.com/30243922/1/184x260/to-order-kitchens-pdf-wickes.jpg?quality=85)